
Fuel Pump Noises
Suspicious noises from fuel pumps usually fall into one of two categories: humming or whirring, depending on the frequency of the sound. A humming noise frequently occurs when the fuel line drums against a body panel or clamp, either from misrouting, backpressure from a clogged fuel distributor internal filter or a defective fuel pump. The higher frequency whirring sound more often comes from a defective fuel pump itself, though sometimes dirt and rust deposits in the tank can contribute to the problem as well.
07.3-87011
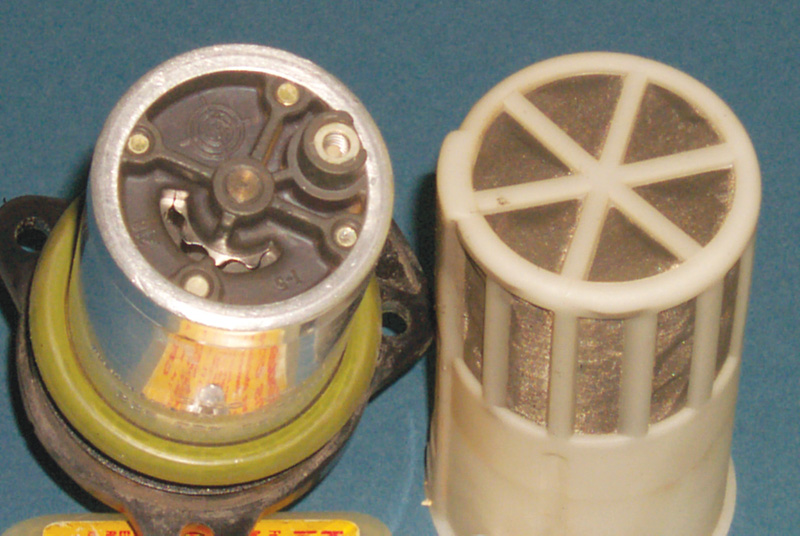
Pump and screen
Snapping or binding in rear axle when cornering or parking, all models with ASD
ASD is the automatic locking differential system, and a resistance to different wheelspeeds is an inherent part of the design. If, however, the binding or snapping is too strong for the motorist, this can be remedied by removing one friction plate per side from the differential clutch packs and replacing it with a special steel plate kit, part no. 140 350 64 23. To do this, you must remove the differential assembly entirely, open the housing and exchange the friction discs for the steel plates.
AF35.41-U-3100DA
Unsteady or erratic speedometer needle, Models 124 and 201
A wobbly needle is probably the result of an interference problem in the speedometer cable or in the speedometer itself. Reroute the cable correctly or replace the cable if needed. Lubricating a speedometer cable will always result in failure of the speedometer, so do not attempt that ‘repair.’
If you’re not certain how to proceed, read the Service microfiche for Electrical system I, Models 124 or 201, Group 54, Jobs 54-245 and 54-250. Detailed service information is available from MBUSA.
AF54.30-U-2100AV
Engine stalling, all engines with CIS-E
An engine that suddenly stalls but can restart after a short time or that sometimes stalls during coasting can have a variety of different problems, and careful checks are necessary to determine the cause. First, check the connections to the ignition coil, seeing that they’re tight and electrically secure. Check the TD (crankshaft position) sensor signal wire for intermittent ground contact at the diagnostic socket, at the tachometer, at the connector for the fuel pump and at the A/C compressor cutout relay.
As you go through the electrical connections, check each one with a meter for voltage drop and for resistance. Check the sockets for the fuel pump relay and overload protection relay in particular, pinching widened sockets back together to form a more secure connection. At the fuel pump and A/C compressor cutout relay, check also for evidence of moisture and corrosion. As needed, clean socket connectors or replace defective or intermittent relays. At the crankshaft position sensor, perform the additional test of moving the harness around while monitoring continuity at the terminal ends.
If the car has engine type 103, check the distributor rotor and cap, being certain to remove the rotor and inspect the lower side for evidence of burn-through, cracks or other damage.
Most affected vehicles employ a deceleration fuel shutoff strategy to control emissions and save fuel, but if the electrohydraulic actuator (EHA) shuts off the fuel at the wrong time or fails to resume fuel delivery, this can cause stalling. Check the EHA to determine this.
If no other cause becomes evident, on model 124.201 only, install a modified component compartment cover (see SI 54/48; 62/18, March 1988).
If the problem is most pronounced when coasting down from a higher speed, check that the speedometer is sending a signal to the CIS-E control unit. This precaution applies to vehicles with one of the following CIS-E control units:
- 006 545 02 32
- 006 545 14 32
- 006 545 77 32
- 006 545 79 32
- 007 545 14 32 or
- 007 545 15 32
For each, connect a voltmeter to the CIS-E control unit plug, between socket 6 and ground. The specific test follows:
- For Model 124.201 – Push the car forward and backward. The result should be between zero and 9 volts and changing. Repeat the test measuring the voltage directly at the Hall-effect speed sensor and again at the wire from the sensor to connector X26, socket 11. Check plug connection X53/5 for intermittent contact.
- For Model 107.126 – Drive the car on a dynamometer or roadtest it. The value at 25 mph should be above 1.0 volt. Check the wire from the electronic speedometer to connector X26, socket 6.
- For all vehicles with deceleration fuel shutoff – check the electrohydraulic correction element and replace it if needed.
AF07.32-U-6702A
Arrhythmic Noise, Warm Idle, Engines 103 and 104
An erratic noise similar to a slipping belt, a noise increasing as the engine temperature rises to normal may be caused by a defective timing belt tensioner if the spill valve for the hydraulic tensioner becomes defective. Replace the tensioner complete except for the end piece.
AF05.10-U-1450GG
Central locking system problem, SL/129
Occasionally it becomes impossible to unlock or lock the driver’s door using a key at the front passenger door, the trunk lock or the infrared remote control system. Check whether a door panel screw has damaged the switch and working element in the driver’s door. This problem can also affect the passenger’s door. When replacing the damaged strip, use a special metal strip, part no. 129 805 00 97 with attachment screws 3 mm shorter, part no. 007981 00457.
AF80.20-U-6094A
No EHA ratio adjustment and CEL on, all CIS-E engines
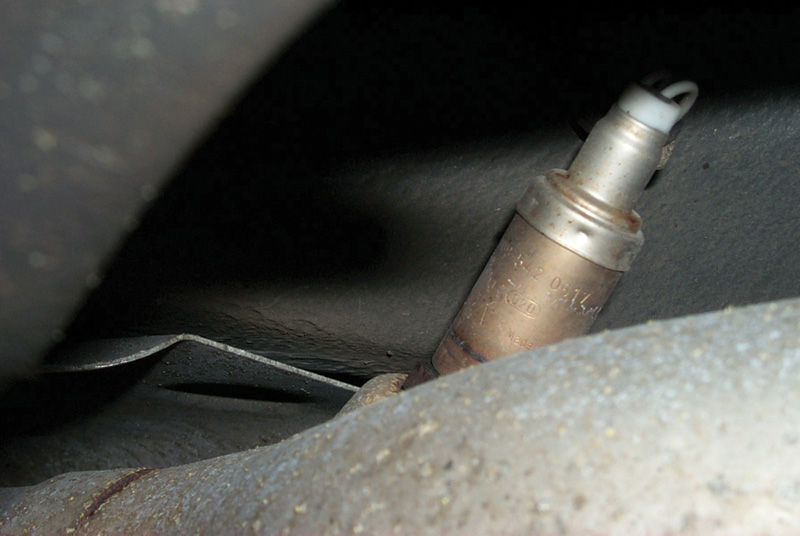 This unwanted new problem can be very irritating right after you’ve done some other job the car badly needed, not infrequently exhaust work. Here’s how to solve the problem the repair caused: The most probable cause of the problem is an intermittent or permanently nonfunctional oxygen sensor. Test for that by monitoring the oxygen sensor signal while driving (steady speed, engine at normal operating temperature, etc). Make sure the intake and exhaust systems are tightly bolted to the cylinder head and engine block. Make sure all negative electrical connections, as well as the manifold and flange bolts are tight and electrically conductive. Loosen and then retighten the oxygen sensor to be sure there’s electrical conductivity through the exhaust system. If you’re in doubt about these procedures, read the technical literature for removal and installation of the exhaust system before you tighten the manifold bolts.
Next check the coaxial cable between the oxygen sensor plug (G3/2×2) and the CIS-E control unit pin 8 is not shorted to ground. Do this by unplugging the control unit and checking the resistance between socket 7 and socket 8. You should find a resistance above 10 kOhm, i.e., infinite. Otherwise replace the corresponding section of the engine harness.
Another possibility is a loose connection or intermittent connection at the connector sleeve Z, a solder joint in the harness, in the CIS-E control unit connector. In that case, you can merely open the plug and resolder the connection at connector sleeve Z on socket 7. Mercedes-Benz recommends checking Diagnostic Manual Volume 2, Engine 102 (available from the company): Tests GE-04.01 and GE-04.05, tests GE-07.01 and GE-07.05. For engines 116 and 117, tests GE 08.01 and GE-08 .05.
AF07.32-U-6000A
Rumbling or droning when cornering, Model 124.2xx with engine 103
A possible cause for a rumbling or droning sound when the car takes a corner comes from a misadjusted engine mount or stop, in particular a collapsed rear engine mount.
AF28.00-U-1100BA
Alternator Whine, all models
Besides the obvious causes, such as worn bearings or damaged pulleys, alternator whine can come from two other causes. At low temperatures, the acoustics of the fan can allow the sound at 3000 rpm. In that case, no corrective measures are necessary. In other cases, the magnetic field of the alternator can cause a whining sound most noticeable at about 700 rpm if there are enough electrical consumers turned on to increase the field saturation to a high level. In the latter case, check that the battery is fully charged, recharging as needed. If the sound continues even with normal charging loads, replace the alternator.
AF15.40-U-1000AG
Engine dies in gear, S-class/140 with engines 104xxx, 119xxx or 120xxx x2
Moisture or corrosion in the connector between the starter lockout switch and the transmission wiring harness can introduce enough resistance that the engine dies when shifted into gear or when parking. When such corrosion is found, replace both the starter lockout switch and the transmission wiring harness.
AF15.40-U-1000AG
Splicing wiring harnesses
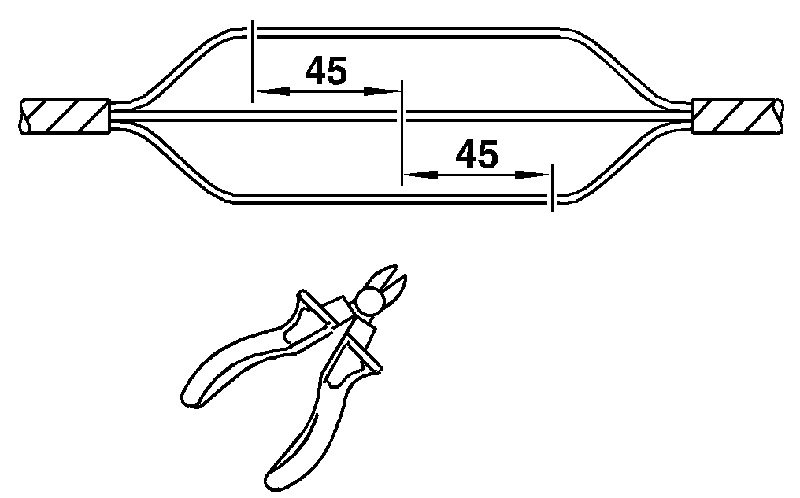 When repairing multistranded wiring harnesses with soldered terminal sleeves, expose the damaged area at an accessible point and cut off the defective section. Separate the conductors in the harness and stagger the connecting points by approximately 45 mm. This reduces the chance of a subsequent short through the splices.
Cut the new harness to fit, matching the old part but allowing an additional 50-mm on each wire for creating loops for the cable. Strip the insulation from the last 15-mm of each wire. Use a terminal sleeve that fits the cross-sectional dimension of the wires joined, and turn the sleeve fully onto the wires. Heat the sleeve with a hot-air gun to about 400 degrees C until the soldered ring detaches and the sheathing moves cleanly around the cable. Stagger the sleeves on a multiple-splice repair and wrap the harness with the appropriate protective insulating tape.
AR54.18-P-0100-02A
Steering rattle at full lock, Models 124, 129 and 140
A modified pressure plate in the power steering pump, found only in LuK PS pumps built between July and August, 1992 (production codes 20G to 23G) allows this problem. While many of these were replaced under warranty, the fix for any remaining is the installation of either a ZF power steering pump or a pump from LuK not made during the period affected.
AF46.30-U-1400BG
Water in headlights or turn signals, all models
Moisture can get into headlights and other lights by two means, leaks or condensation. It’s important to distinguish which problem you have because there is no way to correct for condensation in the lamps – it’s a natural phenomenon when the surfaces fall below a certain temperature under the right conditions of humidity. Leaks, however, can be located and repaired after performing a water spray test. Ordinarily there will either be a visible crack or you can identify the gasket you need to replace. If no water enters the lamp during your spray test, the moisture is from condensation, and no repair is necessary (or for that matter, possible).
AF82.10-U-4041AU
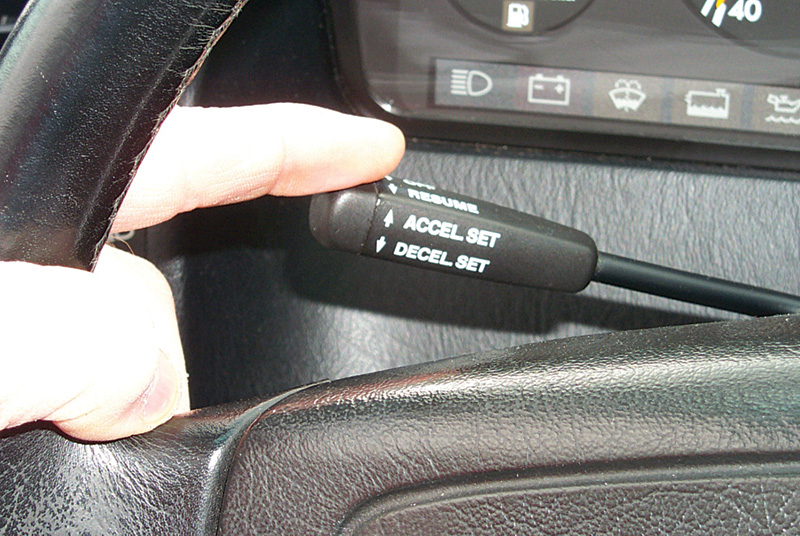 Engine surge in cruise control during ‘decel,’ Engine 102.96/98, 103
If a vehicle with either the 102 or 103 engine surges while the cruise control lever is held in the ‘decel’ position, shortening the connecting rod to the cruise control actuator by 2 – 3 mm (2 – 3 turns) from the slack position should correct the problem.
AF30.21-U-9100AG
Low-speed brake vibration, Models 124.226/230/290
A vibration under light braking in a curve just after starting from a stop and having reached a speed of 6 – 12 mph, may come from air in the transfer case hydraulic system. To bleed the air from this system, remove the hydraulic lines AV and ZS at the transfer case and place the ends in a catch basin. Run the engine and drain the hydraulic oil until it flows free of air bubbles. Finally, correct the hydraulic oil level in the 4-MATIC reservoir.
A second possible cause of this problem is incorrect initial pressure of the multiple-disc clutch AV in the transfer case. Its pressure should measure 1.20 to 1.30 bar.
Finally, the multi-disc clutch AV may have the wrong frictional forces, either because of worn parts or because of the wrong fluid. Replacing the oil in the transfer case with special ATF fluid, part no. 001 989 07 03 and briefly driving the vehicle in tight-radius right and left turns to circulate the new fluid to the clutch surfaces should correct the problem.
AF28.70-U-3103AV
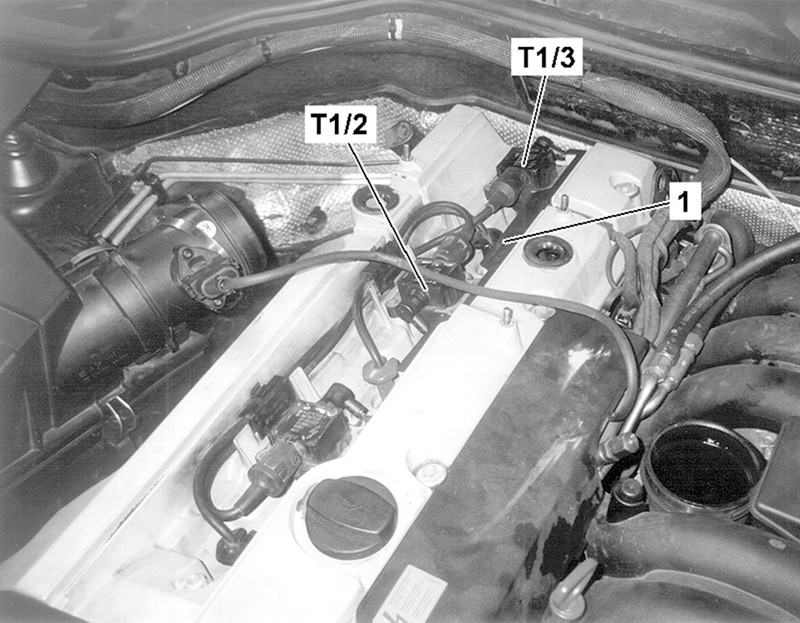 Installing interference suppression filters, engine 104
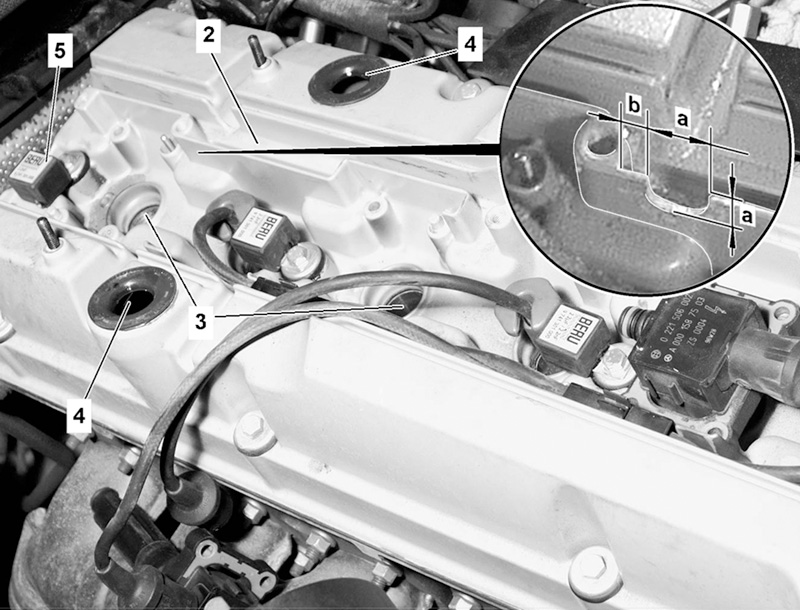 Sometimes the only way to quiet a radio is with ignition suppression capacitors or filters. To install ignition interference suppression filters, first remove the intake air pipe and the ignition wire shaft cover. Then remove the ignition coils T1/2 and T1/3. Next remove cover 1 and remove the wires from the cable shaft (2). Plug the openings in the valve cover (3 and 4), before you cut out sections in the cable shaft wall. Dimension a is 10 mm; dimension b is 7 mm. Install the interference suppressors (5).
Re-install the ignition coils and connect the interference suppressors in the circuit 1 feed lines for the ignition coils. Route the electrical lead for ignition coil T1/3 through the cutout you made with a protective sleeve. Make sure the leads for the interference suppressors for both coil T1/2 and T1/3 are below the ignition coils, but do not pinch the wires. Finally, reinstall the cover, the ignition cable shaft cover and the air intake pipe.

AF07.61-U-1300-01A
Cruise control surging downhill, Engine 103
If the car surges or jerks coasting downhill under cruise control, this may be a problem with the deceleration fuel shutoff system. You can confirm this by disconnecting the idle speed microswitch and test driving the vehicle. If the problem is gone, the cause is the fuel shutoff. Unfortunately, you can’t leave the switch disconnected because that disables the deceleration fuel shutoff and will put the vehicle out of compliance with federal emissions laws. While testing continues on countermeasures, on many affected vehicles it seems shortening the cruise control rod can reduce the problem.
AF30.21-U-9101AG
No start below -5 degrees C, Engines 104.942/992 up to 3/31/94 in Model 124
Sometimes this problem comes along with code 440a, cruise control, or code 471a, ASR. The original HFM-SFI control module software set the fuel mixture too rich at very cold temperatures, flooding the engine. The software was changed after 8/94. Replacing the module is the repair.
AF07.51-U-6430DA
Surge at idle or no start, Model 124 with engine 104.942/992
This problem may also occur with code 440a, cruise control, and with code 471a, ASR. Check fuse no. 7. If it is burned out, replace it with a 16-amp fuse and make a written note at the fuse box that fuse 7 should be rated at 16 amps thereafter. It may also be necessary to replace the HFM-SFI control module if the one installed is earlier than software status that displays 05/93 in the handheld tester readout.
If fuse 6 is burned out, replace it with an 8-amp fuse. Check whether harness connections are reversed for fuses 6 and 7 and correct if necessary.
AF07.51-U-6400DA
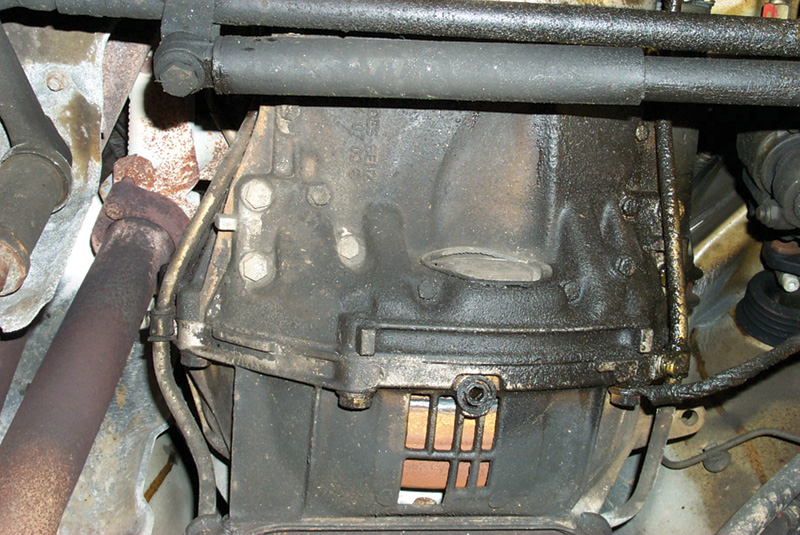 Oil leaks from rear of oil pan
Sometimes there is insufficient clamping force between the rear section of the oil pan and the lower casting of the engine block. But you can t just crank down harder on the fasteners because they have a specific torque assigned to them for proper force without stretching or distorting. If you find a vehicle with oil seepage at the back of the engine as shown here and your customer wants to correct the situation, besides replacing the oil pan gasket with a new one, apply Loctite 5900 sealer in the area in the photo, the back section of the mating surfaces between the pan and the block. Follow the original torque specifications in your service material for the fasteners, however, when completing the repair.
AF01.40-U-4041EU
Battery discharge, sometimes fast, Model 124
If a microswitch in the front door or trunk locks sticks open or the wire to the microswitch shorts to circuit 31, this condition can activate the convenience control unit, which controls the central locking system. Current draw with the vehicle unlocked is between 200 and 800 mA. But if the driver locks the vehicle with the central locking system, the current draw at fuse G or H is between 15 and 20 amps. After the temperature switches in the power window motors trip, this current draw falls to about 200 mA.
To check for this, unplug connector D on the convenience control unit under the left rear seat. Measure the resistance between socket 4 of connector D and circuit 31 (ground). That value should be more than 20 kOhms; in short, there should be no continuity. If your ohmmeter test displays lower resistance than that, disconnect the connectors to the trunk and door microswitches one at a time. If you get the correct resistance with one of them disconnected, that switch is defective. While you check it, it may prove necessary to replace the lock as well.
AF82.40-U-6002A
No central locking from front passenger’s door, Models 124 and 201
If the central locking system does not work and if no malfunction appears after you perform the central locking system test described in the Diagnostic Manual, replace the central locking pneumatic pump with the version designed for the station wagon. If necessary, you can make the central locking system work for a short time by resetting the fault recognition circuit. To do so, disconnect power from the pump for at least ten seconds.
AF80.20-U-6095B


0 Comments