

Misalignment as the cause of drift or pull is often the first problem that springs to mind for vehicle owners and service professionals alike, but it’s not the only possible cause.
Nothing can take the fun out of a highway trip more thoroughly than a car that pulls to one side, or wanders from a straight course so that you have to continually make directional corrections to stay on the pavement. Of course, no Nissan or Infiniti was ever designed to do that, but was intended to go down the road as if on rails. What happened?
After misalignment, tires and wheels are the most common causes of pull and drift. Uneven brake application and torque steer can also cause tracking problems. You may suspect that these issues are at play after behind-the-wheel testing. A brake malfunction, such as a sticking caliper, will make itself obvious when you apply the pedal, and torque steer will be noticeable only on acceleration. Unfortunately however, tire problems can also be accentuated by braking or accelerating. So, it makes sense to focus on tires first when you get these complaints.
Explain yourself
A car that continues to pull after an alignment can frustrate everyone involved: the vehicle’s owner, the service writer and the technician. If the owner does not understand that an alignment may not be all that’s needed to correct a pull, he or she may incorrectly deduce that the technician didn’t perform the alignment correctly. If a service writer is not aware, or fails to explain that an alignment is not the only possible cause of pull or drift, the writer may be forced to give up work in order to keep the vehicle’s owner satisfied. If a technician is unaware of the possible causes of pull and drift, he may needlessly repeat alignments, or order unneeded alignment-machine service.
To avoid dissatisfaction, educate the customer during the sign-in process and develop a shop policy for addressing pull and drift complaints. There is more than one correct way to do it. Some shops start with a basic steering and suspension inspection, followed by an alignment, after discussing the possible causes of pull with the customer. If there is still a pull or drift after alignment, additional diagnosis is sold. Other shops may offer a package that will address all possible causes of pull, including inspections, alignment and tire testing.
Why wheels can cause pull
One could argue wheel-related pull and drift are caused by conicity. If you were to roll a cone on a flat surface, it would not roll in a straight line. The cone would track in the direction of the small end.
The same is true on a car. If one tire is cone-shaped, then it will cause a pull to the smaller-diameter side. If two wheels on one axle are of unequal diameters, they create a cone shape and may cause a pull.
We should mention here that the very first thing to check in this regard is also the simplest: tire pressure. A tire with lower psi in it will have a smaller actual rolling diameter than one with higher pressure, creating a side-to-side cone. Some suspension designs are more sensitive to this than others, but the effect exists regardless. Another factor operating here is that inadequate inflation increases rolling resistance, which naturally causes the vehicle to lead to that side.
Sometimes, a cone-shaped tire can be found with a visual inspection, as is the case with a tire showing uneven tread wear. If the tread depth on the outer edge of the tire is 7 millimeters and the inner edge is almost bald, the tire will push the car toward the worn side because it has a smaller circumference.
Size, make, and model match
Reading the sidewall is important when addressing a pull or drift. Unequally sized tires installed on one axle will tend to cause a pull to the side with the smaller tire, not to mention the unnecessary stress on the differential when installed on a driving axle, and possible ABS malfunctions.
There is a great deal of variation in tire characteristics from one manufacturer to another, even from model to model. You might be able to see a size difference just by looking at the tires side by side, or they may be different only when loaded.
Most often, there is no way to diagnose conicity with a visual inspection. As we said, conicity can be caused by variations in sidewall stiffness (which we will get to next), air pressure, make and model (even if the sidewall says they are the same size), or a bent rim. Much of the time these defects can’t be seen, no matter how closely you look.
Sidewall stiffness, tire pressure, and rims
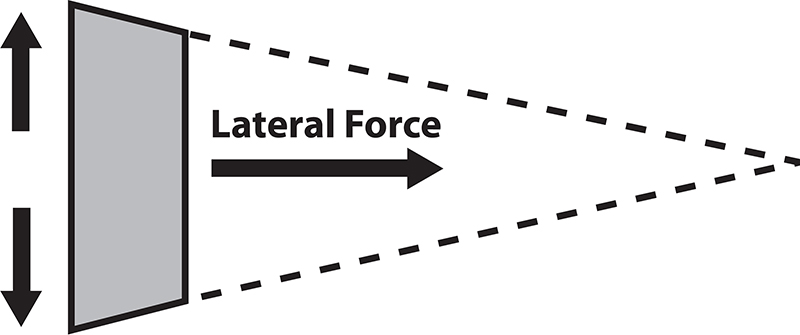
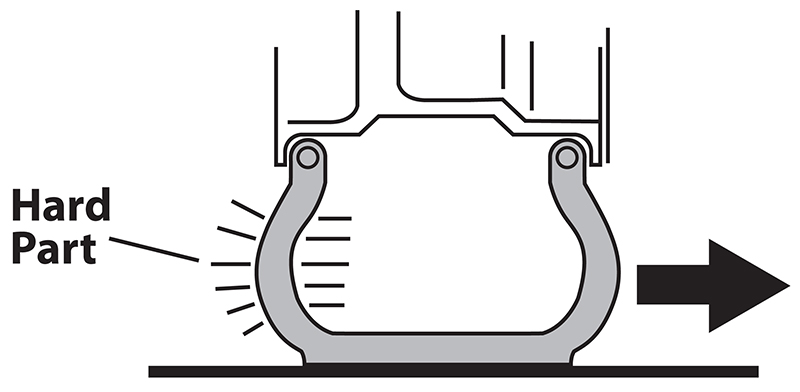
All tires have some variation in sidewall stiffness. If the sidewall is significantly stiffer on one side than on the other, the stiffer side will compress less than the softer side. This will result in a cone-shaped tire and tire pull. Usually, the stiff side is not uniformly stiff; there may be only one spot that is hard. When the hard spot touches the road, there will be lateral force exerted in the direction of the soft side. You also may notice a steering-wheel vibration at low speeds in addition to a pull.
There is a connection to inflation pressure here. Does the steering wheel wobble and pull? This may indicate low tire pressure. The weight of the vehicle is supported by a combination of the sidewall and tire pressure. Low pressure will amplify variations in sidewall stiffness. Often, all that is needed to fix a pull and wobble is to correct the tire pressure.
A bent rim also can cause pull. If the bead seat on one side is bent, it can reduce the diameter on that side, causing conicity when that portion of the wheel is in contact with the road. Sometimes, a bent rim can be found during a visual inspection, although it can be difficult to determine whether only the flange is bent or whether the bead surface is bent, too.
A pushing match
Total pull is the sum of the lateral force generated by alignment and the lateral force generated by the wheels. If they are in opposite directions, they will tend to cancel other out. If they are the same, they will increase the total force of the pull. This is why pull can sometimes intensify after an alignment or tire replacement.
As an example, let’s say the right front tire has very uneven tread wear. The outer edge of the tire is almost new and the inner edge is nearly bald. If toe-out caused the inner edge wear, the toe may be pushing the car to the right, but the tire’s conicity may be pushing the car to the left. The two forces may cancel one another, and the car may drive more or less straight. On the other hand, if excessive negative camber caused the inner edge wear, the car may have a strong pull to the left.
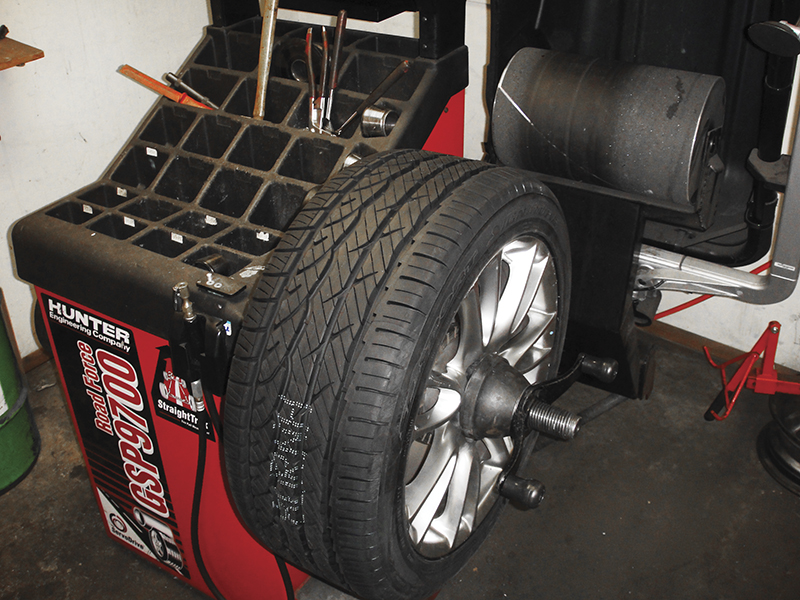
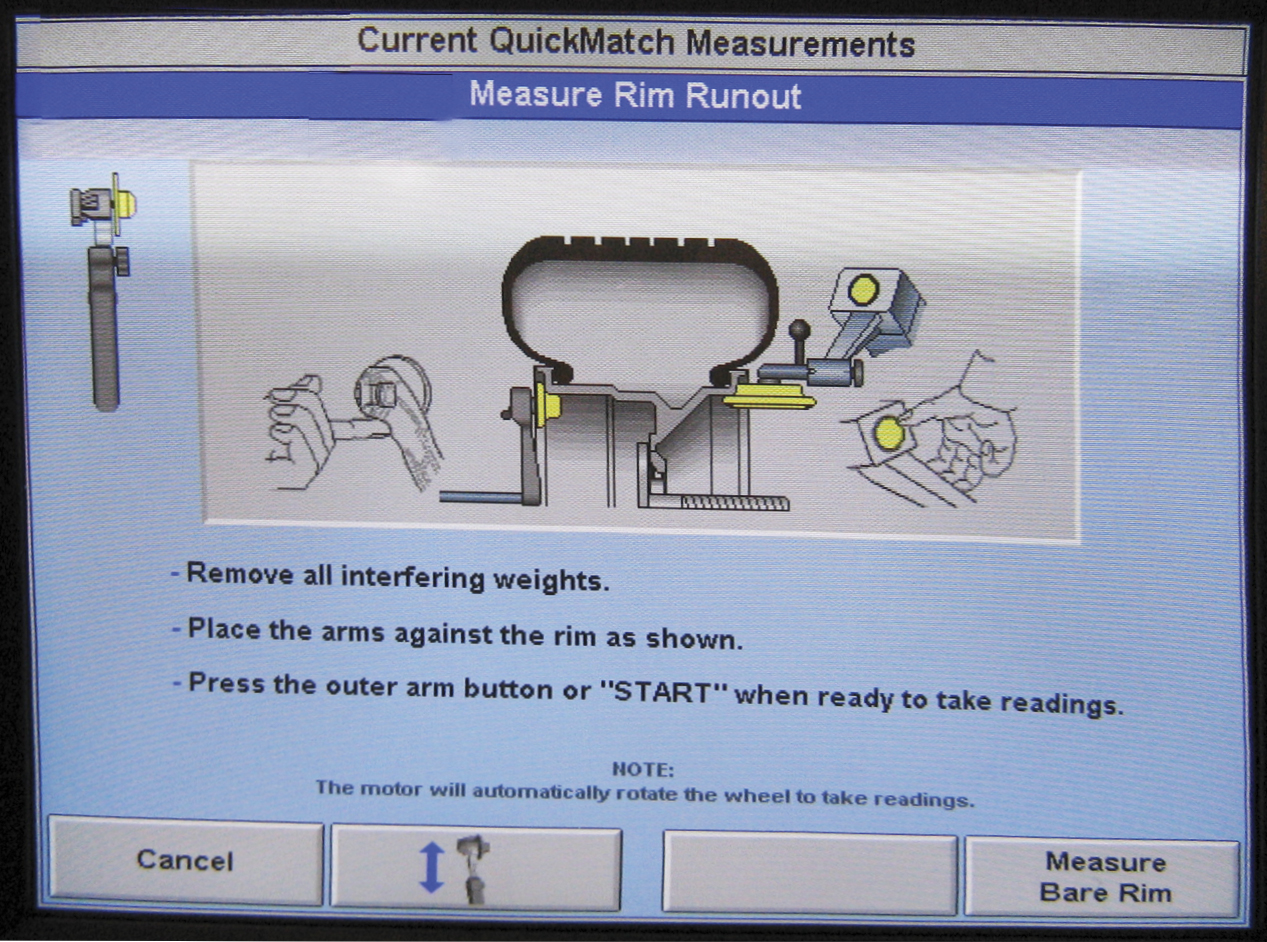
Diagnosing with a Hunter GSP9700
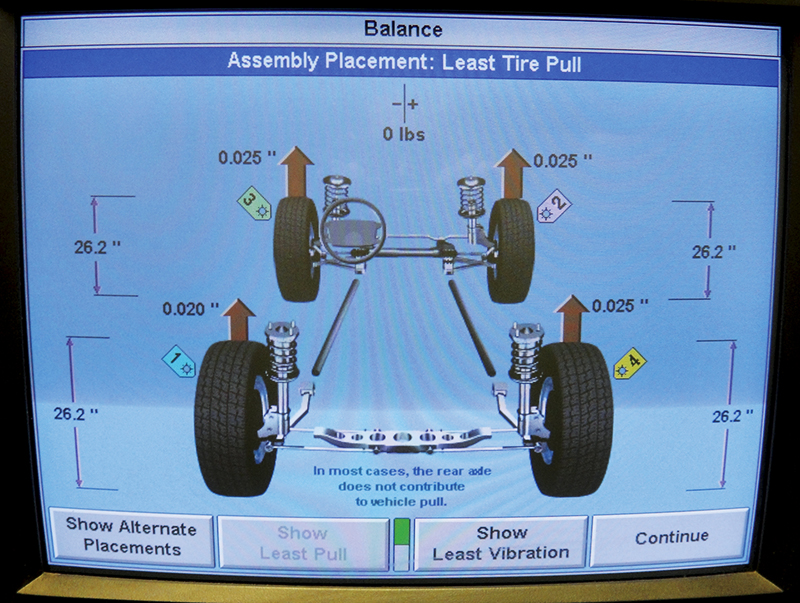
The GSP9700 is a diagnostic platform capable of measuring the lateral force generated by all four wheel assemblies, then allowing analysis of the effect of changing wheel position on pull and vibration.
This piece of equipment uses a pneumatic roller to apply pressure to the tire, just as if the car is being driven on the road. A sensor in the spindle measures the amount of lateral force generated by the wheel assembly. Each wheel assembly measurement is saved, and each wheel is tagged for identification during placement on the car.

Using the GSP9700 is simple. Remove all four wheels from the car, measure and tag each wheel, then use the software in the unit to simulate the amount of pull that would be generated by the wheels in all possible positions on the vehicle. The GSP9700 can inform you automatically of the wheel placement combination that will cause the least amount of pull, or you can cycle through all possible combinations to see how the vehicle will respond to each. The GSP9700 also provides an easy way to determine how much of the stiffness variation is caused by the tire and how much is caused by the rim.
Not so well-equiped?
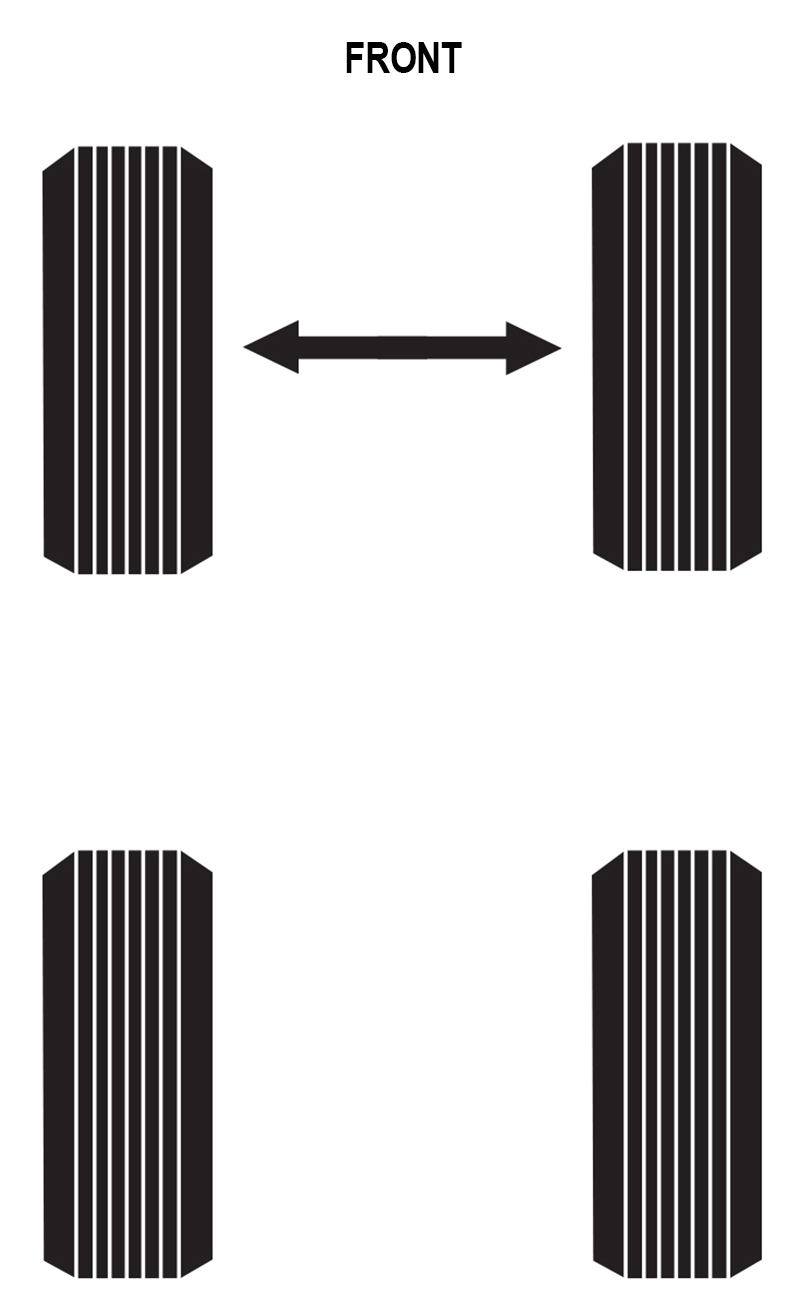
Not every shop has a GSP9700, but it’s still possible to diagnose and correct pull using only an alignment machine and tire swapping — it just takes longer. This diagnostic technique is based on the fact that a wheel is more likely to cause pull when it is on the front axle.
Start by verifying the pull. When test driving, always be aware of road crown or slope (roads are shaped this way to facilitate drainage). The angle of the road will have an effect on the vehicle. So, you’ll need to scout roads in your area that allow for safe and level test drives.
Once you’ve verified the direction and intensity of the pull, bring the car back to the shop to check the tire pressure. If it is not correct for any wheel, check for leaks (might as well look at the stems first), correct the tire pressure and test drive again. If the car now drives straight, you’re done. If not, move to the next step.
If tire pressure was not off or did not correct the pull, swap the front tires left to right (Note: Some tires are directional, so be sure to return them to their original positions if this is the case.). Test-drive the car to see if the pull has changed direction, intensity, or both. If the pull is caused entirely by a wheel assembly, the direction will reverse and the intensity will stay the same. If the pull is caused by a combination of alignment and wheel placement, the pull may change direction and intensity, or intensity only. The pull may disappear entirely if the lateral force generated by the wheel and the lateral force generated by misalignment are equal and opposite. If the pull remains unchanged, the problem is likely caused entirely by misalignment of the wheels or other mechanical problem.
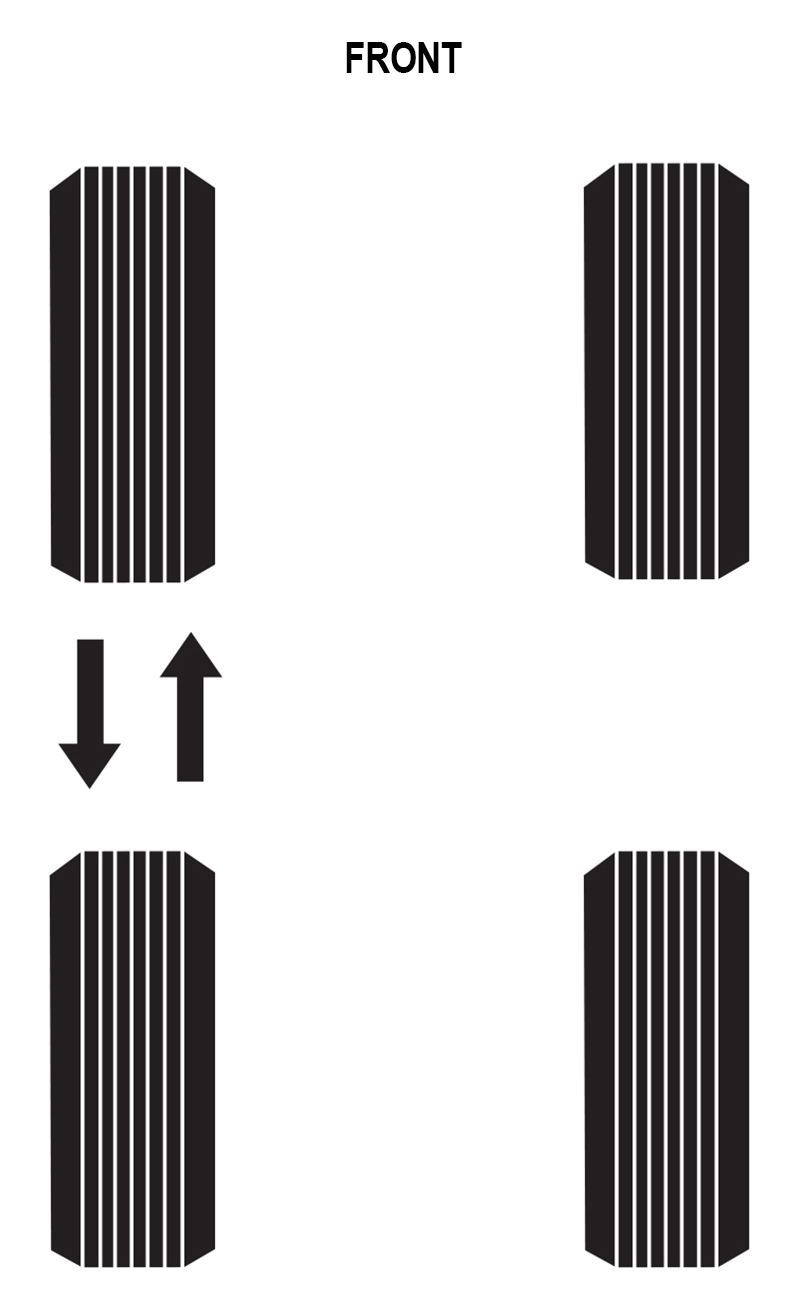
If there was a change in the pull after the left-to-right swap, swap one of the front tires to the rear and drive again, noting changes in the direction and intensity of the pull. If the pull improves, the tire that was just swapped to the rear probably is contributing to the pull.
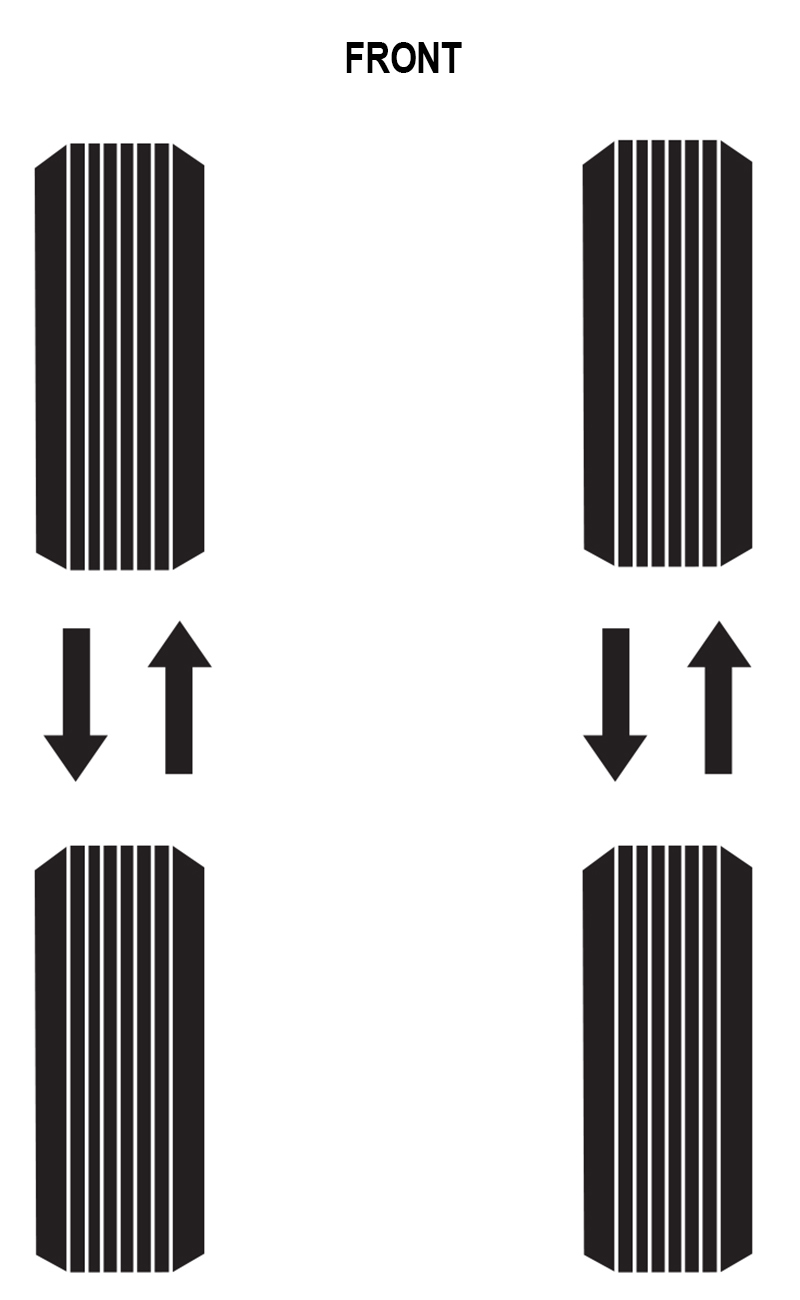
If the pull remains the same, reverse the previous front-to-rear swap, then swap front to rear on the opposite side. Test drive again and note changes in the direction and intensity of the pull.
The problem with this method is you never get the whole picture. Although you should be able to eliminate the customer’s complaint, eventually, you could spend hours swapping tires and never determine the particular effect of each one. If you’re being paid by the hour and enjoy logic puzzles, you may have fun with it. If not, it may make sense to sublet to a shop with a GSP9700.
Like new!
dWhen a Nissan or Infiniti vehicle is new, it does not pull or drift. It’s mechanically perfect. All alignment angles are in center spec, and the wheel assemblies have been tested and optimized for minimal vibration and pull. Returning your customer’s vehicle to like-new performance is simply a matter of making sure the car is mechanically sound, performing a careful and accurate alignment, and testing the wheel assemblies. If you follow those steps, everyone will be happy with the results.


0 Comments