
You may think the adoption of aluminum components is the latest thing in the evolution of Mercedes-Benz vehicles, but even so repair procedures have changed substantially over the last decade.
 SL500 bodyshell is all-aluminum.")
With the exception of the A-Pillar, the 2013 (and newer) SL500 bodyshell is all-aluminum.
It may sound funny to talk about “the good old days when aluminum repair was simple,” but it’s true. Aluminum use on automobile bodies is not new, but it has until very recently been primarily hard parts and exterior sheet metal such as hoods, deck lids, and fenders. Other than for minor dent fixes, aluminum repair was often a simple remove and replace job. It did not require straightening, heating, or otherwise modifying the properties of the aluminum. If you had experience with adhesives and knew your way around a rivet gun, you could handle aluminum sheet metal replacement.
In the past ten years, that has changed dramatically. Weight reduction for fuel economy mandates have resulted in a major expansion of aluminum sheet metal use, and significant new aluminum load-bearing and structural applications. New aluminum alloys are being joined to a wider variety of materials, including advanced high strength, ultra-high strength, and boron steel, magnesium, plastic and other composite products.
There are different types of adhesives, bolts and rivets, each with specific instructions for how to separate the original and install a replacement. Many of these new materials respond differently from old, low-strength steel to heat and cold-working, and that dictates what can be repaired and what can only be replaced. Technicians must be prepared to use a variety of different procedures, often during the same repair.
No Straightening of Structural Components
Mercedes-Benz explicitly prohibits straightening of aluminum structural components. It is simply not worth the risk of unknowingly altering the joint strength and crumple properties of the metal. The one exception is the aluminum panels in the rear floor of the 2013 and newer W-231 chassis (SL500). The floor is a MIG welded frame with a hollow chilled cast longitudinal member as its primary load bearing element. It is closed by sheet aluminum panels which can be straightened, if deviation from the measuring points is not greater than 3 mm.
Some (Don’t) Like It Hot
Aluminum sheet metal softens when heated, allowing technicians to tap, pull out, or straighten minor damage to body panels and non-structural components. This excludes cast aluminum pieces, which resist bending and cannot be reshaped without risk of becoming brittle and forming microscopic cracks. Extruded aluminum channels may be reshaped to a limited extent when heated properly, assuming they are freely accessible and the damage is minor.
But aluminum alloys have a limited temperature range in which they can be reshaped without altering their hardness and strength in the repair area. Mercedes-Benz specifies a temperature range of 250°C – 300° C (482º – 572º F) for reshaping aluminum. Above 300°C, aluminum begins annealing, which is shorthand for softening that is irreversible.
Aluminum does not change color as it heats, so unlike with steel, you cannot judge visually when you are nearing a critical temperature limit. When straightening aluminum you’ll need some sort of temperature checking device—self-adhesive temperature measuring strips, infrared thermometer or pyrometer—and check it frequently during the repair. After reaching the 250°C – 300° C reshaping temperature, release tension by tapping the metal carefully with a hammer.
Reshaping using cold straightening results in hardening and can lead to cracking. Aluminum tends to tear quickly when notches or crimps are present in the reshaping area, so avoid high force or jerky hammering. This also applies for high force in the area surrounding weld joints. Reduce the potential for hardening by heating the reshaped area to approximately 170° C (338º F), then letting it cool slowly (no drenching with cool water or forced air).
Adhesive with Spot Welding or Riveting
Instead of the high heat of traditional metal inert gas (MIG) continuous bead welding, Mercedes-Benz recommends adhesive bonding in combination with MIG spot welding, squeeze-type-resistance-spot-welding (STRSW), or riveting for most aluminum repair.
Adhesives used in collision repair cure at room temperature. That helps avoid the potential of high heat altering the strength characteristics of the aluminum and other materials being joined. It also avoids causing thermal damage to the e-coat, corrosion protection, or other coatings near the repair area or on adjacent components.
Some adhesives can be cured at temperatures up to 120°F to shorten repair time. Do not exceed the maximum temperature tolerated by the aluminum alloy or other materials being bonded together. For best results, follow application instructions from the adhesive manufacturer.
Adhesive distributes its bonding strength over the entire length of the joint, unlike spot welding alone, which has its strength concentrated at the specific weld points. Structural glues add rigidity and stiffness, and offer improved noise, vibration and harshness (NVH) control. And for joints that combine aluminum with steel or other metals, a non-conductive adhesive layer between the two dissimilar metals helps prevent corrosion.
When combining adhesive bonding and STRSW on a new connection, the technician applies adhesive to the entire weld area, and makes spot welds through the glue during its working time. The heat is focused on the weld area and causes only a very small amount of stress around the weld.
The arms of an STRSW gun must be able to clamp around both sides of the joint in order for a resistance weld to work. If both sides are not accessible, Mercedes-Benz recommends adhesive bonding plus riveting. The glue and rivet combination is also advantageous for connecting aluminum with composite polymers and with advanced steels, many of which are sensitive to high heat. When joining ultra-high-strength materials, use only high-strength rivets approved by Daimler AG. Only a riveter with increased draw-off strength can properly attach or remove a rivet in advanced steels.
MIG/MAG Welding
Another alternative is MIG plug welding for aluminum and other non-ferrous metals, or metal active gas (MAG), primarily for steel. The difference between MIG and MAG technology is primarily the type of shielding gas used. Each unique gas mixture has a different effect on arc stability, metal transfer, and the amount of spatter, all of which affects weld pool penetration and the strength of the finished joint.
Continuous MIG welding is still used for joint strength, especially where the gap between materials is large. Aluminum has high thermal conductivity, which makes the start of a traditional continuous MIG (metal inert gas) weld a bit tricky. The repair area must absorb enough heat to create a durable weld fusion, but thermal conductivity draws heat away and makes the initial split seconds slow to warm up. One solution is newer equipment that has “Hot Start” capability. It starts the weld with a higher current for a brief initial period and then automatically switches to a lower level for the remainder of the weld.
When combining adhesive and continuous MIG welding, the technician applies glue to every area except those in which a MIG weld is to be placed. The heat would destroy the glue and release chemicals that contaminate and weaken the weld joint.
Repairing Existing Glued Joint Areas
Before original flange or other glued joints can be separated, they must be warmed up to soften the adhesive. Heat the flange to between 100°C to 120°C (212º to 248º F) and separate using a chisel. Do not exceed a maximum of 180°C (356º F). Always seal riveted body flanges with body sealant. On glued multi-layer sheet metal connections with hardened adhesive, drill out the original spot weld and position the new resistance spot welds over the existing opening. This minimizes the potential heat damage to the surrounding hardened adhesive.
Be sure to remove metal shavings using a vacuum. Do not use forced air to blow metal shavings and dust way from the repair area. If aluminum dust settles on steel, or vice versa, it can cause bi-metallic corrosion over time. It is not good for shop personnel to breathe. Also, aluminum dust at high enough concentrations in the air is explosive when a spark is present. Vacuum removal is good not only for corrosion prevention, but also for safety.
Some load-bearing sections that were originally adhesive bonded will not get replacement glue during a repair. To meet strength objectives in the repaired joint, be sure to install the specified number of rivets per the Mercedes-Benz instructions.
 SL500 bodyshell is all-aluminum.")
With the exception of the A-Pillar, the 2013 (and newer) SL500 bodyshell is all-aluminum.
Part Preparation Is Critical to Adhesive Performance
Mercedes-Benz uses a two-component structural foam adhesive to reinforce body repairs. Follow the application instructions to ensure a quality bond between parts being joined. All steps, from pre-cleaning to releasing the vehicle to the customer, must be completed in the specified time period in order for the bond to set and cure properly.
- Remove any old adhesive from the area that will be re-glued. Don’t apply adhesive on top of rust, paint, e-coat, or galvanized coating. If the metal has a pewter or non-shiny appearance, there is still galvanized coating that must be removed. On aluminum surfaces, Mercedes-Benz recommends use of a CrNi (stainless steel) wire brush to remove coatings down to the bare metal.
- Use the specified pre-cleaner and primer. The primer enhances the long-term stability of the bond. Work the primer into the surface with fresh abrasive paper (included with the primer system). When properly applied, you should see a uniform film of primer covering the repair area. If you do not, repeat the pre-treatment steps. When an acceptable film is present, wipe the primer off with a lint-free paper towel. Allow the surfaces to dry for the recommended amount of time before applying the two-component adhesive.
- Before mounting the adhesive mixing tip onto the tube, squeeze the tube until you see both of the two components coming out. This ensures the proper mix of both components will be applied when the cartridge trigger is squeezed.
- Squeeze out a test quantity of adhesive at least three inches in length, and visually check to ensure that the two components mix uniformly when exiting the cartridge. Discard this test.
- Squeeze out an additional quantity equal to one length of the tube. Use this as a reference bead to monitor and confirm the adhesive hardening process.
- Apply adhesive to the cleaned surfaces to be bonded, making sure it reaches a thickness, or height, of at least 10-15 mm (0.4-0.6 in.). Do not mix or stir the adhesive, as this will alter its curing properties and weaken the bond.
- You must complete joining within the adhesive’s specified application time, or remove the bead and re-start the process at the cleaning step. The instructions will specify an adhesive “open” or working time and how that time may extend at cooler ambient temperatures, or shorten if the shop is warmer. Failure to follow the instructions will result in poor bonding performance.
Unfastening Bolted Connections
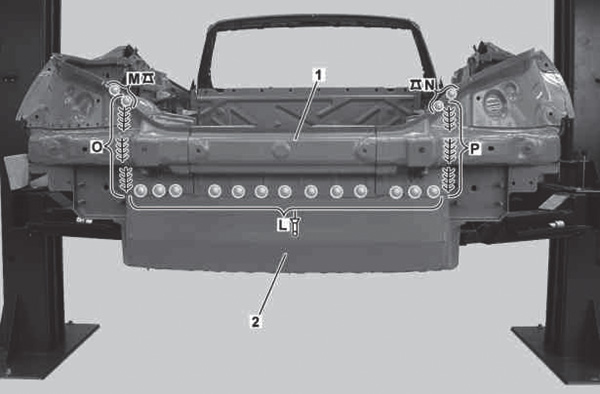
The rear center section (1) in the W-231 chassis (2013 SL500 shown here) features a variety of joining technologies. Installation includes flow-form rivets (areas M and N), MIG welding (areas O and P) and blind rivets (area L). There is also structural adhesive under the blind rivets (at area L).
How you unfasten bolted connections such as flow-hole bolts is determined by whether the part is extruded or cast aluminum. Extruded aluminum parts such as frame rails may be unbolted using an electric or cordless driver. Bolted connections screwed into cast aluminum must always be unscrewed by hand. Use a torque wrench, and don’t exceed the recommended psi for the connection. If you strip the bolt, cast aluminum is a lot less forgiving than steel.
A Dedicated Aluminum Repair Area
No one wants repairs to fail in under a year, but that is likely to occur if you don’t have a dedicated space, tools and equipment for aluminum repairs. Mercedes-Benz recommends a separate room or floor-to-ceiling curtained enclosure. Without it, dust and metal shavings from repairs to other vehicles in the shop can cause galvanic corrosion if they settle on your aluminum surfaces before you seal your repair. For the same reason, you need separate tools for working on aluminum, and separate storage cabinets so that wrenches, sockets and other common tools don’t get mixed in with look-alikes that are used on steel. You need a separate vacuum and, if possible, air handling system for the aluminum room. Don’t second-guess Mercedes-Benz engineers. All of the recommendations in this article have been developed, tested and field-validated with your repair success in mind.
 is parts that are bolted on. Category 2 is parts that are adhesive bonded and riveted. Category 3 is welded non-structural, and Category 3+ is welded structural components. Technicians that have not completed the Mercedes-Benz aluminum welding Certification are not authorized to perform repairs in categories 3 and 3+.")
Mercedes-Benz groups aluminum repair into categories based on degree of complexity. Category 1 (not shown) is parts that are bolted on. Category 2 is parts that are adhesive bonded and riveted. Category 3 is welded non-structural, and Category 3+ is welded structural components. Technicians that have not completed the Mercedes-Benz aluminum welding Certification are not authorized to perform repairs in categories 3 and 3+.


0 Comments