There is more to a radio these days than just punching in the anti-theft code. Since ’93, BMW has been adding features to automotive entertainment systems — push-button control panel interfaces, road-speed dependent volume control, self-diagnostics, BUS communication, etc. Sometimes service may include resetting or adjusting these various features. For a decade and a half, BMW has advanced technology in vehicle entertainment.
Worldwide Radios in the U.S.

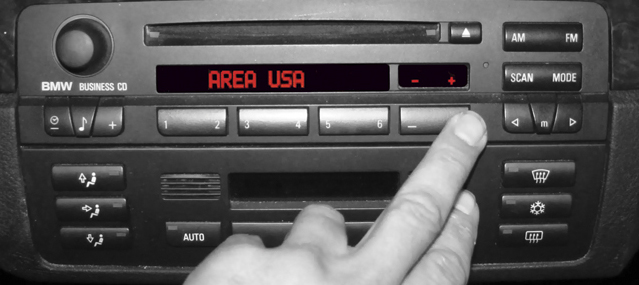
When scrolling through the display and you see this, you can change between multiple regions such as Europe and U.S. Use the number keys to select your region, then press the plus or minus key to move on to the next feature.
Starting with the ‘93/’94 3-Series, BMW’s Bavaria C Business RDS radio features could be changed through the radio head push buttons. In order to do this, you needed to get the radio into “Service†mode. It has to be in FM mode, and you may have to put it in FM mode, shut off the ignition key, and turn it back on again. Immediately push the star button followed by the 1 and 4 buttons together (for more information see Technical Bulletin SI B650704, which you can find in TIS on www.bmwcenternet.com). The word “Service†should pop up on the display. You can scroll up and down using the Seek Up and Seek Down buttons. If you get the word “Region†displayed, you can change from European to USA and back again by using the preset number buttons (USA is #2). To exit the service mode, just shut off the radio. The radio’s anti-theft code is not available in the radio service mode.
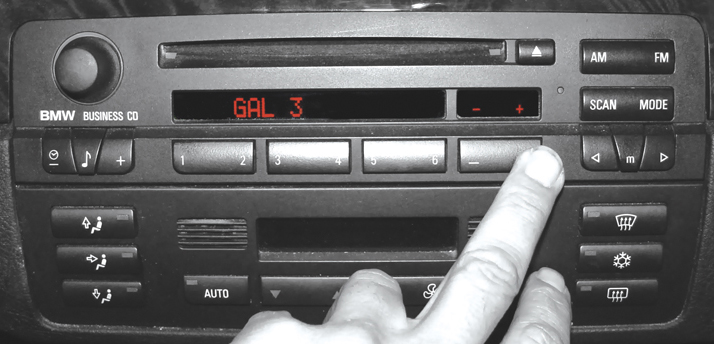
In ’95, the 3-Series convertible, 325iS and the ’96 BMW Z3 received the upgraded Bavaria C radios with new features such as road-speed dependent volume control (GAL) and traffic broadcast volume increase (TP). In the event of improper radio operation, a self-diagnostic feature, with trouble codes, was added through the push-button interface. In these applications, the Bavaria C radio had a few variations in its capabilities. The Business RDS remained chock full of features. To view these features, turn the ignition key on and immediately press the star key, then press the number 8 and 0 together. You are now in service mode. Using the radio station preset buttons, you can select from one of seven modes as follows: Button #1 responds with “SYN,†which allows you to set synthesizer levels, button #2 gets you “ADW,” which is the status of the A/D converters, button #3 gives you volume, tone and fader setting in decibels, button #4 is the LCD test where all of the segments on the LCD should illuminate. If you scroll using the arrow keys such as “<†and “>,†you can get various patterns off the LEDs, button #5 pulls up “GAL” mode in the Professional RDS radio, otherwise known as “Road Speed Dependant Loudness Control.†The factory setting is the number two but you can adjust the increase to any one of three rates. Rate #1 is a minimal increase, #2 is medium, and #3 is the loudest increase. This only applies through the 2000 model year. For New Generation radios, the GAL function has six levels, and is set differently.

GAL mode allows you to adjust the increase in volume as road speed goes up. Road speed is received from the instrument cluster. On early models, you had choices one through three. Newer models have choices one through four.
In the Professional radio (w/o RDS), button #5 causes the “TAB” feature to be displayed, which are frequency readings. Button #6 is the serial number and programming level for the RDS. For the non-RDS, this is the GAL feature explained earlier. Button #7 for the RDS represents “NAT” regional settings for radio station frequencies. On the non-RDS model, button #7 displays the serial numbers and programming level. Where possible once you pick a service mode, you can scroll through options using the arrow keys again. Then, pick your selection. To save your new setting simply press the same button as the mode you just entered. To exit service mode, just push the “0†button.
If you have a cassette integrated into the radio, you are working on the lower-end model. Only three features are included. By pressing buttons #2 and #5 together for four seconds, you enter service mode with an “S†in the display. Pressing the “VF†button yields “Traffic Broadcast Volume Increase†(TB). Select radio station preset number one through five, one being the smallest volume increase and five being the loudest. After entering service mode, you can hold down the button #3 for a few seconds and you will be rewarded with GAL mode. In service mode, try hitting the “M†button and you can now access the “Station Signal Strength†mode (local and long distance reception).
| Model | Button #1 | Button #2 | Button #3 | Button #4 | Button #5 | Button #6 | Button #7 | Button #0 |
| RDS | SYN | ADW | NF | LCD | GAL | SN | Region-NAT | End |
| Non-RDS | SYN | ADW | NF | LCD | TAB | GAL | SN | End |
Everybody Get on the Bus

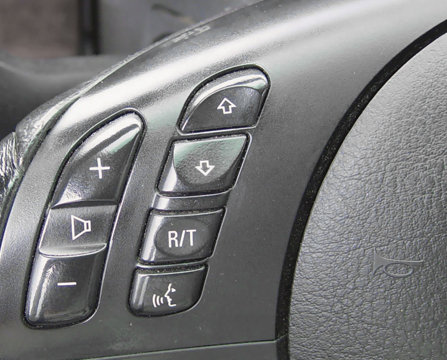
The steering wheel switches control volume, radio station selection and voice activation. The benefits include hands-on the wheel operation so the driver is not distracted looking for a knob. However, this does add some features that one day may have to be diagnosed.
Also in ’96, the high-end cars such as the 7-Series had two high-fidelity options known as “Hi-Fi†and “Hi-Fi w/DSP.†The DSP (Digital Sound Processing) version had a separate LCD for equalizer display, or this was displayed through the “On-Board Monitor†display. Either with or without the on-board display, a new capability was added to the system, known as the “I-Bus.†The introduction of the I-Bus data lines allows all the components to communicate with one another along with other control units such as the IKE (instrument cluster), navigation system, and the vehicle telephone system.
Steering wheel controls were added, and these could be monitored via the self-diagnostic system. This mean the GT1 was added to the arsenal when it came to entertainment system problems. Unfortunately, this also added complexity to reinitiating systems when the battery went dead. Updating software was now added to the possible list of repairs. At this time, it was accomplished by first replacing the radio. With software versions becoming so important, BMW made sure the information was available through the radio. Try holding down the “WB†(Weather Band) button with the ignition key on and the service mode will give you radio serial number, production date, DSP communication, GAL mode (now with options 1 through 4) and Station Signal Strength modes.
Brave New World
For the 2001 model year, a New Generation of multi-information radios (MIR) debuted in the Z8. These represented more features, more communication possibilities and more diagnostic complexity. As well as scan-tool data, the push-button interface would still get you into service mode. With four different radio configurations, you had four different methods to get into service mode. The “Base” radio (display screen in radio) needed you to turn the ignition key on, quickly turn the radio on and hold down the “M†button for a few seconds. When you released the button, a service number, “SN#â€, would be displayed on the screen. You can then use the “+†and “-“ buttons to scroll through the service functions as follows: SN#, software version, GAL setting, radio signal strength, DSP equipped, TP (NA in U.S.A.), AF (NA in USA), region and revision index, in that order.
MIR radios have a separate display screen used for Navigation, telephone and, of course, audio functions. Here you have to turn the MIR on and quickly apply the “Set†button. You get the same service mode as on the other radios, but you have to use the arrow keys to change the category. If the vehicle has an “On-Board Monitor,†you have to press and hold the “RDS†button after turning the unit on. The on-board monitor is identified by its black and white screen. With the wide-screen board monitor (color display), start with the “Info†button, select “RDS†on the screen and hold the control knob down for 10 seconds.

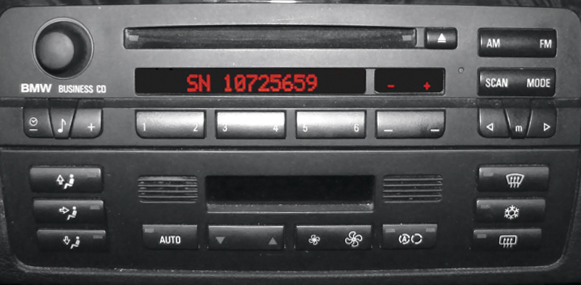
This service number shows that you are in service mode. It is often the first screen that comes up after entering this mode. From here, you can scroll through the categories using the plus and minus buttons, or the arrow buttons to the right.
One function of note on these new radios is the personality feature. This uses the vehicle’s remote to identify who is getting into the vehicle. Radio station settings are saved for that remote. If a different remote is used, then its different radio station settings are displayed. Keep this in mind when diagnosing radio station reset problems. You could waste a lot of time trying to check for battery power loss when the problem was actually due to different key remotes being used.
MOST
Starting with the new E65, or 7-Series, the MOST bus handled all sound generation for the entire vehicle. Radio, navigation requests and warning chimes are all in the MOST system. At the center of MOST is the “Acoustic System Controller,†or ASK. The ASK module controls everything from turning units on and off to retaining self-diagnostic trouble codes. When you plug in your GT1 scan tool, this is the module you communicate with for codes and data. It also coordinates the importance of audio output. In other words, it will override a radio station song with navigation instructions and override that with warning indicators such as “Parking Distance Control.†The MOST system still has a service mode and a good set of instructions is found in Service Information Bulletin SI # B 650704.


0 Comments