

Plastic reconstruction is simple. We offer tips on deciding between reshaping, adhesive bonding or plastic welding for your repair.
Use of plastic in vehicle manufacturing helps improve fuel economy, reduce emissions, design safer structures and create unique body shapes and aerodynamics. With every ten percent reduction in vehicle weight, engineers can extract a corresponding six-to-eight percent increase in fuel economy. By 2020 the amount of plastic used in the average car will reach almost 800 pounds, double the 2014 amount of approximately 400 pounds, according to the report “Weight Reduction in Automotive Design & Manufacture†by industry forecaster IHS Chemical. If you haven’t already, you should be developing plastic repair skills. The good news is, it’s easy.
Safety Caution
The adhesives used in plastics repair can cause eye, skin and lung irritation. Avoid eye and skin contact. People who are allergic to isocyanate should avoid handling polyurethane and plastic adhesives. Both contain isocyanates.
New Plastic Parts
If installing new OEM primed plastic parts, start by inspecting the component for any damage. If you find only minor imperfections, such as fine scratches that do not penetrate through the as-shipped e-coat or primer, you can sand out the blemish using a fine grit paper such as P600 or P800. Then rub down the entire part with a ColorSystem Soft Pad Gray.
If the panel or bumper contains raw plastic substrates, check your repair information to see if you should not paint any portion of the component. If so, mask or tape off that area of the part.
Three Plastic Repairs: Reshape, Bond or Weld
Reshaping, plastic bonding and plastic welding are three different methods available for repair of exterior body and other plastic panels. Each has features that make it advantageous for some applications but perhaps less so for others. Selection of the appropriate repair method is dependent upon the type and extent of the damage. You can find guidelines for which damage conditions suggest which repair method by searching in the BMW workshop information system ISTA.
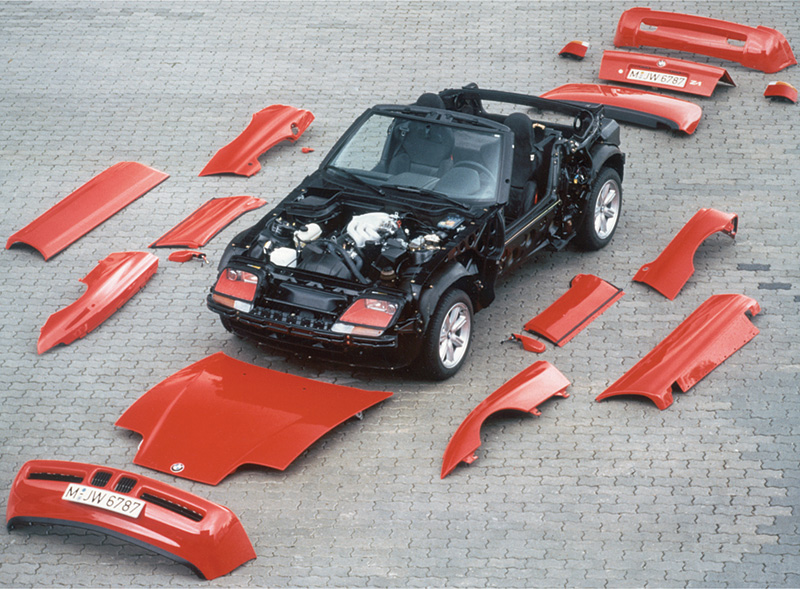
Repairable plastic components include bumpers (excluding the 2000-2003 Z8 Roadster), side sill trim, door outer skin, roof, decklid, soft top (convertible) compartment lids, and other parts made of composite materials. You cannot repair tanks that contain fluids, including fuel, coolant, brake fluid, windshield washer fluid, and other liquids. If cracked or damaged in a manner that results in the potential to leak, you must replace them.
Different plastic types require different repair procedures. However, if you are using adhesive for plastic bonding, or reshaping minor dents using mild heat, you don’t need to worry about the material type. Your BMW repair information will specify which repair procedure is best for a given plastic component. You only need to identify the material type if you are using the plastic welding repair method because different plastics respond differently to high heat.
If there is no code explaining the plastic type on the part or its label, there are quick tests you can use. Sand the part. If it smears or gets rubbery, the material is thermoplastic. If instead, it gets dusty, it is thermoset. Alternately, you could heat the part to over 200 degrees C (about 400 degrees F). If it softens, it is thermoplastic.
Where it is imperative to know the plastic type to plan a repair, BMW includes some identifying code or mark on the part.
Preparation Challenges in Plastic Repair
Wettability, or lack thereof, refers to whether a plastic material encourages or hinders a coating’s ability to “wet out†or spread over, adhere to and penetrate the plastic surface. Many plastic materials are hydrophobic and tend to resist moisture absorption. Coatings will bead up rather than penetrate the surface.
Moisture absorption issues present challenges for application of liquid-based coatings. For primers, fillers, and paints, poor wettability results in surface defects such as cratering of the coating, poor leveling and weak adhesion to the plastic.
You may also see plastic materials referred to as non-polar, low energy, or inert, meaning that they are less inclined to interact chemically with other materials, including different types of plastic. The static chemical characteristic hinders the creation of a strong bond even when using plastic adhesive to attach plastic to plastic.
Some plastic materials have acceptable wetting properties, but for the majority that don’t, the repair industry has developed special helpers. One is a family of cleaning agents that, in addition to degreasing, are explicitly designed to remove surface contaminants that could inhibit chemical cross-linking with a coating or adhesive. Use anything less than the BMW-recommended cleaner, and you may actually weaken the bonding performance of your repair. Even solvent, which you may think is a great all-purpose cleaner, is not acceptable for plastic. It can leave behind chemicals that interfere with the surface changes that are needed to enhance the adhesion potential of the plastic substrate.
Another plastic repair helper is an adhesion promoter. Olefin-based plastics require the use of an adhesion promoter to modify the surface so that it creates a stronger bond with whatever you are applying to it next. Adhesion promoter enhances the cross-linking performance of the next stage, including primer, plastic filler, paint, or adhesive itself. Given that all plastic surfaces are at least somewhat slippery, and the cost of adhesion promoter is low, it is beneficial to apply it in every plastic repair situation. It is one less decision to make, one more assurance of a durable bond created.
A third special product is a plastic adhesive that is formulated specifically for bonding parts to plastic.
Incorrect surface preparation is a primary cause of poor adhesion results. Check the BMW ISTA workshop information system for step-by-step surface preparation procedures before starting any plastic repair.
Sanding and Guide Coat
Sanding an extra inch or two beyond the edges of the damage provides a larger contact area to allow the adhesive to create a strong bond with the substrate.
Apply a guide coat and block sand any area on which you’ve applied primer-surfacer or filler. Do this each time you change sandpaper grit. The guide coat will remain in any low spots, pinholes, or scratches, and help you see problems that might otherwise be hard to find. Tip: sand the area around the spot where guide coat remains, not the spot itself. The guide coat remains because the higher surrounding area elevated your sanding block. You need to sand these surrounding areas to lower them to the same height as the area where the guide coat remains. At that point, you will sand off the guide coat without dipping the sanding block into low spots. If you sand through your primer and there are still sunken spots with guide coat, stop sanding. Re-apply primer and filler and repeat the block sanding step.
Use a hard block, not your hand, for the first sanding pass. Your hand may follow the contours of any waves or imperfections in the panel. Save the hand sanding for the final scratch removal step. Use the longest block you have that fits the shape of the area on which you are working. The long block is less likely to dip into low spots and remove the guide coat, which would defeat the purpose of the block sanding process.
Sand in long strokes. Short strokes will leave undesirable choppy patterns that will be visible through the finish. Move the sanding block at a 30 to 45-degree angle up and down the repair area, then switch direction and repeat so that you are cross-sanding in an “X†pattern over the same area.
Also, don’t fall into the trap of using off-the-shelf black spray paint as an inexpensive alternative to guide coat. The paint may cost less, but it will gum up your sandpaper at a rapid rate, costing you more in materials and time than using the right product.
Plastic Reshaping
After being deformed, some plastics return to their original shape if you apply the proper amount of heat and pressure. A hot air gun and a reshaping tool to press the damage out are all it takes to soften and reshape deformed plastic. The trick is to apply only as much heat as needed to soften but not melt the plastic. A few hours of plastic repair training can teach you the basics. Practice will make you good at it.
BMW recommends heating the plastic to 60 degrees C (140 degrees F) in the deformation area. Too much heat will damage the paint, so watch how the plastic is responding. Remove the heat once the material has begun softening. Then try pressing the damage out using the reshaping tool. When you have restored the part to its original contours, continue holding pressure on it and cool the area by spraying it with room temperature water. Once cooled, the plastic will hold its restored shape.
Reshaping can restore small dents and deformations in plastic. Reshaping is not the answer if the paint layers are pitted, chipped or separated. Visible cracks in the paint, even if you cannot see the bare material below, reach to the surface of the component. They cannot be simply painted over. Due to different expansion and contraction rates of the plastic and the coatings as ambient temperatures fluctuate, the cracks will reappear in the paint after a short time. In that case, you will have to sand down to the bare plastic surface and re-apply the primer and finish coatings.
Similarly, reshaping cannot handle cracks or cuts penetrating the underlying plastic material. Without additional repair steps focused on the fissures, they will re-open after you complete the paint and refinish work.
Watch Out For Sensors
The BMW Advanced Driver Assistance System (ADAS) uses cameras or safety sensors embedded in or positioned behind bumper covers, fenders or other vehicle components. Sensors for Blind Spot Monitoring (BSM), Adaptive Cruise Control (ACC) and other ADAS safety-related technologies require special attention when conducting a nearby repair.
BMW position statements say that the company does not permit body fillers and plastic repair materials (adhesive, welding rods) in front of the sensor or camera. You must also keep any paint basecoat and clearcoat layer buildup below the maximum thickness allowed by BMW for the area over the lens. Excess paint film or even a transparent sticker over the lens can negatively affect what that sensor picks up.
For models that have blind spot monitor sensors mounted behind or in the front bumper, the BMW repair manual states that filler material cannot be inside a 10 cm radius around the sensors. Manufacturers typically house blind spot monitor sensors behind the bumper cover, but be sure to verify the location for the BMW model you are repairing.
The best way to determine whether a vehicle includes a camera or sensor in the area you plan to repair is to check the vehicle-specific BMW body repair manual for guidelines before beginning work on exterior plastic parts. If you are unsure about whether the vehicle includes ADAS-related cameras or sensors, punch the VIN into the OEM repair database and pull the build data.
If you suspect the vehicle may have been in an accident, it is a good idea to check for previous collision repair work. A light sanding of the area where you will be working should reveal whether any prior repairs have affected the area.
The blind spot monitor sensors are constantly checking for the presence of any objects in a pre-defined space around the vehicle. If the position of the sensor in its mounting bracket has changed from its factory settings, it alters the accuracy of the distance observations it is reporting to the PCM. If your repair involved removal and re-installation of a blind spot monitor sensor, reshaping, adhesive bonding or plastic welding, you must, as a post-repair step, calibrate the sensor using a high-level diagnostic tool.
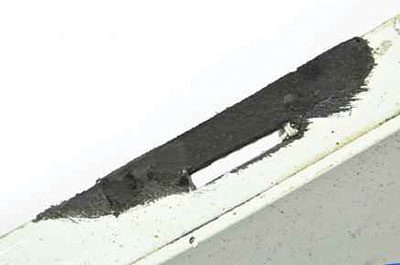
Plastic Bonding
Bonding using plastic adhesive is painless. The adhesive cures at room temperature, and is best for plastic components which cannot tolerate the application of heat. You can use plastic bonding for both thermoplastics and thermosetting plastics, so there is no need for advance identification of the type of plastic. There may be strength, rigidity, or other requirements that restrict whether you can use adhesive on a specific application, so check your BMW repair information as well as the instructions from the glue manufacturer.
Adhesive bonding of plastic involves the application of adhesive, primer, and filler if needed. There is a preparatory stage before each step to make the bond between it and the next leg in the process chemically stable for long-term durability.
The first step even before sanding is to clean the plastic with ColorSystem Antistatic Cleaner, HydroColor Cleaner Plus or HydroColor Cleaner (25 g/l). Cleaning prevents any contaminants from being rubbed deeper into the plastic substrate. Then you can sand the damage and feather into the surrounding paint using a 3-5 mm DA sander with P320/P400 grit paper. After sanding, clean the area again using either BMW ColorSystem Aerosol Antistatic Cleaner or ColorSystem Plastic Cleaner.
Plastic primer provides a base for the adhesive, filler compound and paintwork. It is necessary to create a strong bond between the substrate and the plastics adhesive. BMW ColorSystem Polyolefin Adhesion Promoter Aerosol is the required primer for use with Teroson PU 9225 (a.k.a. Terokal 9225) plastic repair adhesive. Apply Polyolefin Adhesion Promoter to the now bare, clean plastic.
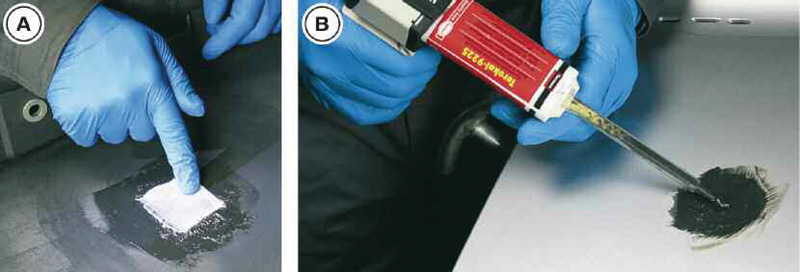
Let it flash off for ten minutes at 20 degrees C (68 degrees F), then apply Teroson plastic adhesive to the repair area. Keep the gun nozzle submerged in the adhesive during application. Nozzle submersion will help avoid the formation of air pockets in the repair area.
Use a fabric mesh to reinforce holes and cracks as you repair them with plastic adhesive. Start with smaller mesh patches for the bottom, then add progressively larger pieces until you have filled the opening. Do not add metal reinforcement when bonding exterior panels or components, as that could diminish passive pedestrian protection in the event of an accident.
You can reduce the time needed to harden the adhesive down to about 15 minutes using an infrared heater set to between 60 degrees C (140 degrees F) and 70 degrees C (158 degrees F). The adhesive acts as both a bonding agent and filling compound. Add a little extra adhesive to account for shrinkage as it hardens.
Allow the Teroson to fully dry, then sand with P320 grit paper and final sand using P400 – P500. Clean the area again with Antistatic Cleaner or ColorSystem Plastic Cleaner.
Apply Polyolefin Adhesion Promoter again, this time to prepare the new, cured adhesive to chemically bond with a primer that you’ll apply before moving to the filler or paint stages. After the adhesion promoter has flashed off, apply one coat of ready-to-spray ColorSystem Plastic Primer. Flash off for ten minutes at 20 degrees C (68 degrees F).
You are now ready for the third stage; application of 2K filler if necessary. There are different combinations of primer-surfacer, 2K filler, flex additive, hardener and thinner to consider. Which you use depends on the basecoat/clearcoat system you will apply, whether you are in an area that requires the use of low-VOC coatings, and the type of plastic you are repairing. For example, in California and other low-VOC regions, you cannot use a hi-def filler on plastics such as ABS or polycarbonate. Check your BMW body repair manual or ColorSystem Manual for detailed information about the primer, filler, hardener and other additives to use for the vehicle and plastic type you are repairing.
Now you are ready for the basecoat/clearcoat steps. But that’s another article.
Repairing Cracks or Holes
Cracks and holes having 25 mm or less diameter can be filled in by bonding or plastic welding. For adhesive bonding of cracks or holes, use the BMW Plastic Repair Kit (BMW part number 51 91 0 398 655). The kit contains a Teromix adhesive gun with dual pistons for use with the 2K product, adhesive remover, plastic primer, and a Teromix static mixer to combine the epoxy and catalyst just before delivery to the plastic repair surfaces.
Drill a small (6 mm) hole at each end of a crack to prevent it from extending further during or after repair. Regardless of diameter, if the crack or hole extends to the edge of the panel, BMW does not permit repair. Refer to your BMW repair manual for adhesive recommendations and instructions.
Plastic Welding
Plastic welding offers a complete fusion of the plastic, and can repair large areas of damage.
The most important thing to know about plastic welding is that you must weld like-plastic to like-plastic. A durable weld only forms when the plastic parts being welded melt together and link at the molecular level. Therefore, the two plastic parts must have similar melting points and chemical properties or they will not be able to establish a durable joint. You cannot weld dissimilar plastics together.
Polypropylene (PP), polyurethane (PUR), polyethylene (PE) and thermoplastic elastomeric olefin (TEO), plastics that are commonly used in automotive applications, each have different chemical properties and melting points.
In plastic welding, the component and a plastic rod (filler material) are fused together with a blast of hot air. Selection of the correct welding rod is critical. Whatever substrate you are welding, you must use the same rod material: polypropylene to polypropylene, polyurethane to polyurethane, polyethylene to polyethylene.
If the substrate is not labeled and you cannot tell what it is made of, you’ll need to test different plastic rods for their adhesion compatibility. Even within a single plastic category, there are blends and other differences that affect your repair options.
For example, the temperature for welding low-density polyethylene (LDPE) must be set lower than that for high-density polyethylene (HDPE). Be careful to select a low-density rod for plastic welding of LDPE. The amount of heat required to melt a high-density rod would permanently alter the molecular structure of a low-density polyethylene substrate. Although you could use an LDPE rod on an HDPE plastic panel, you won’t have to think about it if you always match the rod type to the substrate.
Additionally, different types of welding equipment have different settings to reach and maintain a specific temperature range. Always check your equipment instructions for the correct temperature settings for welding a specific plastic type.
Welding Technique
The key plastic welding technique is to control the application of heat so that it is just enough to melt the plastic in the repair, but not so much as to transfer a large amount of heat to the surrounding area. Three factors – rod angle, filler rod depth and rate of forward movement help you create the ideal weld. First, hold the welding rod at an angle of just less than 90 degrees to the surface. Second, apply just enough pressure on the rod to keep its tip in the weld pool throughout the process. The angle and depth of the rod in the weld pool help ensure that the filler rod and the plastic part melt at the same time.
Third, move forward at a rate that makes a small buildup of molten plastic roll in front of the rod as you work. You won’t be moving so fast that the plastic does not fully melt, or so slow that heat is potentially spreading out to cause deformation beyond the repair area. Follow these guidelines, and you will be able to set the welding temperature on the Plastic Fusion machine to the BMW-recommended 480 degrees C (896 degrees F) even though different thermoplastics melt at different temperatures.
Weld-repair a crack or hole
To repair a hole or crack in thermoplastic, start by sanding any coatings down to the bare plastic substrate. You must weld both sides of the hole or crack to create a high-strength bond. Work the underside of the panel first. Sand the edges of the damaged area into a wedge or, with thin material, a slightly indented shape. BMW recommends using P80 to P120 grit abrasive with a variable speed dual-action (DA) sanding tool set to low speed.
Use a finer P320/P400 to feather the repair area into the original paint finish. Remove all sanding dust and other contaminants (transferred from your fingers, etc.) with the appropriate cleaner.
Start the plastic welding process on the underside first. If the opening is wider than your plastic repair rod, you can lay strips on top of each other with a 50 percent overlap. Once you have covered the underside, add another layer perpendicular to the first. The overlap will strengthen your repair and not be visible from the top of the panel.
Repeat the steps for the top side of the part. Once the weld has cooled, sand the surface using P240-P320 grit paper. Sanding prepares the visible side of the part for filler and paint.
Rebuild a bumper tab
    |
|
Plastic welding a bumper tab involves laying a heat-softened plastic filler rod so that it bridges over the missing part of the tab (steps 1 and 2), applying pressure to the tab until it hardens and cools (step 3), and cutting out a new slot to match the size and shape of the original (step 4). |
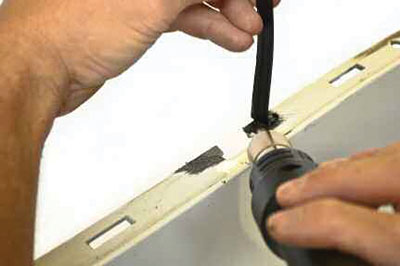
Reworking a bumper tab is different from repairing a hole or crack. The tab is a slot into which you press the bumper retaining bracket. The retaining bracket has a protruding lip that prevents the bumper cover from popping back out. Until recently, plastic bumper tabs were not repairable if damaged. The new BMW-approved Plastic Fusion welding machine now allows you to rebuild broken bumper tabs.
Start by removing all coatings down to the bare plastic substrate. Do this on both the top and bottom sides of the part. Use P80-P120 grit sandpaper.
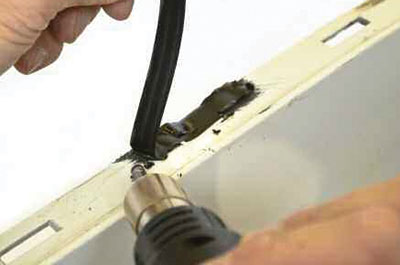
Make a slight indentation into the broken edges of the bumper tab. Cut a section of filler rod material to approximately twice the length of the bumper tab opening. Starting on one narrow end of the bumper tab opening, plastic weld this filler rod to the tab. Wait for the weld to cool. Then heat the filler rod until it is just soft enough to bend and bridge over to the other end of the tab opening. Your weld should fill the tab opening and extend out to the original edge of the bumper tab flange where it was damaged.
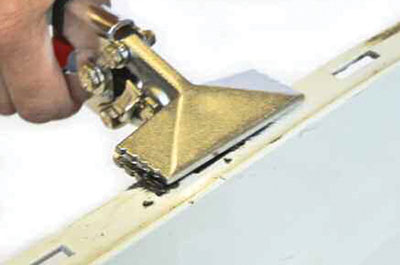
Once you have welded both ends, and while the filler material is still slightly warm, use flat locking pliers to flatten the repair area. Turn the bumper tab over and repeat the plastic welding process on the other side. Cut or grind out the bumper tab opening to restore it to its original location and dimensions. Sand the edges smooth and test for bumper retaining bracket fit.
As with adhesive bonding, when welding exterior plastic panels, metal reinforcements must not be used for reasons of pedestrian protection.
Finishing the Weld
Most weld repairs to thermoplastics can be sanded to improve finished appearance. Sanding will not reduce the weld strength. Refer to your BMW body repair manual for recommendations on the best progression from coarse to fine grit papers.
After welding, sand the area with P240 – P320 grit paper. Clean using Aerosol Antistatic Cleaner or ColorSystem Plastic Cleaner. Apply Teroson repair adhesive if needed to build up the repair area, and allow it to dry. Sand it with P320 grit and then again using P400 – P500. Clean the area again with Antistatic Cleaner or ColorSystem Plastic Cleaner, then apply Polyolefin Adhesion Promoter Aerosol to prep the repair for application of primer. Flash off for ten minutes at 20 degrees C (68 degrees F).
As with adhesive bonding, refer to your BMW body repair manual or ColorSystem manual for application-specific recommendations about 2K primer-surfacer, filler, flex-additive, hardener and thinner to use before basecoat/clearcoat application.
Bonded by affection
Use a value comparison to determine whether to repair or replace a damaged part. BMW recommends repair whenever the labor time and material cost is less than 50 percent of the cost of a new component.
There is something truly satisfying about restoring damaged plastic back to being a fully functioning component. Combine the usage instructions from plastic adhesive and welding equipment manufacturers with your BMW repair information and you are well on your way to becoming a plastic repair master.


0 Comments