
The following procedure describes access to the 4EAT transmission brake band adjustment for 1990-92 Legacy and SVX models. Refer to the applicable service manual for brake band diagnosis, adjustment specifications and proper bolt torque.
Legacy
- Disconnect the ground cable from battery.
- Disconnect the pitch stopper from engine.
- Raise the vehicle on lift.
- Separate the Y pipe or the turbo outlet pipe from center pipe.
- Support the transmission, remove the rear crossmember to body mounting bolts and lower the rear of the transmission completely.
- Remove the shift selector cable clamp from transmission.
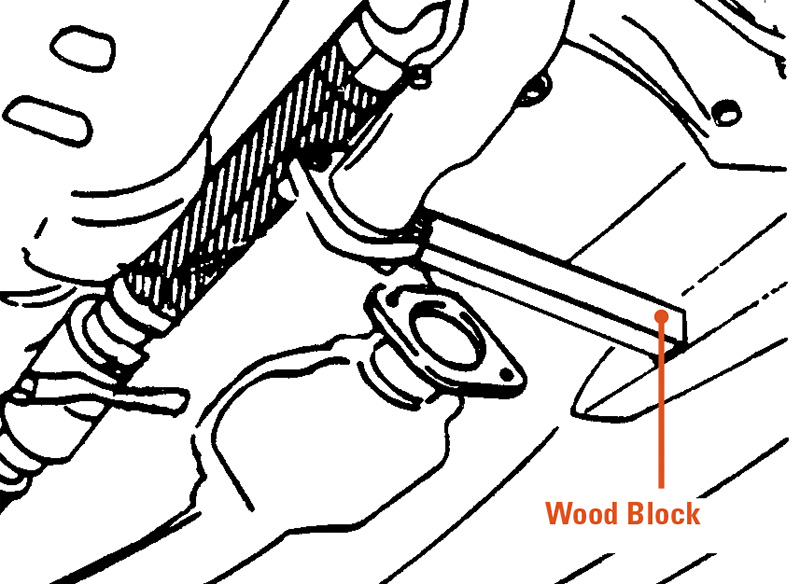
- Using a 2 x 3 wood block cut exactly 13-3/8†long, move the rear of the transmission toward the right side of the vehicle and hold it in position while inserting the block of wood between the left frame rail and the rear “Y†pipe flange. On turbo models, insert the block of wood between outlet pipe heat shield bolt located just before outlet pipe flange and the left frame rail. Refer to the illustration.
Caution: Ensure the block of wood is properly secure between the Y pipe flange and frame rail before proceeding with adjustment. - Access the brake band adjusting nut and screw from the rear of the transmission between the transmission and vehicle body tunnel.
- Perform the brake band adjustment according to the procedure outlined in section 3-2 of the appropriate model year service manual.
SVX
- Disconnect the ground cable from battery.
- Remove the starter.
- Disconnect the pitch stopper from engine.
- Raise the vehicle on lift.
- Remove the left front exhaust pipe, between the left exhaust manifold and rear catalytic converter.
- Disconnect the exhaust system center heat shield which is bolted to both the underside of the vehicle body and the rear transmission crossmember. Slide the heat shield towards the rear of the vehicle.
- Support the transmission, remove the rear crossmember to body mounting bolts and lower the rear of the transmission completely.
- Lower the vehicle on the lift to gain access to the brakeband adjustment screw from under the hood.
- Use special tool P/N SOA625334, 3/8†to 1/2†adapter, appropriate length 3/8†extension so as to allow clearance below A/C low pressure line located near the fire wall, and a 3/8†drive inch pound torque wrench.
- Loosen the locknut and turn the adjusting screw clockwise until resistance is felt. Torque the adjusting screw to the specifications listed for the torque wrench effective length. Next loosen the adjusting screw (counter clockwise) three turns and re-tighten the locknut.
Note: You must determine the torque wrench effective length by measuring the distance from the center of the square drive to the center of the handle grip. This measurement must be used to select the proper torque specification from the torque specification chart on the following page. Refer to the illustration for the proper measurement points.
Note: the torque specification chart listed below compensates for the length of special tool P/N S0A625334.
| Torque Wrench Effective Length | Adjusting Screw Torque |
| 7.0″ | 36.5 Inch Pounds |
| 7.5″ | 38.0 Inch Pounds |
| 8.0″ | 39.0 Inch Pounds |
| 8.5″ | 40.0 Inch Pounds |
| 9.0″ | 41.5 Inch Pounds |
| 9.5″ | 42.5 Inch Pounds |
| 10.0″ | 43.5 Inch Pounds |
| 10.5″ | 44.5 Inch Pounds |
| 11.0″ | 45.0 Inch Pounds |
| 11.5″ | 46.0 Inch Pounds |
| 12.0″ | 47.0 Inch Pounds |
Important: Be sure to keep the special tool and torque wrench parallel with each other.
Note: On models with Subaru security system, always reprogram the security system after reconnecting the battery. Then confirm the proper operation of the security system.


0 Comments