I was called in to a body shop for a complaint on a Dodge Durango that was in a front end collision (Figure #1). The truck suffered only minor damage, but the ABS warning light was on. The body shop inspected all the wheel speed sensors for visual damage and made sure the ABS module was properly latched. They also checked all the fuse panels for blown fuses. The shop did not have a scan tool to retrieve any onboard service codes, so I was called in.

It’s not uncommon to see a body shop that doesn’t own a scan tool, or is even unwilling to hire a diagnostic tech to resolve onboard computer issues. Most of these shops will use a test light and some old-school tactics to get by. This is not their fault because even if the employees invested in diagnostic equipment or diagnostic training there would be no compensation for their efforts because diagnostic time is usually not allowed in collision estimates. Their job function is strictly to put damaged vehicles back together the way they were built at the factory. This task alone is a huge project involving much precision work and patience. When the car is completed, all the onboard controllers will do an integrity check of the whole vehicle. If there are any problems, they are pretty much guaranteed to illuminate a service light.
When I arrived at the shop, I started the vehicle and noticed that the ABS light was the only lamp illuminated. I next connected my Chrysler Star Mobile to scan the ABS module, and pulled a code C2202 (Figure #2-Original VIN Mismatch/Missing). This code by its description alone indicated to me that the internal ID of the ABS module did not match the internal ID of the PCM. A lot of manufactures will store all the vehicle configuration and VIN in the PCM, and other modules on board may be required to match that data. This is why you cannot simply place a new or used module on board without holding a welcoming party to make sure this replacement module is properly set up. There is usually a mass of confusion among my garages about reprogramming a module, so I need to clear the air here.

Setting up a module may require up to three different procedures. The first may be as simple as installing a VIN as part of a Configuring/Coding procedure. When entering a VIN, you need to be very careful. Make sure you’re wearing your best bifocals to enter the correct letters and numbers because some manufactures may only allow a new or rebuilt module to VIN once. After that the module is locked, and you own it. The next part of the Configuration/Coding procedure is to enter the proper options for the vehicle. This may be done through a series of Yes/No selections, entering Tire/Axle Ratio, entering a vehicle specific 4-7 digit coding number, or by going through a lengthy process of string-coding as many as 50 two-to-four digit numbers.
The second procedure is the actual reprogramming phase that involves the loading of operating software into the module. This software is usually available from a manufacture website as a download, or from a manufacture CD subscription. To install the software, a user needs a generic J2534-compliant device or a factory scan tool to be used as a pass-through. This software is usually VIN-specific and is updated as needed by the manufactures to resolve vehicle glitches.
The third procedure I call “adaptation.” This “relearns” the computer so that it may properly control the vehicle. This may include relearning throttle angle, crankshaft position, fuel trim, steering angle, occupant seat weight, power window position, or theft key ID. Now that you have a basic explanation of the process, we can move on to the next diagnostic check.
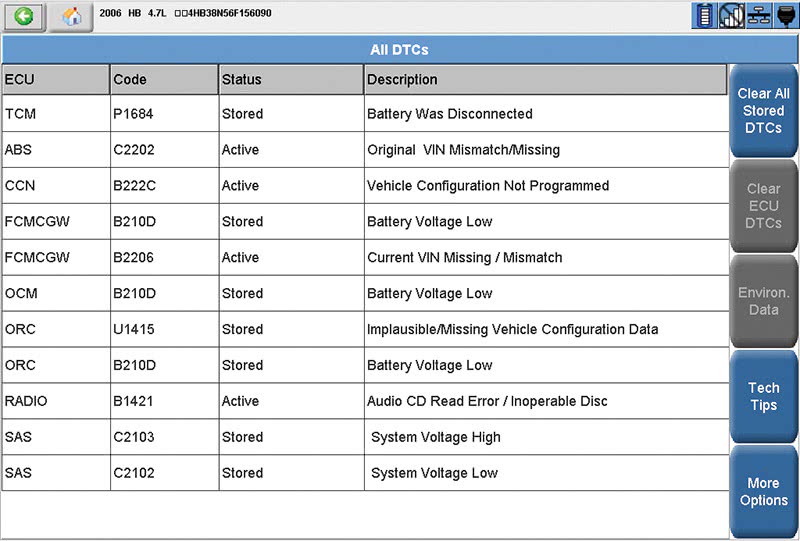
I wanted to view the entire network to see what the other controllers on board were seeing and to get more clues so I could dot the “I’s” and cross the “T’s.” I selected the “All DTC’s” menu (Figure #3) and discovered that the ABS controller was not the only one pointing a finger. The CCN, FCM and ORC also complained of a VIN mismatch as well as a configuration error. This now ruled out the ABS module as a possible suspect because too many other network fingers were pointing in the direction of the PCM. The body shop told me that they never replaced any controller on board. They also called the owner of the vehicle who stated that, “There never were any lights on before the accident.†But you know how that goes. So, my next move was to go to the PCM “Miscellaneous Functions” menu to check the PCM VIN. When I did this, I was surprised to see the “This VIN is Invalid†(Figure #4).
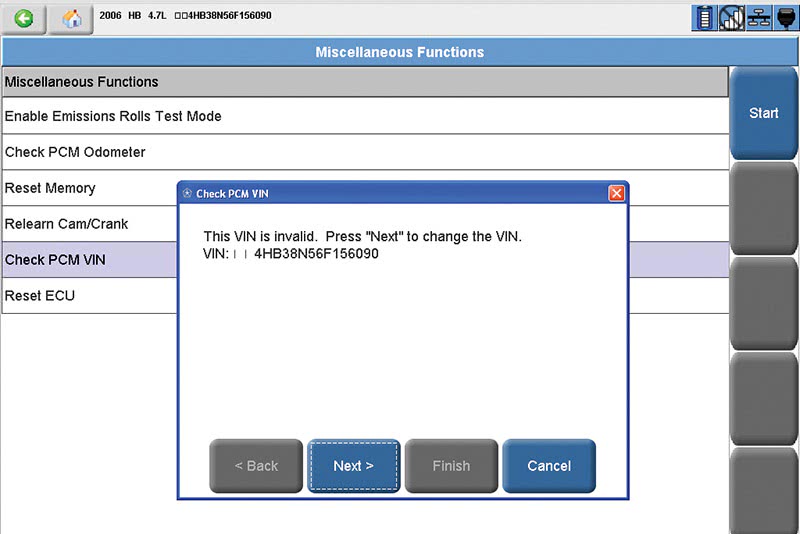
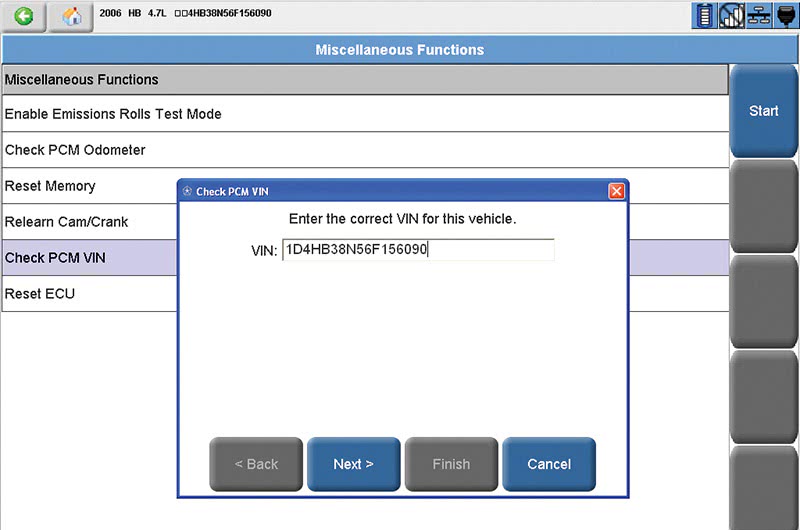
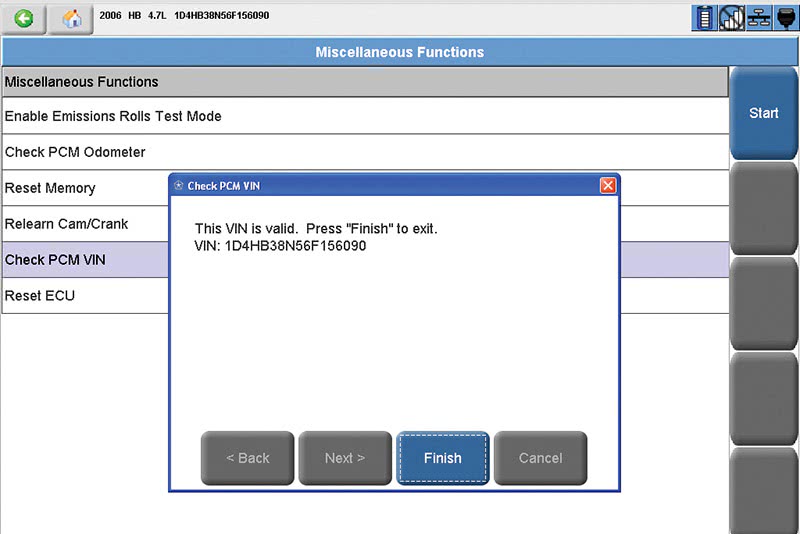
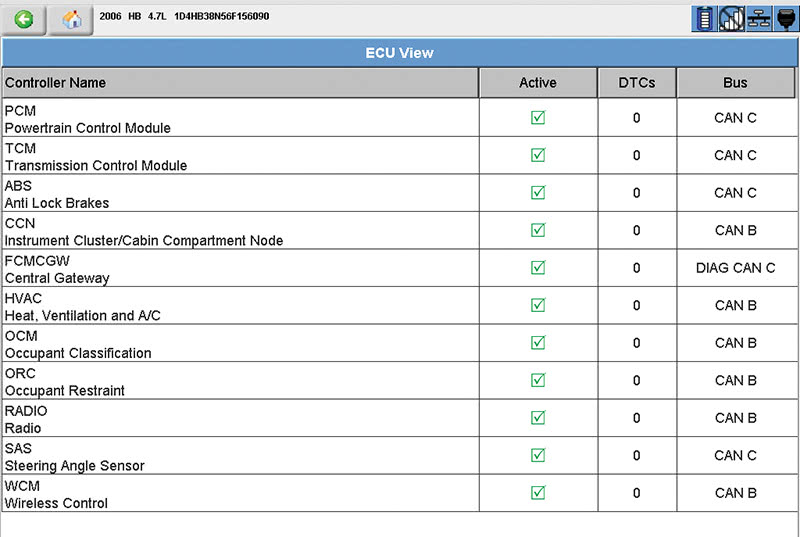
This was not a case of a wrong VIN, but of one that was corrupted. The first two characters of the VIN were actually vertical space bars. There was no way someone could have typed these in to the PCM because the factory tool does not supply these characters as a selection and the scan tool would never validate such an entry. The only possibility that I could come up with is that maybe when the battery went completely dead, the VIN defaulted to a corrupt insertion of VIN characters. There is also a good possibility that the nonvolatile memory of the PCM could not hold its information properly after a loss of keep-alive power. I selected “Next” and entered the correct VIN characters (Figure #5). I proceeded to the following step and the Star Mobile validated the VIN as a good entry (Figure #6). I now went back into the “View All DTC’s” menu and cleared the entire network of error codes. I started the vehicle three times in a row with 10 seconds on and 10 seconds off to allow all controllers on board to perform a three-trip integrity check, and the ABS light was now extinguished. As a final check I went into the main ECU View menu (Figure #7) and there were no codes stored in any controllers.
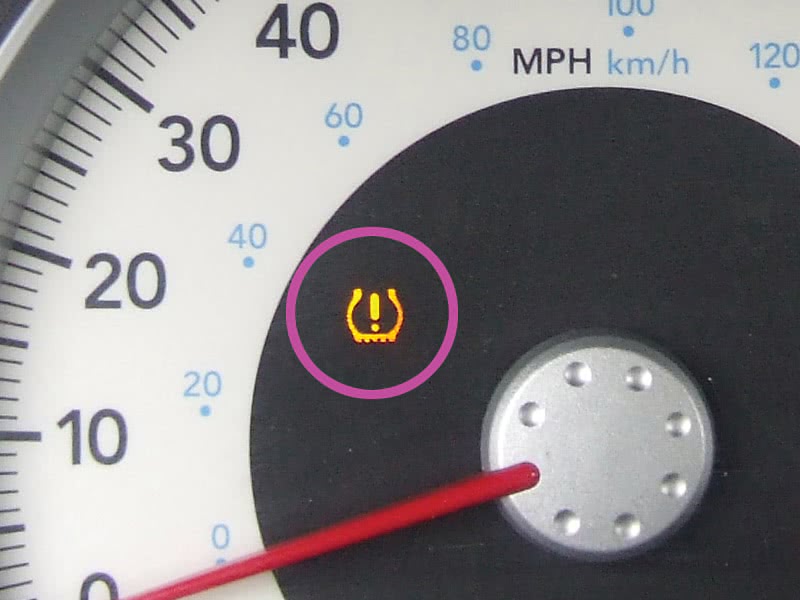
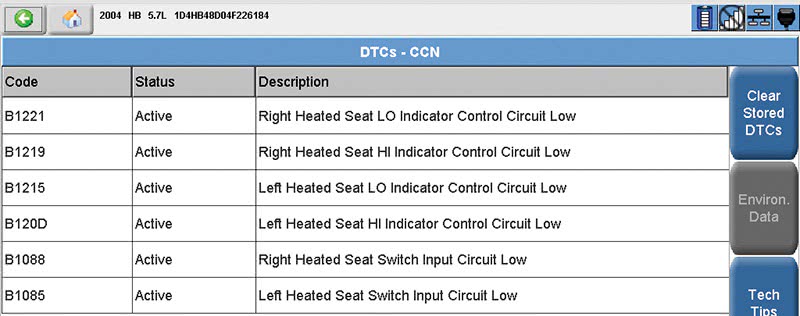
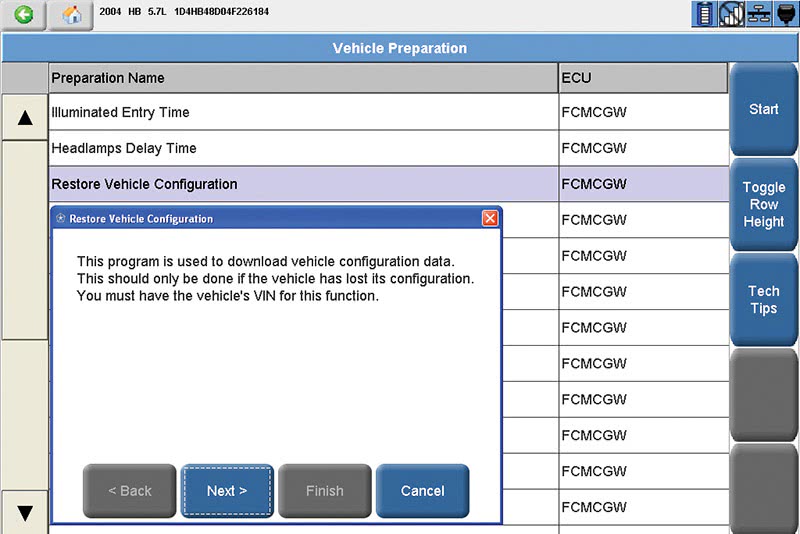
This vehicle was a perfect example of how a shop can be married to a vehicle even if a job was performed using flawless craftsmanship. When the battery is disconnected for a long period of time, most vehicles will need to go through a series of relearn procedures. Some of these procedures may even require a factory scan tool. Configuration and coding information is usually held in the nonvolatile memory of a controller and should not be lost in battery power loss situations. I have seen many cases of controllers defaulting to factory options, but have never come across one with a corrupted VIN. While I was writing this story, I came across a 2004 Dodge Durango with a complaint of a Tire Pressure Monitor light on (Figure #8) after a battery was disconnected. This vehicle was not equipped with a TPM system. There were also six codes stored in the Cabin Compartment Node pertaining to heated seats that the vehicle also did not have (Figure #9). The only fix was to connect the Star Mobile to Chrysler’s server and perform a vehicle restoration using the Vehicle Preparation menu found in the scan tool (Figure #10). I hope this story will shed some light to help you through a similar adventure.
by John Anello,
“The Auto Tech on Wheels”


0 Comments