
Its basic purpose is to save the serpentine belt should the A/C compressor seize.That means it’s in control of compressor clutch engagement, with all the potential issues that implies.

The KLIMA relay is located in the compartment just behind the starting battery next to the fuel pump relay.
Certain MB cars are equipped with a so-called KLIMA relay, named for the large lettering on top. The name comes from the German word that means air conditioning, namely Klimatisierung. This is somewhat more than a simple relay, rising in complexity to the level of a full-fledged control unit. We’ll take a look at the system as installed in the Model 124 E-Class from 1986-1993, but this description applies to other models of the same era as well.
Comparing rpm
This fancy relay controls the air conditioning compressor clutch energization circuit. The A/C pushbutton unit sends a signal to the relay to switch on the refrigerant compressor. After the clutch engages, the relay compares the rotational speed of the compressor with that of the engine, which translates into a reading of serpentine drive belt slippage. As long as slippage detected remains below the threshold, the compressor remains engaged when commanded by the A/C pushbutton unit. In addition, the relay watches the engine coolant temperature, shutting off the compressor if the coolant gets too hot, thus taking some of the heat load off the cooling system. In vehicles with a diesel engine, the compressor is also shut off briefly by a microswitch on the throttle linkage in the 1,100 to 2,150 rpm range to improve off-the-line acceleration, sometimes called “launch.†There is also a short delay after engine start before the compressor is engaged to allow the idle to stabilize, and, in some models, the compressor will disengage at full throttle (kickdown).
How’s the charge?

Use STAR Tekinfo/WIS to find the pinouts for the particular model you’re working on.
If the A/C clutch isn’t engaging, the very first check is of the refrigerant dual pressure switch. This is located on the receiver-drier and connected through 1/4 inch spade lugs on pigtail wires. If there isn’t enough pressure in the system, too little refrigerant will be circulating to keep the compressor properly lubricated. So, the switch opens, interrupting the control signal to the clutch. You can short the harness connections together to temporarily bypass the switch, but remember that you can damage the compressor. A manifold gauge set will tell you the system pressures.
The next checks are at the N6 KLIMA relay, located in the compartment just behind the starting battery. Remove the black plastic cover from the compartment and unplug the relay – a black box a little bigger than a pack of cigarettes — from its socket. Note that the fuel pump relay is right next to it, and has the same size and shape, but it doesn’t say “KLIMA†on top.
Juice & hot-wiring

Here’s one example of pin labeling.
With your voltmeter, perform the following checks. Verify the pin assignments for your specific vehicle using the electrical wiring diagrams on STAR TekInfo (www.startekinfo.com), or on your Classic Service CD (available from the M-B Classic Center for about $20). Follow along on the diagram on page 5, check that the KLIMA relay is getting power by testing for battery voltage between pins 5 (+) and 1 (-), then check the “Compressor On†signal from the A/C pushbutton unit by pressing the center control button and turning the temperature wheel to “Min†(which turns the compressor on), and measuring the voltage between pins 10 (-) and 5 (+). It should be at least 11 volts after about 20 seconds with the engine running. Make sure the refrigerant pressure switch signal is getting to the KLIMA relay (we already checked the switch itself) by measuring battery voltage between Pin 5 (+) and Pin 10 (-) – make sure the switch is connected! Any problems with these readings and the wiring or fuse is suspect.
.")
The wiring diagram for the compressor clutch circuit control relay (KLIMA).
Now let’s check the clutch: Using a jumper, short between pins 5 and 7 and briefly run the engine – the clutch should be engaged and the compressor shaft should be rotating. If not, it could point to a faulty clutch, wiring, or a seized compressor.
A/C AC signals
The signal representing the speed of the refrigerant pump (A9) is taken from the A/C Compressor Speed Sensor (L4), which is located at the rear of the compressor. This is an inductive sensor, generating a low-voltage AC (Alternating Current) signal whose frequency corresponds to actual compressor shaft rpm. Using the AC Volts scale and with the compressor clutch engaged from the previous step, verify at least 0.3 volts AC between pins 11 and 8 with the engine at idle. Any faults point to a bad sensor or wiring, but also verify that the three-pole connector on the compressor is properly connected. Remove the jumper to disengage the compressor.
The engine speed is taken from the TD signal, which is generated by the Ring Gear sensor (L3) located at the left rear of the engine on the flywheel housing. Check this signal with a voltmeter on the DC setting. You should get approximately 8.5 volts between pins 2 (+) and 1 (-) with the engine at idle (vehicles with diesel engines should have at least 4 volts AC instead, the voltage increasing with engine speed, and vehicles with ELR idle control should have at least 2.8 V AC).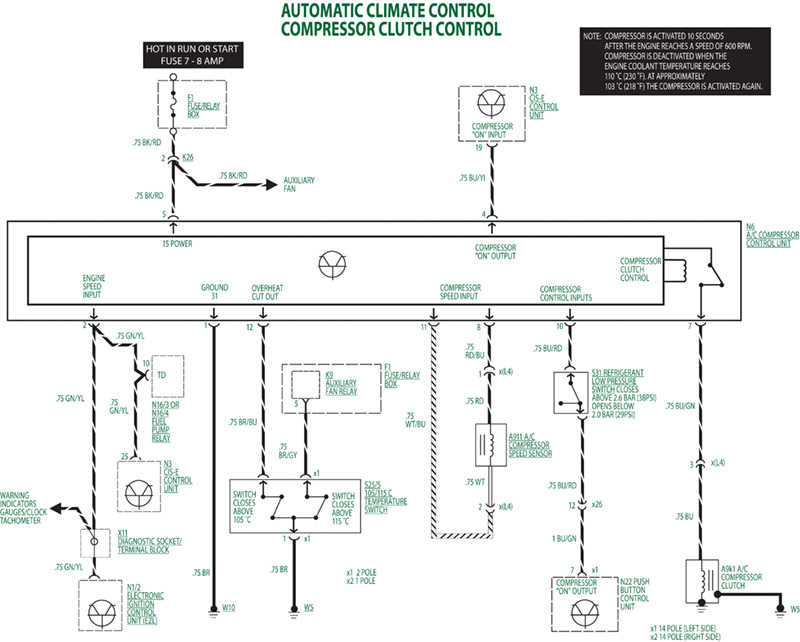 If all the signals are measured as expected, the KLIMA relay itself is suspect.
Induced slippage
Finally, the belt slippage function can be verified by spraying water on the inside of the poly V-belt and blipping the throttle. The slippage should shut down the compressor, and this shutdown will remain engaged until the ignition switch is cycled.
Although this general test procedure will work for almost all models, to be 100% certain of the correct test procedure check in the Workshop Information System (WIS) in STAR TekInfo, in Group 83.


0 Comments