
4MATIC is available on virtually every Mercedes-Benz vehicle so you should know the ins and outs, including service and maintenance recommendations.
At the heart of the matter, the 4MATIC® system applies power to the front axles through a transfer case in the transmission, while a limited slip differential provides balance between front and rear. Sensors throughout manage the torque demands of each wheel, resulting in greater traction and acceleration. Mercedes-Benz offers several variations of this including: 4MATIC Variable All-Wheel Drive, 4MATIC Permanent All-Wheel Drive, AMG® Performance 4MATIC+® Variable All-Wheel Drive, and AMG Performance 4MATIC Permanent All-Wheel Drive.
Mercedes-Benz has a long history of use and development of AWD systems in their lineup.
Most notable in history are:
- 1903 Paul Daimler creates the initial design for an AWD automobile.
- 1907 The “Dernberg-Wagen†is the first AWD car for everyday use. It also features 4-wheel steering.
- 1985 Mercedes-Benz engineers introduce a new passenger-car AWD system at the Frankfurt Motor Show. It’s called 4MATIC.
- 1987 The W-124-series (E-Class) debuts the first 4MATIC models, featuring an electronically lockable differential.
- 1999 4-ETS is added to the E-Class 4MATIC sedans and wagons.
- 2008 A new generation of 4MATIC achieves a system weight of well under 200 lbs. It appears first on the CL 550 Coupe.
Clearly one can see from the early stages of development on, engineers are constantly improving upon design. Staying abreast of the latest developments is imperative for independent workshops to compete in an
ever changing service industry.
As mentioned above, there are several different options for drivetrains available in all the various models and build codes, so we will narrow the coverage down to some later model lineups including the GL series with off road options.
Dynamic Select
To be able to adjust to all the different driving modes available on the vehicle, the customer chooses which mode they would like the vehicle to perform in by using the Dynamic Select lever or dial. There are way too many options to cover here, but we will look at a few available on a 2018 GLE 350 (166.057). There are even customizable options available so your customer can set up the drive characteristics that suit them individually.
All these various drive modes are accomplished by a combination of sensors and drive components. We plan to cover the chassis settings in a future StarTuned article, so today we’ll focus on the differentials and transfer case.
Transfer Case
One of the ways the Dynamic Select control changes the dynamics of the ride is through an interaxle differential lock within the transfer case. By actuating the interaxle differential lock, the drive torque of the center differential is prevented from being equally distributed to the front and rear axle. Corresponding to the locking ratio of the interaxle differential lock and the road surface condition, the drive torque is shifted between the axles.
When the lock is actuated, the transfer case control unit (N15/7) calculates a specified locking power depending on the current operating condition and the selected transmission mode.
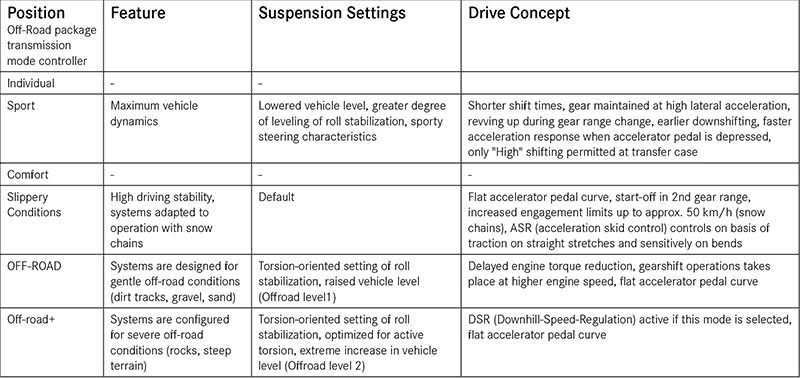
Look at diagram of the transfer case from the left front sectional view in order to see the function sequence of the unit. The transfer case control unit actuates the transfer case switchover solenoid (Y108, not visible behind the motor). The solenoid switches between the High/Low shift function and interaxle differential lock function. When the transfer case actuator motor (M46/2) is actuated by the control unit, it turns the lock control disc (9), producing a counter rotation of the front and rear lock levers (10, 11). As the lock levers turn, the balls (2) in the ball ramp mechanism run up the ball ramps (1), producing an axial movement of the rear lock lever (11). This pushes on the shift lock (3), producing a defined friction torque in the disc pack (5). The differential housing (7) and the front differential side gear (8) are thus mutually locked.
Understanding this sequence can help with the diagnosis of concerns. You can do some visual inspections of the actuations of the transfer case motor and levers, however most diagnosis of concerns will be carried out using XENTRY Diagnosis or other factory compatible scan tool.
Front Differential
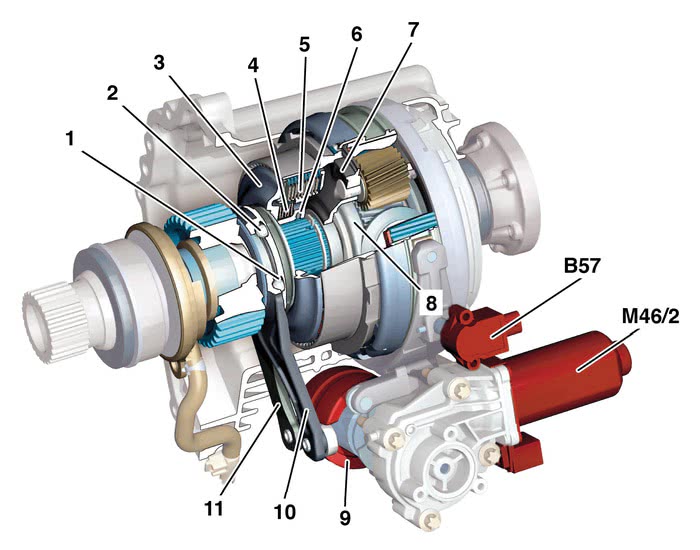
The front axle differential distributes the torque from the automatic transmission to the drive wheels of the front axle. At the same time, the front axle differential is necessary to compensate the rpm differences between the inner wheel and outer wheel when cornering, as known from any differential drive. The differential side gears are a press fit with the front axle shafts (2, 5). The differential pinions (4) are located between the side gears and pivot on the center bolt which forms the connection between the differential housing and the pinions. In differential pinions designated for heavy duty operation, a spider with four pinions is installed between the side gears instead of the center bolt. The housing is bolted to the oil pan via a carrier and the drive pinion (6) is angled just slightly to compensate for the angle of the propeller shaft.
Rear Differential
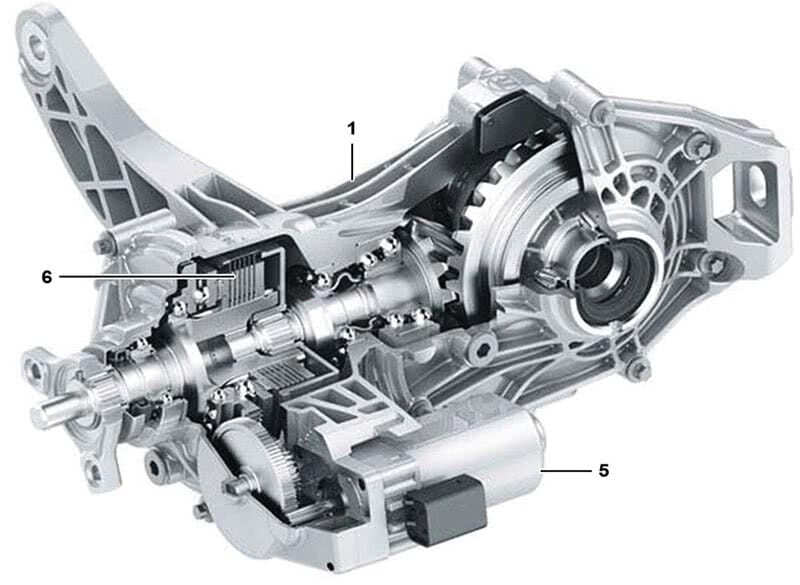
The rear differential is a critical component for the all-wheel drive system and a real workhorse. It distributes the torque of the drive train variably between the front and rear axles. In addition, the rear axle assembly compensates for different wheel speeds at the rear axle.
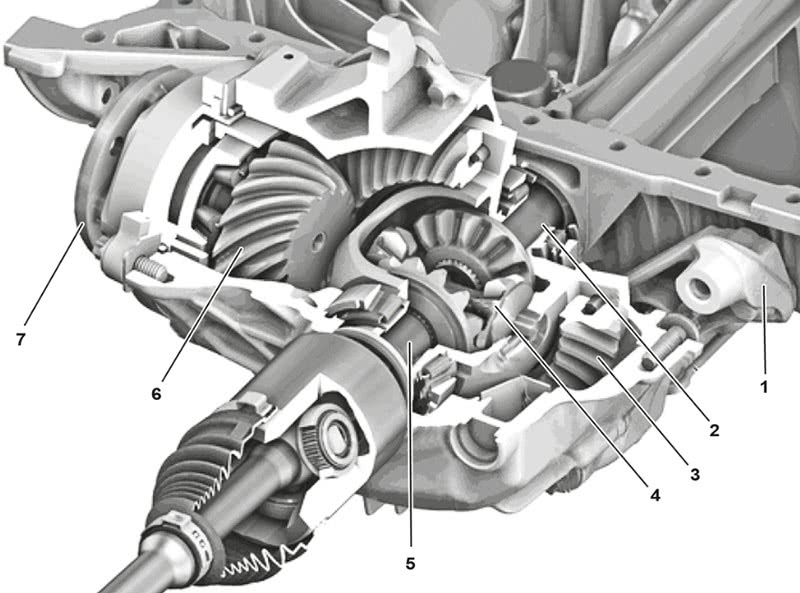
The drive torque is distributed between the front and rear axles according to the driving situation. Typically, 100% of the drive torque is transferred to the front axle and 0% to the rear axle when driving in a straight line without any excessive slip in the front wheels. Any sudden changes in the driving conditions (excessive slip, driver changes modes, etc.) can change the application of the torque to up to 50% to the front axles and 50% to the rear axles. There is an actuator motor (5) that is initialized during system start up along with a temperature sensor and a Hall sensor. The temperature sensor provides information to calculate the temperatures of the clutch and the oil. The Hall sensor detects movements of the electric motor. In order to distribute the torque, a multiplate clutch (6) is integrated in the rear axle differential. This clutch is actuated electromechanically by the actuator motor.
To open or close the plates, the motor transmits an axial force onto the plate pack via a spur gear stage and a ball ramp. The actuator motor is actuated irrespective of the engine speed, allowing control of the rear differential when stationary. Depending on the driver’s commands and the driving situation, a variable drive torque is generated by the rear axle. The drive torque at the clutch varies between 0 and 1000 Nm, regulated by the actuator motor.
Rotational differences in wheel speeds are calculated and compensated for by the all-wheel drive control unit, in coordination with the ESP control unit and CE control unit.
Maintenance and Service
Checking front and rear differential fluid is a regular maintenance task. It is important to check the fluid when it is at room temperature. Higher temperatures can cause fluid to run out of the check plug and lower temperatures may lead to overfilling. Clean the area around the fill/check plug in the differential housing and unscrew it to access the fluid. Fluid should be even with the lower edge of the threaded hole. Also see that the fluid is reasonably clean, without any contaminants. After servicing, be sure to clean the plug and the threaded hole thoroughly, apply the correct sealant to the plug, and tighten to the specification, all as explained in the Mercedes-Benz Workshop Information System (WIS).
Replacing the fluids in the transfer case and differentials should follow the schedule and fluid requirements in WIS. Most maintenance schedules have you perform an inspection every 20k miles with a fluid change every other (40k miles).
Oils
Mercedes-Benz requires hypoid gear oils that contain a high level of extreme pressure/antiwear (EP/AW) characteristics. These also have a highly viscous base for gear mesh, and characteristics which make the fluids compatible with seals. Additives are strictly verboten! Consult Mercedes-Benz sheet 235.61 and 235.62 (WIS tells you which is right for your vehicle) for recommended fluids. Visit the Mercedes-Benz operating Fluids page at operatingfluids.mercedes-benz.com for an up-to-date list, including possible alternative fluids that may be used. Hypoid gear oils must meet US military specification MIL-L-2105 B/C/D and classed as GL-5. When in doubt, consult your Mercedes-Benz parts department and they will make sure to supply you with the correct product.
Repairs
The transfer case and differentials themselves are fairly bulletproof in terms of bearings and gear wear and tear. Most repairs you will see as the vehicles age will be in the area of leaks and mounting bushing wear (i.e. rubber components). Inspections should include a thorough visual check of all mounting hardware and mounting components of the entire drivetrain. Many drive complaints can be solved by correcting a worn bushing, which was throwing the geometry off just a smidge and causing unwanted vibrations. Checking axle boots and clamps for leaks or damage are also a crucial part of an inspection. These are wear items and commonly serviced components.
Seals, whether axle or pinion, are also something you may have to address. Service information SI 35.00-P-0004A Notes that in the event of a complaint of a leaky differential seal, be sure to check the breather for function and leakage. Overfilling the unit can cause the breather to leak down on the differential giving the impression of a seal leak. Also a plugged breather can overpressure the unit causing leakage.
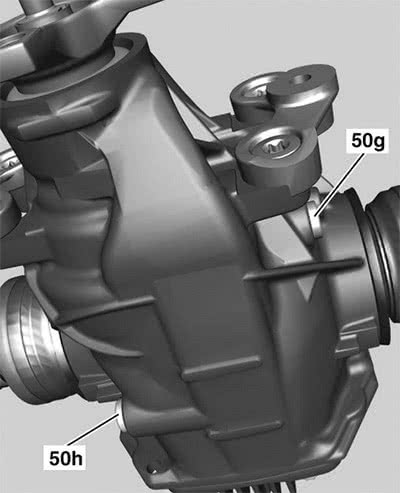
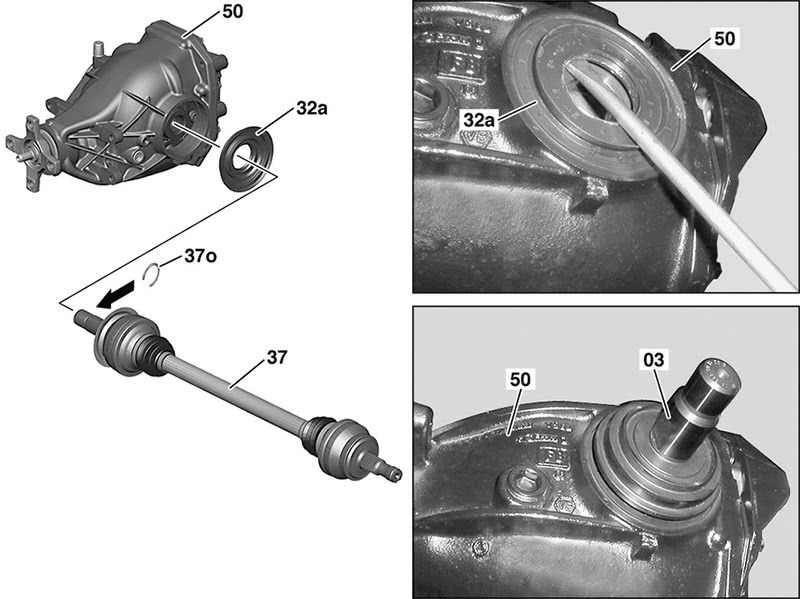
In the event you have to replace the front (or rear for that matter) radial or axle shaft seal, you need to begin by removing the axle shaft. To do this you need to remove the steering knuckle (front axles) and detach the suspension strut from the lower control arm. Sometimes you can just detach the upper connection of the knuckle to give you enough room to pivot it out of the way and remove the axle. Once the axle is removed, you can pull the seal with a suitable puller. Clean the housing and install the new seal with a suitable drift—Mercedes-Benz offers several special tools for the job. Clean the area and lubricate the seal before reinstalling the axle shaft with a new circlip (37o). Of course, check and top up the fluid as needed.
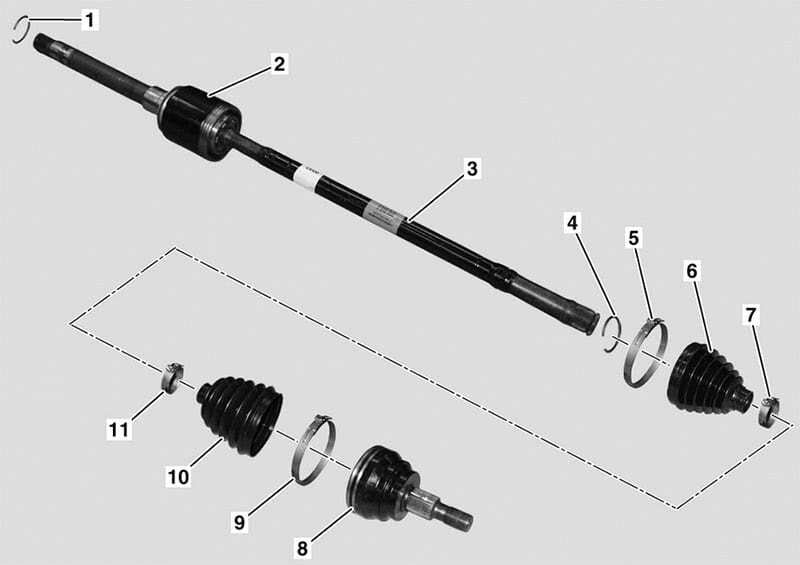
Replacing the CV joint boots and clamps also requires axle removal. Start by removing the axle using the procedure explained in WIS. Detach the inner (6) and outer (10) sealing bellows from the joint. Knock off the outer joint (8). A 32 mm open end wrench slid over the shaft and against the inside of the joint works well to assist with knocking it off: smack the wrench with a dead blow hammer and the joint should come off. You can also clamp the axle in a vise and use a brass drift to knock it off. Your Mercedes-Benz parts department should have the proper boot, clamps and grease to replace your worn components. WIS also recommends replacing the circlips (1, 4). Be sure to thoroughly clean the joint and repack with grease before reinstalling. Also, burp the boot before securing the clamps so that excess air is not trapped inside, leading to expansion and leakage when the joint warms up.
Differential Pinion Seal
You may encounter a differential pinion seal that is leaking. If so, the procedure is fairly straightforward. Always consult WIS for proper techniques, but most use the following steps.
- Remove necessary exhaust and suspension components to access the driveshaft.
- Disconnect driveshaft from drive pinion flange.
- Unscrew the collar nut. Note: unless damaged, WIS mentions it is ok to reuse the self-locking nuts. Some have a sealing coating: be sure to inspect that for integrity. When in doubt – replace it!
- Remove the pinion flange – you may need the aid of a puller for this. Pry out the pinion seal and clean the housing surfaces thoroughly.
- Lubricate and install the new seal using a suitable drift. Reinstall the flange and collar nut, and torque properly. You have to consult WIS for this as it differs by model.
- Reassemble any components removed for access (exhaust, suspension etc.).
- Check fluid level and top up as necessary. Test drive and reinspect for leaks.
A large percentage of Mercedes-Benz sales are AWD, and will continue to be so. Traction and performance are an integral part of our driving culture, so rest assured you will have many opportunities to service these systems in the future.


0 Comments