A reasonable solution to a Prius Hybrid Catch-22
I’m going to start this article with the following statement: Toyota has been very generous in its willingness to share information and access to equipment with independent repair facilities. Not only does it provide manuals, training, software, and equipment to any shop that wants it, it prices it fairly, sometimes more than fairly. It’s all within your reach. Thank you Toyota!
That said, there has been one sore spot for shops like mine that do a lot of hybrid repair: A necessary piece of equipment is missing from Toyota’s offerings. To be fair, most Toyota dealerships can’t buy it either, but when they need it, it’s a phone call away. When an independent shop like mine needs it, we’re told to tow the car to a local dealership.
If you’re an independent shop fighting to assuage your customers’ suspicions that you may not be competent to repair their hybrids, the last thing you’ll want to say to them is,†I’m sorry. We can’t fix it. You’ll need to tow it to the dealer.†I’ve wasted many extra hours with time-consuming and risky work-arounds to avoid uttering these dreaded words.
Have you guessed what I’m talking about? It’s the almost mythical Toyota HV battery charger. I’ve been assured it exists, yet, like the unicorn, I’ve never seen one in person. I’ve head tales of it in classes, from dealer techs, and I’ve seen pictures in training materials, but that’s as close as I’ve been able to get.

Some of you may share my frustration. Swapping a battery pack back and forth between a running donor car and your tow-in to diagnose why the ICE won’t start is a lot of un-needed (and usually unpaid) work. Performing a battery-to-battery transfusion to resuscitate (hopefully) the dead pack once the ICE is running is a risky move. But which is worse: burning time and money, or letting a dealership service writer say whatever he wants about you and your shop to the customer?
This article contains a solution! But first, let’s make sure everyone is on the same page. Here in Berkeley, California, you can’t throw a brick without hitting a hybrid, most likely a Prius. But not every city has the same population density of hybrids, and some folks may be wondering why they’d need an HV charger, so let’s start with that.
The Prius does not have a 12V starter motor. The ICE (Internal Combustion Engine) is cranked at 1,200 RPM by one of the two electric motor/generators called MG1. MG1 can be a motor when cranking the ICE using power from the HV battery, or a generator when the ICE drives it to charge the HV battery. The MG1 is also used to control gear ratio, but that’s not important for our discussion here.
If the HV battery is too discharged, the HV ECU will not attempt to “Ready†the car. If the car is not Ready, the ICE can’t be started to spin the MG1. Without the ICE and the MG1, the HV battery can’t be charged. Some of you may be thinking, “I wonder if I could use “regen” (regenerative braking) to charge the battery?†The answer is no. If the car is not Ready, the MG2 will still generate potential energy when you move the car, but without an operational inverter, it can’t be used to charge the battery. So don’t waste time pushing unless you need a good workout.
The battery cannot be charged unless the car is Ready, and the car cannot be made Ready unless the battery is charged. It’s a Catch-22. If the HV battery is discharged, the car is not going to go anywhere.
Why would this happen? Toyota makes reliable products. Why didn’t the engineers plan for this? Actually they did, and the original Prius had an onboard charger. However, it did not make it into U.S. production models, presumably because it added cost and was deemed unnecessary. And perhaps it would be if Priuses were not driven by people.
Most of the time, the HV battery will not become discharged. In fact, it’s pretty rare. The battery is normally operated between 40% SOC (State Of Charge) and 60% SOC. The HV battery ECU rarely lets the SOC out of this range during operation. The ICE can be started until the battery pack reaches around 20% SOC. So, if the HV battery never drops below 40% SOC, and the ICE can be started with as little as 20% SOC, how can the pack become discharged?
How many times have you had a conventional car with a “crank/no start†towed in to discover the 12V battery is now discharged, on top of whatever problem caused the original crank/no start. Why? Well, your customer lives by the axiom, “If at first you don’t succeed, try, try again.†I’ve discovered that many hybrid drivers have this same attitude when they are late for work.
A discharged HV battery is always caused by an ICE that does not start for whatever reason; at least that’s been my experience up to this point. Sometimes the customer just runs out of gas. Maybe a crank position sensor has failed, maybe the throttle body is all gunked up, maybe it’s the well-known (yet surprisingly common in real life) leaf-in-the-MAF-sensor malady. You get the picture: All the problems that will cause a crank/no-start on a conventional car will do the same to a Prius, but if the customer won’t give up, the HV battery will go dead instead of the 12V battery.
Here’s how it might happen. Let’s say the battery was at 40% SOC when the ICE stalled. After it stalled, the driver does the logical thing and tries to start the car. When he does, the engine sounds like it’s running (because it’s cranking at 1,200 rpm) and the customer will think, “Oh good! It started back up!†He may throw it in gear and drive down the road, but only for eight seconds. This is because the Prius will crank the ICE for eight seconds before giving up. During those eight seconds the driver will be able to drive using electric power. Some drivers will be persistent, trying over and over until the HV battery is depleted. Other drivers may give up quickly, but then the tow driver tries a few times, and the car gets moved a few times in the shop, then by the time you’re ready to diagnose the problem, there’s only a crank or two left, or maybe none at all.
That’s a lot of pressure. Imagine that a Prius comes in with 25% SOC. You may only have eight seconds to diagnose the cause of the no-start. If you fail, you’ll have to tell your customer he or she needs to pay for another tow to the dealer because you can’t fix the car. Can you set up enough tests to find any problem with only eight seconds of cranking? Compression, spark, fuel ratio, timing – got it all set up? Crank, crank, crank. Everything looked good, but the ICE did not start. Perhaps it’s a banana in the tail pipe. Damn you Eddie Murphy! (Sorry youngsters, that was a joke referencing a movie from the ’80s.)
Wouldn’t it be nice to have as many tries as you need? With an HV charger, you can. So, where do you get one? Toyota won’t sell it to you, or let you borrow one. The company won’t send its charging guy to your shop. Here’s the story of how we got ours, and how you can get yours.
I ran into Carolyn and John from Luscious Garage at a Perfect Sky class, and they mentioned they had a charger they’d been using for tow-in Priuses and to charge the Gen2 to Gen1 conversions battery they’d been doing. It was an HV charger originally designed for a glass mat pack, but it was working to partially charge Gen1 packs (274V) and even Gen2 packs (201V) if used with care. Carolyn was kind enough to give me contact information for the manufacturer.
I contacted Gregory McCrea at ELCON/Electric Conversions who seemed genuinely interested in developing a charger to meet our needs. To be honest, I had a bit of trouble understanding all of the technical information he talked about (he’s a battery expert, and I’m not), but I assisted where I could and he started to work on the project.
He said he could not “know†the perfect charging algorithm for Prius batteries, but could make assumptions based on other NiMH batteries, and then fine-tune the algorithm based on data captures once the charger was in use. Basically, he started with a relatively inexpensive programmable charger capable of storing up to 10 algorithms, then he and another programmer collaborated on two algorithms: one for the Gen1 and one for the Gen2. He also added some convenience features like a carry handle, rubber mount feet, instructions, and an external switch for selecting the correct charging cycle.
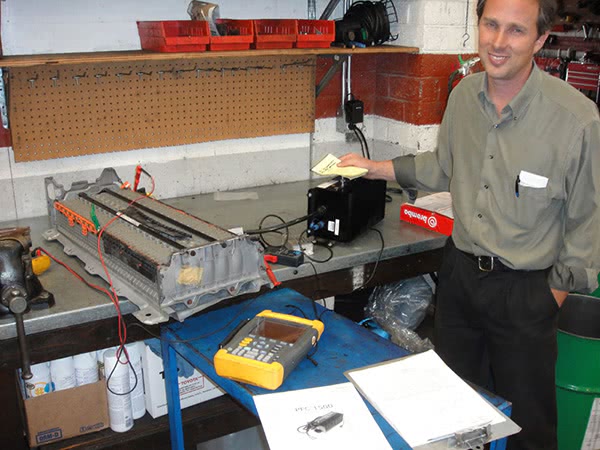
About three weeks later he hand-delivered the unit and we tried it out on an old bad battery I had lying around. We monitored the charging voltage and current and compared it to a graph of the algorithm he had brought. The unit seemed to work flawlessly. He left a data recorder for the charger so we could perform some captures once we had some good, but discharged, batteries to charge.
About a month later, a Gen1 one was towed in from another shop. The tech had correctly diagnosed a bad crank sensor, but the HV battery discharged before the repair was complete. The shop was looking for options besides towing the car to a dealer and found us. In and out in one day, no small talk, and a fair charge (or an excellent charge at a fair price). The only thing that might have been better for the people at that shop is if they had their own charger. And now they can!
Now, a few words about safety: Usually, it’s really hard to kill yourself when working on a Prius. There’s a lot of safety built in. If you are performing Toyota-approved operations, it’s hard to shock yourself even when you’re doing it wrong. However, when you’re charging an HV battery you have left Toyota procedures behind. It’s EASY to kill yourself while doing this work. Many technicians are a little jaded by the excessive and often superfluous safety warnings found in manuals these days. Please treat this warning seriously. If you don’t know what’s dangerous, let someone more high-voltage savvy do the work. If you’ve done lots of high-voltage work and are pretty relaxed about it, stop relaxing, get scared, and be careful.
Now, if the safety warning has not scared you off, the actual procedure is very easy on the Gen1. You just need to do it correctly.
Here’s case study featuring our first “live†HV battery recharge. We will likely work on making the process a bit safer. We’re looking for a suitable connector to ensure proper polarity and to reduce the chances of a short, but this technique got the job done.
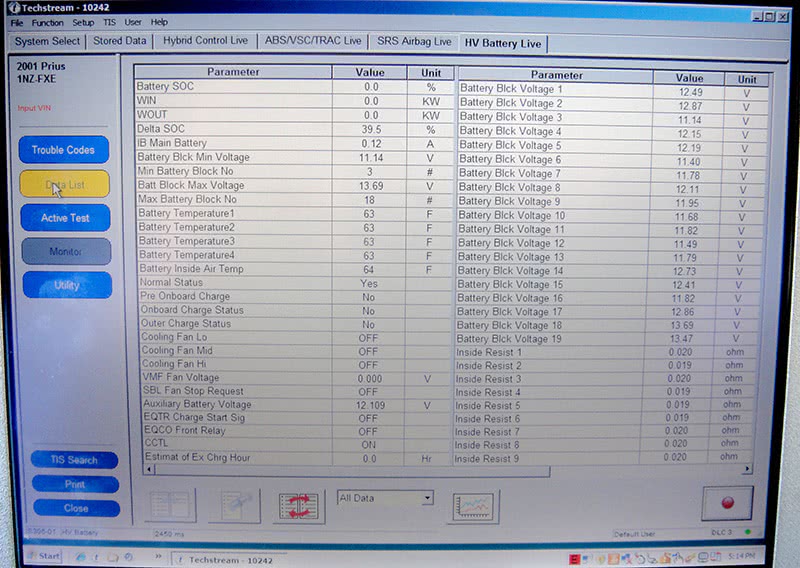

When the car came in, the battery SOC was 0%, and the Delta SOC% was 39.5%. Delta SOC% is the difference in the calculated state of charge between the lowest battery block and the highest battery block. The battery ECU remembers the peak value from moment to moment and trip to trip unless it is “unplugged.†If the battery is good, the Delta SOC% should not go above 20% under normal conditions. However, a discharged battery is not normal, so a high Delta SOC% is not indicative of a bad battery in this case.


There is a small, easily-accessible connector on the left (driver’s) side of the battery. I like to call it the “connector to nowhere†since it’s plugged into a plastic holder on the side of the battery case. The two outer terminals (Terminal 1 and Terminal 3) have full battery voltage, and can be used to charge the battery without removing it from the car, bypassing or activating the System Main Relays, or performing any other jury rigging.
You may notice I’m holding the connector with my bare hand. This is because the battery service plug has been removed and I know it’s safe. If the service plug were still in, there would be 274V at the connector. If I were to test for voltage using a couple of back-probe pins, and I touched them both with one hand, I’d probably lose a chunk of flesh, maybe even a whole finger. If I had one pin in each hand, I’d be dead. Yes, it is easy to kill yourself. So, always make the service plug the FIRST thing you remove and the last thing you install. Remove the service plug, make your connections, put the service plug back and then do not touch anything until the charging is done and the service plug has been removed again.

Polarity is important. There is not a ready-made connector to plug in, so it is possible to hook it up backwards. I asked Gregory what would happen if polarity were reversed. He said, “The charger should recognize the reversed polarity and the relay shouldn’t close. That said, I wouldn’t recommend you test it.†To find polarity, remove the service plug, connect your voltmeter to the two outer terminals, put the service plug back in, and take note of the reading. If the reading is negative, the red lead is on the negative terminal. If it’s positive, the red lead is on the positive. Don’t rely on the wire colors! The white/red has been negative and white/black positive in my experience so far, the opposite of what you might guess. Don’t rely on my experience, though. Do your own testing.

I use male blade connectors salvaged from old O2 sensor connectors to make the connection. It may seem really strange to be routing so much voltage through such tiny wires and connectors, but don’t worry, they won’t melt — in fact they won’t even get hot. Please don’t touch the wires to test this, the insulation is not rated for high voltage and you could get hurt or killed. The combination of high voltage and low charging current keeps the voltage drop low, despite the tiny wires.

The charger defaults to the Gen2 algorithm when it’s turned on. The reasoning is this: If you didn’t read the instructions and started to charge a Gen2 with the Gen1 algorithm, you might damage the battery. To avoid this possibility, the charger defaults to the lower voltage. That way, there’s less risk of an incompetent user damaging a battery pack. If a Gen1 is charged with the lower voltage, it won’t be hurt, it just won’t charge fully.

To change the charging mode to Gen1, press and hold the select switch while turning on the charger. The change in algorithm will be verified by a change in LED color on the opposite side of the charger.

So, how well does it work? Well, I’m still waiting for the official word after the data recordings are analyzed, but from what I can tell it works perfectly. According to Toyota’s training material, the target SOC for the THS charger is 60%, the same as the target SOC while in the car. Take a look at the SOC in the data list below. I took this picture about two seconds after Readying the Prius following recharging with the ELCON charger. Pretty close to 60% SOC, no?

Now that the battery is charged, I figure I might as well test it, but this article is already too long. So, I won’t include much detail on battery testing beyond saying that up to 1.2V is acceptable between “Battery Blck Min Voltage†and “Battery Blck Max Voltage.†As you can see below, there is only 0.3V, so this battery is in perfect condition now that it’s charged.

If you want to purchase your own charger, contact Gregory at:
ELCON / Electric Conversions
Distributor of Zivan Chargers
215 14th St.
Sacramento CA 95814
Phone: 916-441-4161
elcon@jps.net
by Paul Cortes


0 Comments