
The VW 2-liter BPY-designated engine was widely used in mid-2000 model year cars, including the Passat, Eos, Jetta, Rabbit, and Rabbit/GTI. It is a well-constructed dual overhead cam gasoline powerplant that can deliver excellent power, economy* and reliability. Like all overhead cam engines in which the camshafts are belt-driven, the timing belt requires routine replacement as part of scheduled maintenance. The BPY engine uses a single camshaft timing belt sprocket to power both camshafts via a connecting chain between the camshafts. This 2.0L is an interference engine, which means that pistons and valves can meet in a most uncomfortable fashion if the timing belt should break. On the BPY engine the belt should be checked at 60,000 miles and replaced if it’s questionable. And it should be replaced at 100,000 miles in any event.
There are two belts on these engines, a serpentine accessory drive belt that VW refers to as a ribbed belt (for obvious reasons…) and a toothed belt, which is the timing belt that keeps the camshafts and valves in happy coordination.
The earliest configurations of this engine family used a one-piece belt guard for the toothed timing belt, and this design requires a bit more work than the later design, introduced in 2006, which used a two-piece guard, making access faster and easier. We’ll deal with that one first, since it is the more common design, and then we’ll come back and recap the additional steps needed when dealing with the single-piece design.
*Based on EPA estimates. See fueleconomy.gov for details. Actual mileage will vary and depends on several factors including driving habits and vehicle condition.
Start at the Beginning
After removing the engine cover and upper air filter housing, you’ll need to disconnect the fuel pump module electrical connector since the fuel pump is initially activated by the driver’s door contact switch. Of course, you’ll need to exercise the usual cautions about de-pressurizing the fuel and cooling systems, and work on an engine that’s at ambient temperature.
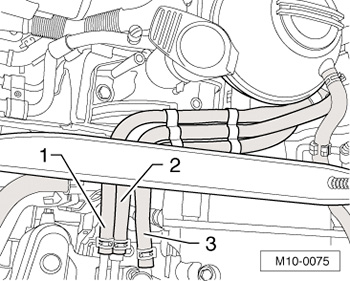
All that being said, start by marking and disconnecting the three fuel lines at the fuel rail. This will facilitate proper reassembly. Unbolt the coolant recovery bottle and move it to the side, disconnecting the electrical connector if necessary for improved access. Mark the direction of rotation of the ribbed serpentine belt and remove it by loosening the spring-loaded tensioner with an appropriate tool. Then remove the tensioner itself.
At this point you’ll need to support the engine since it will need to be raised off its mounts to gain access to the timing belt. There are several special VW service tools for supporting the engine, and you likely have a shop crane with appropriate adapters for safely supporting the engine.
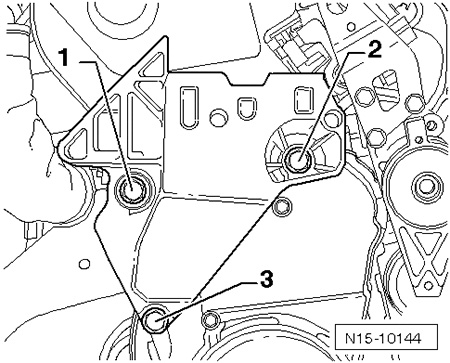
Remove the two bolts that secure the upper timing belt cover, and lift out the cover, keeping the engine supported for subsequent steps. After removing the adjacent body noise insulation, unbolt and remove the right front wheelhouse liner.
It’s Time to Take Your Time
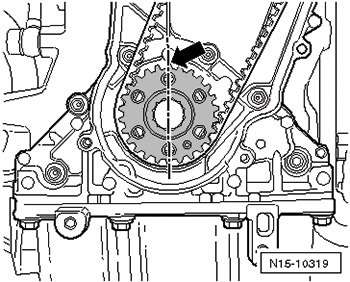
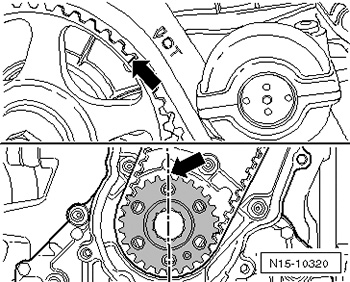
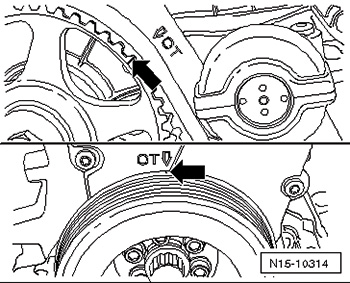
Now the precision work begins. Bring the camshaft gear to the TDC mark for cylinder #1, such that the arrow on the camshaft sprocket aligns with the arrow on the belt guard.
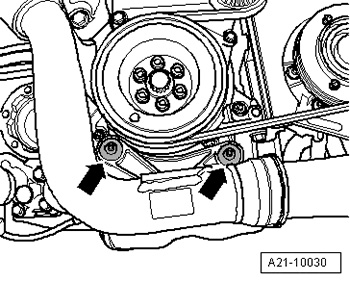
The next step is to remove the vibration damper and its pulley. It is critical at this point, with the engine known to be at TDC, to make an additional mark on the crankshaft to identify TDC, since reference will be lost once the damper and pulley have been removed.
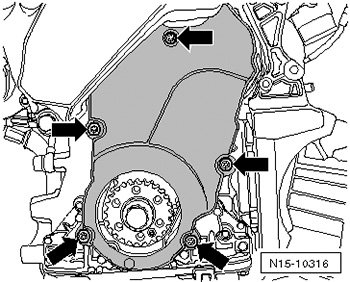
Next, remove the five bolts that secure the lower half of the toothed belt guard and lift off the guard, and remove the lower engine mount bracket bolt, loosen the fasteners for the right main wheelhouse liner, and push it off to the side.
Now you can access the second engine mount bracket bolt through the hole in the wheelhouse, and remove the two pendulum support bolts.
At this point you can remove the two bolts holding the engine mount itself in place, and lift out the mount. After raising the engine, you’ll be able to remove the remaining bolt that secures the engine mount bracket. Remove the two bolts that secure the lower half of the timing belt cover, remove the cover downward, and lift out the bracket upward.
Now, if you’re in there for some reason other than timing belt replacement, you can mark the direction of rotation of the timing belt to facilitate re-installation. But, frankly, unless you know the belt was replaced quite recently, it would be wise to recommend replacement at this time. Next, loosen the roller nut for the semi-automatic tensioner, turn the crankshaft back slightly, and lift the belt out.
At this point you can use this opportunity to offer to replace the water pump. It is pretty labor-intensive to get this far into the engine, and the water pump is now readily accessible. You may find that few customers would object to the modest additional cost of a genuine new VW water pump carrying little additional labor cost. And you should also take advantage of this opportunity to carefully examine both the toothed belt and the ribbed belt for any signs of irregular or uneven wear, which might indicate looseness or misalignment of one of the pulleys or pivot points.
Readying for Reassembly
In preparing the engine for installation of the new timing belt, you’ll need to assure that both the crankshaft and camshaft are at TDC. But since this is an interference engine, if you turn the camshaft with the crankshaft at TDC, you risk valves meeting pistons. So, it’s better to set the camshaft to TDC first, and then the crankshaft.
With crank and cam both at TDC, install the timing belt in the following order: crankshaft gear, then the roller for the semi-automatic tensioner, then the camshaft gear, the water pump, and finally around the damper pulley.
In the process, assure that the tensioner roller is firmly seated in the cylinder head.
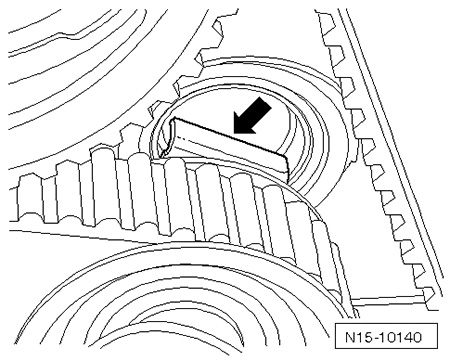
Setting the tension on the new belt is a critical step. You first need to over-tighten it by turning the eccentric clockwise until the notch is above the tab. Then, loosen the belt and re-tension it until the notch and tab align. Now, tighten the nut on the semi-automatic tensioner roller. For confirmation, rotate the crankshaft two full turns, in the normal direction of rotation, back to TDC, with the last 45 degrees of rotation turned without interruption. Check again to assure that the notch and tab still align. This will confirm that the crankshaft and camshaft are properly synchronized. Double-check the valve timing by noting the alignment of the marks on the camshaft sprocket and the housing behind it.
After that, reassembly is pretty much a reversal of the disassembly procedure, with a couple of cautions:
- Reinstall the vibration damper pulley using new bolts.
- Triple-check the valve timing marks, assuring that the arrows align.
- Note that the engine mount bracket is secured by two bolts of the same length, and a third bolt that’s slightly shorter than the other two. This shorter bolt goes into the bottom-most hole.
- Observe the engine mount alignment procedure to assure proper clearances around engine components.
- Observe proper torque specifications for all fasteners.
BPY torque specifications
| Semi automatic tensioner roller nut: | 25 Nm |
| Vibration dampener: | 8.8 bolts – 10 Nm + 90O (1/4 turn). Use new bolts. 10.9 bolts – 20 Nm + 90O (1/4 turn). Use new bolts. |
| Engine mount bolts (3): | 45 Nm. Use new bolts. |
For all other fasteners refer to the following table:
Fastener Tightening Specifications
| Component Fastener Size Bolts and Nuts | ||
| M6 – 10 Nm | M10 – 40 Nm | M7 – 15 Nm |
| M12 – 60 Nm | M8 – 25 Nm |
|
Now What About That One-Piece Cover Design?
The procedure for replacing the timing belt on the earlier engine design with the one-piece cover for the timing belt is similar to that on the two-piece design. However, the job is more labor-intensive because the engine must be raised higher in order to access and remove the one-piece cover. For this reason, it is necessary to disconnect both front wheel drive half-shafts from the transmission, and also to remove the front exhaust pipe with the catalytic converter in order to allow for the added lift height needed.
Eliminating these extra steps was the reason for Volkswagen moving to the improved two-piece design in later models, and there are relatively few of the earlier cars with the one-piece cover.
In any event, timing belt replacement is an important procedure that needs to be performed as scheduled in order to prevent major engine damage, the likes of which we’ve all seen, and the aftermath isn’t pretty. Your local Volkswagen dealership parts department can provide you with the quality belt, fasteners, and water pump you’ll need for this job, and your customer can motor on, confident that the valves and pistons will happily keep their distance from each other.
A Kit Does the Trick |
|
Since there are certain parts that should be replaced whenever installing a new timing belt on a VW engine, the good folks at Volkswagen have conveniently packaged appropriate parts into timing belt replacement kits. These kits, available for both gas and diesel applications, typically include a new timing belt, a new tensioner, new relay rollers and, where appropriate, single-use fasteners that should be replaced in the process. While not included in these kits, it is recommended to buy and replace the water pump and accessory drive belt during this service since it is fairly labor-intensive to be this far into the engine, and provides good value to the customer. A listing of popular applications appears between pages 10 & 11; be sure to check with your VW parts professional for the exact kit for the car you’re servicing. |


0 Comments