
We will focus on the complete diagnosis and repair of an ailing Audi A6 Quattro. This Audi was suffering from very low power under acceleration and the MIL was displayed.
They say good things come in threes. An epic movie or book trilogy. A three-point conversion. A freshly made BLT. The world around us is even made up of threes: the three states of matter—the three dimensions of length, width and depth.
The automotive world is no different; threes abound. The ‘Big Three’ auto manufacturers (well, not so much anymore); the three main requirements for good combustion: fuel, spark and compression; or the three types of misfires: ignition, fuel or engine mechanical. And a complete diagnosis and repair of a vehicle concern also takes place in three stages: testing, repair and validation.
For this article we will focus on the complete diagnosis and repair of an ailing Audi A6 Quattro (an A3 would have fit the theme better, but alas, it was not to be). This Audi was suffering from very low power under acceleration and the MIL was displayed.
Instead of dragging out the final diagnosis, let’s cut to the chase and then work through the three stages of testing, repair and validation while exploring various options along the way. Ultimately this A6 needed a new high pressure fuel pump to cure the low power concern. Now with the final reveal out of the way, we can work through several different testing pathways to get to the correct diagnosis.
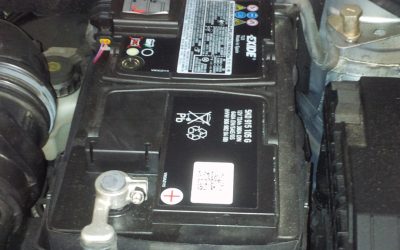
Before diving into the first stage of testing, let us take a brief flyover and get the lay of the land for the Gasoline Direct Injection (GDI) fuel system equipped on our Audi. As with most GDI fuel systems there is a low pressure in-tank fuel pump which supplies gasoline to the mechanical High Pressure Fuel Pump (HPFP). The HPFP attaches to a housing on the front of the right side cylinder head and is driven by an eccentric on the front of the right camshaft.
This particular CGXB 3.0L supercharged engine has a low fuel pressure sensor (G410), which threads into the high pressure fuel pump. The low fuel pressure sensor is not present on all VAG GDI engines, but it is a nice data pid to have when the sensor is present. There is also a high fuel pressure sensor (G247) in the lower fuel distribution pipe. To access this sensor, the supercharger and lower intake manifold sections need to be removed. The last main piece of the GDI system is the fuel metering valve (N290). The fuel metering valve is controlled by the engine computer and is attached to the high pressure fuel pump.
Act 1: Testing
The first step of testing is to perform a quick triage of the subject vehicle. This includes a road test to verify the concern, a visual under-hood inspection, and a fault code scan. Think of the old television show MASH, where one of the doctors quickly assesses the wounded to determine who needs immediate attention and who can wait to be treated. Gather key pieces of data to establish a starting point and direction on the problem.
This initial assessment was done on the Audi A6 with the following results. The road test confirmed the client’s complaints of “having to push the gas pedal all the way to the floor to get any acceleration.” An under-hood inspection did not reveal anything out of the ordinary, which was no surprise, since the owner kept meticulous care of this vehicle. The fluid levels were correct, and no visible leaks or damage were present. This under-hood check is important and can turn up valuable clues. For example, possible issues include a low oil level affecting variable valve timing, oil that smells strongly of fuel indicating a leaking injector or high pressure pump, or a low coolant level on a vehicle with a cold start misfire.
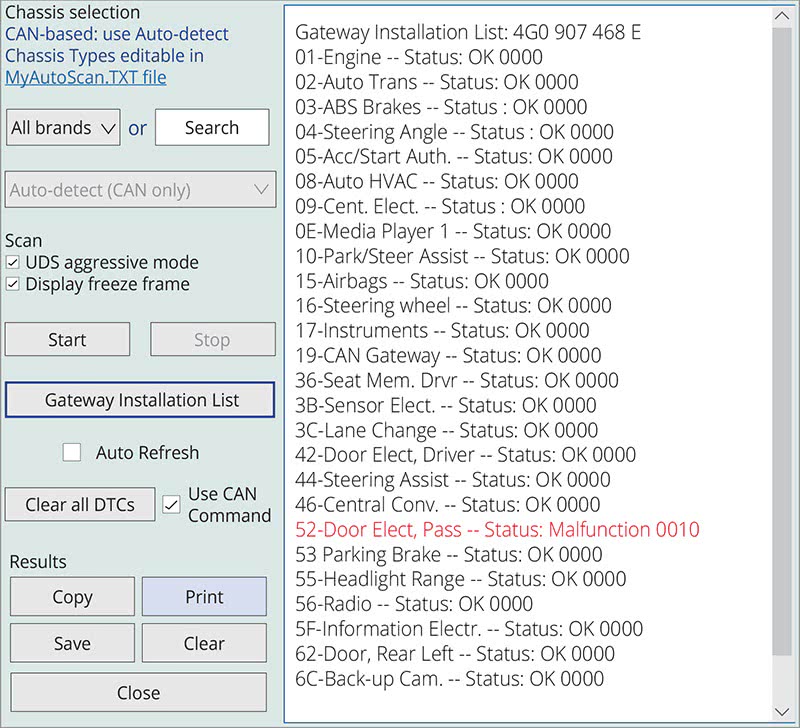
After the road test and visual inspection came the fault scan. There were three faults in the engine control module and all three were related to the low power concern.
| 6238 | Fuel Rail/System Pressure |
| P0087 00 [237] – Too Low | |
| MIL ON – Confirmed – Tested Since Memory Clear | |
| 9537 | Fuel Pressure too Low during Cold Start |
| P053F 00 [237] — | |
| MIL ON – Confirmed – Tested Since Memory Clear | |
| 6208 | Fuel Trim; Bank 1 (Mult) |
| P1128 00 [101] – System too Lean | |
| Not Confirmed – Tested Since Memory Clear |
There were two faults for low fuel pressure and one lean system fault. The two fuel pressure faults were for the high pressure fuel system, and they were being set based on data from the G247 high fuel pressure sensor. We can pause here to mention that having these two fuel pressure fault codes without any drivability symptoms would point toward an input sensor giving out erroneous data and causing the MIL to be turned on. That was not the case on this A6 though.
After a brief triage has been completed, continue with the next easiest test that has the potential to gain the most information. The testing process can be thought of in terms of a GPS mapping program. The initial tests are performed at the satellite view level taking into consideration the whole vehicle and all possibilities, and each subsequent test zooms in closer until the problem is discovered at the street level view. It is important to not zoom in too quickly though, as the overall perspective is easily lost. The next test for our Audi was to verify the readings on the fuel pressure sensors. A second road test was carried out while monitoring fuel pressure data with VCDS.
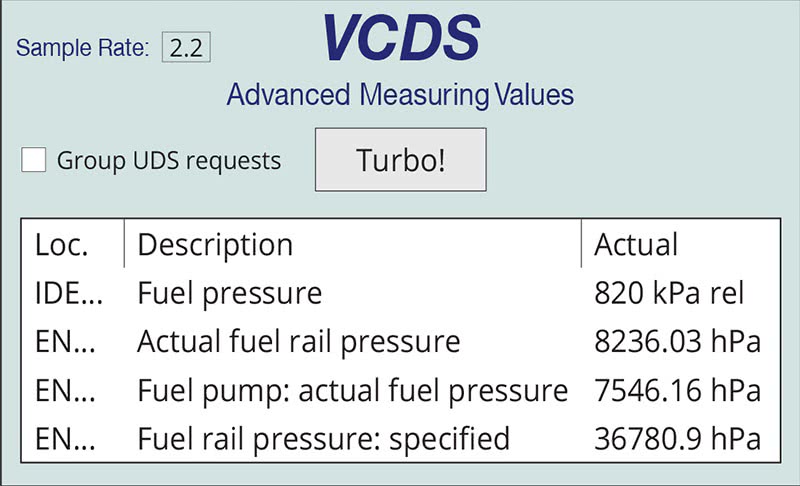
The measurements are listed in pascals, which may be an unfamiliar pressure measurement to some. Even without using a conversion calculator, it is clear that the actual rail pressure is significantly less than the desired pressure. This data confirms what the fault codes were indicating. One further test that can be performed with the scan data is to check for internal leakage within the fuel system. This can be done by monitoring fuel rail pressure after warming up the engine and then shutting it off to create a hot soak condition. The heat from the engine should cause the fuel rail pressure to increase for several minutes after the engine is shut off. If the pressure increase does not happen, or if the pressure goes down, then there is an internal leak in the fuel system. The A6 passed this internal leak check with flying colors.
With the scan tool testing complete, it was time to move to component testing. Low side fuel pressure is a good starting point for testing any direct injection fuel systems. The high pressure pump cannot be expected to operate correctly and produce the specified pressure if the low side delivery pump isn’t fulfilling its part of the bargain.
Let’s examine three methods of testing the in-tank low pressure supply fuel pump for this A6. We will test fuel pressure, fuel volume and circuit integrity. There are, of course, other tests for fuel pumps, like maximum or “deadhead” pressure, and current ramping.
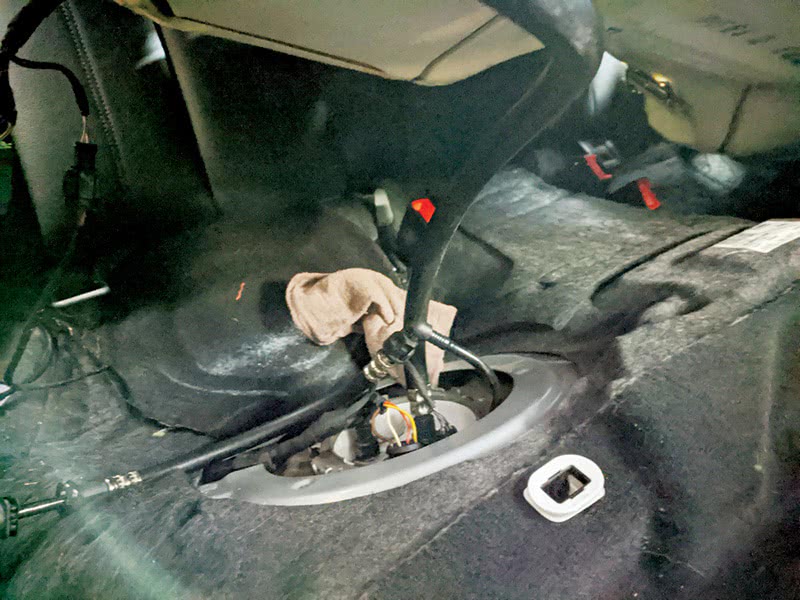
In order to test the fuel pressure on this Audi the rear seat needs to be removed and the access panel unscrewed. Once the fuel pump assembly is accessed, install a fuel pressure gauge in-line so the engine can be run while monitoring the pressure.
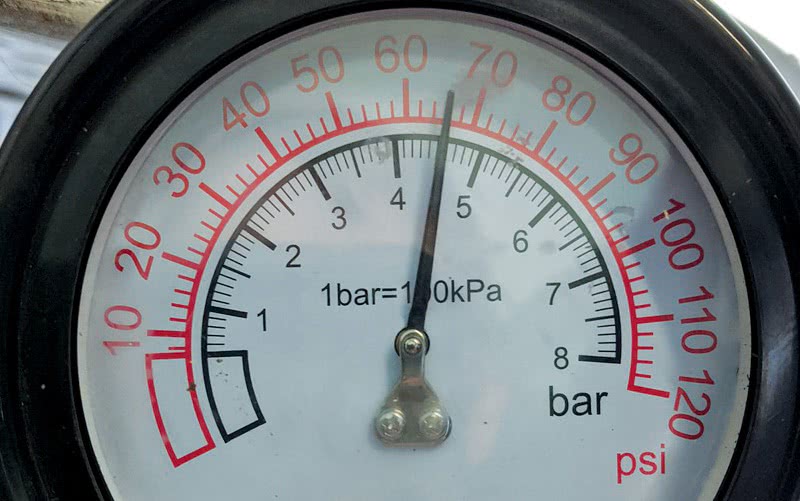
Our Audi had a running pressure of 4.6 bar, or 66 psi, which is well within the specification of 3.5 to 6 bar (50 – 87 psi) provided in Audi service information. Audi SI also listed a residual fuel pressure test, in which a pressure of at least 3 bar (44 psi) needs to be present for ten minutes after shutting off the engine. The A6 was holding strong at 3.5 bar (50 psi) long after ten minutes elapsed.
Fuel pressure only tells half of the story, so fuel volume is the next check that can be made on the low pressure fuel system. The fuel pressure can be within specifications, but if the fuel volume is low due to a restriction, weak pump, or cavitation, there will still be problems with the system.
A fuel pressure gauge with a built-in flow meter is the most accurate way of testing fuel volume, but if a flow meter is not available, the next best option is to use the bypass valve on the fuel pressure gauge to release fuel into a graduated cylinder for a specific amount of time. For example, a general fuel volume measurement is 0.5 quart in 15 seconds. Fuel volume specifications are sometimes available from the OEM in service information, but if there is not a printed spec, a fuel volume calculator can also be used. The image above shows the fuel volume calculations for the A6.
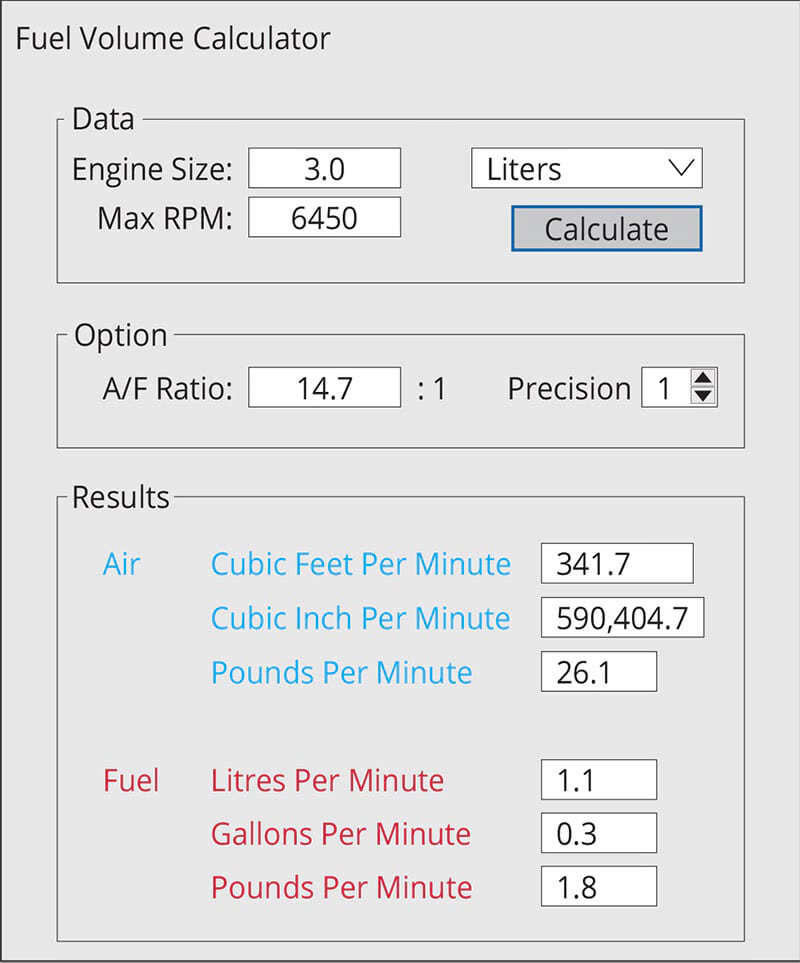
The Audi A6 had a fuel volume of 900 milliliters in 30 seconds, so this BLDC fuel pump was easily outpacing the listed specification.
The third low pressure system test is checking the circuit integrity, in this case using a lab scope. Coincidentally, performing scope testing on this Audi’s fuel pump brings up another “three” to follow in our theme—a three-phase brushless direct current electric fuel pump. Three-phase BrushLess Direct Current (BLDC) fuel pumps were quite new technology for automotive applications back in 2012 when this Audi A6 was born. They are becoming more commonplace though, with many auto manufacturers adding the new pumps to their latest model years. BLDC pumps are more expensive than traditional fuel pumps, but they offer improved efficiency and an extended service life since there are no brushes to wear out.
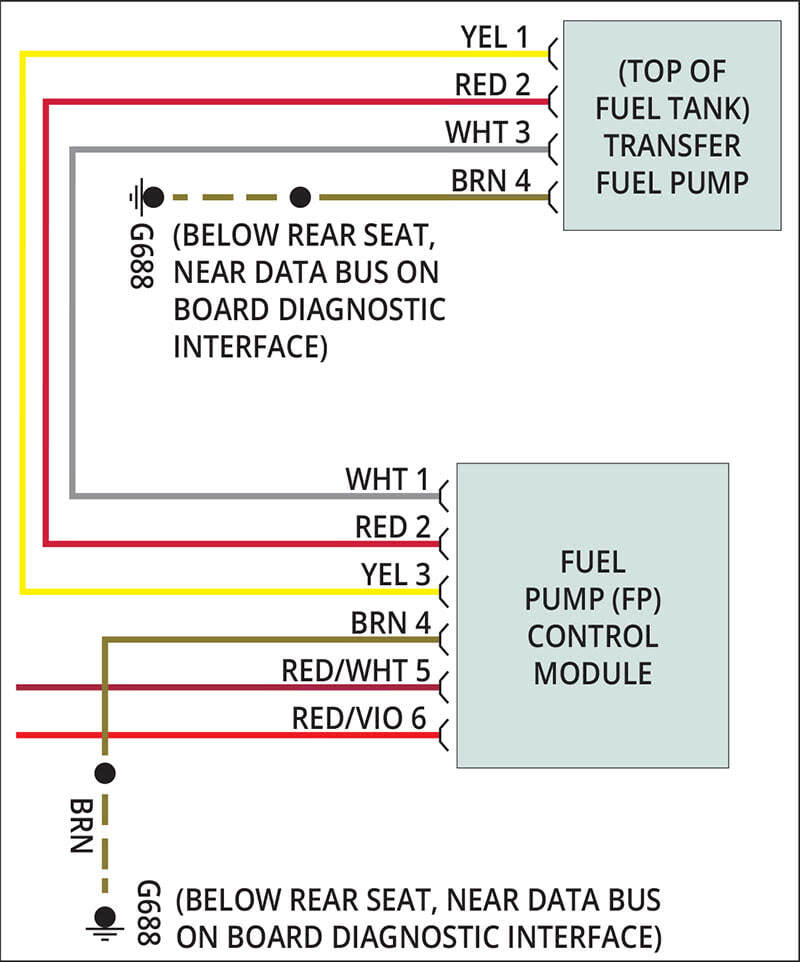
Testing this style of pump is best done with an oscilloscope to check the three voltage phases; the phase current can also be checked. There are four wires at the fuel pump on this Audi. Three of the wires are power wires for each of the three phases. These power wires come from the fuel pump control module. The final wire is a ground shared with the fuel pump control module at G688.
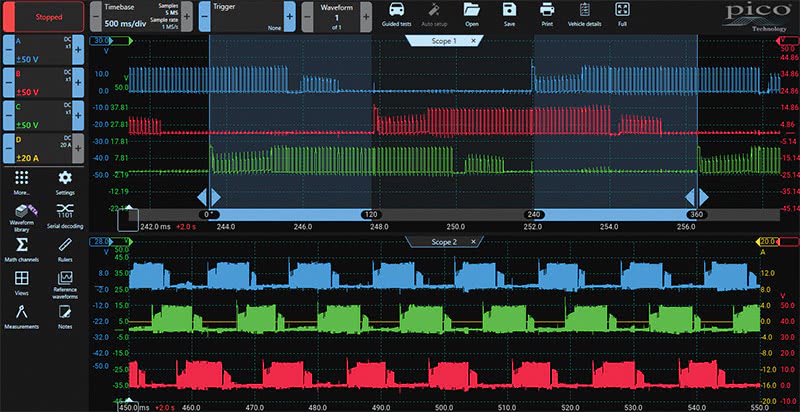
By connecting an oscilloscope to each of the phase power wires, the BLDC Waveform (below) was captured. The waveform can be analyzed to determine if the three phases have the same voltage amplitudes and frequencies, as well as the same 120 degree phasing. Using PicoScope’s multiple scope views feature, the fuel pump voltages can be viewed at different zoom levels and the phase rulers can be used to verify that a new voltage phase begins every 120 degrees.
With the low pressure fuel pump passing multiple testing methods, it was time to move further along in the GDI fuel system. The testing on our Audi so far points towards a failed high pressure fuel pump, but it is important to verify the camshaft timing before condemning the HPFP. Since the high pressure pump is mechanically driven, the cam timing is critical. Retarded cam timing will usually result in elevated fuel pressure, and advanced camshaft timing will typically cause low fuel pressure.
An easy check for camshaft timing is to check the phase measurement in scan data, which indicates any wear on the timing chain components. Ideally, the cam phase data should be within -5 to +5 degrees. The Audi’s phase measurement was good at +1 degrees. Camshaft timing needs to be remembered because it is possible for fuel system faults to be set before cam timing codes.
A final step is to verify duty cycle control to the fuel metering valve. This can also be done through scan tool data. The duty cycle signal can be further verified by using a lab scope if an issue is suspected. All of the testing on the Audi confirms that the high pressure fuel pump has failed and needs to be replaced.
Act 2: Repairs
The second act—the repair—is just as important as the testing. Testing with scan tools, laptops and lab scopes is the glamorous part that we as technicians are most interested in. However, a good diagnosis needs to be backed up with an excellent repair.
There are several key points outlined in the replacement procedure to bear in mind. First, the engine must be cold when removing the high pressure fuel pump, and great care needs to be used so as not to bend the high pressure fuel line or damage the high pressure union fittings in any way.
Once the HPFP has been removed, the roller tappet may remain in the housing bore, or it may fall out on its own. The tappet needs to be inspected carefully for signs of wear. Signs of excessive wear indicate further inspection is required since the camshaft eccentric lobes may also be worn. Either way, it is best to replace the roller tappet with the new pump, remembering to coat the roller in fresh oil before installation. Finally, it may be necessary to rotate the engine by hand to reach a low spot on the camshaft and allow the tappet to fully recess into the housing bore.
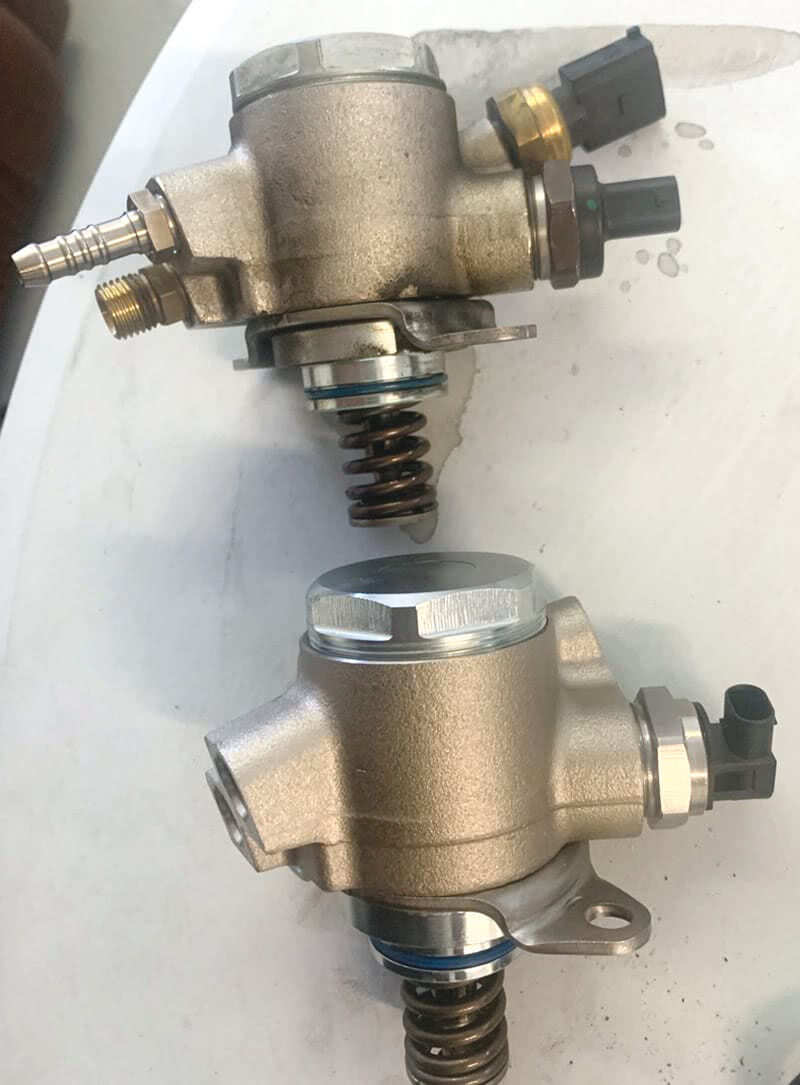
Make sure to line up the new pump next to the old part and verify correct fitment. Also, double check to confirm that the part numbers match, or confirm that the part number has been superseded if they do not match. As seen in the photo, the HPFP on this Audi had been updated and the electrical connector for the fuel metering valve had been reoriented. It is also worth noting that the low fuel pressure sensor (G410) and two line fittings needed to be transferred to the new pump and, of course, a new o-ring seal was installed. Also, do not forget to check for technical bulletins related to the HPFP system to see if there are any updated parts or repair procedures.
Act 3: Validation
The third and final stage is validation, and it is just as important as the other two stages. Whenever possible a repair should be validated by using the same testing that led to the diagnosis.
Validation can come in many forms: a road test to verify that symptoms are gone, a fault-free code scan, running readiness monitors, or even rechecking components with scan data or a lab scope. Repair validation has the added benefit of learning what good sensor data looks like or what a good waveform looks like, which will help on the next diagnosis and repair.
A brief drive around the block is not good enough to validate most repairs. Just because the Check Engine light didn’t turn back on during a two mile test drive does not mean that the vehicle is fixed. Allowing the owner of the vehicle to validate the repairs should be avoided at all costs. Relations with even the most understanding client can easily be damaged when the same problem returns on the drive home from the repair shop.
After clearing the fault codes on the Audi, an extended road test was carried out and the codes were rechecked. No faults returned and the sedan had the power one would expect a supercharged A6 to have.
By Jordan Hill


I had the pleasure of working as a parts guy 8-5 and as a apprentice tech after hours with a very smart and skilled import tech many years ago in Ann Arbor, MI. Id help Jim, and hed give me guidance and check on me every once in a while, taking time to carefully explain not only how, but why. I left the state a long time ago, but have fond memories of working sometimes late into the nights . The way this article was written seemed very familiar, wasnt too specific nor vague. Thank you.
Wait, I did have one question: The chart that showed this Audis HPFP pressure showed a discrepancy, but I woud have guessed that the actual pressure was much higher than the computer was calling for. Did I miss something?
Really nice write up, thanks so much for your time. 🙂