StarTuned® explores the latest developments in this exceptional technical resource
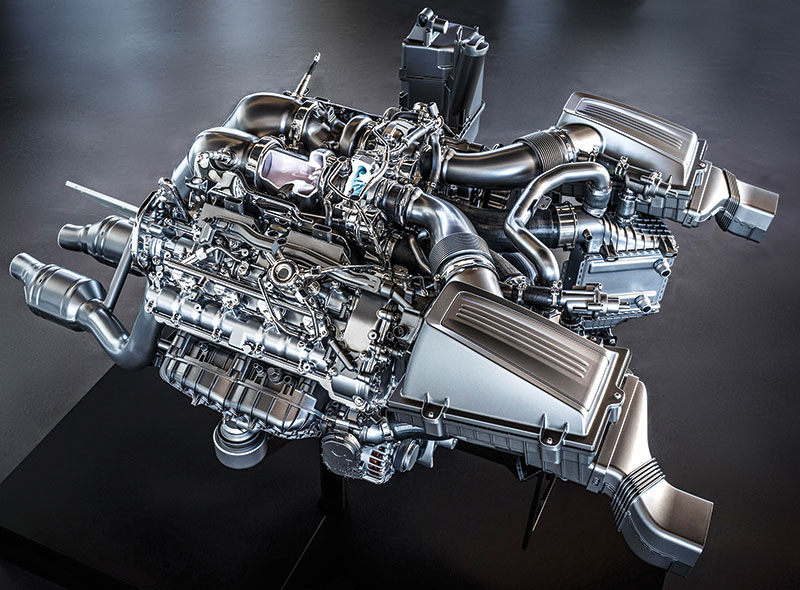
Late model powertrains, such as this Mercedes-Benz M178, are complex in the extreme. The latest-generation XENTRY kit will take the mystery out of them, plus it’ll allow you to diagnose just about everything else in the vehicle.
It’s no secret that Mercedes-Benz has always been at the forefront of developing useful and user-friendly diagnostic tools and equipment. XENTRY is the latest iteration of the Mercedes SDS (Star Diagnostic System), and continues to see refinements and additions to its hardware, software, and protocols that make it an especially powerful and useful tool for independent repair shops to use when servicing Mercedes-Benz vehicles.
XENTRY is especially appropriate for diagnosing Mercedes-Benz vehicles beginning with the introduction of the new 204-series in 2008, but it does so much more. It also includes DAS capability, which appears automatically for vehicles produced prior to the 204 series. Technically, XENTRY is compatible with Star Diagnosis basic2, Star Diagnosis compact3, Star Diagnosis compact3w, and Star Diagnosis4, but none of those are available or supported anymore. Since Mercedes-Benz leases XENTRY to automotive service businesses, you will be using it exclusively. It literally covers every system in every Mercedes-Benz since connected diagnosis started.
The XENTRY/SDS system is structured in such a way as to enable three key functions:
- Comprehensive vehicle identification. Far beyond the vehicle’s VIN, XENTRY will help you identify the build model (“Baumeisterâ€) number for the vehicle which, in turn, will allow you to view and record all of the attributes of the vehicle, including comprehensive chassis details and options as equipped. This will prove helpful for determining specifications and parameters for a particular vehicle, and will also facilitate the ordering of parts from your local Mercedes-Benz dealer’s parts department.
- Diagnosis. XENTRY will provide you with comprehensive diagnostic procedures, suggestions, and cautions. It will help reveal both known and not-yet-discovered faults. It will also facilitate post-repair quality control checks to confirm the effectiveness and accuracy of repairs that have been performed.
- Programming and software updates. Using XENTRY, you can program or re-program existing control units as necessary after servicing or battery power disconnect. Note that the memory stored in a control unit that is being updated will likely be lost, so it is a good practice to record codes and other data during a Quick Test before re-flashing. You can also program new replacement components as necessary, and you can install software updates in order to keep vehicles up to date with the latest enhancements.
Be aware that while the ignition key must be turned to the “Run†position while updating a control unit, the engine must be off since other control units will be awake, functioning, and communicating, and this can interfere with the reprogramming operation. Ideally, you want all of the other control units on that CAN to be “asleep†and not transmitting data while updating the software on a particular control unit. Also, it is best to have a battery voltage maintainer connected to the battery cable lugs while programming a control unit.
System Resources
The latest version of XENTRY incorporates a host of resources to enhance the speed and accuracy of service in independent repair shops. Included are the following features, often referred to by their acronyms:
- Diagnosis Assistance System (DAS)
- Workshop Information System (WIS)
- Electronic Parts Catalog (EPC)
- STAR Finder – Component locator
- STAR Utilities – Utilities for self-test, word processing, file management, etc.
- Benz Disassembly System – a package of video lessons showing how to remove individual parts from Mercedes-Benz vehicles
The contents of XENTRY are multi-lingual in order to meet the needs of service technicians who may be more comfortable with a language other than English.
Broad Coverage
The XENTRY system provides technical information and procedures on a wide variety of vehicle systems and components including:
- Gasoline and diesel engines
- Transmissions and electronic selector modules
- Traction control systems, including ESP, ASR, ETS, ABS, BAS, and SBC braking systems
- Active body control suspension systems
- Supplemental restraint systems (SRS)
- Body control modules, including ACP, UCP, LCP, SCM, SKF, KFB, RCM, and DCM
- Drive authorization system
- Signal acquisition modules (SAM)
- Electronic ignition system (EIS)
- Instrument cluster
- Tire pressure control
- Parktronic
- Keyless Go
- Climate control systems
- Comfort/convenience systems
What You Get
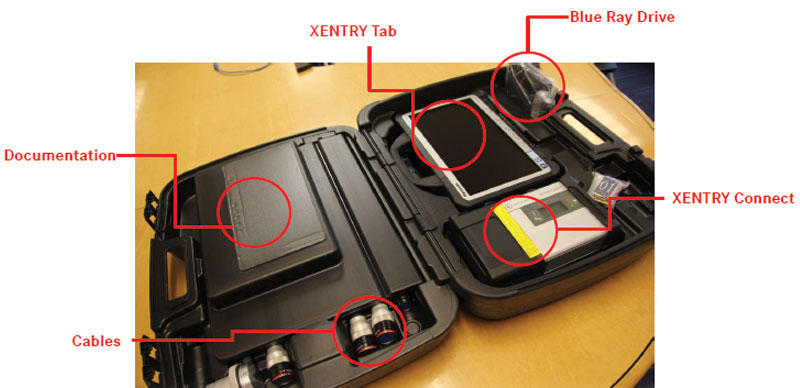
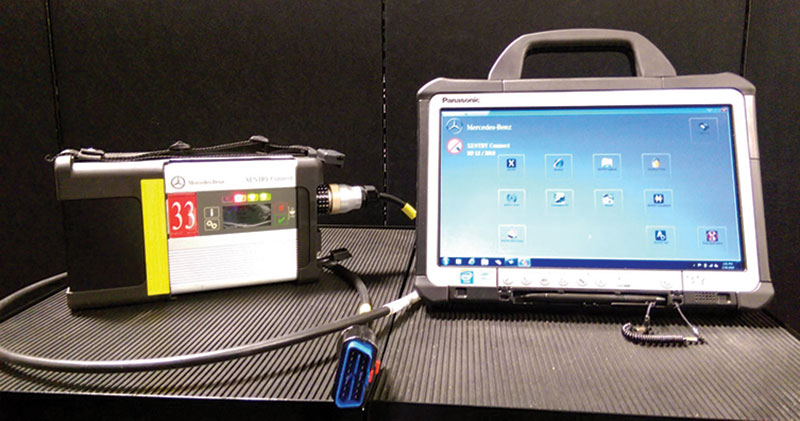
Right: XENTRY kit components are neatly packaged, and interface easily with each other and with the vehicle.
The latest XENTRY package includes hardware and software, plus a subscription for software updates every 60 days. The XENTRY kit comes in a sturdy carrying/storage case, and includes:
- XENTRY Connect main control unit
- XENTRY Tab, the multi-function unit that also serves as a monitor/display
- Blu-ray drive
- Software/DVD discs
- All necessary cabling and power supplies
The XENTRY Connect is, essentially, a task-specific PC, based on a Windows 7 operating system, on which the software runs. It has two cooling fans, two USB ports, plus an input for the power supply, a network/LAN port to use during initial setup, and an illuminated display that shows the operating and function status and includes function buttons.
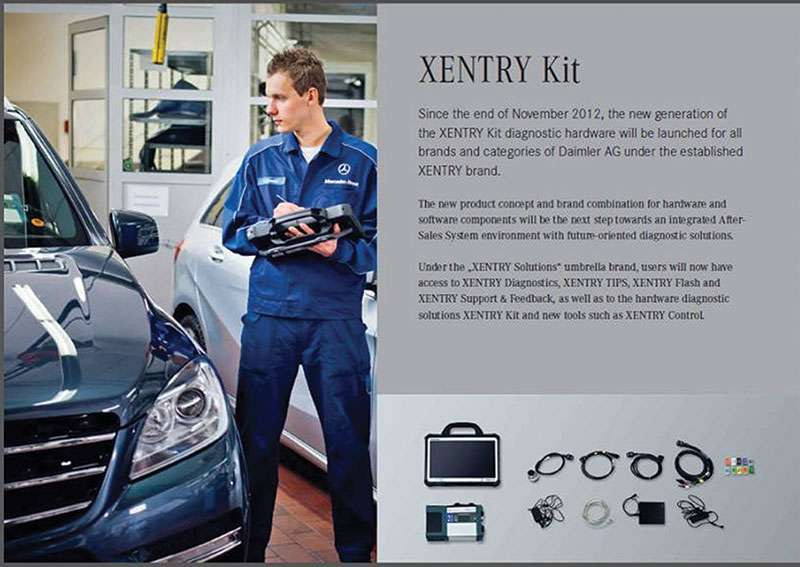
When the upgraded XENTRY kit was introduced a few years ago, most ISPs had no idea how much it can help them improve their service capabilities. Of course, software updates are ongoing.
The XENTRY display unit features a touch screen with operating pen, and is equipped with function buttons and a speaker. It has input ports for a host of connection needs, including a serial port, a LAN port for network cabling, a power supply input port, three USB ports, headphone and microphone jacks, a multi-card reader, and a WiFi on/off switch.
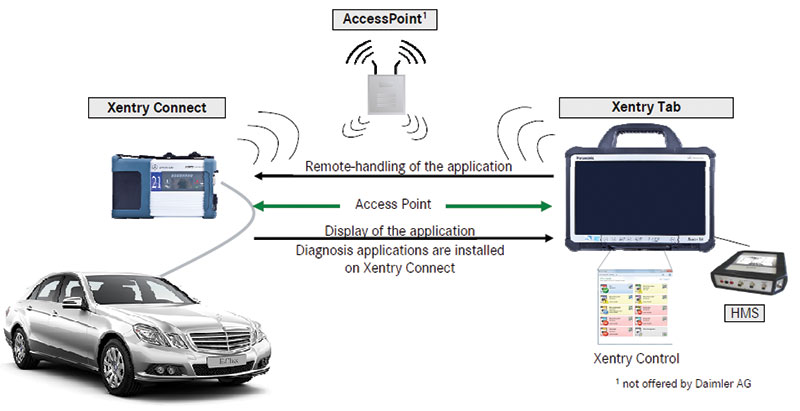
The main innovation is that all applications are installed and run directly on the multiplexer — XENTRY Connect. At the same time, it communicates with the car, interprets the vehicle’s data, and offers the wide range of DAS/XENTRY diagnosis.
Setup is Straightforward
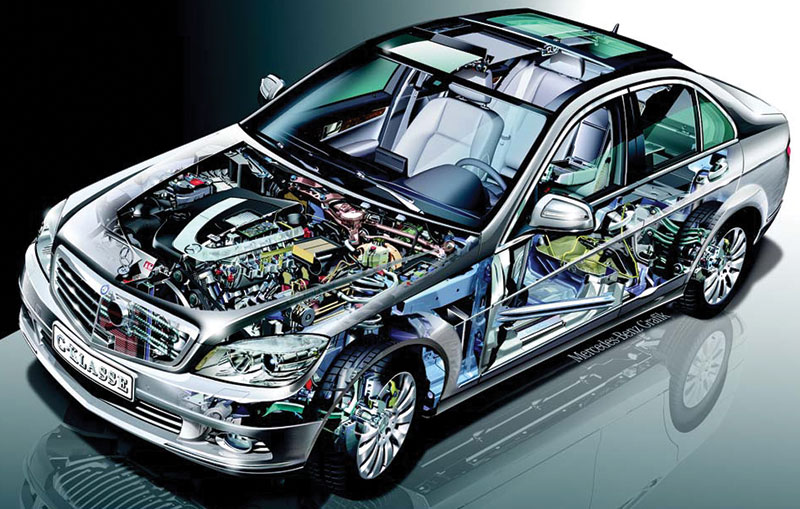
Especially since the introduction of the new 204 series in 2008, the latest XENTRY kit makes practically anything possible.
Once the various cables are connected, setting up the XENTRY unit is not difficult. It starts with opening Windows 7 and working through the self-guided Windows setup. Then the Blu-ray unit is connected via two USB cables, and the XENTRY installation DVD goes into the Blu-ray unit, where you’re asked to proceed through a self-guided configuration setup. LAN and WiFi configuration is next, as per your shop’s setup. Then configuration settings are transferred to the XENTRY Connect unit via a network cable.
The system includes expert configuration options to meet the network and internet needs of various shop setups. Once the system is set up and configured, you can use the Blu-ray update disc (every 60 days, as already mentioned). Once you insert the disc, the download process is automatic.
Controlling it
When using XENTRY, it is helpful to understand the role of the various buttons and controls on the screen. Here are some of the functions of XENTRY and the procedures for launching them. This is by no means a comprehensive explanation of all of the features of this innovative system, just an overview of the primary functions.
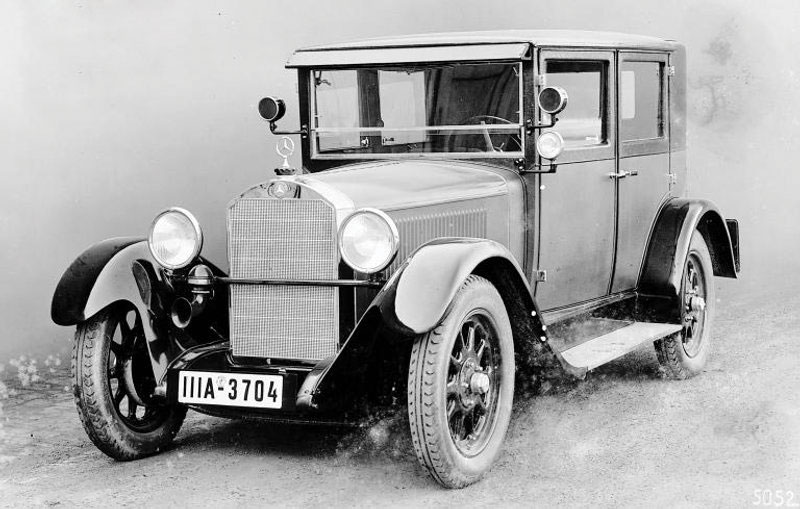
Ten Times?The 1926 to 1928 8/38 Typ 200 was the first real Mercedes-Benz, newly developed after the Daimler-Benz merger. Its 2L M 02 inline six generated 38 hp, could propel the 2,535-lb. car to 47 mph, and achieved an estimated fuel efficiency of 15.7 mpg. Why are we attaching this to an article on XENTRY? Because the technical complications that make sophisticated diagnostic equipment necessary have definitely been worth it. Consider the 2L four-cylinder in a 2016 AMG CLA45, for example. At 385 hp, it puts out 10 times the power of the 8/38 Typ 200 from the same displacement. It also gets about twice the fuel mileage. Whew! It’s obvious that the engineers have been hard at work over the last 90 years, and what they’ve accomplished adds to our value as technicians. |
Vehicle identification, preferably by VIN, but can also be provided by model year, chassis type, body style, etc.The main navigation bar is down the left side of the screen, and the icons are listed in a logical order from top to bottom. This is done so it is intuitive to work from top to bottom when using the system. Tapping the icons activates the following:
- Diagnosis via XENTRY or DAS, depending on which model series is being serviced.
- TIPS – this page, soon to be available in the U.S., requires a network connection and also a valid PAI User ID.
- WIS/ASRA net – requires the user to log into EPC net or the WIS/ASRA net server.
- EPC net – requires an online connection to EPC net or WIS/ASRA net server with password.
- System settings for language, date/time, etc.
- Exit – closes XENTRY.
In addition, icons are provided for Print and Help functions.
Attaching XENTRY to the vehicle is straightforward, starting with the OBD connector. The Control software will show that the XENTRY Connect drive is ready. You can then open the software, tap on the Diagnostics icon, and select the model being serviced.
From there you can open the diagnostics field to adjust various settings using the Diagnostics Desktop. Finally, choose the appropriate profile – Workshop Network, or Direct Connection (Service 24 hour mode).
In order to launch and actually use XENTRY, you begin by identifying the vehicle you’re working on. This is done, preferably, by entering the vehicle’s VIN. However, you can also click on the appropriate vehicle model designation and select the Diagnostics icon, and XENTRY will automatically pull the VIN directly from the vehicle via the OBD connection.
“Pass-thru†is accomplished with XENTRY Connect. It interprets the vehicle’s software language and communicates that information to the SDS.
If for some reason the VIN is not available, you can select the Passenger Car tab, then choose a model and sub-model, along with appropriate engine and transmission selection.
As you begin to enter data and task selection, you’ll note that there’s a status bar across the bottom of the screen that shows the specifics of the detail you’ve selected. XENTRY retains this information even as you continue to open multiple applications, and you can always refer to this status bar to confirm the particulars of the vehicle you’re servicing.
In fact, that’s one of the helpful features of XENTRY: It has combined a variety of applications into a single interface, so it is only necessary for the user to log on once, and to enter vehicle identification information once. This facilitates switching among multiple open XENTRY applications when servicing the same vehicle, and the system will “remember†any settings that have been changed or any changes made to the vehicle, so the same up-to-date data will appear in all open applications.
Opening the diagnostics tab will open either XENTRY Diagnostics or DAS depending on the vehicle being serviced. Newer models will open in XENTRY Diagnostics, while older vehicles will open DAS. XENTRY Diagnostics has two main views – Functions view and Control Units view, with the Functions view being the default setting. As a general rule, the default Functions view is the best choice for nearly-new vehicles, while the Control Units view is typically the most appropriate for older vehicles where targeted control unit programming is called for. There is also an icon for Special Functions that provides a pathway to information on retrofitting and conversions.
Users will be happy to know that they can perform quick tests in either Functions view or Control Units view. When using the Quick Test function, a status line will show key parameters, such as battery voltage, the status of the connection with the vehicle, and even the status of the vehicle’s ignition switch (on or off).
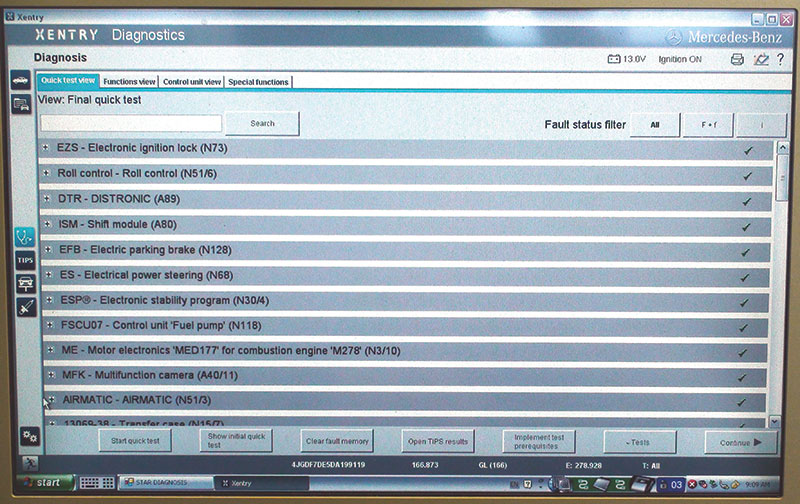
Today, since so many features are dependent on control units working together, it makes sense to run XENTRY’s “Quick Test†of all the vehicle systems at the outset of any diagnosis, as Mercedes-Benz recommends. This will allow you to see the “big picture†and avoid chasing dead-ends. You can select “Functions View,†and the SDS will pull up the units that have control over the feature you select.
The Quick Test function is a viable alternative to the Guided Fault Finding (GFF) feature in XENTRY — Mercedes-Benz recommends starting each diagnostic procedure with Quick Test. This is because this function typically leads you to the various related functions that a customer might describe as malfunctioning. From there you can look at “Actual Values†to examine live data and view adaptation information that a control unit has acquired. This precludes the need to use a DMM (Digital Multi-Meter) to test and record the voltage at each component’s signal line. If the live data shows a questionable voltage, you can confirm this reading by checking voltage at the actual component.
To determine whether a control unit is actually able to regulate an output, you can opt for the “Actuations†feature in XENTRY. This provides a simple on/off function that allows you to manipulate a control unit to operate the driver that controls the system outputs. You’ll measure the voltage on the control side of the component and determine whether or not the control unit is able to supply power or a ground pathway to the control circuit. These functions normally must be carried out with the ignition key in the Run position and the engine off, as noted above, which reinforces the need for the use of a battery maintainer during testing.
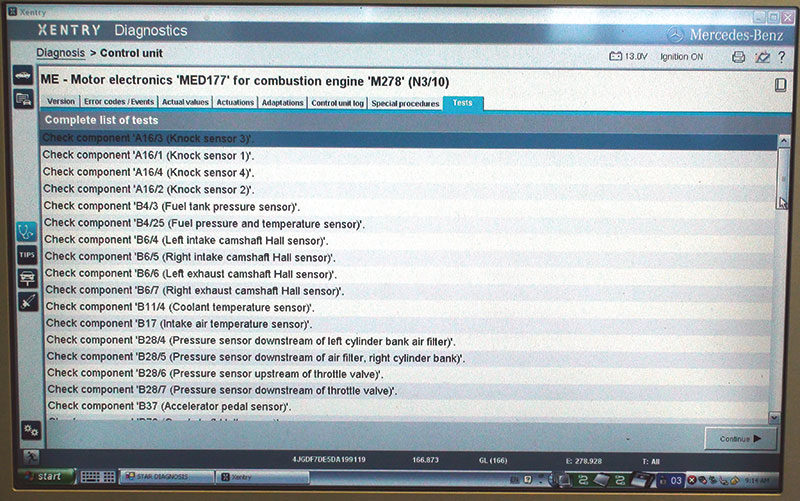
The latest XENTRY system has a “Tests†tab that expands on the previous SDS software actuations tab. You can perform static and dynamic tests for each system in a particular control unit. They will simulate the self-diagnostic functions that run automatically.
When exiting XENTRY, active programs continue to run, such as when flashing a control unit. This feature is helpful when you are connecting to another vehicle immediately after your current procedure is done. This makes it easy when working on multiple vehicles concurrently, such as when you’re waiting for one vehicle to warm up or run through certain cycles. XENTRY allows multiple programs to continue to run in the background, so you can switch between vehicles as necessary.
While the XENTRY Connect is taking care of its business, perhaps flashing a control unit, you can use the Tab for other purposes
When service is complete and you’re ready to sign off, the exit menu offers you three choices.
- You can exit XENTRY diagnostics.
- Or, you can log off from the service, in which case all on-line applications are exited, the user is logged out, but XENTRY and XENTRY Diagnostics remain open.




0 Comments