After hours of labor and attention to detail, you finally finish your transmission service, repair, or replacement only to find it still isn’t quite right. Let’s see if we can demystify some of the difficulties in transmission repair and diagnosis.
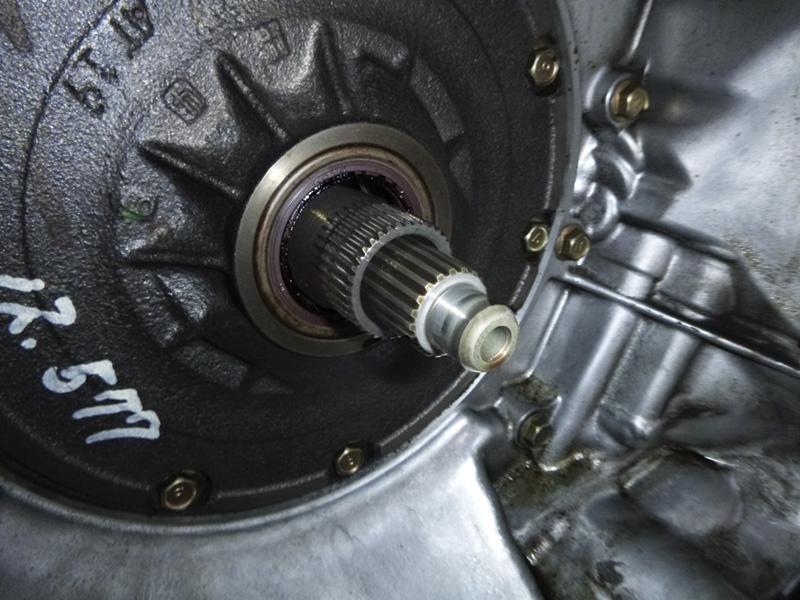
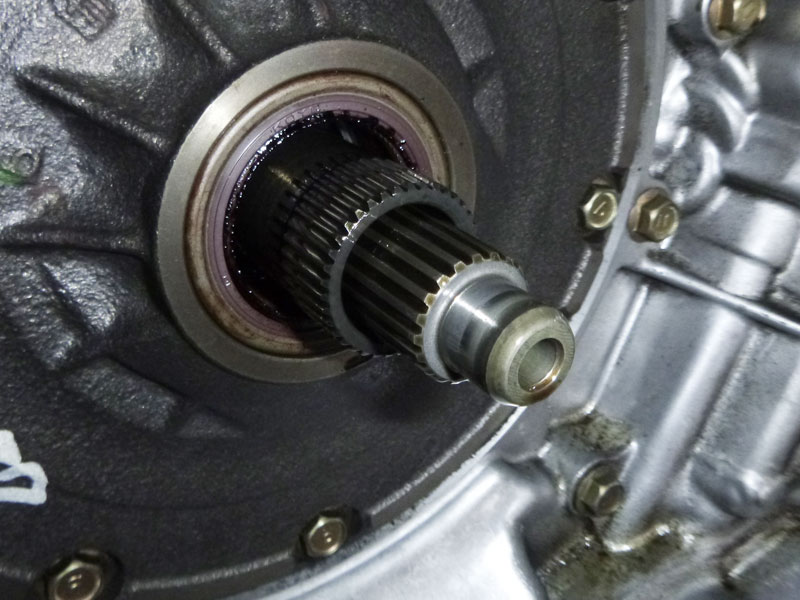
Besides the two splined shafts and the pilot surface at the tip, there are also two tabs under the seal that aren’t obvious. All four steps must be aligned and engaged in the torque converter before the transmission installation can proceed.
The modern automatic transmission is a mystery, wrapped in an enigma filled with red oil and clutches. Although the basic function of the automatic transmission hasn’t changed much over the last 60 or 70 years, it has become significantly more advanced in shift quality, timing, range of gears, strength, and efficiency. All these advancements mean much tighter tolerances and some of the most advanced computer controls in the industry.
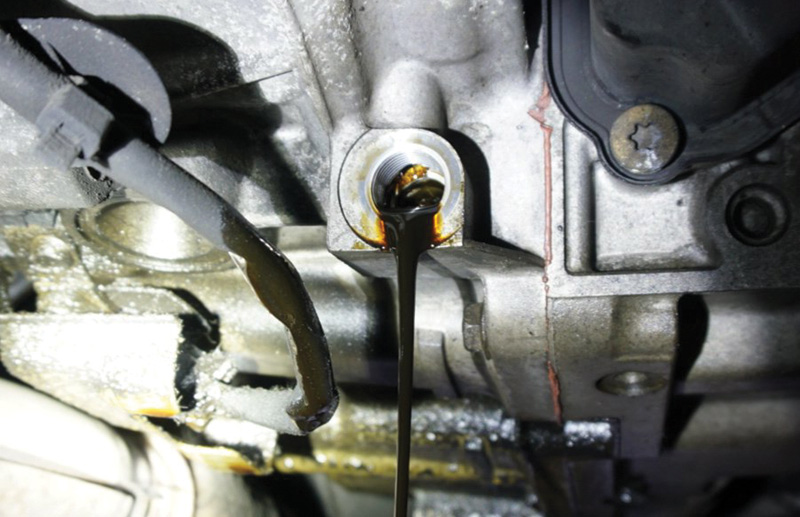
This fluid should be bright cherry red. Years of neglecting fluid service may explain this transmission’s poor shifting. Catching the fluid and examining for particles is a good idea for assessing the transmission’s condition. Some fine metal on the magnetic drain plug is OK, but any chunks bigger than 1 mm can spell disaster.
Diagnosing and servicing these transmissions will take more knowledge and attention to detail than ever before. Missing the root cause of the problem you’re dealing with can lead to a return visit and an unhappy customer. It can be a daunting task but with some patience, practice and a little bit of reading you can get to the bottom of your transmission woe and get your customer back on the road.
What makes a transmission fail? There are many things that can cause a transmission to fail. Determining where the problem originated is a critical first step in diagnosing the problem. To condemn and replace a transmission without having an idea as to why it failed may leave you with a second bad transmission in a short time.
Looking at the age range of the transmission is a great place to start. Anything less than 100,000 miles and you know it’s not just worn out. There was a component failure that needs to be identified. In a transmission over 250,000 miles you may not have to look as hard since the root cause is likely the high mileage having caused worn out clutches. Most of the time vehicles coming in with transmission problems will be within these two ranges. The first area to check is usually to talk with the customer about the way they use the vehicle and the manner in which it’s driven. Due to the tale it can tell, a peek at the fluid before that conversation might not be a bad idea.
Transmission fluid is a truly multi-purpose component. It lubricates all the moving parts in the transmission, it takes the heat to the transmission cooler or radiator, it flushes clean the passages and clutches inside the transmission and it transmits the pressure from the transmission oil pump to apply the various clutches in the transmission.
The condition of the fluid is critical to the function of the transmission. If the fluid looks brand new you might presume that a service had just been done. Did they use the correct genuine Nissan fluid? Using the wrong fluid can cause shuddering and shift problems.
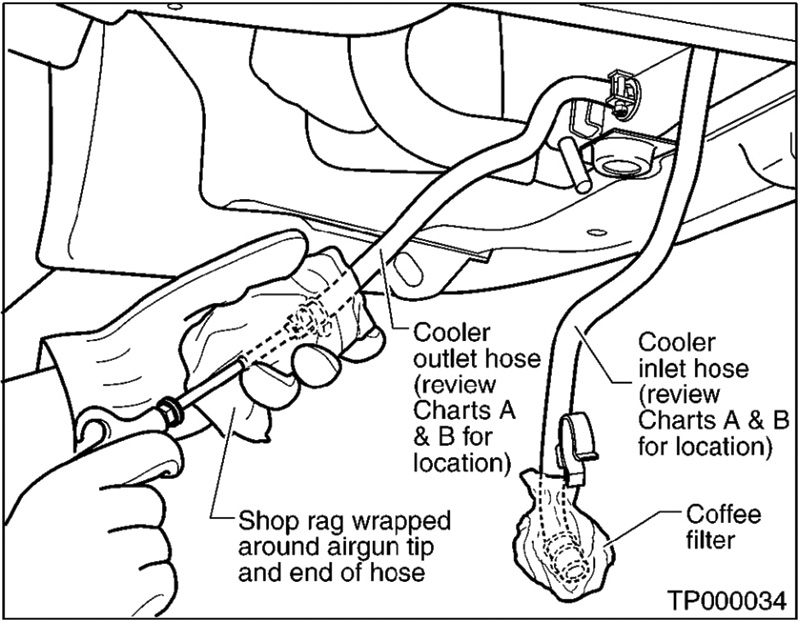
When performing a transmission or valve body replacement, cleaning and inspecting the external coolers and lines is critical to insure that no foreign particles are going to cause a premature failure in your hard earned repair. Check out TSB NTB00-056B that applies to all Nissan vehicles with automatic transmissions. It describes this procedure in great detail.
If the fluid level is low there are a couple of problems that can occur. There is less fluid to disperse the heat and clean the dirt and debris inside the transmission, causing premature wear. Very low fluid can cause the transmission oil pump to suck in air, causing a loss of main line pressure affecting shift quality, allowing flare ups and excessive wear on the clutches.
Is the fluid black and burnt? This might indicate an internal problem in the transmission or it may indicate that the transmission is being used outside of its intended purpose. Towing a 10,000 lb. boat with a Frontier or drag racing a Sentra will cause burnt fluid, for example. Mildly dirty or light brown fluid might indicate a lack of servicing. Missing these clues in the fluid before doing your repair might lead you to miss the underlying cause of the transmission problem.
Being zealous about the fluid condition during the service can also save you from a failed transmission repair. Too often the fluid is considered good, so long as there is enough in the transmission to keep it working. Even a small amount of contaminated fluid left behind after a rebuild can affect a replacement transmission.
Think about the cleaning aspect of the fluid. As the fluid ages, gets dirty and burnt, it loses its cleaning ability. It doesn’t lose its ability to transfer debris and contaminate components like the transmission cooler in the radiator and the hoses to it. An unsuspecting technician might install a new transmission without considering the debris lurking in these lines. The new transmission fluid will promptly clean this debris out and flush it right into the new transmission.
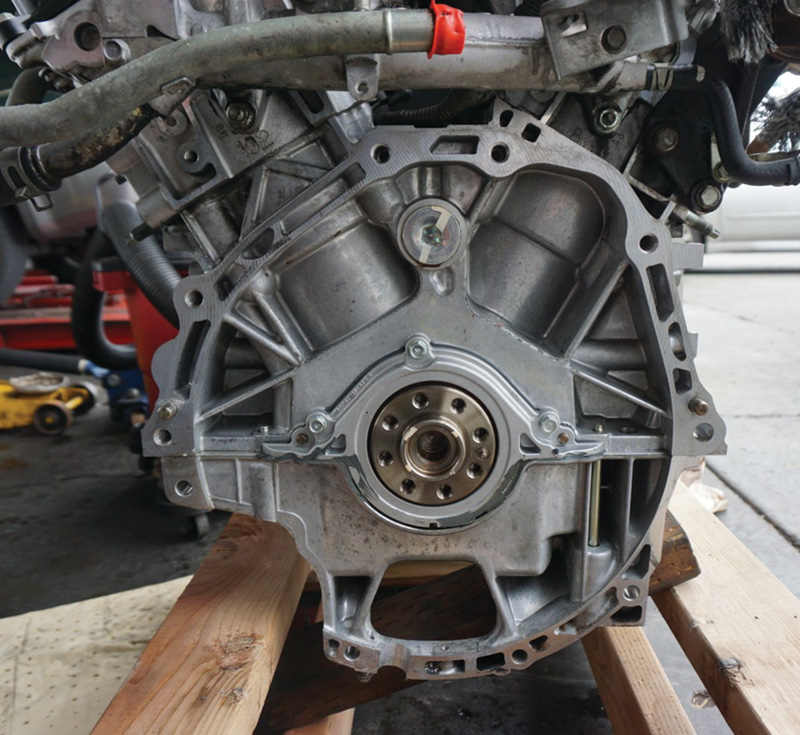
The dowels on either side of the bell housing at 9 and 3 o’clock and at the 3 o’clock position on the crankshaft are absolutely critical. More than just a guide for your install, these are designed to insure perfect alignment between the crankshaft and transmission input shaft.
It may seem like an excessive upsell for an already expensive job, but replacing the radiator and any external transmission coolers is a reasonable precaution to take. At a minimum, the lines and coolers should be thoroughly flushed with air, then genuine Nissan transmission cooler flush fluid (PN999MP-AM006P), then flushed with more air.
The most common way of cooling the transmission fluid is a small cooler inside the radiator. Since temperatures in a hot transmission reach above 300 degrees F, cooling with engine coolant that’s only about 200 degrees F is very efficient. Over the years this has become the standard method. It also introduces a potential failure where a relatively inexpensive part, the radiator, can instantly ruin, beyond repair, the transmission.
Most Nissan vehicles are not prone to this failure. It may happen, but only in unusual circumstances. When a radiator leak allows coolant into the transmission fluid. It’s fairly well known that if any water based liquid gets in the transmission, whether by flood or radiator failure, it will homogenize with the transmission fluid making what has been called “the strawberry milkshake of death†SMOD for short.
Many aftermarket transmission rebuilding shops will recommend or require that an aftermarket external oil cooler be used and the internal radiator oil cooler be bypassed to avoid this kind of failure happening in the future. When doing any major repair or replacement of the transmission, consider that confirming the radiator has been replaced recently or replacing it yourself can save you the possibility of a transmission killing SMOD event. Â Â
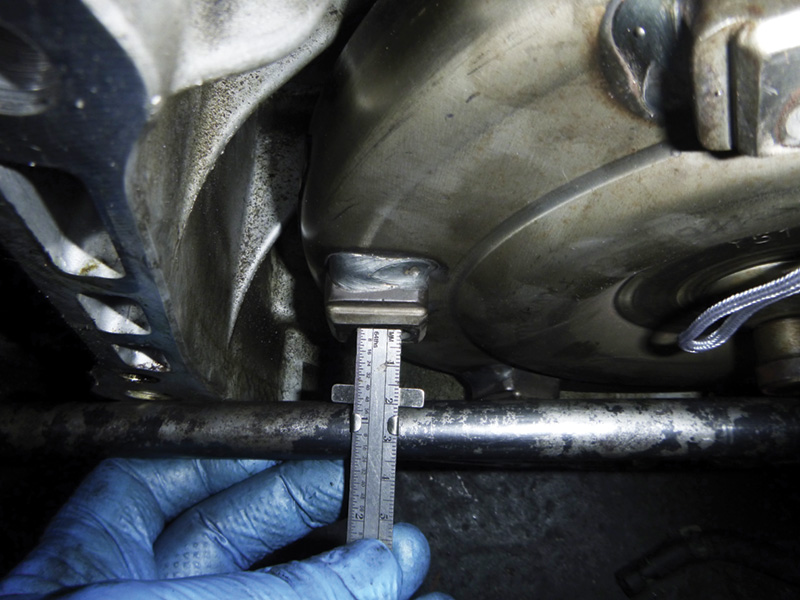
Actually measuring the torque converter setback into the bell housing will ensure that it is fully seated and safe to install. The distance required should be more than the distance the flex plate protrudes from the engine.
Replacing a transmission can be a stressful job. It takes a lot of time, so it’s tempting to cut corners. On the other hand you only want to do it once. Using a little caution during the installation process won’t take too much longer but it can save you the time and expense of doing it a second time because something went wrong.
Take for example the dowels that line up the engine and transmission. These are the main reason you will have to pry the engine and transmission apart. Should one of the dowels stick in the old transmission it is critical that it be replaced in the engine block. These dowels aren’t there to make your install easier (although they do); they are there to insure the centerline of the crankshaft and the centerline of the transmission are lined up perfectly. Even the tiniest shift in position would spell disaster for your new transmission.
This is also true of the crankshaft alignment dowel. In the case of vehicles with the crankshaft position sensor tone ring on the flex plate, like the VQ35DE 3.5L in the mid 2000s Maximas and Quests, failure to use the dowel to line up the flex plate will result in a CKP sensor problem due to the tone ring being in the wrong position.
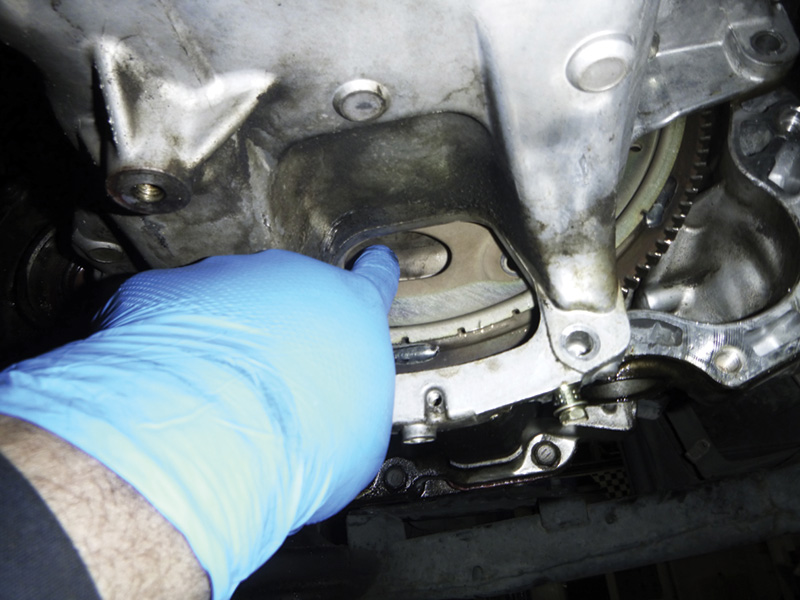
The torque converter should spin freely behind the flex plate to confirm it is fully seated in the transmission. If it’s stuck, find out why, even if it means pulling the transmission back out.
By far, the most painful failures are the ones caused by the installation. Bad parts or misdiagnosis can be frustrating, but actually damaging a transmission because you installed it wrong can crush your morale. With little argument, the worst installation error with an automatic transmission install is actually an easy mistake to make. It’s lovingly referred to as “stacking the pump.†Basically it’s when the torque converter is not fully engaged in the transmission oil pump when the transmission is bolted up to the engine. This alone can damage the pump as the bell housing bolts are tightened.
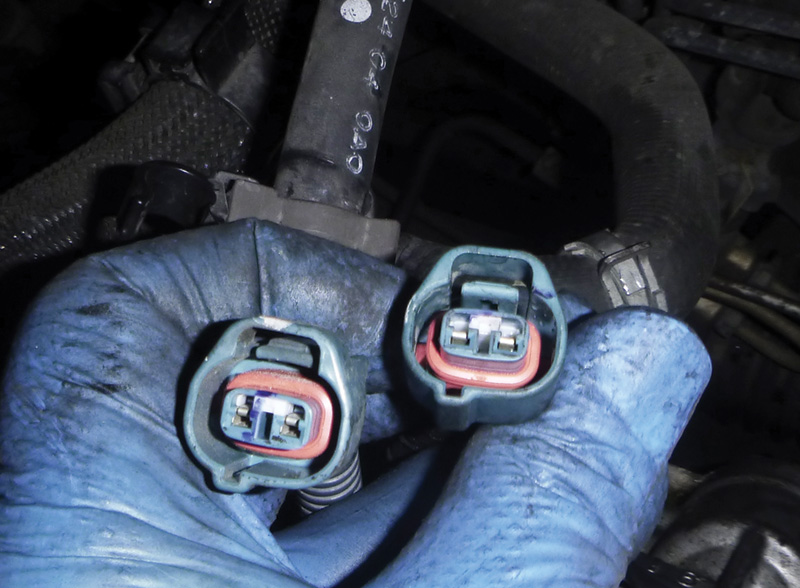
One of these is for the turbine revolution sensor (input speed sensor) and the other is for the revolution sensor (output speed sensor) and yes, they will reach and fit the wrong sensors. Aside from just remembering where the connectors go make sure the fit makes sense. Most connectors are different to prevent mix-ups, but not all.
It is possible in some cases to actually get the torque converter bolted up and even crank or start the engine. If this happens it will mean severe damage to the transmission oil pump and metal particles being sent through the rest of the transmission including the valve body and possibly even further. Since the consequences are so dire, extra precautions should be taken at several steps in the installation process to ensure that the torque converter is fully seated.
When installing the torque converter in the transmission it will seem to engage in several steps making it a little difficult to tell when it’s all the way in. If there is any doubt, simply place a straight edge across the bell housing and measure from the straight edge to the mounting bolt hole on the torque converter. You can use the flex plate as an example of how deep it should be. It shouldn’t be a tight tolerance.
When the engine is running the torque converter is bolted up tight to the flex plate and has room on the transmission side to prevent binding. This gap can be a quarter inch or more. As you bring the transmission into the engine be sure to keep the torque converter vertical or tilted back into the transmission. Allowing it to tilt away may let the torque converter slip out of position while trying to align the transmission.
Always double check after the bell housing bolts are tight by simply turning the torque converter with your fingertips. If all the exterior bolts are tight and you can still turn the torque converter easily you are good to go. If the torque converter won’t turn freely, stop, find out why and fix it before moving on.
A really bad situation techs can find themselves in is having taken a transmission out and then, due to scheduling, wrong parts, or whatever reason they can’t put the replacement transmission in right away. Having to come back to the job several days or weeks later can present a whole new set of challenges.
A system to keep bolts organized and parts safe is a must. Using an old muffin tin is an excellent, and inexpensive, way to keep your bolts organized for example, as is a magnetic steel dish.
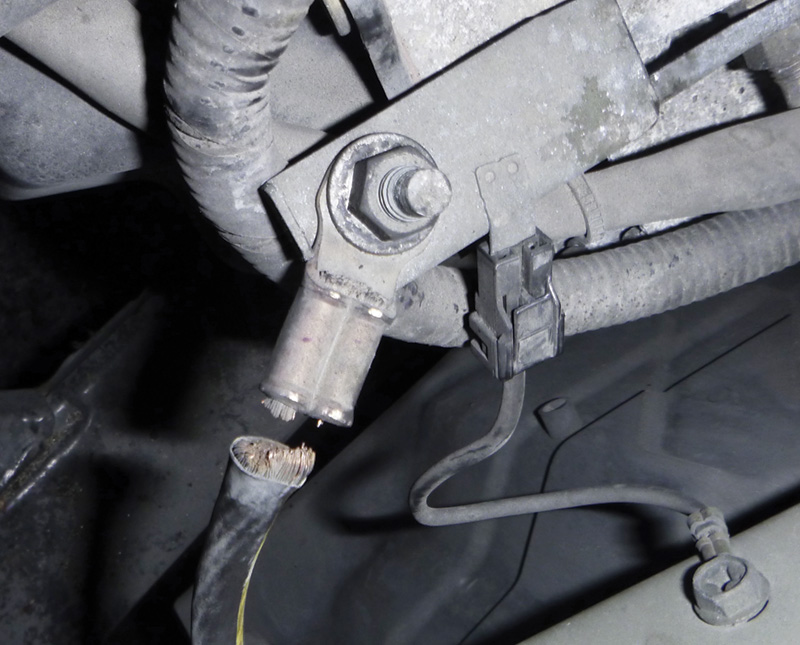
As with any computer controlled system, a broken ground can cause all kinds of weird problems with the TCM. A simple wiggle test revealed this broken ground wire.
Bigger challenges can arise in the wiring harness. It’s important to be diligent in making sure the wire harness is routed the way it was designed to be routed. This will help make sure you get the right connectors on the right sensors. Most of the time connectors have small differences to insure mistakes don’t happen, but not always. Oxygen sensors, motor mount sensors and some transmission speed sensors can have the same connector type and be close enough to be connected incorrectly. These kinds of mistakes can be especially frustrating to diagnose. Making sure you have the harness in the right position to start with can save you big headaches in the end.
As the technology for these advanced transmissions increases, so does the need for specialized parameters in the transmission control module. Shift points will differ from model to model with the same transmission. This necessitates that the TCM is programmed specifically for each vehicle.
Since many Nissan transmissions have the TCM as part of the valve body inside the transmission, replacement of the valve body and TCM or entire transmission will require programming of the new TCM. The typical way this should go is the parameters from the old TCM would be uploaded into a Consult III, Consult III Plus or in some cases even a Consult II or aftermarket scan tool, before it is removed from the vehicle. After the repair is complete and fluids in, the parameters from the old transmission would be downloaded to the new TCM. Confirmation with a test drive and a check for trouble codes to ensure everything worked and you’re done.
If the old TCM is damaged beyond its ability to communicate with the scan tool, or if parts were changed before finding out about this procedure, it is still possible to get the correct information into the TCM with the use of a CONSULT III or CONSULT III Plus. The transmission should function without being programmed but in a default or limp mode of operation.
It’s important not to condemn a repair until you have confirmed that the TCM is programmed correctly. When installing a used transmission with the TCM in the valve body, it’s still a good idea to program the TCM. It may have programming that works but it may not have the right parameters for your application.
TCMs and ECMs share a lot of information back and forth as the perfect shift is planned for every driving condition. A mistake that is made on occasion is to assume that a problem with shifting in an automatic transmission is internal and requires the replacement of the transmission. This leads to the possibility of a costly transmission replacement not fixing the customer’s complaint.
It is important to consider the inputs from the engine that might have an effect on the transmission’s shifting. Consider that air flow, manifold vacuum and throttle position are all taken into consideration in the timing and intensity of the shift. Any missing data will be recognized by the ECM, will cause a DTC, and will not be taken into consideration for the shift. A skewed reading might get missed by the ECM and cause the transmission to shift incorrectly. If the shift is not as it should be and no codes are present in the TCM, take a quick look at the engine data to make sure nothing is out of place before assuming it’s an internal transmission issue.
If you are cautious about the quality of your parts, immaculate in cleaning and preparation, and up to date with the technology in TCM programming, transmission repair can be fun and profitable. The important thing is to take the time to be sure of your diagnosis before removing the transmission. Guessing with expensive repairs will eventually cost you. Â
Â



0 Comments