
How They Work and How to Troubleshoot Them
Cabriolets have always represented a challenge
in car bodies.
A beautiful sunny day, not too hot, temperature just right, cruising the countryside with the top down. There’s nothing like it and that remains the reason convertibles and retractable hardtops are popular among driving enthusiasts. But does the lack of a roof structure mean they are flimsy? Well, no, because engineers recognize this and beef up the structure to keep them safe and dependable. According to Autobytel, the Mercedes-Benz C and E Class models are among the safest convertibles in the world. What it does mean is that there are some structural differences in car bodies when a soft top is involved.
Since a cabriolet has no fixed roof, a car loses a major part of its structural support system. Even though reinforcements are added, convertibles might not always make up for the loss of the roof. Even with the top up they tend to be noisier. Leaks can also be a concern for a soft top. Roof materials have improved considerably but as a vehicle ages, rain and heavy snow can still find their way in. There is also the issue of compromised security: A cabriolet is much easier to break into, a quick slash of the top and you’re in. Exposure is also a concern: Interiors, seats, dashboards and trim can become sun damaged and cracked over time. Still, convertibles remain a popular concept and you will continue to see them in the shop, so it’s important to understand how they work and how to service and repair them.
Theory and Operation
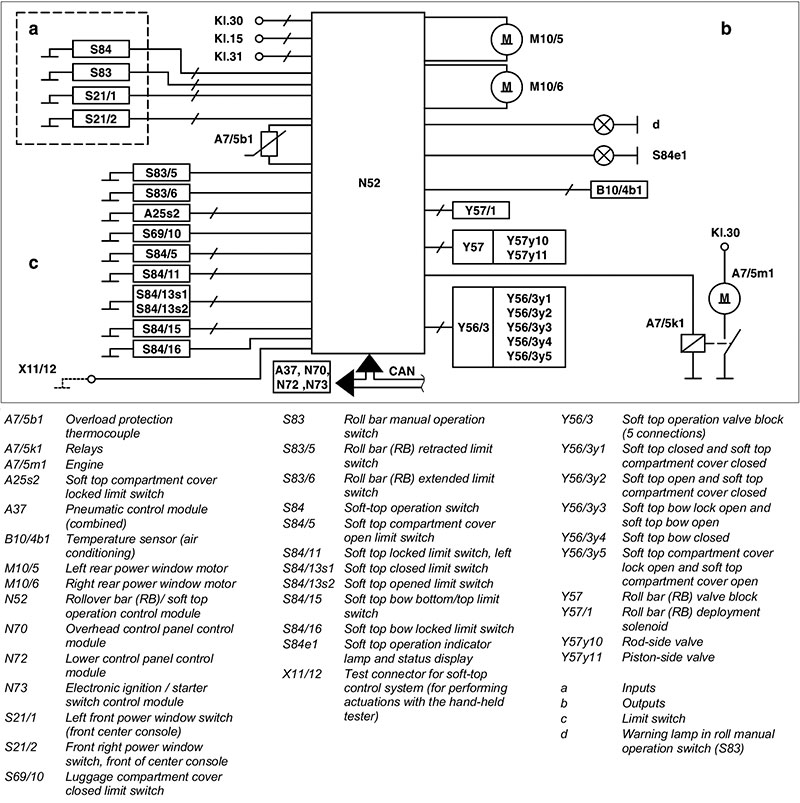
Any analysis of the soft top or retractable hard top (vario-roof) operation of Mercedes-Benz vehicles will be futile at best without access to the latest function and wiring diagrams. Engineers are continuously improving upon the function and ease of use in the convertible top function, so it’s important to consult the most current data and workshop information. Here is a rundown of a 208 CLK chassis with a soft top. Others may be similar but again, changes and improvements are constantly being made.
Opening the soft top consists of an 11 stage operation. The following stages are adapted from WIS document GF77.30-P-2002KA:
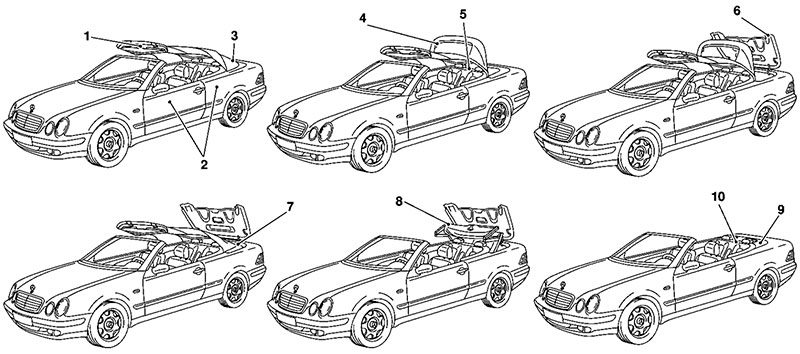
Stage 1
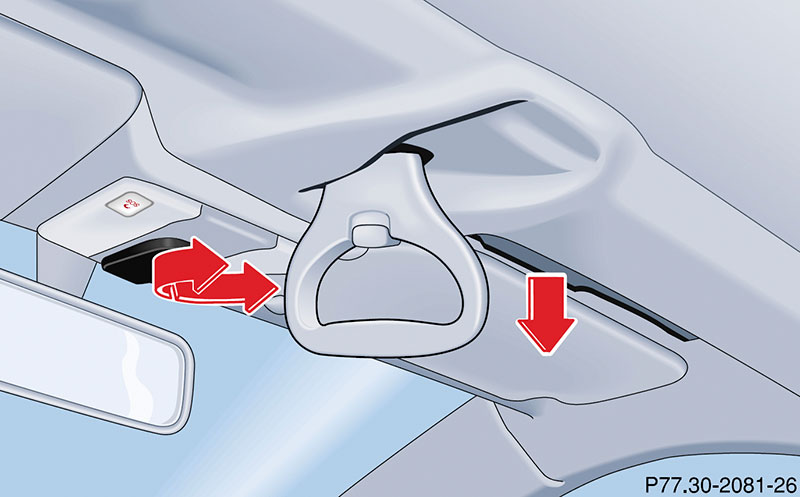
Pull down and turn the release lever at the windshield header to the clockwise and gently push up the front of the soft top about 8 inches. Return the release lever to its stowed position. The indicator lamp in the soft top operation switch (S84), located on the center console, lights.
Note: If the indicator lamp flashes slowly, there is a malfunction. If it flashes rapidly, the trunk lid and/or luggage cover may be open and needs to be closed. Remote trunk release is not possible until the soft top is completely open.
Pull and hold the symbol side of the soft top switch. For safety reasons the opening procedure is interrupted immediately at any time if the switch is released.
Stage 2
The side windows at the front and rear are opened electrically. The roll bar is lowered hydraulically if it is up.
Stage 3
The soft top bow is unlocked hydraulically.
Stage 4
The soft top bow is pivoted hydraulically until in an approximately 90 degree position.
Stage 5
The soft top compartment cover is unlocked hydraulically.
Stage 6
The soft top compartment cover is pivoted upward hydraulically.
Stage 7
The soft top bow is moved hydraulically into the soft top compartment.
Stage 8
The soft top is moved hydraulically into the soft top compartment. The temperature sensor (B10/4b1) for the air conditioning is automatically switched to ground by the roll bar/soft top operation control module (N52).
Stage 9
The soft top compartment cover is pivoted downward hydraulically.Â
Stage 10
A signal sounds from the overhead control panel control module (N70) confirming the correct operation. The indicator lamp in the switch switches off.
Stage 11
If the switch is held, or released and lifted again within 2 seconds, the side windows at front and rear are closed and the roll bar raises if it was initially raised.
It is important to note the even after the individual limit switch positions have been reached, the corresponding hydraulic cylinder still remains actuated for a short time to compensate for tolerances of the limit switch switching points. The closing operation is basically the reverse of the opening procedure, with safety and pinch protection built in.
Troubleshooting
Understanding each stage of operation can be of great help in diagnosing and troubleshooting soft top failures. Very often the customer’s concern is going to be a failure of the top to open or close, or a stopped operation somewhere in between. A careful analysis of the stage where an operation fails, combined with an understanding of which components are involved at that stage, will greatly aid in diagnosing faults.
When confronted with a customer complaint, the first step is to find what isn’t working. Try to operate the top using the switch. If it works, but stops at a certain point, you need to first identify which limit switch is supposed to be signaling the top’s position, and find out why it isn’t doing its job. Easily said, but it can be time-consuming in practice. Again, the information in WIS is essential to understand what is supposed to happen and when.
If completely inoperative, check the obvious first: Are the trunk and luggage cover closed and engaged in the limit switch? Operation switch OK? Fuses OK? Power & ground to the hydraulic pump OK? Don’t neglect the limit switches that are needed at the end points (open or closed).
With a Mercedes-Benz XENTRY Diagnosis tool, all these tasks are greatly simplified, since XENTRY displays not only the actual values of all the switches and circuits, but contains excellent diagnostic trees and supplemental information to make this a breeze.
Electro-Hydraulic Operation
The Mercedes-Benz Workshop Information System (WIS) documents show how each stage of operation is governed by electric or hydraulic (or both) systems. Determining which of the two are at fault, while still considering a mechanical fault (bent or broken component), is your first step in diagnosing a customer’s concern.
One of the most common failures in the field where there is a complaint of no or limited soft top operation is that the hydraulic fluid is low, thereby impairing the operation of all the hydraulic rams.

If you have a XENTRY Diagnostics system perform a quick test for any fault codes. Make sure vehicle system voltage is sufficient, as low voltage can have an effect. Then verify that the hydraulic fluid reservoir is sufficiently full.
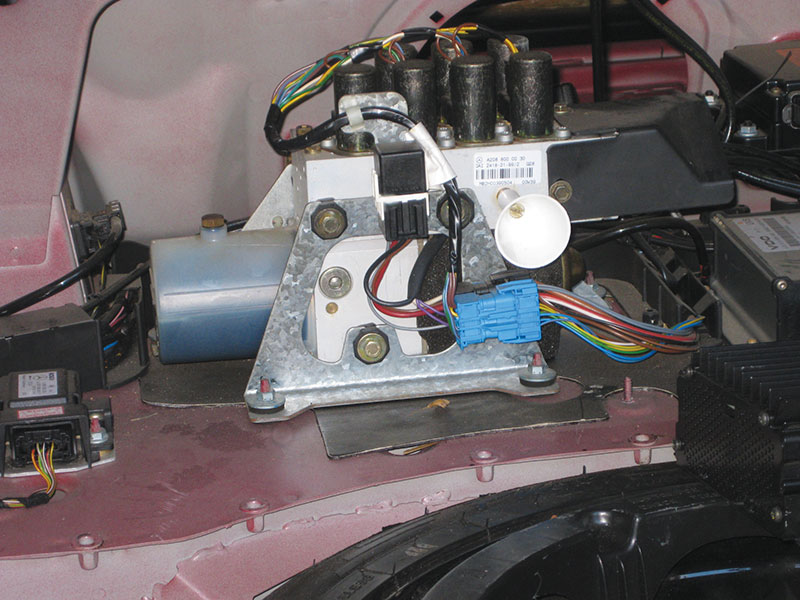
In Model 208, the pump is found forward in the trunk compartment. Visually check the fluid level and top up if necessary. Note that the torque spec on the plug is just 2 Nm, which is just barely finger-tight. Be sure to use the correct fluid, MB specification 343.0 or higher, corresponding to part # A000 989 91 03 10.
In other models, follow the WIS instructions, since the top may need to be open or closed when checking the fluid level.
Bleeding the system after topping up or making repairs is necessary. Most top systems are self-bleeding. With the engine running to ensure sufficient system voltage, operate the roof four complete open-close cycles to fully bleed the system. Some noise is normal as the pump aerates in the process.
The hydraulic system is a closed system, so if you find you have had to add fluid then there must be a leak. Probable components are the lines, hydraulic cylinders, and the pump itself. Carefully inspect all of the items and replace as necessary using the correct WIS repair information. The lines are plastic and susceptible to damage over time, particularly in vehicles exposed to inclement weather and harsh conditions.
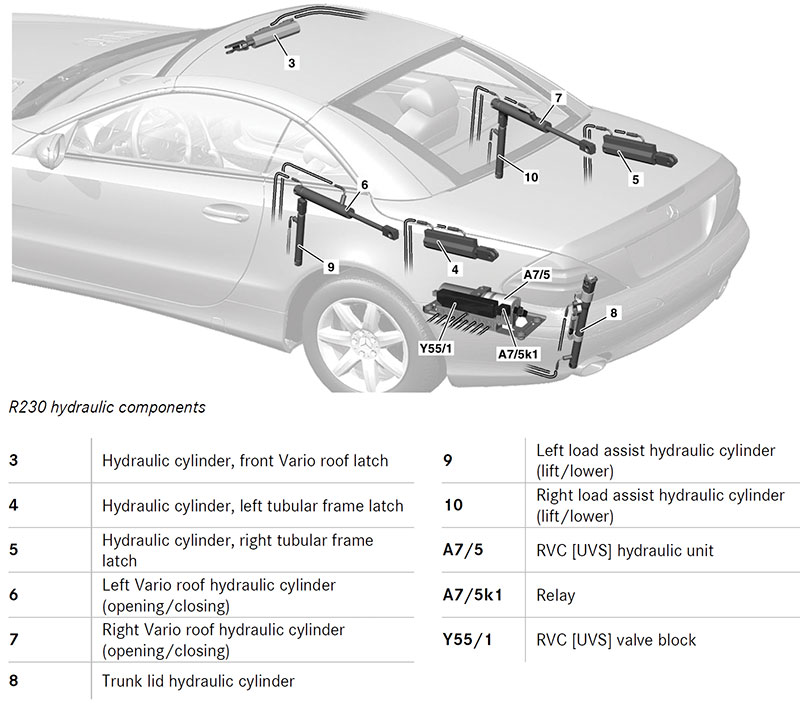
Hydraulic Cylinders

All hydraulic cylinders operate on the same principle: Push pressurized fluid in, and the piston on the cylinder is moved, as long as the outlet isn’t blocked. So, fluid behind the piston extends the rod, and fluid in front of the piston retracts it. Because the area of the rod subtracts a small amount from the piston’s effective area, a cylinder pressurized equally on both sides will extend: With the same number of pounds per square inch, the piston end has a little more square inches, so more pounds of force result.
Manual Operation of the Soft Top
When the top is completely inoperative, you will need to manually operate the top to inspect components or make repairs and adjustments. The following applies to a model 207 E Class cabriolet, and assumes the top is retracted, but as previously mentioned always consult the workshop information for the procedure used in a specific model.
Apply the parking brake and remove the key. Lower the head restraints automatically or manually. Open the side windows and get the 6mm Allen wrench from the owner manual packet. Also get the two black straps from the vehicle tool kit.
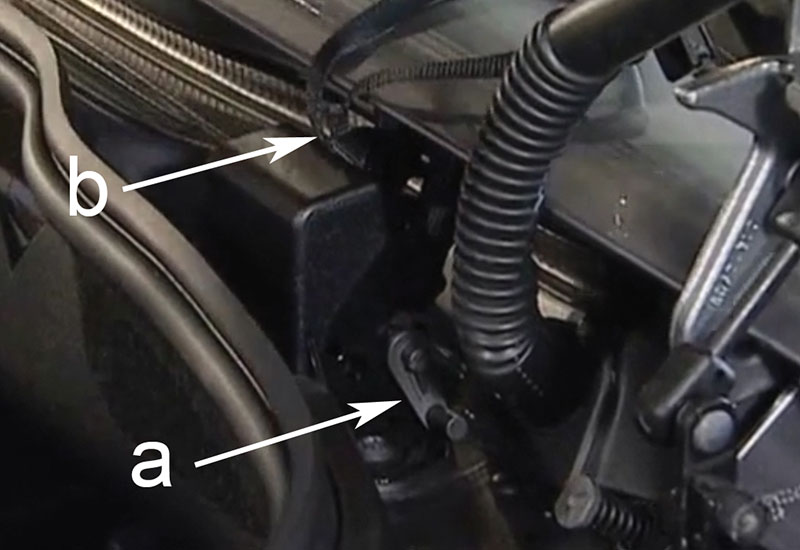
Open the cover in the trunk on the left-hand side to get to the pump, and move the foam covering aside. Open the brass valve screw for the hydraulic unit using the Allen wrench by turning it one turn counterclockwise. The hydraulic system is now unpressurized.
Next, open the perforated trim on both sides in the trunk – you may have to cut the trim with a knife. Pull out the black lock knob on the lid cylinders, up to the end stop, and then turn the lock 90° counterclockwise. Make sure that the lock is not pulled back in again. The soft top compartment lid is now unlocked.
On each soft top compartment hinge is a lever – flip these levers down. Take the straps and pass them behind the top of the hinge and through the resulting loop so you can pull on them. Lay the straps onto the soft top compartment lid – do not pull on the straps while the trunk lid is still open. Where applicable, remove the Allen wrench and the vehicle key from the trunk. Close the trunk lid.
Caution: Keep the trunk lid closed, or there may be damage to it or the top lid. Two people are absolutely required for these next steps, or the top will get twisted from uneven force!
Using the straps, pull the rear of the soft top lid to the rear and upwards. Lift the front of the soft top compartment lid until it is vertical. Hold it there.
Each person needs to reach deep into the soft top compartment, under the top, and lift the top from the compartment until it unfolds and rests gently on the windshield header. Move slowly.
Pull off the roof lock cover behind the overhead control panel. Open the lock by turning the Allen wrench clockwise up to the end stop. Press the top down gently into the latches, and turn the Allen wrench counterclockwise to the end stop. The soft top is now preliminarily latched at the windshield frame.
Move the soft top tensioning frame (rear bow) to a vertical position and lower the soft top compartment lid. Then apply a flat hand to press the soft top tensioning frame downwards, until it makes contact with the base of the soft top compartment lid. Push the soft top tensioning frame forwards/down until it engages in the guide. Then lock the roof lock on the front of the windshield frame by turning the Allen wrench counterclockwise up to the end stop. The roof is now closed.
Care and Maintenance
Care of the soft top material is primarily the responsibility of the vehicle owner. Keeping the material clean and cared for will extend the life of the top. Your Mercedes-Benz parts department can help your customers choose the right products for the job.Â
Keeping the fluid up and inspection for leaks, proper fit and smooth operation are the primary maintenance items.
Typical concerns to be addressed are going to be wind noise, leaks, rattles, and rough operation. When dealing with noise concerns, especially rattles, ensure that the customer removes all personal belongings from the vehicle before the vehicle analysis. It is extremely helpful to have the customer accompany you on the test drive to demonstrate the complaints.
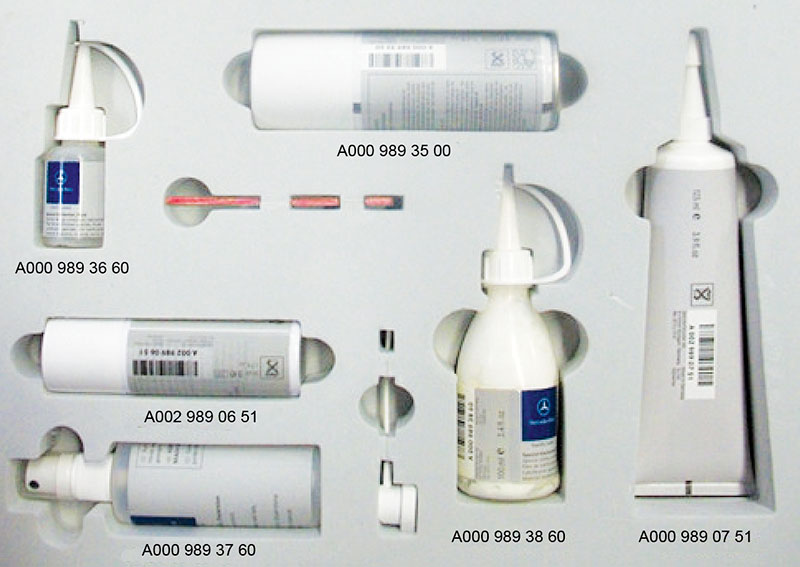
Dry and dirty seals are the most common cause for creaking, cracking and ripping noises while driving. Clean the seals thoroughly with a cloth and mild detergent, then apply the special antifriction agent A000 989 36 60 (liquid) with a clean cloth.
Rattling noises, particularly on rough roads, from the windshield header could be caused by mis-adjusted latches or worn components. The trick is to drive the car to reproduce the condition, while a passenger listens to locate the source. A paper towel tube is an effective way to focus your hearing to a specific location.
Air and water leaks need to be localized. Temporarily cover suspected leak areas or cracks making wind noise with masking tape. In the vehicle, use a passenger to cover suspected areas with a cloth to see if wind noises change or disappear. While the top itself has few adjustments, the doors and windows have several, and a problem with any of them means a noise or leak.
These are examples of just a few areas where noises can develop over time. There are dozens of pivot points and adjoining areas where you may have noise complaints.
A good idea for dealing with all retractable roof systems roof systems is to develop a maintenance package that consists of cleaning, lubricating and adjusting all moving parts and pivot areas.
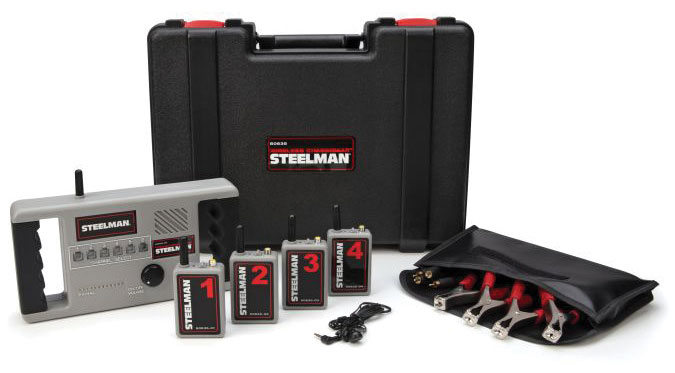
Mercedes-Benz recommends the use of the Betasonic 1000M ultrasonic noise kit: Ultrasound is transmitted inside the closed vehicle while a special receiver is used. Even the smallest crack will allow the tiny ultrasonic sound through, making localization of leaks fast and easy. A remote microphone system like ‘Chassis Ears’ is also a potentially useful tool for noises originating outside the passenger compartment.
Working on convertible tops can appear daunting with all the various hydraulics, control units and complicated pivoting and locking systems in place. Start with the basics, get a complete and accurate description of the concern from the customer and take the maintenance and repair in stages.


0 Comments