

This article is intended for the young and learning technicians, and us old folks that need another addition to our bag of tricks.
The saga of this BMW enabled the use of various testing tools over many months off and on, when the vehicle owner returned for known service updates and repairs. The article describes tools from a factory setup to Android devices with “olde school†slack tube manometer and simple meters that send data via Bluetooth.
| Tools used |
| Laptop running ISTA + and ICOM |
| Screen capturing and screen (video) recording software |
| Built-in/added PDF printer to save scan data |
| 90 amp power supply with DLC breakout box |
| Android tablet running Launch (Easy Diag) and various OBD II platforms |
| Olde school Dwyer slack tube manometer and mechanical vacuum gauge |
| 40, 60 and 200 amp clamp testing |
| Sperry Smartmeter |
Victim
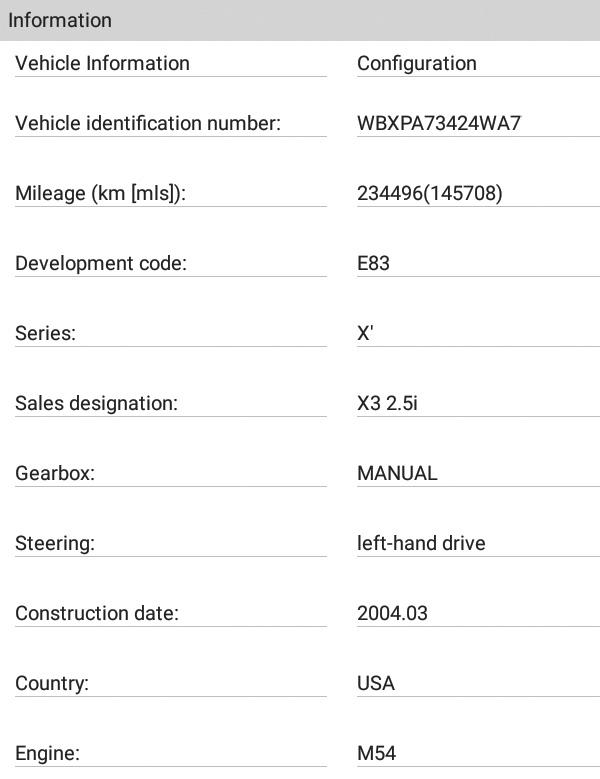
2004 BMW X3 2.5i with M54 and manual transmission.
To date having 250,000 kilometers, this model has been well taken care of.
The only non-factory installation is a radio with folding screen.
Simple advice
Modern scan/test equipment offers many ways to capture events with captured images, but at times a video recording may offer different results during a mixed city/highway road test. Look at it as “proof over time.â€
Adding extra “high tech†recording software is not difficult.
The best option with BMW models is the factory equipment because of the incorporation of bi-directional control with test plans and supporting documents. There are other options with less setup time.
Incident 1
The first complaint (210,000 km) about the BMW was a constant/repeating rough running condition on the first start and the occasional misfire while driving.
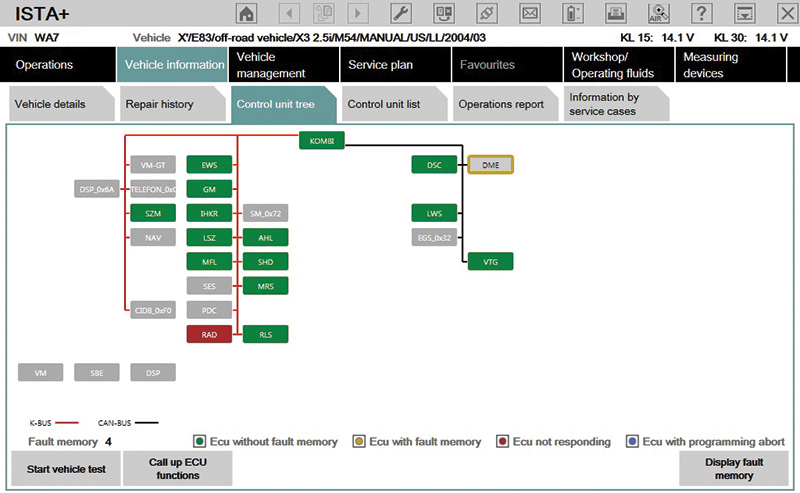
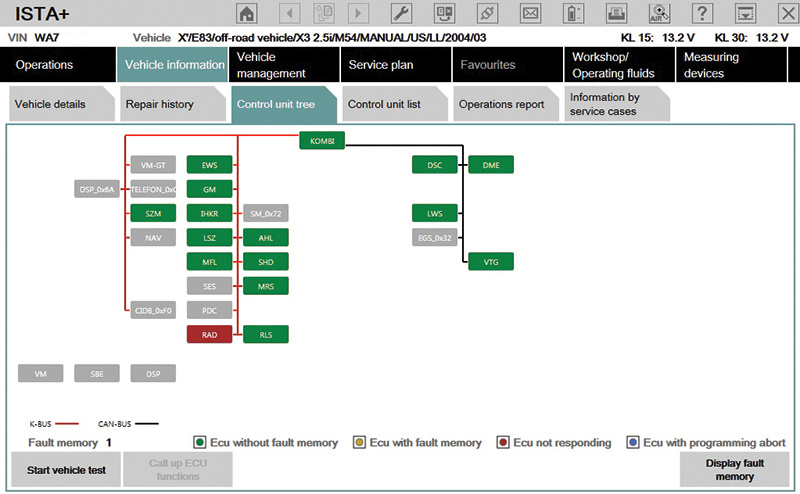
The factory equipment offers a view of the various network connections and a quick view of any controller that may or my not have a fault. That view will also include any controller that may not be communicating within the network.
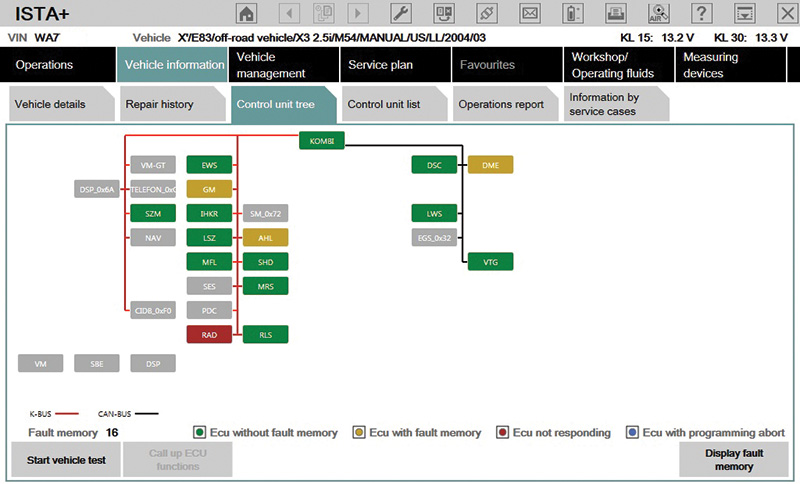
After the initial identification, the control unit tree indicates three controllers with faults and a radio that is not communicating (it was replaced). The virtual PDF printer saved each step and repair.
The primary DME fault leads to a lean condition. Data via MAF is an indicator, but “standing on the fenders†and attempting to remove the oil filler cap was a chore. It would seem this model has an internal leak with the ventilation system. The choice was to replace the defective assembly with the intake manifold attached. Disassembly/inspection offers an added defect.
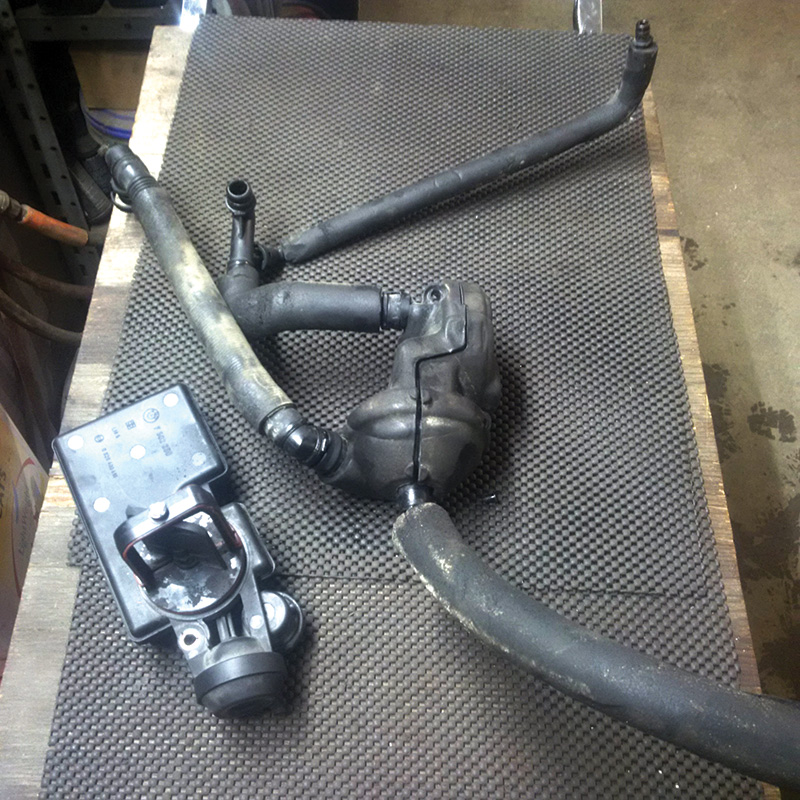
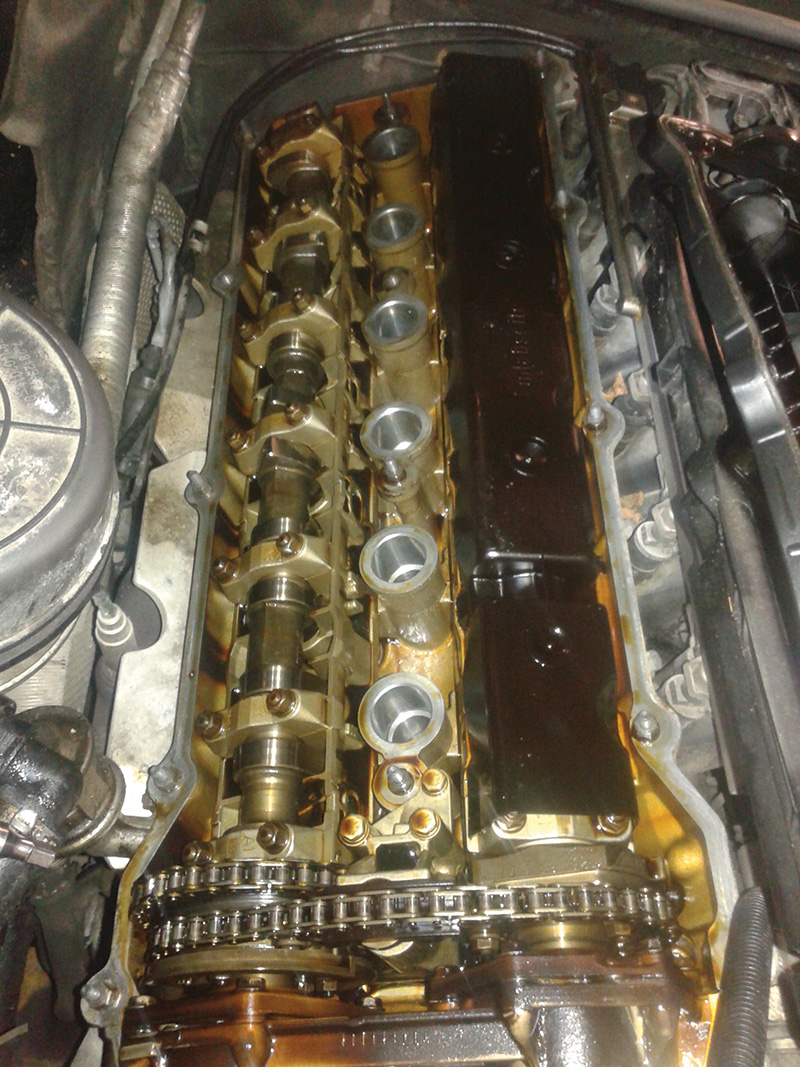
An external oil leak at the valve cover was noticed with this high mileage vehicle, so it was certainly prudent to remove the ignition coils (oil soaked on three) and replace the gasket. Cleaning the coil towers and replacing the spark plugs proved a success with a cautionary mention to the owner for a future replacement of the ignition coils.
With this many miles/kilometers, it wasn’t such a surprise that the internals of the engine were so clean with proper service over a long period of time. That meant high quality oils and fuel had been used. Now that all the parts were installed, what does the repaired ventilation system look like with a vacuum gauge and a slack tube manometer? Unfortunately there are no “before†images, but the “after†images are a good known guide.
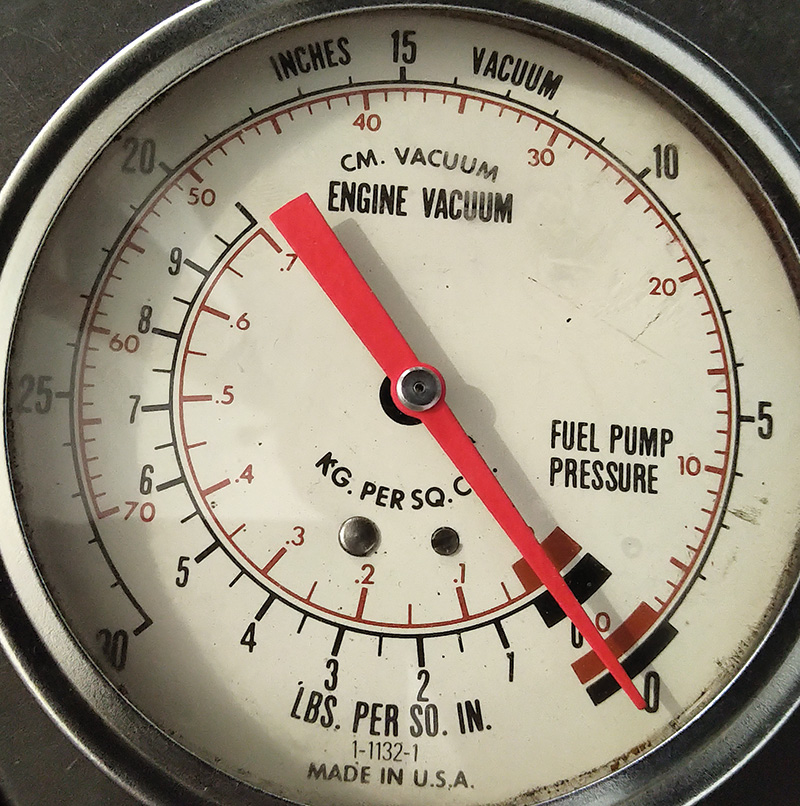
Attaching a simple vacuum gauge to the dipstick opening offers a view of the ventilation system not having an internal leak. The reading should be near zero. It is simplistic but it works. High vacuum may indicate internal damage to the ventilation system.
Reinsert the dipstick and think about this. Now imagine positive pressure at the crankcase. Would that also mean serious blow-by
pressure or compression gases entering the crankcase?
Is there another simple test?
An aftermarket oil cap was found to fit many BMW and VW/Audi models. The cap was modified by drilling a hole on the top and inserting a new/used elbow from a battery ventilation tube with some JB Weld.
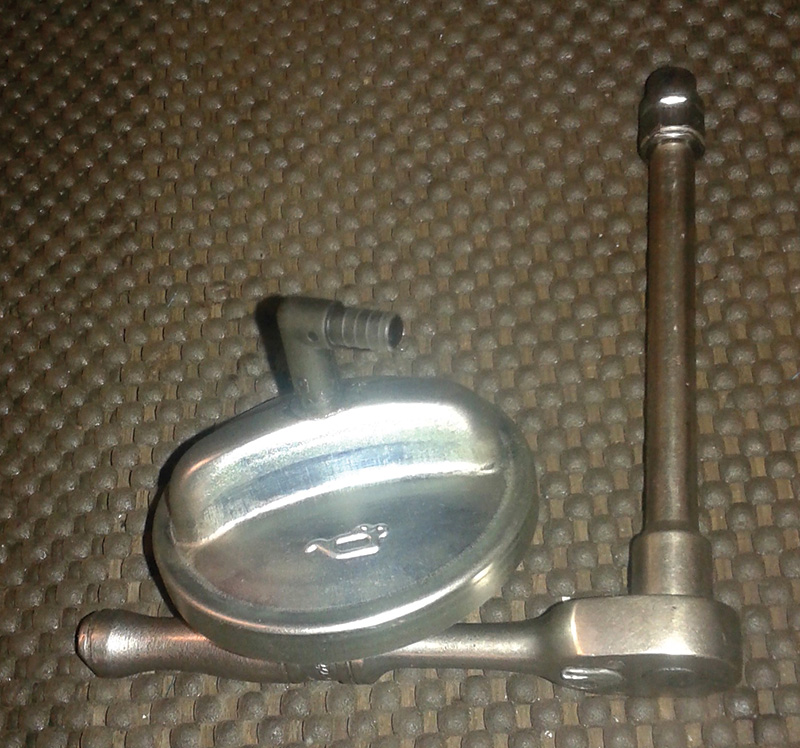
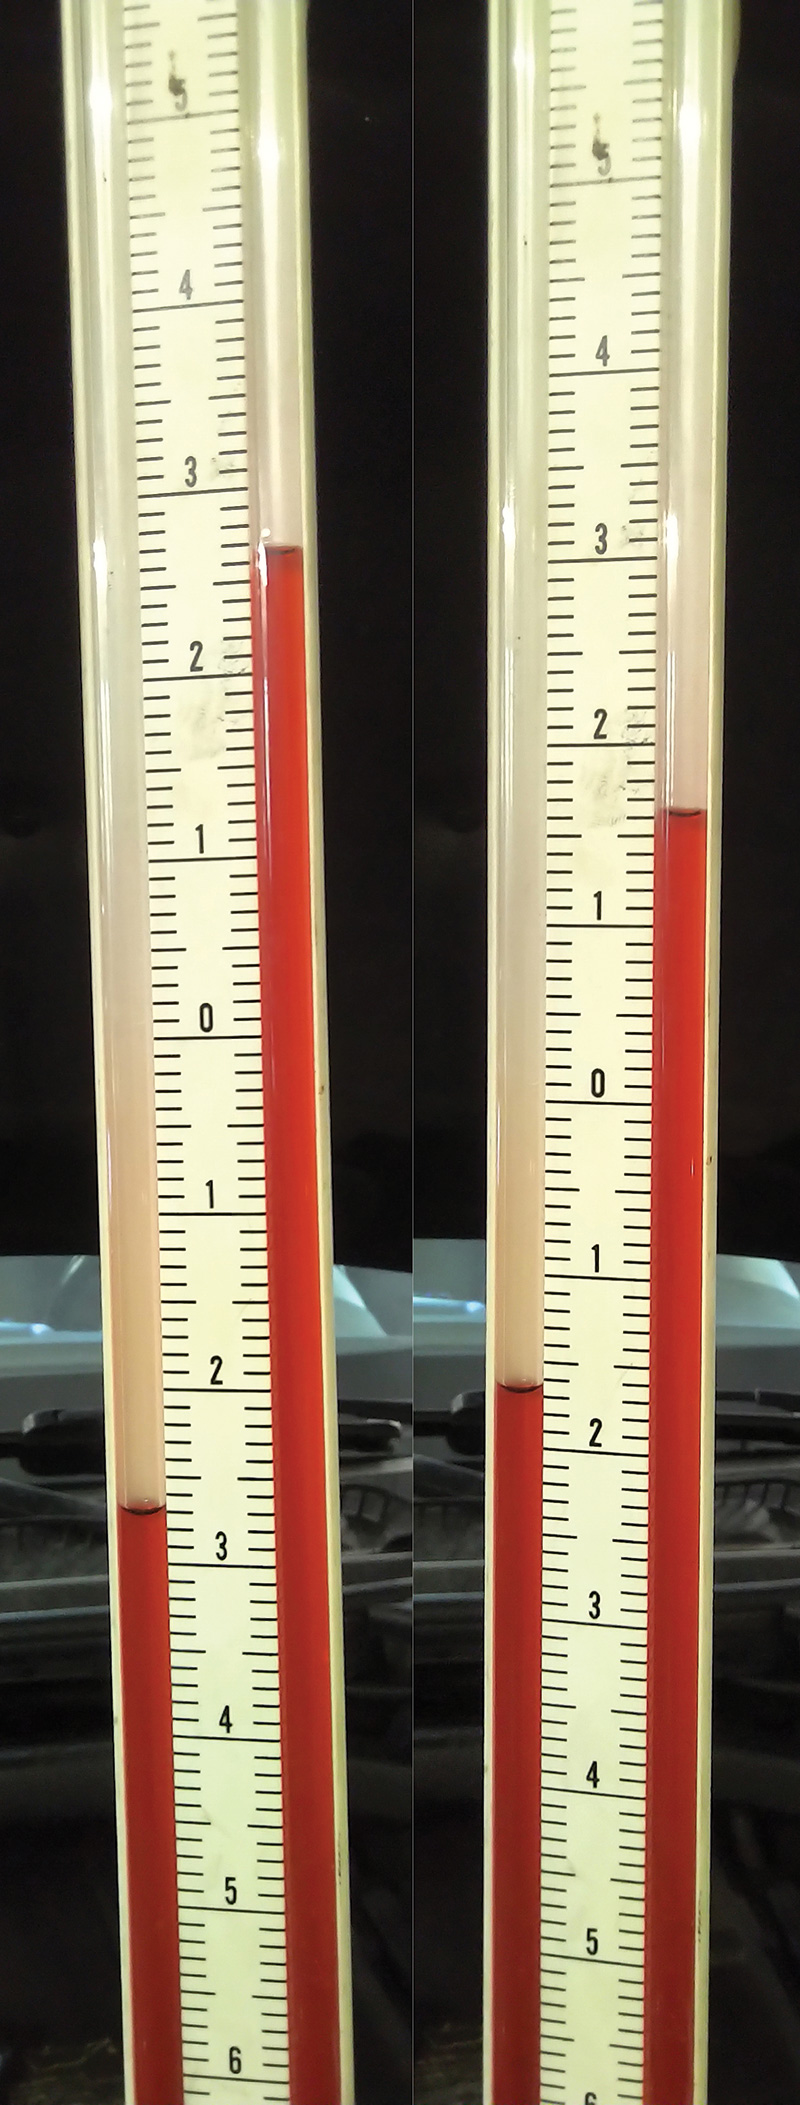
A hose is connected from the test cap to one open end of the slack tube. The other end of the slack tube is open to the atmosphere. With vacuum applied (engine hot and at idle), the red liquid will rise on one side while the opposite side drops.
The difference at each level is the sum of the readings.
This indicates the amount of vacuum measured (inches of water).
MAF values
The original measured value was about 3.29 g/s at a hot idle condition.
The expected value should be close to 5.0 g/s and was after repairs.
Therefore, keep all records and research to match known values.
Clearing the remaining faults and resetting learned adaptations gave this model a new lease on life.
Incident 2
The same vehicle owner called and expressed something odd about throttle control and a complete lack of engine torque. This also included a shudder when the BMW began to move/accelerate. The shudder was repeated at the repair facility.
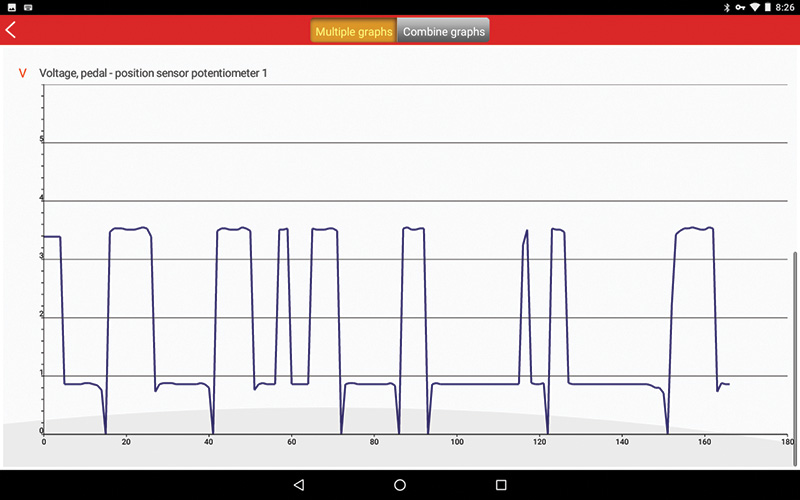
A quite interesting scan and capture found the throttle pedal was complaining but gave up some interesting data.
The madness was to try out other tools and create some images for the younger technicians that were interested. ISTA, an Android device, and even graphing data from ISTA created a teaching moment.
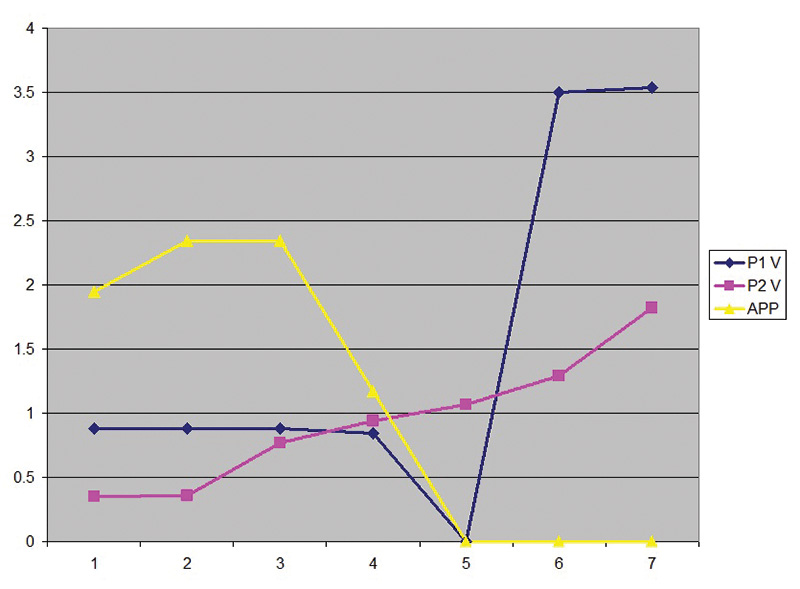
With ISTA, the potentiometers were tested from closed throttle to wide open throttle. During the throttle opening in a slow and deliberate application, screen capturing software was faster than writing the output of each potentiometer
Seven screen captures offered the following data:
| P1 V | P2 V | APP |
| 0.88 | 0.35 | 1.95 |
| 0.88 | 0.36 | 2.34 |
| 0.88 | 0.77 | 2.34 |
| 0.84 | 0.94 | 1.17 |
| 0.00 | 1.07 | 0.00 |
| 3.5 | 1.29 | 0.00 |
| 3.54 | 1.82 | 0.00 |
From closed throttle to wide open throttle, seven screen images were captured. With the seven images, the data from ISTA was inserted into an excel spread sheet in columns and rows. Excel has a feature that graphs or plots data. Anything with data can be used to graph.
Imagine graphing the injector pulses or misfire counters over time.
The graph offered the defect at the throttle pedal potentiometer as immediate proof and repeatable every time.
Is there another test?
With another “quick tool†and used during road testing, the Launch EasyDiag was set up to read the “bad actor.†Looking at the next image, follow PV1 in the Excel graph and match the repeating drop on the next image that was recorded over time. Each drop was the movement of the throttle from closed to WOT.
Oxidized screws were the enemy when the part arrived!
The cure
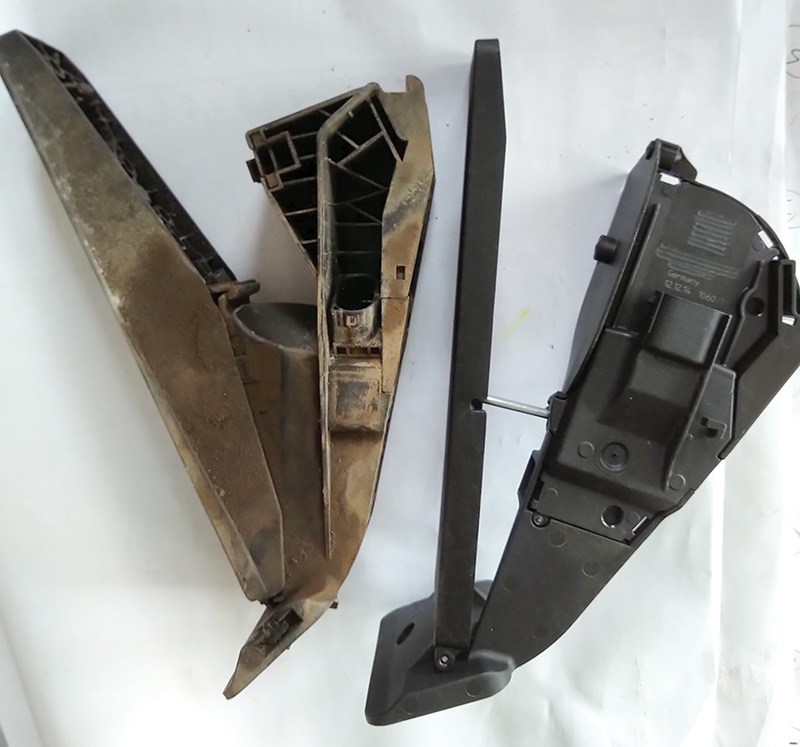
Extra coffee, liquid SeaFoam, lots of patience, and a neat tool from MAC that “bit†the internal hex of the bolt(s) allowed complete removal without any damage
When the parts are placed side by side, it is obvious that this new part was updated along with the wiring position mounted higher than the original.
To ensure perfect connectivity, the original harness was cleaned and Stabilant-22 was applied to the connection blades.
What does it look like with a “quick tool?†With the Android device and “dongle†connected to the DLC, the image indicates that the new pedal operates and, at the same time, the Android device will delete all the DME faults.
As a last measure, ISTA will capture the final scan.
With the faults deleted and performing a simple road test, ISTA should provide a cleared network scan.

Extra tests with the Android
With ISTA and the Launch tool, there was a need to know how close each tool performed with this BMW model. ISTA is the “no nonsense †tool of choice with amazing features built into the system. One drawback is the setup. It can be awkward with extra in-vehicle power supplies during a road test (a second technician is required). Screen video recording can be an aid to record the road test with playback.
The Android version is much faster and far simpler to use. Added to the Android that’s in service is screen video recording software with playback ability. This Android version, however, does NOT include bi-directional control compared to ISTA. Not included is any test plan compared to ISTA.
Comparing the network connection
Another difference is the terms used between the diagnostic platforms when describing the installed controllers. There are similarities, but attention needs to be paid to access the named controller that’s being tested.
Commonalities
Both ISTA and the Launch have access to:
- Read the model and display the information related to the model
- Read all controllers on the network
- Read and produce all faults related to the controllers in communication
- Clear all related faults that are communicating
The following images are a quick snapshot of the identification and list of controllers that are communicating with the scan tool.
The list of controllers is stitched together because the Android list continues with a “swipe up†motion.
Incident 3
In between incident 1 and 2, there was a period when the owner required a complete clutch assembly replacement. How the 02 sensors failed is a mystery, but one “tell tale†sign is the red/orange silicone that is sealing the connection after the catalytic converters. That part of the exhaust was removed at the transmission shop. It is assumed that modern shops know enough to never use high temperature silicone to seal exhaust flanges.
A decision was made to replace the “complaining†oxygen sensors with Bosch versions. Total mileage and time were part of the discussion, with the agreement that all four sensors would be replaced. Always clean the threads!
Graphing a parasitic draw
During Incident 1, there were a few faults that were related to the General Module. All of the faults were saved, printed and deleted.
| 00000F GM | Anti-trap protection of power window unit rear driver’s side |
| 000081 GM | Anti-theft alarm memory door contact front driver’s side |
| 000088 GM | Anti-theft alarm memory engine-bonnet/hood contact |
| 00008A GM | Anti-theft alarm memory interior movement detector front |
At the time, all window and latch operations worked as intended, but there was, in the previous week, a very cold snow/ice condition that lasted a few days. With the vehicle thawed, input and output tests passed and the battery was charged/tested. The vehicle didn’t complain again.
The BMW was tested for a parasite with the common amp clamp(s) and a Fluke multimeter. One issue was “babysitting†the BMW and watching the display over time. This model tested OK.
The need at the time was to measure multiple vehicles that had either a parasite or no parasites at all. Testing included vehicles that were in sleep mode but with keys either in the ignition switch or not. Testing included direct injection vehicles that were in a cold or hot state. All models were tested over time.
This particular vehicle was tested with the Sperry Smartmeter that has Bluetooth communications with an Android or IOS device. The meter was never intended to connect to an amp clamp; this one is and works well!
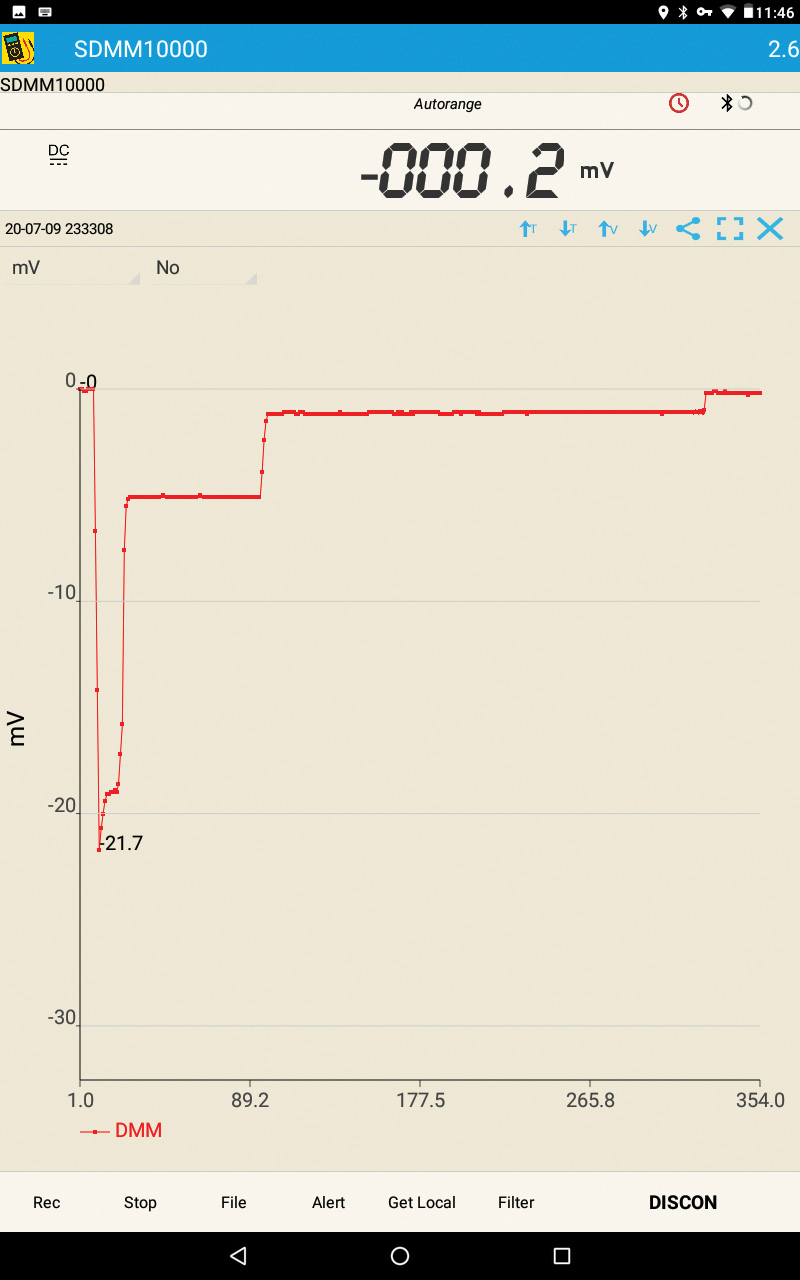
Now the BMW can be graphed over time with the Bluetooth device on the work bench. No intense babysitting required.
The BMW has a battery in the cargo area. The negative connection is one cable attached to a clean connection on the body. Orienting the amp clamp correctly offers the image on the Android or IOS device. A screen capture offered the parasitic load when the driver’s door was opened and closed for the experiment.
The path of least resistance
Electrical energy will always take low resistance paths and will include the one with least resistance. Electrical energy will also take every other path available to it.
Translation
Learned over time was the simple fact that multiple ground connections at the battery negative cable are not an accurate test. One major problem is disturbing a “bad actor†to reset and possibly misbehave in the future. That means disconnecting the battery negative and applying a single service cable may create more problems than the vehicle arrived with.
With this particular BMW, the test was set to 15 minutes and recorded every second. The display offered one second interval tests that measured the parasite every second for 354 seconds. This test was applied multiple times with no key in the ignition, but it seemed to go to sleep faster if the door was opened and closed once and no one entered or “woke up†the ignition system.
Different model tests seem to repeat with time intervals that are longer or shorter. The same tests were applied to vehicles in sleep mode but with the key removed. That “key†parasite was graphed. Some other models also expressed a last spike that appears to command sleep mode within the last moments of the graph. Different models and manufacturers display this spike at different times and intensity. Most, however, look similar to each other, recording different longer or shorter sleep time.
In later articles, much more information and tests will be provided as an aid to testing, measuring, and especially discounting false and repeated misinformation as to measuring any parasite and or network sleep mode.
This model tested perfect despite a radio replacement.
Parasite testing rules
Ask for the customer’s interpretation of what happened to the vehicle.
Scan and record the condition of the vehicle when it arrives.
Follow obvious defects and repair them first.
Open and latch the needed doors, hood, and gate.
Test/charge the battery, and it must be in perfect condition.
Test at ONE ground cable only; multiple ground connections are misleading.
Ensure there is no added or non OEM equipment installed.
Any document that professes a parasite test across a fuse is used as a guide only.
Advertisements about networks that take an hour to two hours to enter sleep mode “must have sold lots of batteries†in the course of testing.
Direct inject models are completely different to test.
Always be aware of software updates with the model being tested.
Test in a building when the vehicle is COLD or at ambient temperature.
While testing for a parasite, measure and record CAN or serial data activity.
A scan tool or anything that is attached to the DLC is a parasite.
Be attentive to proximity remotes (place them in a metal cookie container).
Visit these interesting links
dwyer-inst.com/Products/ManometerIntroduction.cfm
sperryinstruments.com/en/smartmeter
One last mention, and poking a bit of fun towards Sperry; when was the last time a AAA battery was read on the AC scale with a voltage of 000.4 V?
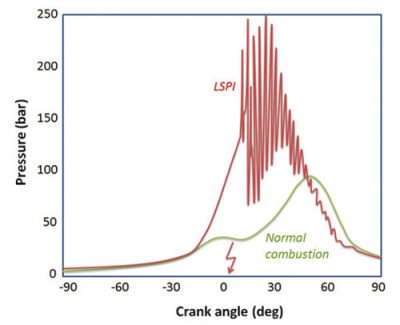
Low Speed PreIgnition (LSPI)
(Low Speed PreIgnition) aka “Stochastic PreIgnition (SPI)â€
Abnormal combustion can sometimes be attributed to combustion chamber particles which can be caused by debris inside the intake port and fuel droplets coalescing around the intake valves.
LSPI is unpredictable; events can be sudden and costly, causing severe internal engine damage.
Engineered modern oils requirements:
a) Operate under any condition
b) Anti-wear properties
c) Cleaning properties
d) Oxidization control
Harsh environment
Direct injected engines use fuel pressures far greater than those found in port injection engines. DI engines also experience greater cylinder pressures.
Fuel and oil mixing
The API SN Plus is the current specification oil that all DI engines require to sustain the harsh environments. This will include the ability to achieve increased economy and longevity.
LSPI is problematic if using low quality fuels exhibiting boiling properties and octane numbers that can contribute to LSPI counts or incidences. Another fuel prediction is the heat or engine temperatures, that low quality fuels can cause.
A DI engine that’s not running at design temperatures will not expand internal components to specification. Cooler than normal engines will have higher than normal levels of blow-by, meaning that the fuel could dilute the engine oil.
Under-specification fuel will have major consequences that will include oil dilution. Diluted mixtures of fuel with the oil can migrate into the combustion chamber via the piston rings if the engine runs cooler than normal.
Any migration into the combustion chamber that is unusually hot while remaining within that chamber can cause LSPI.
LSPI has been studied to death with distinct analysis to ensure that DI engines use the correct fuel/oil specifications.


0 Comments