
These suggestions and solutions for technical problems come from service bulletins and other technical information published by Mercedes-Benz, selected and rewritten for independent repair shops.
ESP Ground Connection
Model 203.061/064/065/264
Chassis Number F 150265 F 191763
The ESP ground connection, located just ahead of the left shock tower, may not be properly installed. The ESP control module harness plug should also be checked for moisture intrusion.
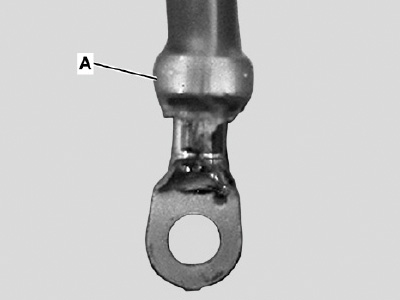
- Loosen ground nut at W16/3 (Figure 1) and remove ESP Control Module ground wire (thick wire), as well as all other wires.
- Remove heat shrink from cable lug completely, being careful not to damage the wire insulation.
- After the heat shrink is removed from the cable lug, remove the heat shrink from the ground wire itself .
- Unplug the ESP harness plug from the ESP Control Module.
- Carefully tap the unplugged harness plug against your hand to remove any moisture and blow out the ESP harness plug with dry compressed air while elevated above the ground cable, for at least three minutes, at the ground pins to completely remove any moisture.
 Blow out the multi-pin connector directly at the ESP Control Module, then carefully reconnect the ESP harness plug to the ESP Control Module connector.
- Install new heat shrink tubing onto ESP Control Module ground wire (thick wire), ensure that the heat shrink tubing stops where removed (A in illustration) and does not cover crimped end.
- Place the 6 x 1.2 mm washer onto the ground stud at W16/3. Install thin ground wires first, then reinstall the ESP ground wire (thick wire) and secure with the previously removed ground nut, tightening the nut to 10Nm.
Minor Oil Sludging
Mercedes-Benz defines “minor oil sludging†as oil that has thickened, but still flows. “Severe†sludging is oil that cakes inside the engine. Signs of sludging include:
- Excessive engine oil consumption
- White/blue engine smoke
- Has an effect on the oil level indicator
- Engine oil filter is clogged, engine oil has thickened to a jelly-like consistency
- Oil sludge is visible when removing oil filter, engine valve covers, oil filler cap, cam positioning sensor.
Sludging can be caused by:
- Crankcase ventilation system not functioning properly.
- Engine oil drain passages closed or clogged.
- Using the wrong engine oil.
- Using aftermarket fuel or oil additives. Mercedes-Benz does not approve the use of any fuel or oil additives.
- Recommended oil change intervals not being followed.
- Using fuel with an octane index less than 91.
- Coolant leaking into the crankcase.
Severe sludging requires disassembly and cleaning of the engine. Minor sludging can be treated by “Oil Purging.â€
- Change engine oil and filter, using only approved engine oils.
- Park the vehicle and run the engine at idle for 1 hour.
- Change the oil and filter.
- You can repeat the process up to three times in a single day.
- 6,000 miles after the purging, check the engine and change the oil and filter.
 Replacement Door Stop
Model 221.171, from VIN A009500 to A027500
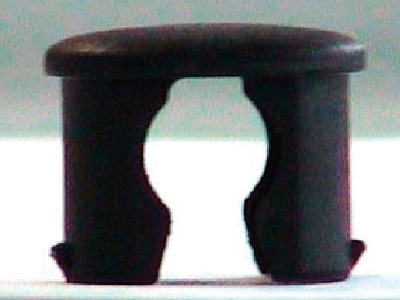
If your customer complains that the front or rear door stop is loose because the plastic retainer at the rod end has broken, you can now just replace the retainer (P/N A221 727 12 14). You do not have to replace the complete door stop.
Storage of Vehicles Equipped with High-Performance Tires
All models
High-performance tires are typically made with a nylon overlay that enables them to achieve the designated speed rating and also enhances handling capabilities. However, nylon material has memory retention, and may develop flat spots when the vehicle is stored for long periods of time without movement.
With this in mind, Mercedes-Benz recommends that the following precautions should be taken to avoid flatspotting when vehicles equipped with high-performance tires are not driven for extended periods.
- All vehicles to be stored for periods longer than 30 days should be prepared by inflating the tires to 44 psi.
- The car should be moved several feet at least once during each 30 day period so that a different portion of the tread contacts the ground.
-

Adjust fog lamp using vertical adjusting screw.
Before the vehicle is driven, tire inflation should be reduced to the recommended operating pressure.
Cannot Aim Headlights

Unclip fog lamp vertical adjustment screw by pulling upwards.
Model 220 as of model year 2003
If the low beam or fog lights are always too high or too low, no matter how much you adjust them, the connection between the low beam and fog lights may be disconnected. To fix the problem:
- Adjust fog lamp using vertical adjusting screw.
- Unclip fog lamp vertical adjustment screw by pulling upwards.
- Adjust low beam using vertical adjustment screw.
- Push down on fog lamp vertical adjustment screw to clip back in place.
Fuel Tank Noise
Model 203.052/054/056/087/092
Model 209.356/456
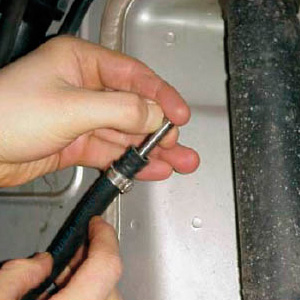
Tapping noise coming from the rear of the car, near the fuel tank, may be caused by noise in the purge line. The condition can be solved by installing a restrictor (P/N A203 476 03 32) and clamp (P/N A005 997 19 90).
- Remove right rear wheel and its housing to reach the area of purge line.
- Open purge line.
- Insert restrictor in the purge line up to the red marking.
- Reconnect purge line with a new clamp.
- Reinstall purge line, rear wheel housing, and wheel.
 1. Purge line |
 2. Open purge line |
 2. Open purge line |
 3. Insert restrictor to red line |


0 Comments