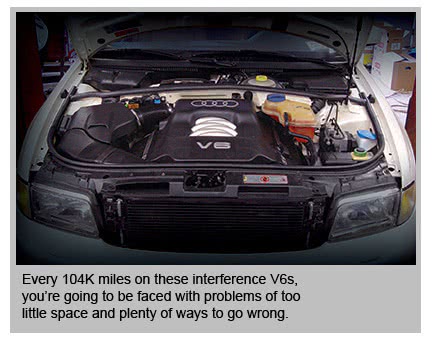
We’ve all had that sinking feeling: You just completed a timing belt job, and the engine either doesn’t start, or starts and runs roughly and/or misses. What happened? Did you get the timing marks wrong? Did you not set up the variable valve timing properly? Did you not install the tensioner correctly? On some newer engines, there are many ways to go astray. We need to do the job right the first time so that another costly teardown isn’t required. In this article, we’ll go over how to easily do any late ‘90s Audi A6 V6 timing belt, step-by-step.
A Question of Access
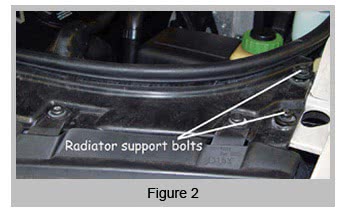
The Audi V6 is mounted longitudinally, and there’s simply not enough room at the front of the engine to perform timing belt service. Getting the front of the vehicle out of the way is the cost-effective procedure. With a couple of bolts removed, the radiator support can be pulled away enough to provide some extra room. After pulling out the lower grilles, look under the front bumper and you’ll see two hex bolts pointing up (Figure 1).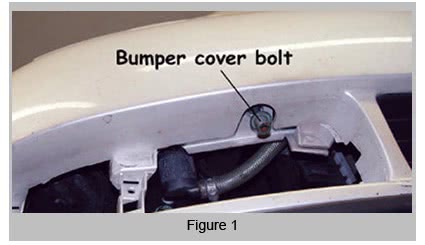 Unscrew these, unclip the outer edges of the bumper cover from its reinforcement, then remove the bumper cover. Be careful where you place it because it tends to roll over onto its painted surface. Next, remove the two bolts on each side that mount the radiator support to the fender (Figure 2).
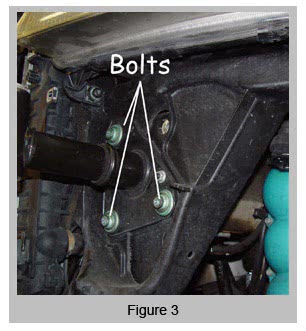
At this point, the lower mounting bolts for the radiator support will be exposed. These are the green bolts around the bumper shock absorber (Figure 3). Take the two bolts you pulled out of the bumper support and put them in place of the radiator support mounting bolts — they’re longer. After removing the side bolts, which mount the fender to the radiator support, you can slide the radiator support outward without removing any hoses.
We put two wooden blocks between the frame of the car and the radiator support. You could remove all the connections and lines if you like, but this works fine if you want to save some time.
Now We Can Do What We Came Here to Do!
Now you can easily remove the engine cover, valve covers, timing belt covers and secondary air injection pipe. With the accessory drive belt, tensioner, and cooling fan pulley out of the way, you’ll get some much needed space.
Note: On the cooling fan pulley assembly, two of the fasteners that need to be removed are 5mm internal hex bolts. A normal length hex key socket is too short to reach the bolt, and a long hex key twists too much if the bolts are frozen. We cut a long one down to medium length, which flexes less yet is still long enough to reach the bolt head.
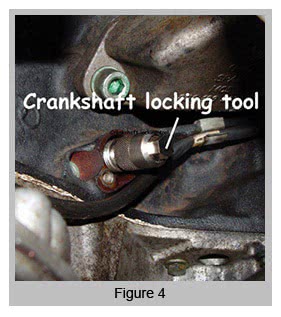 To get the center cover behind the crankshaft pulley off, you have to remove the pulley, but you don’t have to unscrew the big center crankshaft pulley bolt. Instead, you can remove the eight pulley bolts and only the pulley ring itself will come off. Be careful with these bolts — you can strip them out very easily. If you have problems with the crankshaft spinning while trying to remove these bolts, now would be a good time to install the crankshaft holding tool, which threads into the driver’s side of the block. When the crankshaft is at TDC, the tool (VW part #3242) will screw all the way in (Figure 4), which locks the crankshaft. This is a safety measure to prevent movement of the crankshaft after the timing belt has been removed. By the way, we wouldn’t use this tool if we were removing the center crankshaft bolt. We don’t believe the tool is strong enough for all that torque bolt, and the pin may snap in the crankshaft!
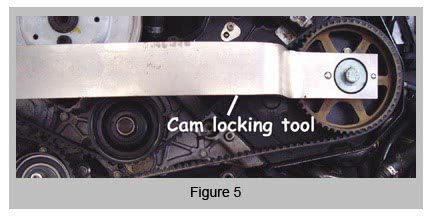
Make sure you set the engine at TDC of the compression stroke. You can tell this by looking at the flange of the camshaft retaining bolt. Make sure the larger holes are towards the inside and the smaller holes are towards the outside of the engine. This will allow you to install the camshaft alignment tool (Figure 5, VW part #3391). Both these tools are available from aftermarket suppliers as well.
Install the special tool required to lock down the camshafts before removing the belt. It holds the camshafts in place as well as linking the two camshafts together so they can’t spin. This prevents the cams from rotating independently of the crankshaft and eliminates the possibility of a piston/valve collision. By the way, at TDC of #1 some of the intake valves will be open enough to possibly contact a piston. Any camshaft movement at this time could tweak a valve, so it’s best to lock down the cams before removing the belt.
Since We Have All This Apart...
With the crankshaft and camshafts locked down, it’s safe to remove the timing belt. While the belt is off, check the idler pulley, water pump and tensioner bearings. We suggest that you change them all at this point, but cost and customer desires will have to be addressed before starting off in this direction. The thermostat is also mounted behind the timing belt. Now, would it be advantageous to replace that as well? Some follow the adage, “If it ain’t broke, don’t fix it!,†but if the thermostat were to stick or the water pump were to fail, it will all have to come apart again. One component we insist on replacing is the hydraulic timing belt tensioner. This contains a piston that pushes against a cam on which the tensioner bearing is mounted. The new tensioner is preloaded with a pin holding the piston in. In order to reuse the hydraulic tensioner, you would have to twist the cam counter-clockwise slowly until the hole in the piston lines up with the hole in the tensioner body. But how are you going to feel when you get the phone call that your customer is stuck and needs a tow — “It was running fine, and then all of a sudden . . .â€
Add up the water pump, thermostat, idler pulley and tensioner, and you’re talking an additional $500 in parts alone, plus the additional labor time. We don’t try to be heroes. We lay it all out for the customer and let him or her decide. One of our famous lines is, “I did not engineer the car, I did not build the car, I did not drive the car for 104,000 miles (which is when the manufacturer recommends that the timing belt and tensioner should be replaced), I’m just trying to help you maintain it.â€
Finally, Setting Up the Belt
Back to the timing belt. After all the accessories have been dealt with, we can start the assembly process. Although the crank and cams are locked down, the timing still may not be correct for the new belt. To ensure proper valve timing, Audi designed the camshaft gears to float on the camshaft. If you loosen the cam gears from the camshaft, you can set the tension on the belt and then lock the cam gears. This helps prevent any cam movement when the tension is applied to the belt. We’re sure you’ve seen other timing belt jobs where you set up the timing marks perfectly, then when you put the tension on the belt the marks move.
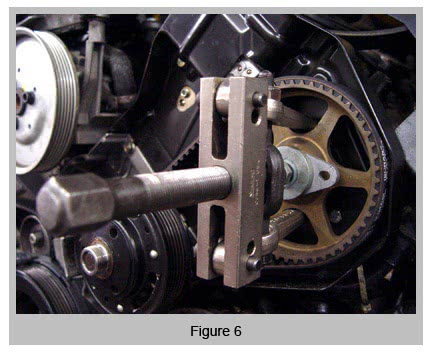
In order to get the cam gears off, you naturally have to loosen the retaining bolts. Just spin them out about three turns. This gives sufficient clearance to disengage the gear. Put a puller on the gear and force it forward (Figure 6). You don’t have to remove it all the way, but the gear should now spin freely on the camshaft. With the crankshaft locked at TDC and the camshaft locked down, you can now set up the timing belt. We tighten the retaining bolt just enough so that the gear doesn’t rock, but still spins on the shaft. This way when we tighten the bolts they don’t add any additional tension to the belt.
The timing belt will still be difficult to put on since it is a tight fit even with the tensioner retracted. Sometimes we install the belt first and then while holding the tensioner in place we install the mounting bolts. Or, we get the belt halfway on all the pulleys and get a good grip of the belt and flip it onto the tensioner pulley. Do not use any tools as they would take up space between the belt and the pulley, and may damage both. Also, the mounting bolt torque on the tensioner is only 7 ft./lbs. We’ve had these bolts loosen at this light torque, so now we use thread locking compound and increase the torque slightly.
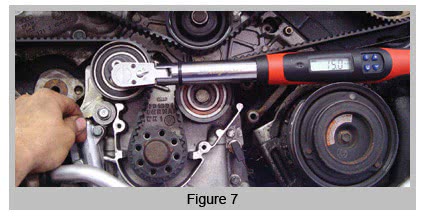
With the new belt and tensioner installed, you can now preload the belt and release the tensioner. If you haven’t noticed, the particular timing belt job pictured is the ’98 V6 AHA motor. The same procedure also applies to all the 2.8L AHA and ATQ motors through ’01, and the 2.7L turbo APB and BEL motors through ’04. To set the tension, use an 8mm hex key socket on a torque wrench and apply 15Nm to the tensioner pulley (Figure 7). At this point the belt should tighten up and all the slack should be gone. Release the the tensioner pin and the piston should pop out up against the tensioner cam. Now you have tension on the belt and the crankshaft and camshaft are lined up. You can now torque down the camshaft gear retaining bolts. Proper torque is critical here. If the gear is allowed to rotate on the camshaft then the timing is compromised and valves may hit. Proper torque on this bolt is 40 ft./lbs. We didn’t change the variable valve timing, so we’re basically done.
Checking Your Work
As a precaution, always rotate the crankshaft a few times with the spark plugs removed to insure there’s no interference. Belt timing and tension are now set and all bolts are properly torqued, so you can move on to the reassembly phase. We start with the cooling fan pulley followed by all the covers. Next, the crankshaft pulley, the accessory drive belt pulley tensioner and belt can be installed. All that’s left is reassembling the front radiator support, which should go together as easily as it came apart. The bumper is the last part and it’s all over. This job pays about 5.0 hours, 5.7 for turbo models (there are some extra air intake tubes that have to come off). We hope this article will help you beat that time and maybe finally we’ll all be ahead of the game!
by Kerry Jonsson


0 Comments