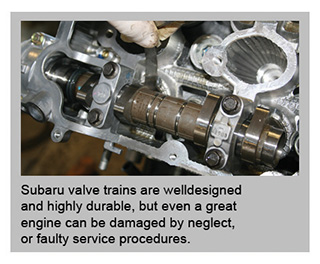
 Valve train service may be one of the most overlooked maintenance procedures in auto service today. Unless there’s a customer complaint of clatter, rough idle, or loss of performance, or the valve covers happen to be off to fix a leak or some other problem, you might never know the valves are out of adjustment.
Although it may sound strange, in some cases an engine’s valves may recede into their seats faster than the mechanism that opens them wears, resulting in the counter-intuitive situation of the clearance getting tighter instead of looser over time. If neglected, this situation will result in misfires, then burned valves.
Inspection
The steps leading up to checking the valve clearance will vary with different models, due to the individual complexities of removing the valve covers to facilitate the inspection. Refer to the appropriate shop manual or the Subaru Tech Information System website at https://techinfo.subaru.com for correct procedures for the vehicle you are inspecting.
 Note: Vehicles equipped with variable cam i-Active Valve Lift System (2006 and later) require special diagnostic and service procedures, and therefore, strict adherence to the specific service manual. Please refer to the factory service information for the vehicle you are servicing.
Valve clearance for each cylinder should be measured at top dead center (TDC) of its compression stroke, unless directed otherwise by the service manual. Always position the feeler gauge as close to horizontal as possible with respect to the cam or rocker arm and the valve stem or lifter.
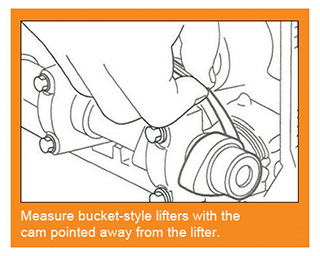
Engines equipped with bucket-style lifters should be measured between the heel of the cam and the valve stem tip with the crown of the lobe directly opposite the lifter.
Feeling
 Getting this right requires careful technique. First, of course, it’s easier if you take all the plugs out so you don’t have to fight compression.
Next, use your head in choosing the specs. For example, if the range for an intake is .003 to .005 in, we naturally choose .004 in. Specs are usually given for a cold engine. Ideally, you’d do it after the car sat overnight, and that’s a definite requirement if the adjustment is being done to address a noise (too loose?) or idle misfire (too tight?) complaint.
 How much drag is too much? It comes down to the tactile judgment of a craftsman. You may find that a set of Go/No-go gauges helps. Then, remember that as you tighten the locknut of the rocker arm type, you’re opening up the clearance by the amount of the play in the threads even if you hold the adjusting screw stationary. Take a few seconds to recheck.
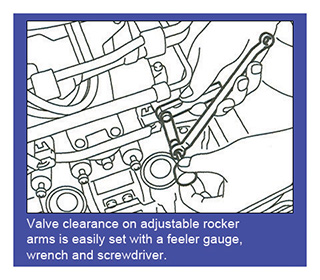
Valve clearance adjustment on engines equipped with standard adjustable rocker arms is easily accomplished by the use of a feeler gauge, wrench and screwdriver. Refer to the proper service manual for clearance specifications.
Replacing Bucket-Style Lifters
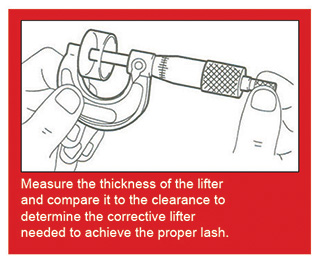
 Adjusting the valve clearance on engines with bucket-style lifters can be accomplished by measuring the thickness of the bottom of the lifter with a micrometer, then acquiring the corrective lifter from your Subaru N.E.W Horizons Dealer. Please refer to the vehicle-specific service manual or the Subaru Tech Information System website at https://techinfo.subaru.com for clearance specifications and corrective replacement lifters.
Select a valve lifter of suitable thickness based on the measured valve clearance and the valve lifter thickness, by referring to the following formula:
S=(V + T) – specified clearance
S: Valve lifter thickness required
V: Measured valve clearance
T: Valve lifter thickness to be used
Hydraulic Lash Adjusters
 Subaru of America began using hydraulic lash adjusters (HLAs) in the mid-eighties on vehicles with 1.8L engines and eventually the system spread to all engines. The use of HLAs ended with the 1996 2.2L and 2.5L engines. Since then, mostly bucket-style lifters have been used.
While HLAs have proved very trouble-free, some occasional instances of air trapped in the HLA have caused a loss of performance, accompanied by tapping.
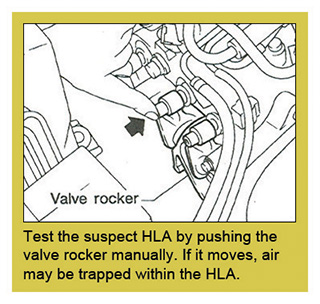
 To check the problem, remove the valve cover on the noisy side and attempt to push the rocker against the HLA with your finger. If it moves, air may be trapped in the HLA.
To remove the HLA, loosen the bolts that retain the rocker assembly in a criss-cross pattern starting with the center four, but leave an upper center bolt engaged by a few threads, and pull out the offending lash adjuster.
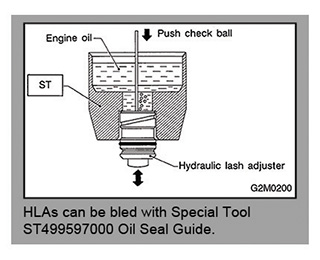
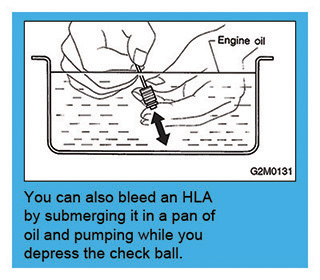
There are two methods of bleeding air from an HLA — by use of a special tool, or by submerging the HLA in an oil bath and purging it manually.
With Subaru Special Tool ST499597000 Oil Seal Guide, you can bleed the HLA using a thin rod or wire (0.08 in., or 2mm in diameter):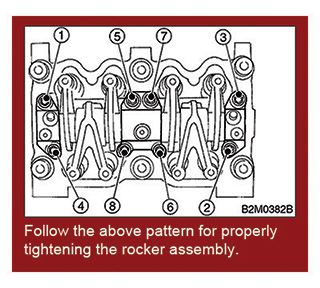
• Insert the HLA into the tool and fill the tool with oil, holding it in an upright position.
• Push the rod or wire down against the check ball while pushing the HLA plunger up and down until bubbles no longer escape from HLA.
• Remove the rod and depress the HLA plunger to ensure that all air has been completely bled out.
• Another acceptable method is to submerge the HLA in a pan of engine oil and depress the check ball with a thin rod or wire while you move the plunger up and down slowly until you don’t see any more bubbles. Leave the HLA in the oil until you are ready to reinstall it.
Note: If the HLA plunger does not properly lock into position when pushed, replace it with a new one.
For reinstallation, fill the rocker reservoirs with oil and keep the bleed holes up. Tighten the rocker assembly bolts to 9 ft. lbs. in the pattern shown.


0 Comments