Things you should know when the warning light glows.
A decade ago, in 2000, the U.S. Congress passed the Transportation Recall Enhancement, Accountability and Documentation (TREAD) Act to deal with the concerns regarding several major recalls of defective and improperly inflated tires that created dangerous and unsafe driving conditions.
A large portion of the TREAD Act addressed the dangers of low tire pressure, which can cause a number of serious problems: reduced steering control, braking ability and vehicle stability. Realizing that consumers do not check their tire pressures adequately and that many other climate, road hazard and driving conditions cause tire inflation failures, the legislation mandated tire and vehicle manufacturers to help improve overall safety.
The TREAD Act required vehicle manufacturers to equip all passenger and light truck vehicles with tire pressure monitor systems (TPMS) to alert the driver if tire pressure falls to 25 percent under the recommended pressure, by the 2008 model year. Nissan, way ahead of the industry, began offering TPMS as early 2003.
Nissan and Infiniti models
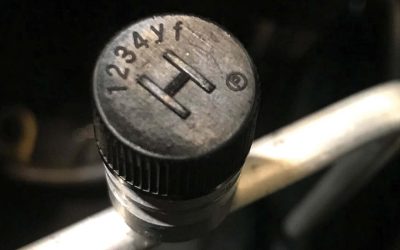
It’s easy to identify a Nissan or Infiniti vehicle with a TPMS. Just glance at the wheel and observe the valve stem. While standard valve stems are black rubber, valves that incorporate TPMS transmitters have gray-colored aluminum retaining nuts. However, some aftermarket tire replacements may use other valve types, including black rubber ones. If you are unsure, do a thorough check.
The basic function and operation of Nissan and Infiniti TPMS has changed a little over the years, but the specific parts, components, control unit locations, tire pressures and diagnostics vary from model to model and year to year. Therefore, you must refer to the specific service manual for the vehicle you are servicing for the correct information. Also, refer to the owner’s manual for TPMS information and correlate that data with the service manual.
Note: Many Nissan and Infiniti service manuals refer to TPMS as Low Tire Pressure Warning System (LTPWS).
How TPMS works
Sensors in the valve stem body of each tire monitor the inflation pressure level and an integral transmitter relays that real-time information to a control module located elsewhere on the vehicle. The sensor/transmitter unit is inside the tire, on the interior end of the valve stem.
Each sensor incorporates a battery to provide power to transmit the signal, which also identifies its location. The control module checks the signals from each wheel and alerts the driver by illuminating a warning light if the pressure in any wheel drops below the safe level.
When the vehicle begins to move and the wheels start rotating, a centrifugal switch inside the sensor activates the pressure measurement and signal-sending functions. At about 20 mph, the sensor begins taking pressure measurements every 30 seconds and transmits the results once each minute to the control module. This electronic “handshake” keeps the wheels in touch with the control module. Each wheel sensor has a unique ID code so the module can recognize it. When the vehicle is moving, the sensor will transmit a signal once each hour. When the vehicle is parked and has not moved for 15 minutes, the sensors stop transmitting a signal to prolong the life of the internal sensor battery.
If the tire pressure drops below the minimum setting, the module will then illuminate the warning light. The warning light will not indicate which tire is low so all tires need to be checked with an accurate tire pressure gauge. Even though the culprit tire may be visibly evident, all other tires must be checked. Some models, equipped with a driver information display unit, may warn that a tire pressure is low. Some display units show the pressures of each tire. On vehicles equipped with NAVI systems, the visual screen may display a graphic which shows the air pressures in each tire.
Normally, if the tires remained in the same position and all you did was add air, the system should not need to be reset, but it may be necessary. Always refer to the particular service manual for the model you are servicing.
Identifying TPMS warning indicators
The first indication there is a problem with the TPMS is the warning light flashing or staying on after initial start-up or illuminating during driving. Turn the ignition OFF and then ON (engine not running) and observe the warning light.
If the warning light illuminates and stays lit, the problem is normally low pressure in one or more tires. Follow the service instructions for the specific vehicle to inflate the tires to the proper level. Check the tire for leaks and repair as needed. After inflating to the proper level, the vehicle may need to be driven at speeds above 16 mph to activate the TPMS and turn off the warning light. DO NOT use a Consult II or III to reset the system.
If the warning light flashes for more than one minute, a malfunction of the system is indicated. Further diagnosis will be required.
Inflating tires to the proper pressure
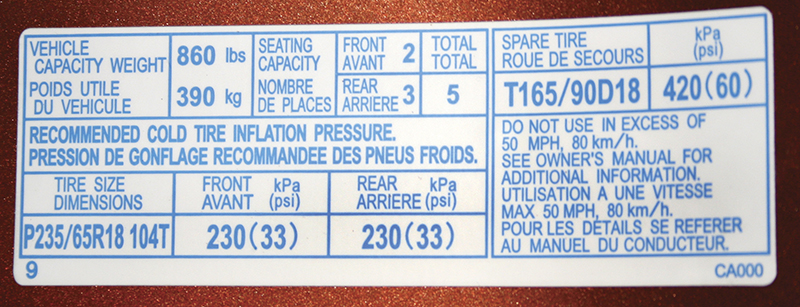
Every Nissan and Infiniti vehicle has a Tire and Loading Information placard, usually located on the driver’s door frame. This label indicates the tire pressure requirements for that vehicle – when equipped with factory tires. Also check the Owner’s Manual for proper inflation level information.
If a vehicle is equipped with aftermarket replacement tires, you should check the tires for the inflation requirements and correlate that with the placard. Note: The ignition should be ON, but the engine not running when inflating tires to the correct level while the tires are mounted on the vehicle.
The Tire and Loading Information placard indicates the “cold†pressure level, meaning the vehicle has been parked for three hours or more or driven less than one mile at moderate speeds. Tire pressure may change 3 – 5 psi between a cold reading and a reading taken after the vehicle has been driven for several miles.
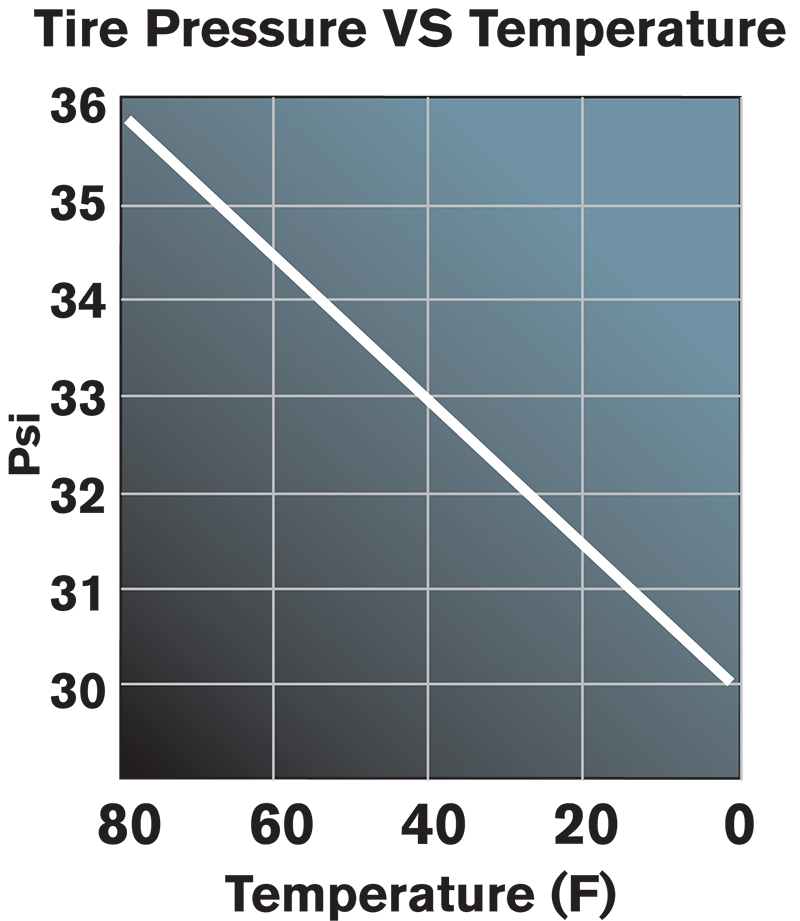
Remember that tire pressure may be affected by ambient temperature. Tire pressures can change approximately 0.6 -1.0 psi for every 10° F of temperature change. As temperature decreases, so does tire pressure. Seasonal temperature changes can result in low tire pressures that will cause the TPMS warning light to illuminate. Refer to the graph at left for ambient temperature/tire pressure variation.
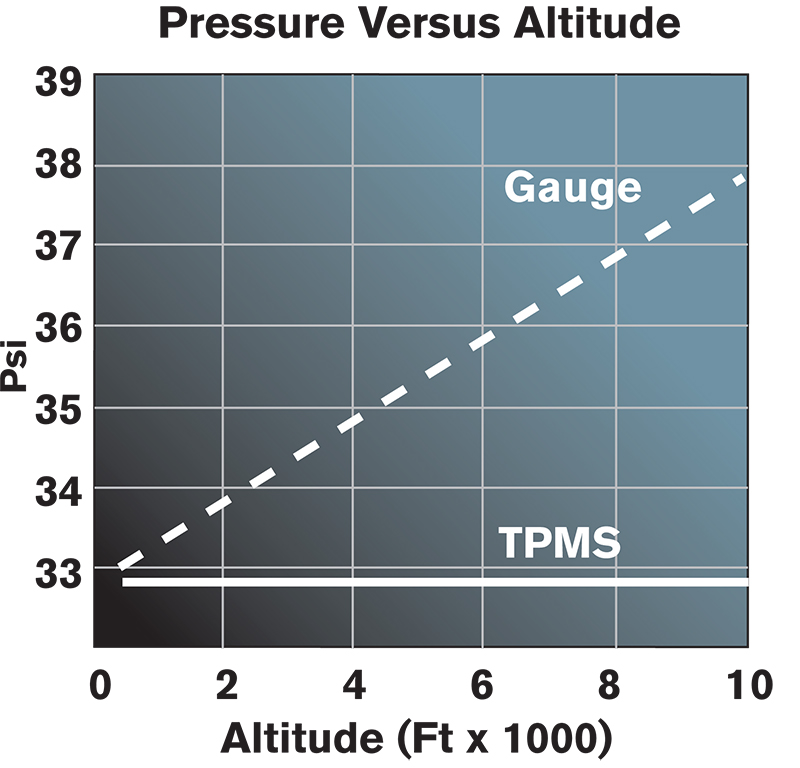
Tire pressure can also be affected by high altitude. Standard tire pressure gauges may show the tire pressure to be higher than the vehicle’s TPMS. If this is not taken into consideration when checking the tire pressure, the TPMS may illuminate the warning light. Typically, pressure gauge readings increase 1.0 psi for every 2,200 ft. of altitude above sea level (up to 10,000 ft.).
If you find a set DTC, refer to the following list to narrow your investigation:
List of TPMS Diagnostic Trouble Codes (DTC) |
|||
DTC |
Display Item |
Malfunction Condition |
Possible Cause |
| C1708 | [NO DATA] FL | Data from front LH transmitter can not receive |
|
| C1709 | [NO DATA] FR | Data from front RH transmitter can not receive | |
| C1710 | [NO DATA] RR | Data from rear RH transmitter can not receive | |
| C1711 | [NO DATA] RL | Data from rear LH transmitter can not receive | |
| C1712 | [CHECKSUM ERR] FL | Checksum data from front LH transmitter is malfunction | |
| C1713 | [CHECKSUM ERR] FR | Checksum data from front RH transmitter is malfunction |
|
| C1714 | [CHECKSUM ERR] RR | Checksum data from rear RH transmitter is malfunction | |
| C1715 | [CHECKSUM ERR] RL | Checksum data from rear LH transmitter is malfunction | |
| C1716 | [PRESSDATA ERR] FL | Air pressure data from front LH transmitter malfunction | |
| C1717 | [PRESSDATA ERR] FR | Air pressure data from front RH transmitter malfunction |
|
| C1718 | [PRESSDATA ERR] RR | Air pressure data from rear RH transmitter malfunction | |
| C1719 | [PRESSDATA ERR] RL | Air pressure data from rear LH transmitter malfunction | |
| C1720 | [CODE ERR] FL | Function code from front LH transmitter is malfunction |
|
| C1721 | [CODE ERR] FR | Function code from front RH transmitter is malfunction | |
| C1722 | [CODE ERR] RR | Function code from rear RH transmitter is malfunction | |
| C1723 | [CODE ERR] RL | Function code from rear LH transmitter is malfunction | |
| C1724 | [BATT VOLT LOW] FL | Battery voltage of front LH transmitter drops |
|
| C1725 | [BATT VOLT LOW] FR | Battery voltage of front RH transmitter drops | |
| C1726 | [BATT VOLT LOW] RR | Battery voltage of rear LH transmitter drops | |
| C1727 | [BATT VOLT LOW] RL | Battery voltage of rear LH transmitter drops | |
Altitude/pressure gauge variation
For example, consider a tire set to the Tire and Loading Information placard recommendation of 33 psi at an elevation of 5,280 ft. using the vehicle’s onboard display or a Consult III data monitor. A gauge may read 35.5 psi even though the tire is actually set to placard specs. Refer to the graph above for altitude/pressure gauge variation.
Diagnosing TPMS problems
If you encounter a vehicle with a faulty TPMS, the first thing you want to do is check for a set Diagnostic Trouble Code (DTC). If no DTC is set, the problem is most likely low pressure in one or more tires. Check each tire, even if they appear to be up to pressure.
This way, you can quickly eliminate tire inflation level as the culprit. Be sure to use a quality pressure gauge that has been calibrated for accuracy. This is very important when servicing TPMS.
For best diagnostic results, a Consult III should be used on 2006 and later Nissan and Infiniti models. A Consult II may be used on models prior to 2006.
Changing a tire
Extra caution should be taken when changing a tire that incorporates a TPMS transmitter. It’s easy to damage the transmitter if any tools or mounting equipment come into contact with the sensitive unit and could cause it to malfunction, requiring replacement.
When using a tire changer, be careful not to damage the sensor/transmitter. After filling the tire to the correct pressure, install the wheel to the vehicle and register the transmitter ID to the TPMS control module, if needed.
Here are the recommended tire changing procedures for Nissan and Infiniti vehicles:
Removal of tire from rim
- Deflate the tire by depressing the valve core. Do Not remove the valve core as it may damage the sensor/transmitter. Unscrew the transmitter retaining nut and allow the transmitter to fall into the tire. Gently bounce the tire so the transmitter falls to the bottom of the tire.
- Place the tire on the changing machine and break both tire beads, ensuring that the transmitter remains at the bottom of the tire.
- Turn the tire so the valve hole is at the bottom and gently bounce the tire so the transmitter is near the valve hole. Carefully lift the tire onto the turntable and position the valve hole (and the transmitter) 270 degrees from the mounting/dismounting head.
- Lubricate the tire well and remove the first side of the tire. Reach inside the tire and remove the transmitter. Finish the removal of the tire from the wheel.
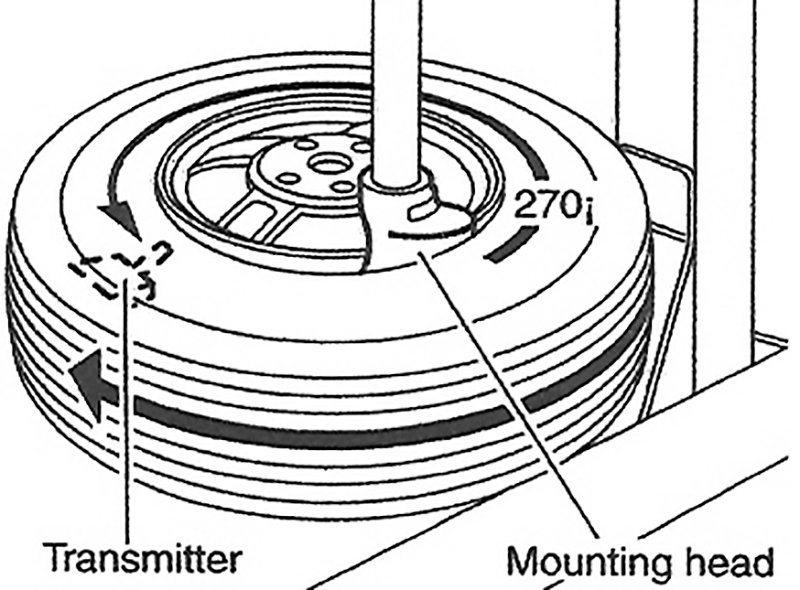
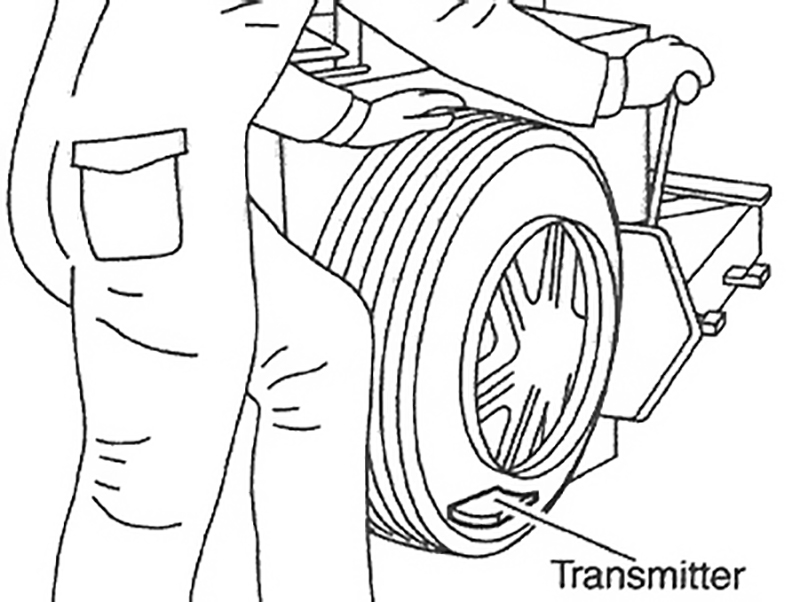
Mount the tire on the turntable so that the transmitter (1) is 270 degrees away from the mounting/dismounting head (2).
Installing tire on rim
- Put the first side of the tire onto the rim.
- Mount the transmitter onto the rim and tighten the transmitter retaining nut to the required specification.
- Place the wheel on the turntable of the tire changing machine. Ensure that the transmitter is 270 degrees from the mounting head when the second side of the tire is fitted. NOTE: Do Not touch the transmitter with the mounting head.
- Lubricate the tire well and fit the second side of the tire as normal. Ensure that tire does not rotate relative to the rim.
- Inflate the tire and install to appropriate wheel position.
TPMS seal leaks
Once in a great while, you may come across a wheel with a TPMS seal leak. This usually occurs only when the transmitter has been re-mounted and then mostly when the mating surfaces of the rim and seal are dirty or other foreign material is present. In such cases, make sure it is really the seal leaking before removing the transmitter.
The good news is that replacement seals are available from your Nissan or Infiniti dealer. This is a whole lot cheaper than replacing the entire transmitter. Order the replacement seal by referring to the sensor part number (note the color when ordering) as they vary in style. Be sure to follow the recommended tire changing procedures.
Rotating Tires
When rotating tires on a regular maintenance schedule, re-registration of TPMS sensors is not normally required. However, always test drive the vehicle to ensure no problems arise.
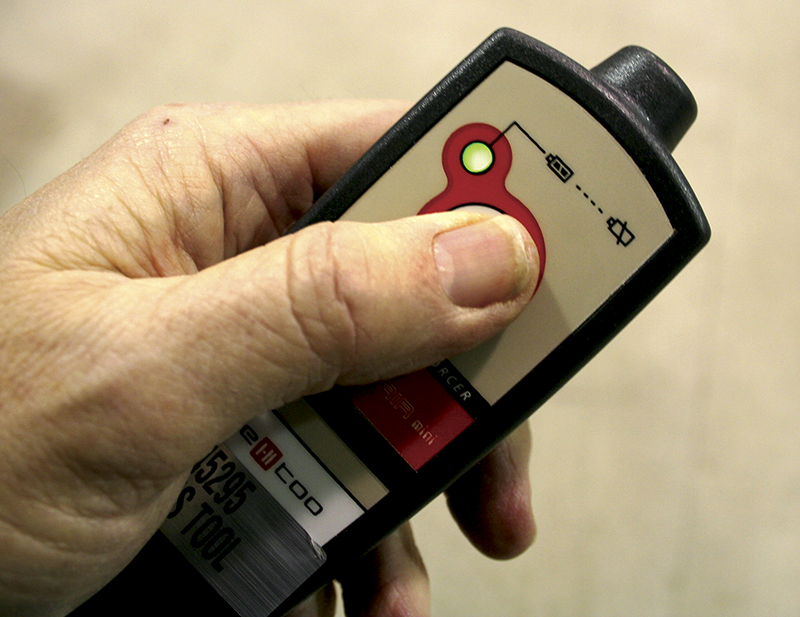
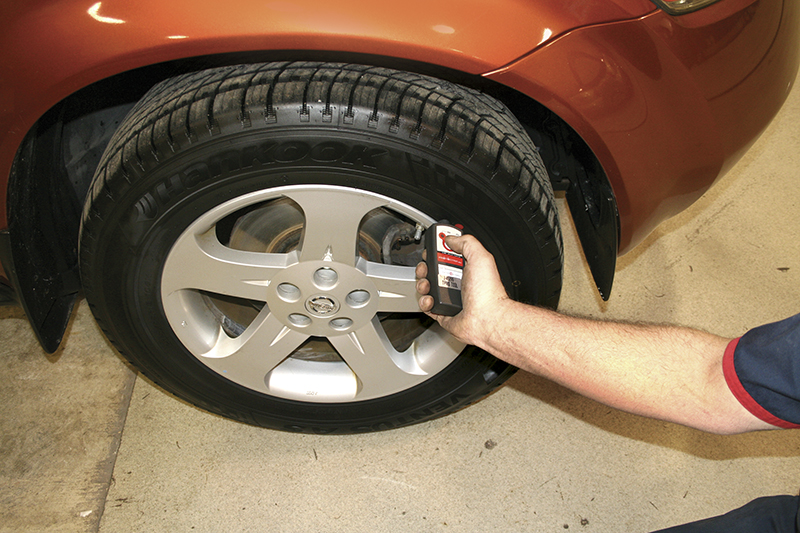
When the activation button is pushed, a green indicator light will illuminate to let you know the tool is triggering the transmitter.
Registering a new TPMS transmitter
When replacing a transmitter or body control module (BCM), you must first perform a procedure to “awaken†and initialize the new transmitter so it can be registered. This procedure must be done with a Consult II or Consult III, depending on model year of the vehicle and as called for by the specific service manual. After this procedure is completed, the transmitter is ready for registration with a J-45295 Transmitter Activation Tool.
When registering tires, the correct procedure is to activate the wheel transmitters in this order: Front Left, Front Right, Rear Right, Rear Left.
Triggering the transmitter is accomplished by holding the tool to the tire sidewall, close to the transmitter body, which is inside the tire, below the valve stem.
Push and hold the tool’s activation button for five seconds to send a signal to the transmitter to communicate with the control module. A green light on the tool will glow to let you know the tool is triggering the transmitter.
When the control module has registered the transmitter, it will respond with two flashes of the hazard lights and a buzzer to indicate which wheel has been recognized. Usually the buzzer will signal once for the Front Left, twice for the Front Right, three times for the Rear Right, and four times for the Rear Left.
When using a Consult II or Consult III during the registration process, always refer to the specific service manual for the vehicle you are servicing and follow the instructions on the Consult unit.
TPMS Tips
Here are some helpful tips for servicing TPMS
- Filling tires: When filling any tires, the air supply should be clean and dry. This is exceptionally critical for TPMS tires as any sediment or moisture can affect the precision workings of the sensor and transmitting devices. Take care to blow off the area around the valve stem to rid the area of dirt. If a valve stem does not have a cap, gently blow air into the valve to remove any dirt or dust. Then, install a cap.
- Aerosol inflators with sealant: Using a can of aerosol tire inflator with sealant is not an option for TPMS. The gummy sealant will clog the valve and pressure sensing port of the wheel sensor. The warning light will illuminate and you’ll end up replacing the sensor.
- Sensor battery life: The tiny integrated lithium battery in the wheel sensor has an estimated life of 10 years or 100,000 miles. When a sensor battery voltage gets to the low limit, it may cause the TPMS control unit to generate a diagnostic trouble code. If one sensor battery is low, the others are sure to follow shortly. If any tire work is performed as the vehicle nears the 10-year or 100,000-mile mark, it would be good preventive maintenance to replace all the sensors.
Tools and information
For best results when servicing Nissan and Infiniti vehicles, you should always use Nissan-approved tools, which are available though the Nissan Tech-Mate Website at www.nissantechmate.com. The J-45295 Transmitter Activation Tool, as well as the Consult II and Consult III are available at the site. Â
And, of course, the best service information is available on the Nissan and Infiniti service information websites at http://www.nissan-techinfo.com and http://www.infiniti-techinfo.com.





0 Comments