Now, more than ever before, customers are concerned with the fuel mileage, performance and cost of ownership of their vehicles. Fuel mixture codes are definitely related, and are some of the most common codes we work on.
One of the most significant developments in automotive history was the introduction of feedback fuel systems. Electronic fuel injection had already been around for quite some time, but in 1976 Robert Bosch developed the oxygen sensor as the linchpin of the closed-loop principle. This allowed computer-controlled systems to monitor exhaust oxygen content, calculate a rich or lean mixture, and make changes to the amount of fuel injected into the engine. This resulted in a substantial reduction in harmful emissions and increased fuel economy. As with any automotive system, at some point it will require maintenance and/or repair. This is where we come in.
Feedback systems have come a long way. They started with a single-wire, unheated 02 sensor, and now there are four- and five-wire sensors. Initially, there was only one sensor mounted in the exhaust stream, now there are typically two per cylinder bank. Also, there are other emissions controls that work with the engine management system. Exhaust Gas Recirculation, Canister Purge, and Positive Crankcase Ventilation systems all assist in reducing harmful emissions and add complexity. The more complex the system, the harder it is to diagnose when something goes wrong. What approach should you take when testing the emissions feedback system? When you see an O2 sensor lean code are you always going to replace the sensor?
The Symptoms
There are two situations where you will need to diagnose the emissions feedback system. Number one would be a DTC, and the second would be a drivability problem. A DTC means the powertrain control unit has monitored the feedback system and has determined that there is a problem. If the problem is severe enough, this can lead to a performance complaint. It’s your job to figure out the cause of the symptom. In the case of DTC, you can follow the Guided Fault Finding charts. These are found in your VAG 5052 scan tool. You can still test components and diagnose a vehicle without the factory scan tool, but it will probably be more time consuming.
When dealing with fuel trim codes such as P017X and P0112X, you can evaluate scan tool data, perform electrical component checks, and, of course, basic engine tests. One of the best ways to get started is to evaluate scan tool data. This is a huge step toward identifying where the problem is. Either with your VAG 5052, or your aftermarket equivalent, you can select “Read Measuring Blocks†and start looking at data. Select data blocks 030 to 039 on most Volkswagen vehicles and you will see fuel trim data. On most vehicles, data block 032 is an important one. This offers what is called “Additive†and “Multiplicative†fuel trim data. This data block number may change by year and model. A paid subscription to ERWIN allows you access to service information to identify the proper value block.
Fuel Trims Explained
As an engine is operating, the PCM is evaluating various inputs such at coolant temperature, throttle position and mass airflow. The PCM determines a base injector pulse width to add the right amount of fuel to the engine. If combustion is normal, a conventional oxygen sensor should read a stoichiometric mixture, aka Lambda, and maintain the injector pulse width and ignition timing. If the oxygen sensors pick up a rich condition (excessive fuel), or lean condition (insufficient fuel), it will report back to the PCM. The PCM will make the necessary changes to the mixture by altering the injector pulse width and/or ignition timing. The PCM can tell us the changes that it makes to get the engine emissions compliant.
These adaptations or changes are referred to as Fuel Trims. Trimming the air/fuel mixture corrects problems that may have come up during engine operation as components wear. If the changes are small, there is no problem and you will not set a code. However, there is a limit to how much the computer will change the mixture. If the Federally-mandated limit is exceeded by 1.5 times the norm, the computer is required to turn on the Check Engine Light, a.k.a. Malfunction Indicator Lamp (MIL), and flag a code for this condition. This is when the vehicle is no longer emissions compliant with EPA standards. Most of us are used to interpreting Long Term and Short Term fuel trim readings. Long Term would be the fuel adaptations over a longer period of time and short term readings would be immediate changes in fuel trim. You can find these numbers when scanning the vehicle using the Generic OBD II protocol and looking under “Data.â€
Volkswagen does not use the same scale as the Generic OBD II protocol. Volkswagen-specific software organizes fuel trim into two scales.    They are called additive and multiplicative scales. The additive fuel trim occurs all the time. The changes made are at idle and throughout the rpm range. The fuel trim readings have a greater effect in the lower rpm range, at idle, and just off idle. Multiplicative readings only represent the fuel trims above idle and the higher part of the rpm range. This means the fuel trims will change when the vehicle is being driven around city streets and on the highway. Getting back to the measuring blocks, the fuel trim numbers are displayed in the 03X range. Most vehicles produced after 2000 display the additive and multiplicative numbers in data block 032. Field 1 shows the additive fuel trim and field 2 displays the multiplicative fuel trim on single bank engines.
With the VAG 5052, fuel trim readings are displayed in milliseconds. Positive milliseconds means the injectors are being kept open longer. Negative milliseconds means the PCM is closing the injector sooner. With aftermarket scan tools, the scales may change. Some display these readings with a scale based on Lambda, or the number 1.00. This means the number 1.00 is our midpoint or stoichiometric reading. If the number were to go above one, then the PCM is adding fuel to correct for the lean mixture. If the reading is below 1.00, then the PCM is subtracting fuel to compensate for a rich condition. Percentages can also be used to display changes in fuel trim. Here 0% is usually the midpoint. Above 0% is adding fuel and negative 0% means fuel is being subtracted.
How Do I Use This Information?
So, the additive fuel trim number tells us what the PCM is doing at idle, and the multiplicative number tell us what the PCM is doing at part throttle. When you first pull the fuel mixture codes, you need to look at these numbers to determine where the problem is. If you see the additive number has changed, you know the problem is mostly at idle, and this is where you should be performing your tests. If the multiplicative number has changed a lot, then the problem is more at part throttle, or while driving. Of course, different combinations will steer you along different diagnostic paths, so it is important to look at these numbers if you can.
There are some symptoms that are a result of common problems. For instance, if you have a vehicle with high additive numbers, but the multiplicative is normal, you are probably dealing with a vacuum leak. This has more of an effect on mixture when the airflow is low than when the airflow is high. Check for broken vacuum hoses for the fuel pressure regulator, secondary air, and canister purge systems. You should smoke test the intake manifold and its plumbing to look for external vacuum leaks. You may also have internal vacuum leaks. Look to see if you have a code for incorrect purge flow as this may be a stuck-open canister purge solenoid “leaning out†the mixture at idle. This is an example of an internal vacuum leak.
If you have a vehicle where the additive number appears normal, but the multiplicative is high, you need to watch fuel pump pressure and MAF performance. The engine may be starving for fuel at higher rpm. When testing fuel pressure, remember fuel volume is just as important. A clogged fuel filter will restrict fuel flow to the engine. When testing the MAF, remember that if the air intake system has restrictions, you may get false low readings. Check the air filter and snow screens for debris that will restrict airflow. If the fuel pressure/volume tests pass and there are no airflow restrictions, you can now test the MAF. You can do this by monitoring the signal voltage while the vehicle is running, but how?
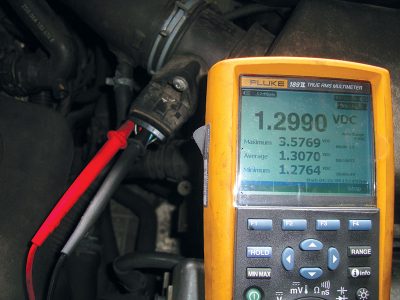
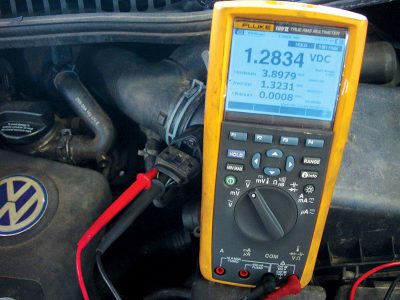
You can perform this test with either a digital multi-meter (DMM), or an oscilloscope. You will need to have some experience determining what a good voltage reading is for each engine type. For instance, the 1.8 liter turbo motor can have either a four- or five-wire MAF, depending on the engine designation. The signal wire typically puts out 1.3 volts when everything is normal. This is an indication that you have a good MAF. Next, turn on the MAX/MIN feature of your meter, which setting captures the maximum and minimum voltages sensed by the meter. Open the throttle as fast as you can to get the engine to rev to between 3,000 and 4,000 rpm. The rev limiter will prevent the rpm from causing engine damage, but you only need to bring the rpm up once to capture the peak voltage.
The maximum signal voltage should be over 4.0 volts. Usually, a MAF that produces these signal voltages is okay for the 1.8L engine. A 2.0L AEG motor may only peak out at 3.8 volts on a snap throttle. You can also use your scan tool to check the MAF. For instance, on a 2001 Jetta with the 1.8 liter turbo AWW motor measuring value block 002 will give you grams per second. You should measure between 2.0 to 4.5 gps at a hot idle with all accessories off. If not, always replace with an OEM MAF from your Volkswagen parts supplier. Aftermarket new or remanufactured sensors are not always properly calibrated for the different Volkswagen engines and have been known to set codes for a rich condition. You do not want a comeback due to an aftermarket MAF being installed.
Other Factors
Of course, the O2 sensor has an important influence on mixture. But when you see a mixture code like P0171/4 or P1128, do not shoot the messenger. Test. If the engine is a V6, and you had mixture codes for both bank 1 and bank 2, you should suspect a vacuum leak or a bad MAF. If only one bank set a lean code, then you should suspect an O2 sensor. Once again, looking at measuring block 032 would give you the additive and multiplicative values for both banks. Fields 1 and 2 are additive and multiplicative for bank 1, and fields 3 and 4 are for bank 2 respectively. There is a chance you may have a vacuum leak at one of the intake manifold runners affecting only one bank. You are going to have to test something to determine if it is an injector, a vacuum leak, or an O2 sensor.
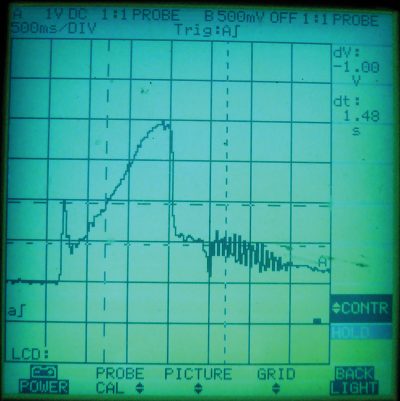
There are a few different ways to test an O2 sensor. On four-wire sensors, you can monitor the signal voltage with a scan tool, a DMM, or an oscilloscope. You can connect your DMM and watch the voltage change as the vehicle is idling. This voltage will continually change between 1.0 to 0.1 volts on a warmed-up sensor. A graphing multimeter will give you a visual graph of the voltage as it changes. An oscilloscope will give the best voltage pattern. You can look at the rise time and switch rate just as a PCM would monitor the signal. Typically, you should expect to see the O2 sensor signal switch from rich to lean at least once each second at idle. This means you have a good, working O2 sensor. If the switch rate is lower, or the signal voltage range is not above .8 volts and below .2 volts, then you will probably need to replace the 02 sensor with an OEM from your Volkswagen parts supplier. Make sure you have power and ground to the heater circuits.
The five-wire heated oxygen sensor (a.k.a. Air/Fuel Ratio) is harder to test with a DMM or scope. These sensors do not use a signal voltage to indicate a rich or a lean condition. Instead, they use an amperage signal to tell if it is rich or lean. You can tap into the pump cell to measure this amperage signal, but you will need to connect your ammeter is series. This means you must open the circuit to connect. Inductive ammeter probes do not measure low amperage signals accurately. This is a very low amperage, only switching between +5ma and -5ma. With these sensors, it is best to use the Volkswagen-capable scan tool.
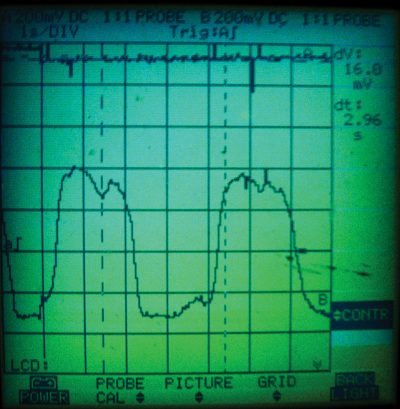
Volkswagen does offer a way to test these types of O2 sensors (a.k.a. air/fuel ratio) using their factory-specific scan data. By entering “Basic Settings,†you can run tests on the various monitored systems. The component you want to test is the air/fuel ratio sensor. On most engine types, you can enter block 034 in Basic Settings. You will be instructed to rev the engine usually between 1,800 and 2,200 rpm for a few minutes. Look at field #4 and it will indicate if the air/fuel ratio sensor has passed or not. You can also perform this same test on a vehicle equipped with a conventional O2 sensor. Once again, you should get your Basic Settings block information from your paid subscription to https://erwin.vw.com/erwin/showHome.do.
In Conclusion
When diagnosing fuel trim codes, it’s best to use Volkswagen specific data. Once you have identified the rpm range, you can start testing. However, if you do not have this data available you can still check basics. The importance of checking fuel pressure, smoking the intake system, and testing basic engine operation cannot be overlooked. If the problem lies in the engine management system, you can start testing MAFs, oxygen sensors and blocking off auxiliary emission systems. Getting to the root of the problem and fixing the vehicle the first time is what all of us are after.
Download PDF


0 Comments