
The first Volkswagen engine to have a timing belt was the one in the Rabbit, introduced nearly four decades ago.  T- belts last a lot longer now, but replacement is a much more involved job.
In any Otto-cycle engine, if a problem occurs in the 2:1 rotating relationship between the crankshaft and the camshaft, the engine may lose power or not run at all. If it’s an interference engine (sometimes called a “hitterâ€), the valves may contact the pistons causing severe and expensive damage. So, timing belt inspection and replacement intervals must be strictly observed. Although these rugged toothed belts last much longer than they used to, given the huge number of miles most cars are expected to last today, just about every one with a T-belt will need to have this job done. But to say it’s not the simplest service in the world is a big understatement, especially given recent advances such as variable valve timing (VVT).
Now, a timing belt job is still a timing belt job, but when diagnosing drivability issues we now have another factor in the equation. Volkswagen’s self-diagnostic capabilities can determine if there is a problem with base valve timing and these VVT systems. Once the problem is determined, it still needs to be repaired. Just like the synchronization between the crankshaft and camshaft, the timing between intake and exhaust valves is critical to performance. Also, improper timing will set a DTC and turn on the MIL, and the job will have to be done over.
Check ‘em often
The Volkswagen 2.0L gasoline is not the interference type, but the 1.8L turbo and 2.8L are. Volkswagen does not officially require specific replacement intervals for timing belts on all models, but for others specifies every 105,000 miles (along with the tensioner). So, always look up the recommendation for the car at hand. Regardless, Volkswagen says that in all cases the belt must be checked every 40,000 miles. If you are working on a vehicle for the first time and it has any considerable mileage on it, we recommend that you check the belt and related components. Belts can stretch, fibers can break, and hydraulic tensioners can weaken or seize over time. The basic test that goes back to Volkswagen’s first use of timing belts is to find the longest section of belt — on a 2.0L between the water pump and cam sprocket — and try to twist the belt more than 90 degrees with your fingers. If it is difficult to twist, the tension is okay. If you can twist it more than that, you should replace it. While you won’t find this test in the latest service literature, it’s still useful. You should also look at the condition of the rubber teeth and inspect for fraying and cracking. After all, the belt and tensioner you are inspecting may be aftermarket replacements. Many inferior parts get imported and make it to parts store shelves. They may or may not meet the quality control standards of Volkswagen, and may have their own maintenance interval. This is why it is always a good idea to replace all parts with OEM from your Volkswagen dealer. There will be no question when it comes to quality. Also, there are three different 2.0L engines with three different timing belts. Is your aftermarket supplier going to get you the correct one?

The V6 is way different
The 2.8L is a different animal. Woodruff keys are not used to position the cam sprockets to the camshafts. They are conically cut so that surface friction and bolt torque secure the sprocket to the cam. The crankshaft sprocket is still keyed to the shaft. Setting up this timing belt is different. Special tools are required to secure the camshafts in place. Each cam has a flange with two holes in it 180 degrees apart. One hole is smaller than the other. The small holes should be positioned towards the outside of the engine, and the two larger holes toward the inside. VW special tool 3391 holds the cam flanges, and the camshafts in place. The sprockets are removed from the camshaft with a puller. Making room for this puller is why you should remove the front support. VW tool 3032 is recommended, but any puller that can get behind the center hub of the sprocket can get the job done.
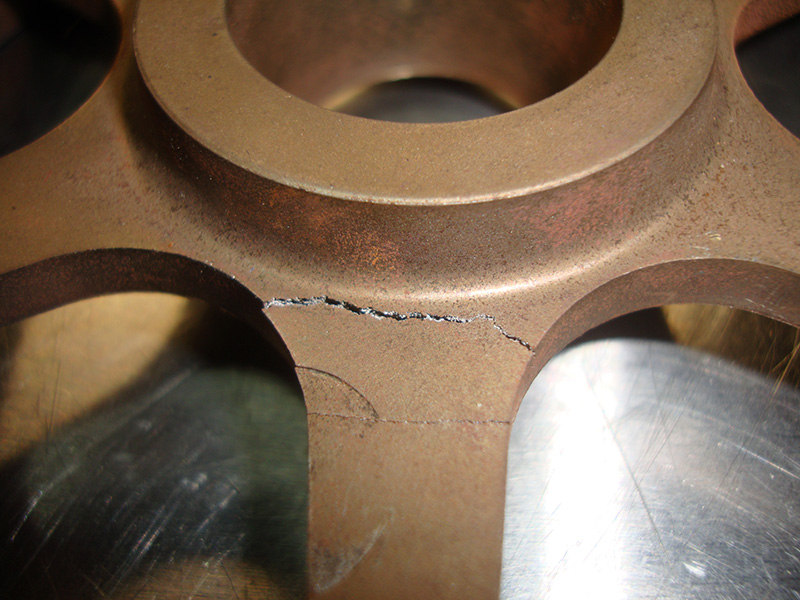
If your puller only grabs the outer sprocket or the sprocket fingers, you may crack the part trying to remove it. Check around the hub section for cracks that may have been caused by previous service. Of course, the part will need to be replaced. The crankshaft is held in place with a securing pin, VW special tool 3242. On the driver’s side of the block behind the motor mount is a plugged hole for the tool. With the crankshaft in position, thread the tool into the block until it is fully seated. You should not be able to rotate the crank at all. With the crank and cams secured, you can remove and reinstall the timing belt. It is strongly recommended that you replace the hydraulic tensioner, tensioner pulley, and idler pulley at this time as well. If any of there components were to seize or come apart, it would not only waste the effort of this current job, but would also cause a much worse catastrophe because the cylinder heads would have to be removed for valve replacement. It would also be a good idea to replace the thermostat as it is behind the timing belt.
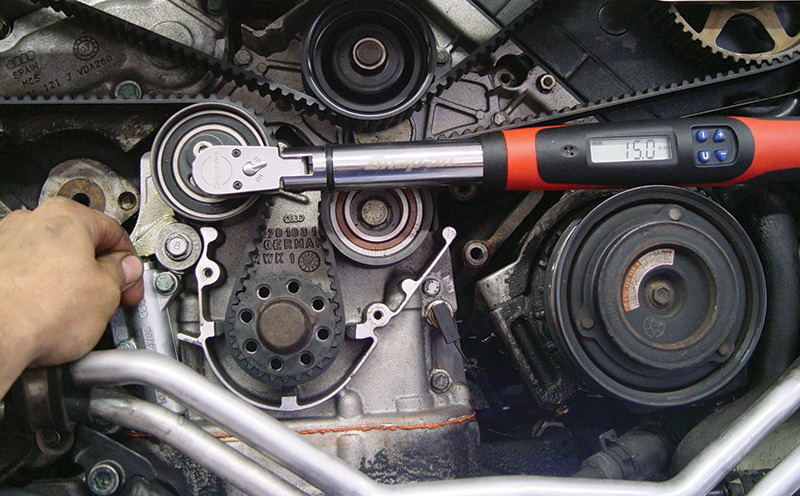
To install the timing belt, wrap it around the crank sprocket, idler pulley, bank #2 cam sprocket, water pump pulley, bank #1 cam sprocket, and tensioner pulley. The cam sprockets will “floatâ€on the nose of the camshafts, so don’t leave the securing bolts too loose or too tight. The goal is to set the proper tension on the belt while the crank and cam are held in place to insure proper timing. Also, you need to torque the tensioner securing bolt to its proper torque. The goal is to set the proper tension on the belt while the crank and cam are held in place to insure proper timing. Use an 8mm Allen socket in the tensioner pulley and rotate it toward the belt until you have applied 15 Nm of torque. This ensures the belt is properly seated and tensioned. Remove the pin from the hydraulic tensioner assembly. This should hold the belt tight. The cam sprockets may have moved but it does not matter. VW tool 3391 held the cams in place so you have proper timing. Tighten the cam sprocket bolts to 55 Nm to make sure they do not rotate on the shaft.
Hybrid belt and chain
This handles the timing belt portion of the job. By now you should have noticed that only the exhaust cams are driven by the timing belt. That’s because the exhaust cams have small timing chain sprockets mounted at their other end under the valve cover. It is at the rear of the head for bank #1 and the front of the head on bank #2. This sprocket drives a small timing chain that then drives the intake camshaft. There is a timing chain “camshaft adjuster†mounted in between these sprockets. It either pushes the timing chain up or pulls it down. The normal position is down for basic valve timing. When the tensioners are pushed upward, they pull the intake cam into the advanced position. A solenoid mounted in the adjuster allows in oil pressure to be used to position the upper and lower pistons.
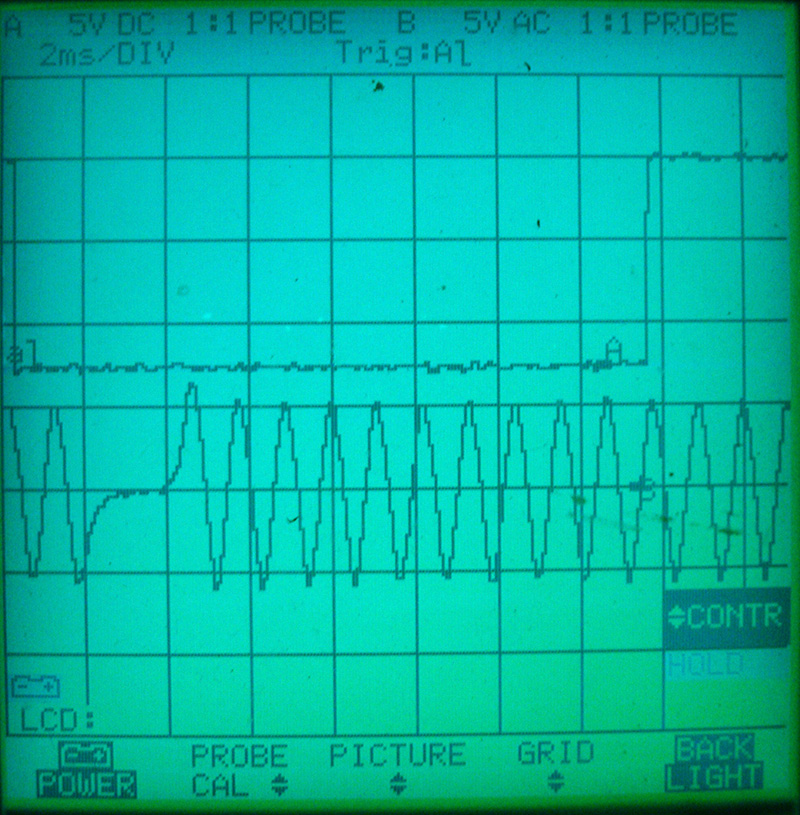
The PCM uses the crank and cam position sensors to determine if the initial valve timing is correct and if the camshaft adjuster is working properly. You can evaluate scan tool data to see if the timing is being advanced. Look at measuring value blocks in the 090s and you should see valve timing readings given in kW (kilowatts). This is what makes timing belt installation critical. The vehicle may run with one tooth off, but you will not be able to fool the computer and valve timing codes will appear. Every tooth on the timing belt results is a 6 kW change in your scan tool reading, so you can’t have any mistakes here. On 2000 and later models, you can go into basic settings block 094 and increase rpm to 2000. Here, the VVT system will be checked and you will be told if one or both banks have passed or failed. You can also put a lab scope on the crank and cam sensors and activate the solenoid yourself. You can watch the change between the timing of the crank and cam.
If the adjuster is “ratcheting†on a cold start, oil pressure is being bled off, so it will have to be replaced. This requires the removal of both camshafts, particularly on the driver’s side head. While you have the adjuster off, be sure to blow out the oil passages that feed it. You should feel air coming out of the cam journal oil feed holes. A new gasket contains the half moon seal that is mounted under the gasket. When you receive the new camshaft adjuster you will see a fixture holding the pistons in place. You should install the unit with the fixture in place, and remove it when you are ready to crank the engine by hand two rotations to double check the timing marks for    the cams. When installing the adjuster, be sure you have the two notches in the cams lined up with the arrows on the cam caps. You should have 16 timing chain rollers between the two notches when the tool is removed.
This is how Volkswagen designed their VVT systems for years on their DOHC (Dual Over Head Cam) engines. Around 2005 Volkswagen only kept timing belts on the BBW and BEW SOHC (Single Over Head Cam) motors, and started using timing chains instead of belts. The BPY motor does not have VVT, but it is DOHC, so the timing belt procedures remain the same. On later engines, the camshaft actuator was moved to the front of the camshaft as part of the sprocket. VVT was also applied to the exhaust cam for greater engine control.
Download PDF


0 Comments