Though very durable and dependable, after long use Mercedes-Benz power seats can develop problems. Here’s how to approach them.
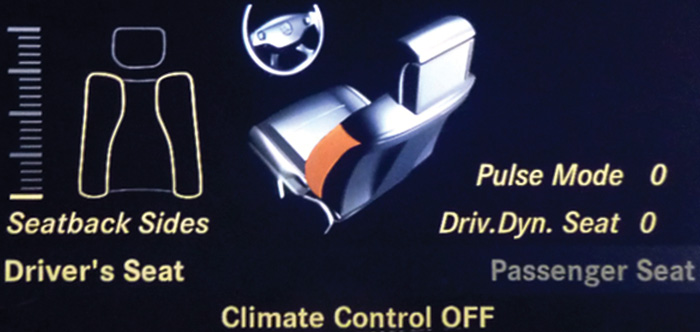
The Dynamic Seat function uses steering sensor input to instantly inflate the side cushions in tight turns to keep your body more stable.
Remember the days when you had to use leg power to move a seat forward or back? There was a lever underneath the seat between your ankles that had to be pulled, then you would slide the seat back and forth manually (footly?). What a hassle! Also, if you lacked the necessary coordination and power it could get comical, especially on hills. Thankfully, somebody had the great idea to electrically power seats in a way that allowed anyone to work a switch to move the seat to where you wanted it — to a position that gave you safe control.  As the years went on, engineers incorporated more everyday conveniences into the automotive seat. A modern Mercedes-Benz vehicle can be ordered with seats that are heated and ventilated, and with adjustable bladders that massage and support your back and sides. Ah, the comfort. Nobody wants to give that up. So, let’s talk diagnosis.
Orthopedic dream
Power adjustable seats in the Mercedes-Benz world can be deceptively complex. How difficult can it possibly be to diagnose a defective power adjustable seat? Well, it can be tricky, but is much easier when you have SDS to help you find the problem. Our test subject will be a 2007 Mercedes Benz S550. At its launch, the seats of the W221 chassis were recognized by the European Orthopedic Society as having the best design of all automobiles. Not bad, and it shows that extensive engineering went into the design of this seat to make it more comfortable while meeting the extremely high safety standards of all Mercedes-Benz vehicles.
How does it work? The frame bottom, back and headrests are adjusted via electric motors bolted to the track and frame. For lumbar support and the massage function it uses several bladders that are independently inflated/deflated to adjust the size and stiffness of the cushions. These same bladders are used in the Dynamic Seat function. Dynamic Seat uses steering sensor input to instantly inflate the outside cushions, relative to the direction you are turning, to help hold the driver in a more upright and stable position. The heated surface feature is achieved through an electric element with high resistance that converts 12V electrical energy into heat. This element sits between the cushioning foam and the leather covers. The ventilation of the seat works by means of small fans embedded in the cushions, pulling air through the perforated leather covers.
What goes wrong? The most common problem with the seats is when they stop moving. If this happens, the first thing you have to do is an operational check. What exactly doesn’t work? Does the seat move forward, but not back? Does it recline? Do the headrests work? By doing this you can narrow down what the probable source of the problem is. If only one motor fails, you can rule out a problem with rest of the system. If nothing works, then you know there is a larger issue. So, the second thing you should do is a short test to search for any fault codes.
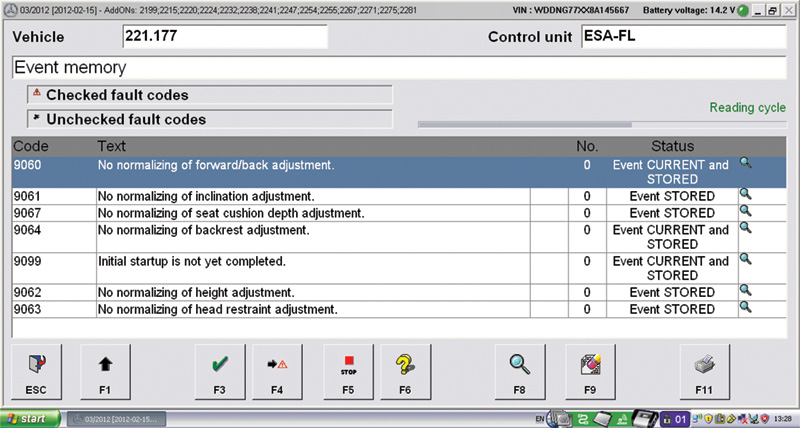
If SDS can communicate with the seat control module, then that is a good sign — it means the module is probably okay. Often, what you see is what’s shown in Figure 1.
What does this mean? “No normalizing†means that the seat control module does not know the location of the seat track in a given position. The module likes to know where each electric adjusting motor is on its path of travel. How far away is the end stop? It needs this information to make a map of how far back the seat is, how high it is, the inclination of the backrest, and the height of the headrest. That way, when the driver adjusts the seat back, the headrest automatically rises to accommodate a taller driver in the seat.Â
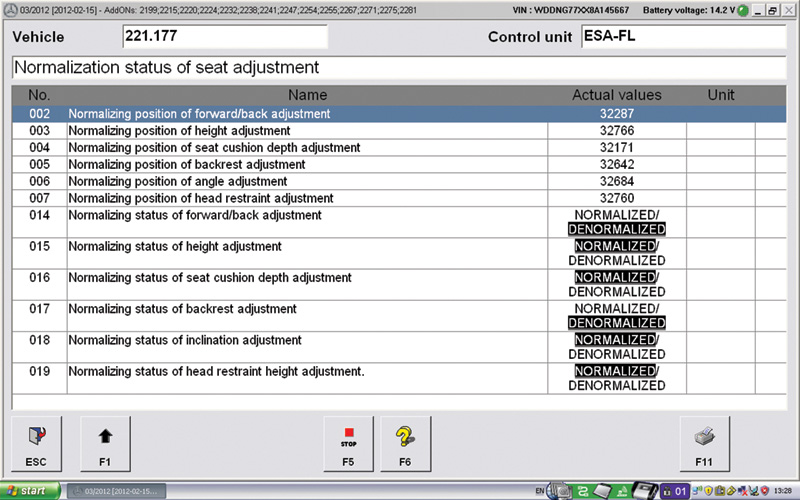
If the module has faulty information, bad things can happen. For instance, the seat may move in the opposite direction desired, or clearance issues with the headrest and headliner may occur. First, you should check actual values in the seat control module (Figure 2).
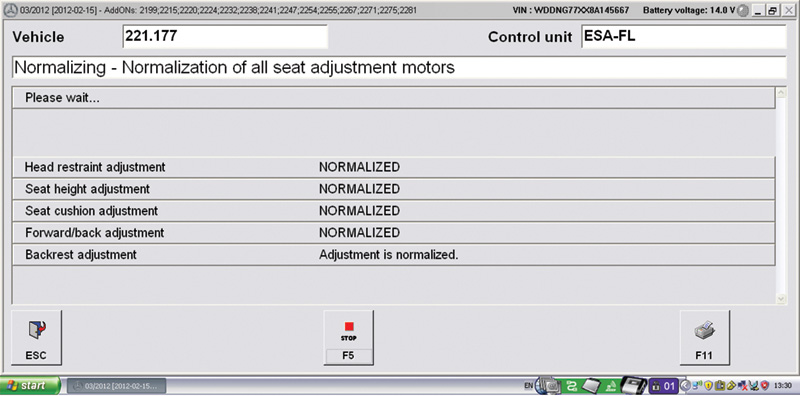
How do we resolve this? SDS has a function in the “Adaptation†menu for normalizing the seat automatically. Select this function and let it run, you will get a report (Figure 3).
If the procedure fails, the program will alert you as to which motor didn’t normalize. This will help you narrow down the source of the fault. The motors have built-in Hall-effect sensors. If you get a fault code for the sensor of a given motor, it means the motor is defective. A caveat: If there are any obstructions on the track, such as a coin or soda can, the seat will not normalize properly.
How does the module lose this data in the first place? Almost always, it is a case of low battery voltage. If the car has a weak battery and the voltage drops below 11.0V, the module might “forget†the normalization data. Fix the battery issue, then re-normalize all the seats, and recheck. If the problem persists, either an individual motor (which would throw a fault code), or the module is at fault.
Seat heat?
What to do when the seat heater doesn’t work? The first thing is to verify that the red LED indicators in the seat heater switch come on when the button is pressed (engine running). If that is the case, then the problem resides in the seat itself. If the LEDs do not come on, perform a short test with the SDS and process the faults. To check the circuit, look for the heated seat connector underneath the cushion. You will see a four-pin connector that splits into two separate two-pin connectors. This is the junction where the seat bottom cushion and seat back cushion heaters get their power. If you are getting power at this connector, check to find out whether or not there is an open in the seat side. To do this, disconnect and split the connector and ohm out the heater elements separately. An open indicates a defective element, which means the cushion must be replaced.
The seat ventilation is checked in a similar manner. The fans are either running when the blue LED in the switch is on, or it is not. But beware: The effect is very subtle and might be hard to feel. Use a sheet of paper to check if it’s working. If the sheet is sucked to the seat, then the fans are running. If the fans are not running, check the wiring.
Dynamic Seat Function
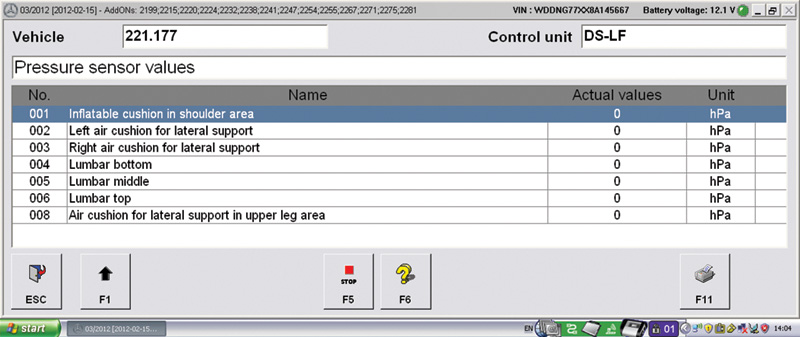
Now comes the more complicated part: What if the Dynamic Seat function doesn’t work? For this you almost certainly need SDS. The first step, as always, is to perform a short test. Also, search for any available software updates for the Dynamic Seat Control. If there is a code for a steering angle sensor, address that first. If you have fault codes for a leak in the system, SDS will help you find it. As mentioned before, the bladders are inflated with air individually. This is regulated by a control module and air distribution center called a Module Carrier. A pump supplies the needed air. The first thing to do is check the pressures in the bladders using SDS. Under “Actuations,†you’ll have the ability to inflate the cushions (Figure 4).
Using this screen, you can check whether or not the pump is working, and also check for leaks. If one or more cushions does not inflate, find the location of the leak. Is it a line? Is it a bladder? Usually, you can listen for this, or use a smoke machine. If the bladder leaks, then the entire bladder package has to be changed. This is a bit of work since you basically have to take the leather cover off to replace the bladder. All this can also be used to find a fault with the massage function.
If you don’t have SDS handy, you can enlist the built-in functions of the vehicle to do a quick leakage check. Use the Command Controller in the center console to select the “Seat†menu in the Command screen. Here, you can select all the individual cushions and inflate them. If one or more do not inflate or deflate right away, you have a leak.
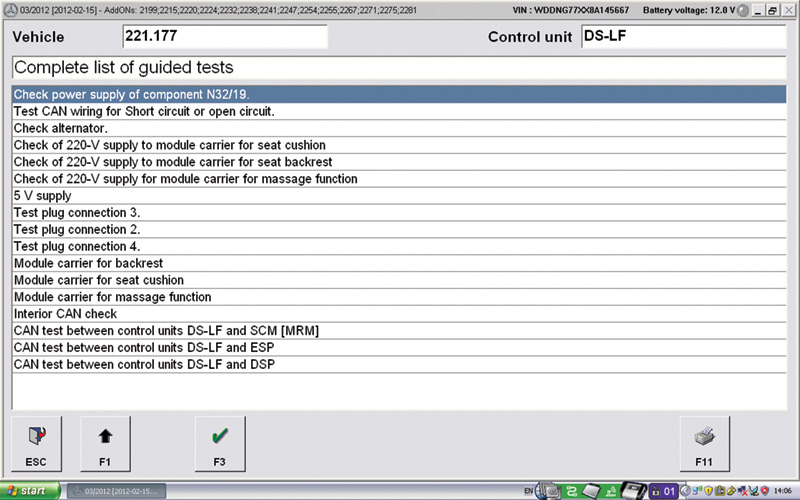
At times, you will get codes for a defect in the module itself. There are a series of ‘Guided Tests’ in SDS that will help you find the problem (Figure 5).
Process these in order to find the problem. We mentioned software updates earlier. Before you get too crazy, flash the control module using SDS and clear the codes. Remember that battery voltage is critical — low voltage can trigger phantom fault codes.
Squeaks, creaks, and rattles
Let’s talk about a very common and very annoying problem: noise, as in squeaks, creaks, and rattles. No matter how well engineered and built a seat is, there’s always the possibility of noises occurring. With leather, plastic, and metal all interacting with each other, chances are somewhere a squeal will develop. What to do? Mercedes-Benz sells a kit (Part #000-580-0350) to treat this. The kit includes different types of lubricants and felt tape. Whether it’s the leather seat bottom rubbing against the plastic seat trim, or a plastic guide sliding on metal rails, or wherever else two types of materials meet, there is a lubricant in the kit to address it. Think of the noises as vibrations. When the leather rubs against the plastic, it makes a noise. Adding the right lubricant between them will reduce the friction, and, therefore, the vibration. No vibration, no noise. Felt tape can be used where seat covers go over the frame, or where the air bladders contact the seat covers.
Lastly, what to do when the seat refuses to move and you can’t get to all the bolts to remove the seat? Before you break out the power tools and hammers, try this: If one of the motors is detached from the rail, try to reach under and reattach it temporarily to move the seat. You can also try powering up motors individually using a battery pack. Just make sure to isolate the motor from the rest of the car and be sure to use a fused connection.




0 Comments