
Our tech editor gives us some of his hands-on experience with the often-neglected parts that hold everything together.
One of the biggest variables in performance engine building is bolted assembly techniques, which can be seen as controlling clamping forces. For many decades, we relied on torque wrenches during the assembly of street engines because “close enough is good enough†when you’re talking about heavy iron making modest power. The main limitation of a torque wrench is that it’s really just a friction detector. As little as 10% of the detected “torque†is used to adjust the fastener’s clamping force, while as much as 90% is used to overcome the friction of the spiral ramp we call “threads,†and the friction of the bolt head flange as it digs into the surface under it. As engines evolved, the assemblies became lighter with the use of aluminum heads and blocks while the power per liter increased tremendously. This evolution in engine design led to the introduction of “torque-plus-turn,†or “torque-to-yield†fasteners.

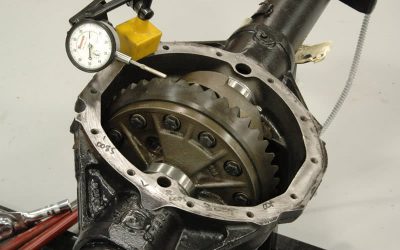
Stretch is measured to the tenth.

Your torque wrench alternatives.
What is torque-to-yield and why it is now considered the proper way to bolts assemblies together? There is a narrow window in which a bolt or stud becomes “stretchy†and acts more like a spring than a rigid fastener. When I say a “narrow window,†it’s often as little as .0005 in. For example, the manufacturers of many of the rod bolts I’ve used will tell you to stretch them to .0053-.0058 in.
I first saw stretch used on U.S. Navy nuclear submarines in the early ‘70s. After refueling the nuclear reactor vessel, we reattached the head by using a crane with a scale mounted inline to pull outward on the mounting studs. Once the specified tension was achieved, the nuts were then spun down by hand and the pull on the stud was removed, thus establishing the proper stretch in the studs.

Center your hand over the notch of a digital torque wrench to assure uniformity.

There’s junk, then there’s the good stuff. ARP is the gold standard in fasteners.
In whatever technique you use, consistency is the key. Your torque wrenches must be regularly calibrated, or checked to a known standard. The lubes, locking chemicals, or thread sealers you use must not vary. After chasing every thread and every hole, I personally cycle fasteners five times to roughly 70% of torque using the same lube that I’ll use for final assembly to polish off any rough threads or tool marks before I complete the final tightening.

Whatever you put on the threads has a big effect on the stretch. Be consistent.
On rod bolts, I use the setting torque-plus-turns to attain the correct stretch because I’ve discovered that it’s very accurate and very repeatable once my prep work is done. Once I get the correct stretch on the first set of bolts, I can get within a 10,000th or two on all of the rest of the fasteners almost 100% of the time. Just remember, never “chase the stretch!†If you miss the number, you must back the fastener completely off, re-lube the threads and the underside of the bolt head and start over. If you attempt to check, tighten, check and tighten more and so on, you’ll twist the shank of the fastener because the friction will lock the threads and you’ll have to wind up the head and shank with enough force to overcome the friction on the threads — a great way to obtain an early, and catastrophic, bolt failure.

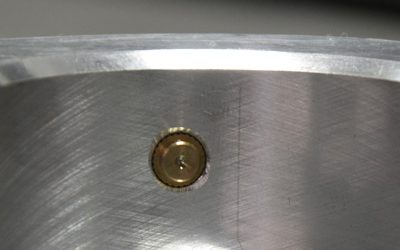
Washers must be relieved to clear the radius.
For those fasteners where measuring stretch or yield isn’t possible, we only have the torque wrench or the setting torque-plus-turns methods. Of the two, torque-plus-turns is the most accurate. Fastener preload is critical on racing engines — it’s used to counteract all the forces that are trying to separate the bolted assemblies. A fastener in yield will also allow some parts growth without over-clamping a gasket, and aluminum heads will grow about .006-.008 in. with temperature.

If you see daylight at the washer interface, you’ll damage the bolt.
Real world:
- You should chase every thread.
- Bolt failures are rarely caused by defects, but more often by impact fatigue (someone nicked it, or dented it. INSPECT YOUR FASTENERS!!)
- Overtightened or undertightened — the bolt preload must be more than the forces trying to separate it but NOT so tight that the preload on the bolt plus the force trying to separate it are enough to overcome its strength.
- You should cycle the bolt at something near full torque at least five times with the approved lube to polish the threads prior to the final installation.
- Use studs wherever you can.
- Lube threads, both sides of the washer (in case it spins), and the underside of the nut.
-

Flip the washer if necessary to make a proper mating.
Use only the special washers from the bolt specialists as the standard stuff will fret away and the fastener will lose torque.
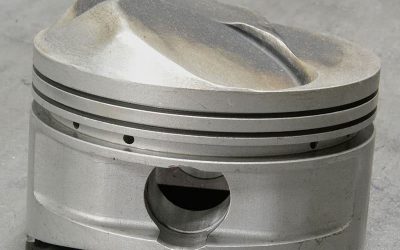
- If you’re using bolts, make sure the radius of the washer matches the radius on the underside of the bolt head.
- Loctite all critical fasteners that are not washed in oil — cam fasteners, brackets, crank pulley bolt, flywheel bolts, etc.
-

All high-performance bolts are radiused.
Measure and mark rod bolts before installation and recheck measurements before re-use. Discard if the bolt is .001in. longer than it was during first measurement.
- I engrave the bolts on the shoulder or head “1†and “1L†for rod number one. The “L†is for the locator tab in the bearing shell so I always know where they came from and where they go back.
- CAREFUL with bare hands! Many specialty alloys will not tolerate salt or sweat — L-19, 625+, and others. There’s a long list at the ARP website of materials that must be properly handled or stress failures will result from the chlorine in perspiration.
by Greg McConiga
Â
0 Comments