

Here’s a review of the once-common skill of valve clearance adjustment and how it should be done on modern Nissan vehicles.
Ask any auto shop teacher who was working back in the ‘80s, and he’ll tell you that measuring valve clearance is a skill that is best learned through practice. After enough repetitions, students will develop a “feel†for it. The first attempt at a valve adjustment would usually result in an engine that clatters, misfires, or a combination of both, but after a bit of practice the students would be able to get it perfect every time.
Measuring valve clearance with a feeler gauge.
Checking and adjusting valve clearance used to be a very common operation. For example, a 1983 Sentra with an E16 motor would need the valve clearance checked (and likely adjusted) every 15,000 miles. There was ample opportunity for technicians to practice the art of measuring clearance. Fast-forward to 2014 and engines are usually able to hold clearance for 100,000 miles or more, valve covers are buried under intake plenums and other obstructions, and technicians in their 20s and 30s don’t remember a time when checking valve clearance was a skill employed daily.
Consider these two facts: technicians don’t get much practice checking valve clearance these days, and performing a valve clearance adjustment can take a very long time, often requiring removal of the camshafts. Add to this that checking and adjusting clearance on many modern engines is often a lot trickier than it has been in the past and you have a recipe for a miserable and costly comeback.
If it were possible to prescribe daily practice until mastered, it would be a far better solution than this article, but since that’s not going to happen, let’s talk about how to get the job right the first time.
The Basics
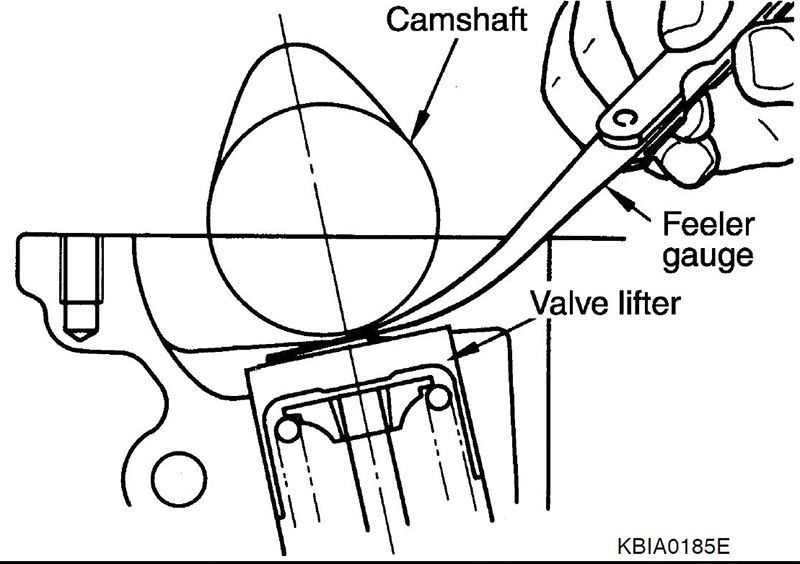
First, let’s define valve clearance. Valve clearance is distance between the bottom of the cam lobe and the “tappetâ€. A tappet can be a rocker arm or lifter, but you’ll find solid lifters on most modern Nissan vehicles. A tappet is defined as any device that intermittently makes contact with a cam or other part so as to give or receive motion. You’ll notice that the definition say’s intermittently; that’s where the clearance comes in. The bottom, or heel, of the cam lobe is circular and is ground concentric with the centerline of the camshaft. This means that there is about 180° of cam lobe rotation where the distance between the cam lobe and the tappet is the same. This gap between the tappet and the cam lobe is called valve clearance and can be measured by finding a feeler gauge of a known thickness that will fit into the gap without too much or too little resistance.
The gap between the cam lobe and lifter is necessary to allow the valve spring to pull the valve head fully against the seat to seal the combustion chamber. But why not make a universal valve clearance specification of .001 in. That would allow the valve to close, right?
There are three reasons for engine-specific clearance specifications. First, we need to have some “fudge factor†built in. Parts wear and clearances change. If valves were adjusted to .001 in. clearance, even the smallest dimensional change might cause the valve to be held open.
Next, we must consider thermal expansion. The aluminum cylinder head and steel alloys used for parts like the valve and seat all have different rates of thermal expansion. Luckily the engineers have calculated what will happen as the engine heats up and provided us a shortcut the right answer in the form of a clearance specification.
Finally there’s valve timing. The closer the cam is to the lifter, the sooner the valve will begin to open and the later it will close. On older engine designs you could assume that if there was some clearance, there would not be an engine performance concern. This is no longer the case. If valve clearance is out of specification, but there is still some clearance, do not assume that the engine will still run properly. For example, if the specification is .010 – .014 in. and the measured clearance is .006 in., don’t assume it’s not causing a problem just because there is some clearance. Tight valves can cause an increase in the duration of valve overlap, low manifold vacuum, and misfires, even when there is sufficient valve clearance for good combustion chamber sealing.
So, tight valves (too little valve clearance) are a bad thing. What about loose valves? If valve clearance is excessive, wear on the cam lobe and tappet will be increased and the valve timing will be a little late. This is preferable to a tight valve, but still isn’t good. If faced with a choice, go looser not tighter. For example, if you have a specification of .010 – .014 in., and the available shims would set the clearance at either .010 in. or .014 in., go with the shim that sets clearance at .014 in.
Which brings up worthwhile, albeit subtle, point: whenever setting valve clearance, try to match valves on the same cylinder as closely as possible. Valve clearance does have a small effect on valve timing and if there are two intake valves on a cylinder (and when are there not?) it would be best if they both open at the same time to prevent any weird eddies and maximize cylinder filling. Per the service manual, you might be allowed to set one intake valve at .010 in. and the other at .014 in., but you won’t be doing the best job possible for your customer.

A Go/No-Go gauge has two thicknesses. The primary size should fit with low drag, but the secondary size should not fit at all.
Check Valve Clearance When…
Valve clearance inspections used to be preventive maintenance, so looking at the odometer and the maintenance section of the owner’s manual was the most common way to know if the valve clearance needed to be checked. Most modern Nissans do not have an interval, so when should you check the valve clearance?
If the valve cover is off, it’s a good time to check clearance. If the valve cover gasket is being replaced it makes sense to check the valve clearance while the cover is off.
Abnormal tapping noise is another reason to check clearance. A single loose valve can cause a “click†noise every 720° of crankshaft rotation – the same cadence as an engine misfire, or for that matter, a fuel injector, which also clicks every 720° so be sure not to confuse the two. If several valves are loose, expect a cacophony of clicking with frequency tied to engine speed. However, with modern engines, valve clearance typically doesn’t increase over time as a result of normal wear; valves tend to get tighter as the engine wears.
Tight valves are the most harmful and difficult-to-detect reason to perform a valve clearance check. We might call insufficient valve clearance “the silent killer†because a tight valve makes no noise. A tight valve can cause an engine to run rough, but so can a lot of other things, so it takes a bit of knowledge to determine when the next step should be a valve clearance check.
Tracking a Silent Killer

You can use a micrometer to help develop a feel for the right amount of drag.
If there is no valve clearance, the valve face will not press firmly against the valve seat and this can quickly damage the valve. Here’s why: the valves, especially the exhaust valves, are exposed to combustion gases around 3600°F. A steel-alloy valve will melt around 2400°F. Obviously, the valve will need to be cooled so it does not melt. This cooling takes place when the valve face is closed against the relatively chilly liquid-cooled valve seat. If the valve is being held away from the seat because there is no clearance between the cam and the tappet, the valve will quickly overheat and melt. Obviously, we want to correct a tight valve ASAP, but we also don’t want to recommend an expensive investigation without good cause.
The only observable indicator of a tight valve is a misfire. The misfire it causes will typically be erratic; in other words it won’t misfire on every cycle. Just in case that doesn’t sound sufficiently diagnostically challenging, the misfire is also likely to be intermittent; in other words it won’t be present all the time.
When hunting elusive prey like the tight valve, it’s best to know its habits, then lie in wait at the time and place you’re most likely to find it. The silent killer prefers the morning, when the engine is cold, because valve clearance decreases when the engine is cold. A misfire caused by a tight valve is also most likely to be found at idle. If you want to catch a tight valve, leave the car to sit overnight then do your testing while the engine is cold and idling.
When a tight valve causes a misfire, it’s often because compression pressure leaked out past the partially open valve. A compression gauge might seem like a good tool to check for tight valves, but it’s rare that it will uncover problems other than the most severe cases. Every time a valve is cycled, it has an opportunity to seal or leak. A compression tester will display the peak compression achieved while cranking the engine. If the cylinder being tested misses a beat or two due to a tight valve, it won’t have much effect on the gauge reading at the end of the test. A vacuum gauge on the other hand is an excellent tool for finding tight valves. A needle pulsation around 1-2 in. Hg at idle provides a solid reason to recommend pulling the valve covers.
Checking Valve Clearance
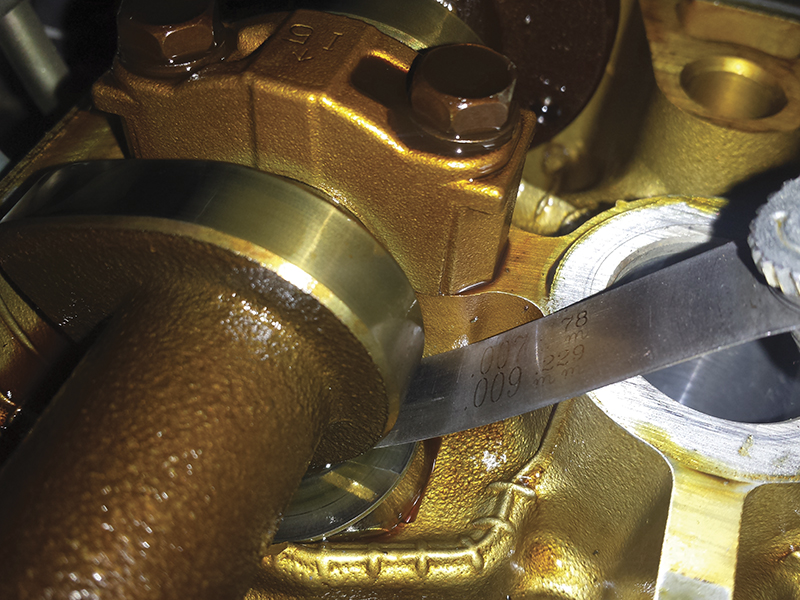
Be careful to avoid this. The feeler gauge is touching the spark tube casting and may cause an inaccurate measurement.
Earlier in this article we defined valve clearance as the distance between the tappet and the bottom of the cam lobe. So, if we are going to check valve clearance, the cam lobe must be pointed away from the tappet. Old-timers are sure to have their own opinions on the best way to go about setting up engine position for measurement. A common technique has been to rotate the engine to valve overlap on one cylinder, then check the clearance on its companion. Others like to adjust each valve with the lobe 180° away from the lifter. Before deciding to use your own technique instead of using the procedure prescribed in the manual, consider the amount of effort involved with re-adjusting clearance if it doesn’t work out.
You can bend your feeler gauge to avoid obstacles, but avoid bending the area used for measurement.
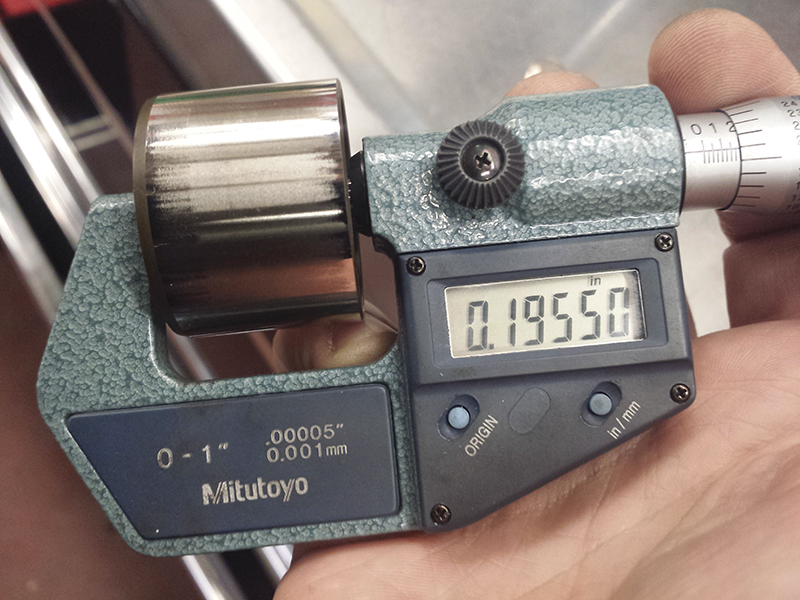
Once the cam lobes are in the proper position, clearance is measured by inserting a feeler gauge into the gap between the cam lobe and the lifter and sliding back and forth. When the correct amount of drag is felt in the gauge, the clearance is the same as the gauge thickness. But what is the correct amount of drag? That’s where the practice used to come in. Here are two shortcuts for developing “the touch.†First, set a micrometer to the size of the feeler gauge being used and lock the spindle. Then compare the feel of the feeler gauge in the micrometer to the feel of the gauge between the lobe and lifter. Second, Go/No-Go feeler gauges can be a big help, especially on engines with low-tension valve springs.
A selection of lifters of different thicknesses can be purchased from Nissan dealers to adjust valve clearance.
Clearance Measuring Pitfalls
Here are some things to consider when using feeler gauges to measure valve clearance (see images below, and top-right).
There’s Stuff in the Way
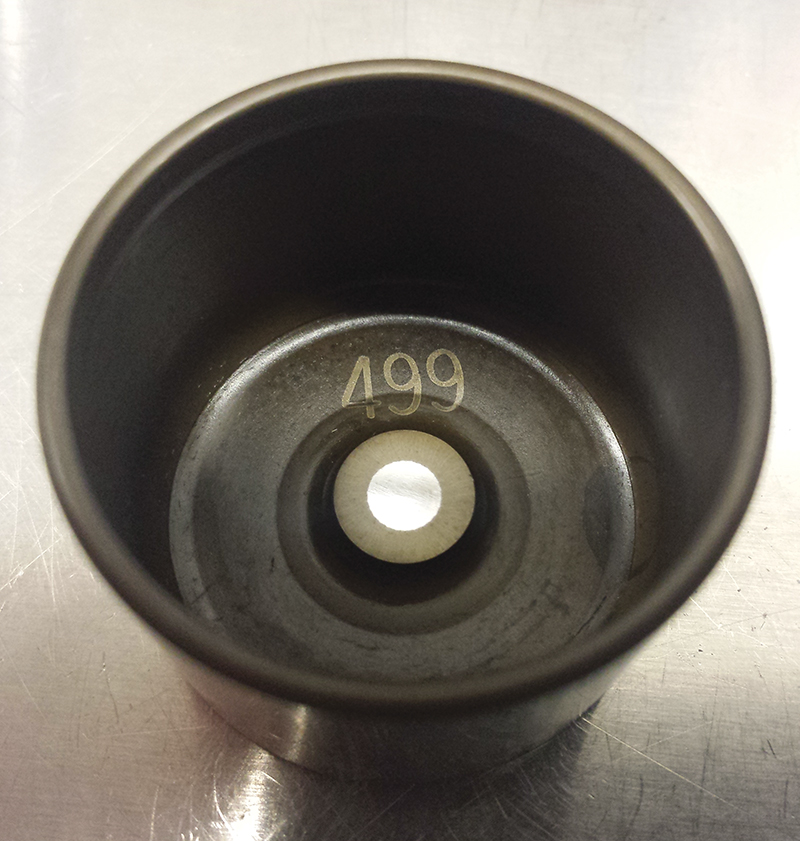
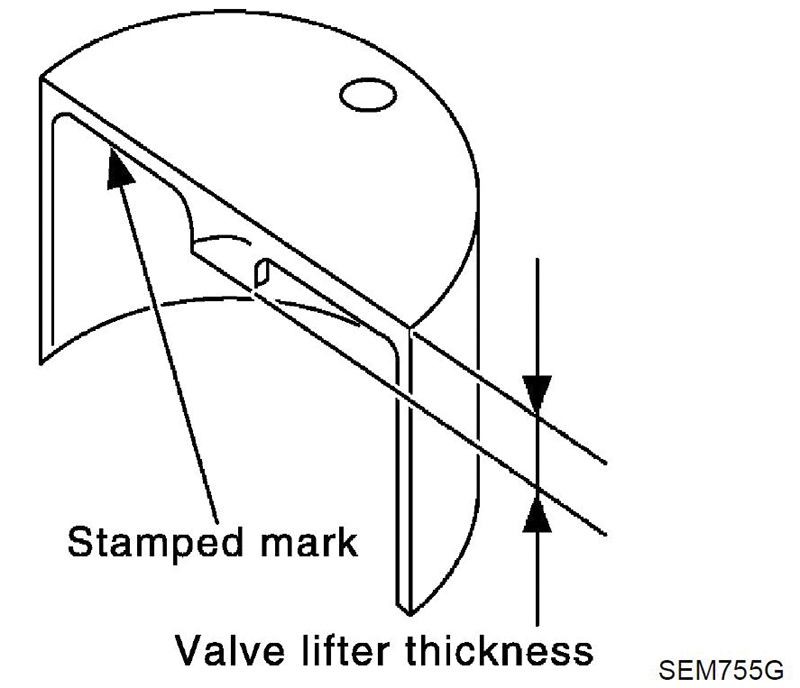
Lifter thickness is marked on the underside of the lifter to make it easier to find the size you’re looking for. This one is 4.99mm or .196 in.
It is often difficult to insert a feeler gauge between the lobe and lifter because of obstructions. Cam caps, injector rails, even the cylinder head perimeter can get in the way. The ONLY things the feeler gauge should be touching are the cam and the lifter. Anything else can create a false drag and mess up your measurement. You may want to buy one of the many types of custom shaped feeler gauges to avoid obstacles. If necessary, you can bend the feeler gauge so that it does not touch anything else. It’s best to bend the gauge in a non-measuring area because a curved gauge can also cause false drag.
Twisted Gauge

Measure Clearance
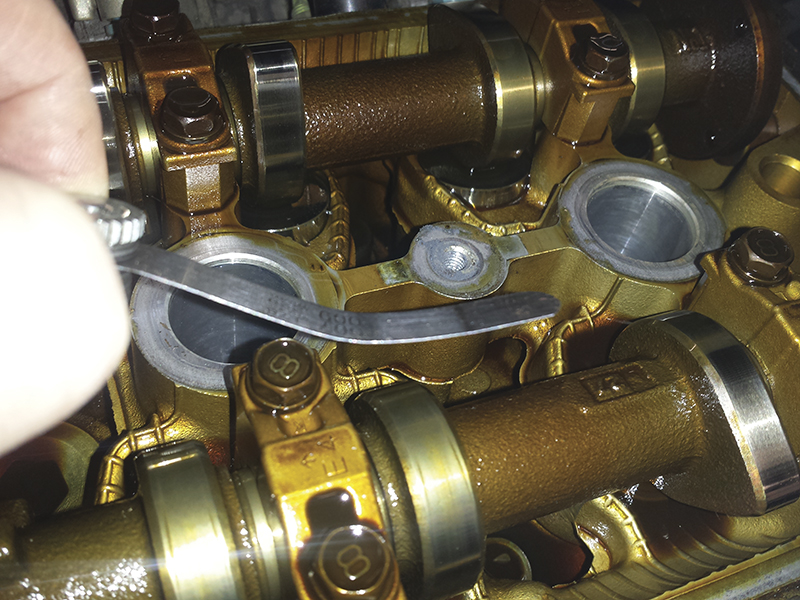
The feeler gauge must go into the gap straight. If you put any “English†on the gauge it will cause a false drag. If the feeler gauge is twisting or bending, a very wide gap may feel perfect. Avoid the temptation to tweak the gauge so you can clear obstacles. It’s OK to bend the gauge before measuring, but don’t twist the gauge while measuring.
Soft Springs
Measure Lifter
Valve springs are not as stiff as they were in the old days. It’s easy to insert a gauge into a gap that does not exist and think that it feels like it’s on the “tight side of OK†when in fact you’ve just opened the valve with the feeler gauge. Shooting for a loose fit with a Go/No-Go gauge is one of the best ways to deal with soft-spring valves.
Adjusting Valve Clearance
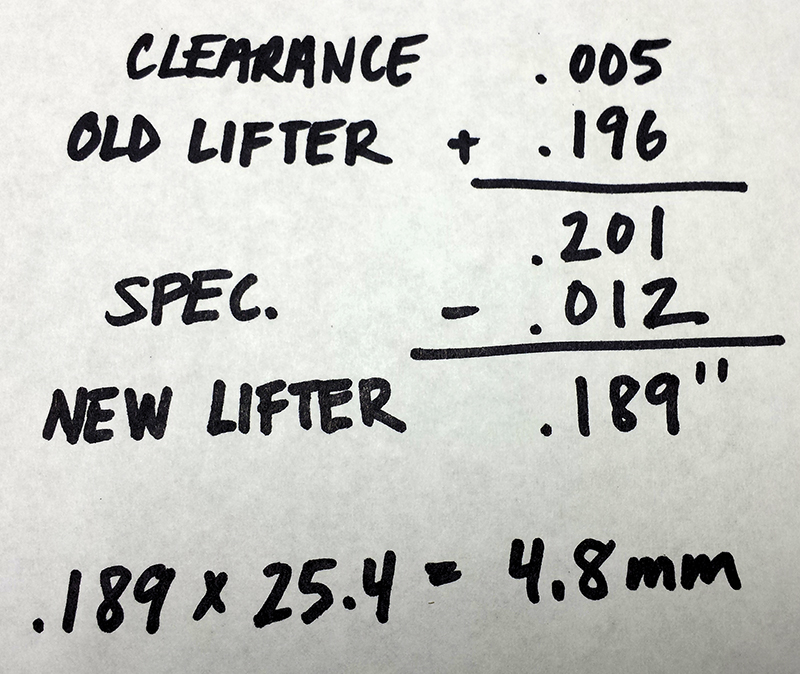
Calculated new size.
Screw and jam nut adjustments are rare these days, and lifters with adjustment shims are fading as well. The most common method of valve clearance adjustment is select fit lifters. The camshafts must be removed to remove the lifter, so measure and document very carefully. Take your time and be very sure before disassembly. Also, be sure to organize and mark lifters so you know where they were located before they were removed. If you somehow lose track, you’ll need to reassemble and recalculate before continuing.
Lifter or Shim Selection Formula
Valve clearance measurement + Thickness of lifter removed = Distance between lobe and valve stem tip – Valve clearance specification (from manual) = Lifter thickness to order from Nissan.


0 Comments