
The VW Beetle is an accessible, fun car. The current generation pays homage to the original by keeping the unmistakable shape. But its similarities stop there.
In 2012 VW updated the “New†Beetle, originally released in 1998, putting a sleek, modern spin on the iconic design. It has a lower, sleeker roofline and a wider, more aggressive front end. The running boards are reminiscent of the original design as are the wheels, which have an old school style center cap just like the old Beetle. Another interesting addition is the upper glove box, or Kaeferfach, aka “beetle bin.â€
Think of the new generation as a Beetle GTI. It is built right alongside Jetta and Golf models on the assembly line, so it shares from the same parts bin as several other VW models. Updated looks and new technology, along with multiple engine and trim options, make the 2016 Beetle widely accepted and sought after.
Other popular options include a panoramic sunroof, Fender® Premium Sound System, upgraded leather interior, and VW Car-Net® App-Connect, which offers compatible smartphone integration.
Early models were available with the 2.5L 5-cylinder engine as the base model offering. Other engine options are the 2.0T, and the 2.0L diesel engine. The base model Beetle also came with a solid rear beam suspension. In 2016, models all receive a multi-link rear suspension design, transforming and upgrading the handling characteristics.
VW also released the updated 1.8T engine in 2015 and later models of this generation. In 2016, all Beetle models will be turbocharged, with either the 1.8T or 2.0T engine. There are also several transmission offerings: 5-speed manual, 6-speed manual, 6-speed automatic, and the coveted 6-speed direct shift gearbox (DSG®) transmission. The DSG is VW’s dual clutch gearbox. It is a bit of a hybrid, offering manual transmission performance with the ease and simplicity of an automatic. The driver won’t have to worry about the clutch pedal.
Suspension, body
As stated, the 2016 Beetle is a close sibling to the Jetta and Golf bodies and is built right alongside them in VW factories. They share many of the same electrical components as well as suspension and drivetrain pieces. This simplifies the assembly and helps ensure parts availability for the technician.
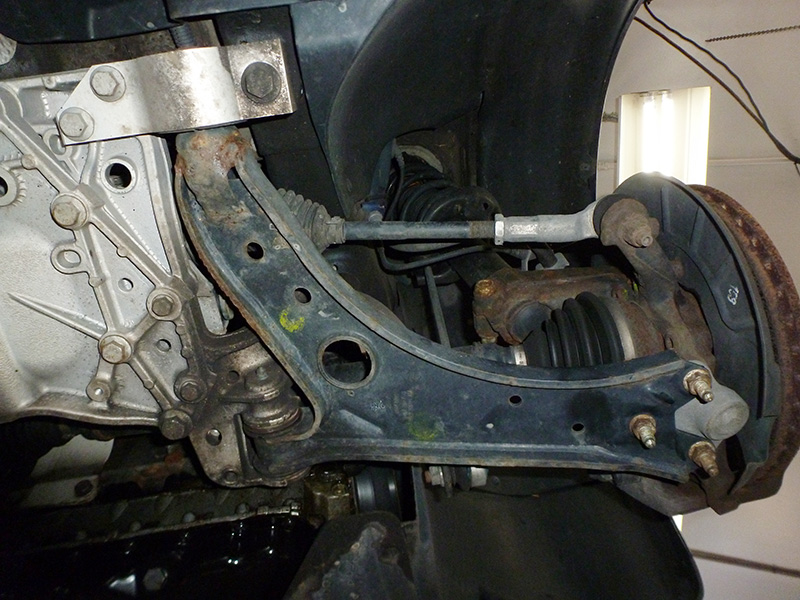
The overall suspension design, strut front suspension with lower control arms, is relatively unchanged from other models. It was common in previous generations to have strut mount failures. New models have updates, and upper strut mount noise/failure is now extremely uncommon.
The one area in the front suspension that wears is the control arm bushings. These take significant abuse and absorb initial jarring from road surface irregularities.Worn bushings, however, are relatively easy to spot. Visible tears in the rubber and excessive movement in the control arm are indicators of a failed rear control arm bushing.
The front lower bushings also get a lot of use. They provide a twisting dampening force as the vehicle moves up and down over varying road surfaces. Often, if these fail, they make a squeaking sound, very similar to a failed upper strut mount. Dont be fooled! The easiest way to test the front bushings for noise is to first remove the three nuts securing the control arm to the spindle. Once removed, it’s easy to move the control arm up and down to listen for abnormal noise or movement.
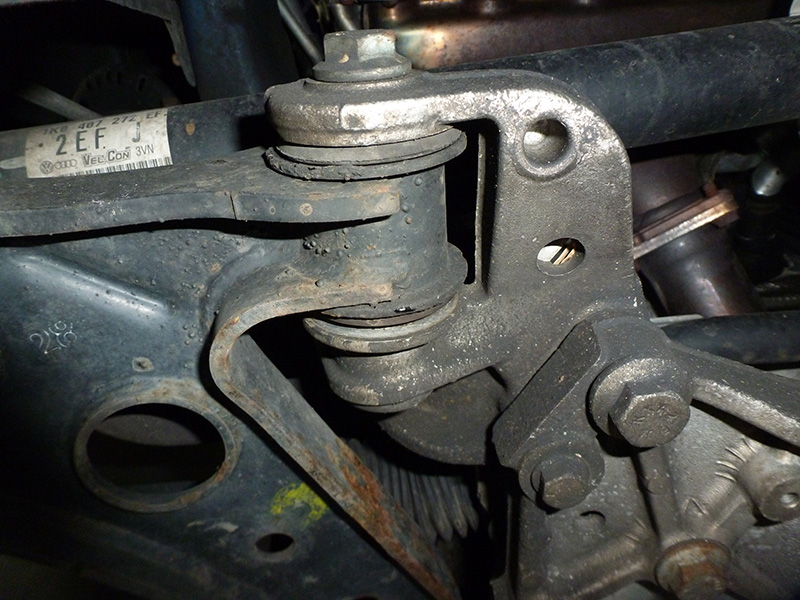
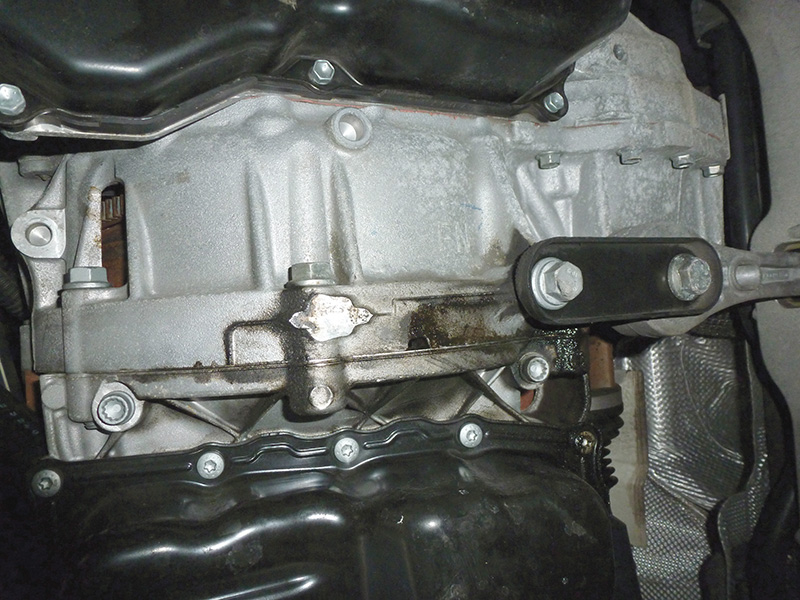
If control arm replacement is required, steps must be taken to remove the arms properly. Because of the length of the front control arm bolts, it is necessary to lower the subframe to clear the oil pan and transmission case. The subframe with steering rack must be fully supported, preferably by a hydraulic table or lifting table.
Once secured, it is merely a matter of removing the primary subframe bolts as well as the steering gear bolt. It is extremely important not to damage the steering gear by stretching wiring or connections to the unit. Once the subframe is lowered, the bolts can be removed fully and control arms replaced. It is also wise to perform an alignment any time a suspension component has been replaced. Failure to do so may result in premature tire wear and poor vehicle control.
Buying a 2015 or newer turbo model Beetle will get buyers the same multi-link rear suspension design offered in a Jetta GLI. This definitely inspires confidence and sportiness in the handling department. It also allows for rear camber and toe adjustments if necessary. Minimal tools are required for adjustment. A 16mm and 18mm wrench will cover all rear-end adjustments.
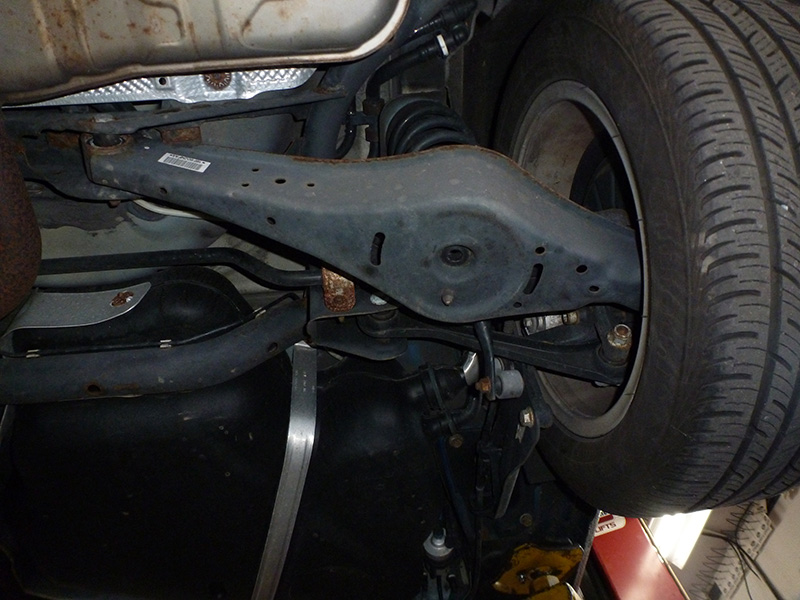
Turbo Beetles also come with larger sway bars, front and rear, to help keep the car more level through turns and eliminate excessive body roll. Rounding out the turbo package upgrades is an available differential upgrade. VW calls this the XDS® or electronic differential lock. This system utilizes the ABS system to help limit wheelspin throughout turns. The inside wheel on a turn has less weight over it, allowing it to spin more easily while accelerating. The braking system applies pressure on that wheel in varying degrees to lessen wheelspin, helping to increase control and handling. This system is designed to lower understeer when cornering and helps to increase stability for the driver, in a variety of road conditions. This system is controlled by the ESC, Electronic Stability Control program.
Lighting
Updates to the lighting system are also available. Standard halogen headlights or upgraded bi-xenon lighting are available. In 2016 models, LED lighting kits are available for daytime running lights as well as tag lights. All models up to 2016 come with automatic DRLs, when switched to automatic setting. In auto mode, the headlights and tail lights will operate automatically through light sensors with no additional input necessary. 2016 models are also available with a coming/leaving home feature, which leaves exterior lighting illuminated for a short time period after parking, assisting owners when exiting the vehicle.
The headlight housings are a bit easier to remove than those in the last generation New Beetle. Removal of the new design is a simple procedure involving swinging a latch downward, which pushes the headlight assembly forward and out. Then, merely disconnect the main plug, and the headlight is removed. This allows for easy bulb replacement access.
Access to the taillight assembly is also fairly simple. Pulling back the fabric cover behind the tail light reveals a large thumb screw. This is the lone securing bolt for the light. Once this thumb screw is removed, gently wiggle the light straight out the back to free it from the body mounting, and disconnect the slide lock electrical connector. During re-installation, always make sure the rubber body seal is intact and installed correctly to help ensure a leak- free installation.

New technology, new issues
It’s not uncommon for new technologies in vehicles to bring new issues that must be addressed in service bays. Here are some of the issues found in current Beetle models.
PCV/Breather malfunction
A properly operating crankcase ventilation system is critical to helping maintain a good running engine. A turbo engine complicates and can put more strain on the breather system as well. Unfortunately, positive crankcase ventilation (PCV) issues can be found with many newer engines and can cause a multitude of issues. The most common symptoms of a failing PCV system are a check engine light and high/rough idle. If left long enough, multiple codes will store in the engine computer: random misfire, misfires across all cylinders, idle higher than expected, as well as lean Bank 1 faults. Those are a lot of codes for one faulty component.
A failed breather can also cause increased oil consumption, which is a common complaint with many of the 2.0T engines. The increased crankcase vacuum pulls the oil into the cylinders, burning it. Many owners have reported oil consumption problems, and, by far, the most common cause is the PCV valve.
The easiest diagnostic technique to pinpoint a failed PCV valve is to remove the engine oil filler cap while the engine is running. When the PCV valve fails, the crankcase vacuum becomes so strong that the cap becomes almost impossible to remove. This test takes only seconds and is one of the easiest ways to pinpoint the failed breather. Often a moaning or hissing sound accompanies this action, as air is being pulled in from various seals.
If left for too long and not repaired, the increased vacuum in the engine can damage other components. The most likely to suffer is the rear main seal. The engine will actually pull air through the seal and into the engine. This creates vacuum leaks, and, if left uncorrected, the rear main seal will start to leak externally, both air and oil. A failed rear main seal can cause a lean fault and may be difficult to diagnose. Even with a smoke machine, very close inspection is necessary to verify the leaking rear main seal.
A failed PCV valve is also a large contributor to oil consumption. Yet again, the suction can pull engine oil past the piston rings, burning it, as well as pulling oil through the induction system, which only worsens carbon buildup in the intake tract.
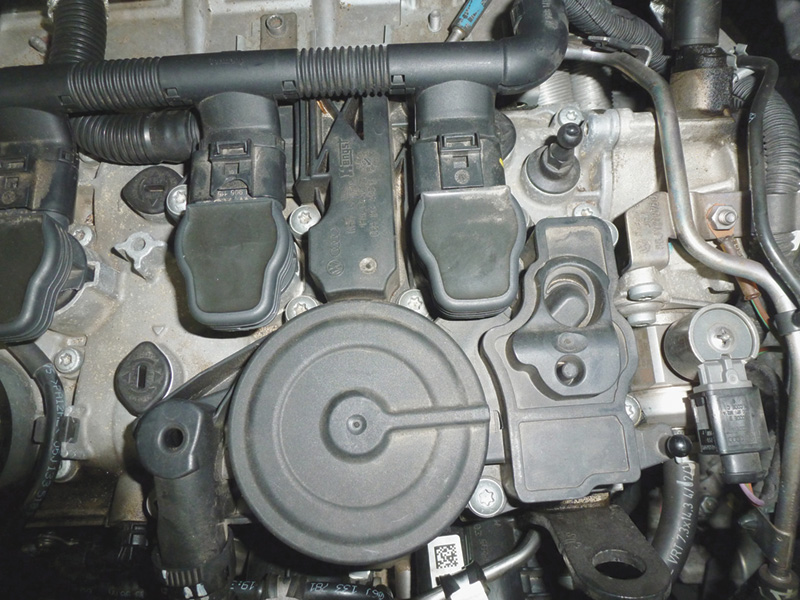
Timing chains
The 2.5L engines, as well as the late 2.0T powerplants, have timing chains instead of a timing belt setup. This is overall a great system, helping eliminate the need to service and replace the timing components as part of scheduled maintenance.
On the 2.5L 5-cylinder engine, the timing chains are run on the transmission side of the engine. This means that almost any service done to the chains requires transmission removal. The exception to this is when replacing only the upper chain or cam adjuster.
The most common failure on this setup is a stretched chain or worn chain guide components. Another common failure point in this system is the cam adjustment solenoid. This actuates the cam adjuster and may fail, causing cam timing faults that often do not pinpoint the faulty solenoid. Its important to actuate this solenoid as part of diagnosis to verfiy proper operation.
In the 2.5L engines, many times the adjuster does not fail, it just gets temporarily obstructed by dirt or debris, which can be cleaned. In such cases the solenoid does not need to be replaced. The VW Helpline has instructions for technicians who need them. The helpline is available at 855-828-4016.
The 2.0T shares many of the same issues as the 2.5L for the timing chains. The 2.0T has the timing components on the crank pulley side of the engine, so servicing the components is much easier than on the 2.5L. The 2.0T also has a balance shaft with a multiple chain setup. This setup can be confusing, but every component has a timing mark. Always double and triple check all timing marks on this engine to verify proper camshaft/crankshaft timing.
The lower timing chain tensioner has been plagued with the most issues on the 2.0T engine, particularly when running low on oil. When this fails, bent valves are the most common result, necessitating a new cylinder head or, at the very least, new valves. VW has issued updated lower chain tensioners to help combat the high failure rate, including a ratcheting tensioner design to eliminate chain slack.
The one major common issue with these engines is oil consumption. Timing chain systems rely on a consistent oil pressure supply to run properly. Most chain failures can be directly tied to low oil levels for extended time periods. This is why it is critical to follow proper oil change intervals with the factory-recommended synthetic oil available from your local VW dealership’s parts department.
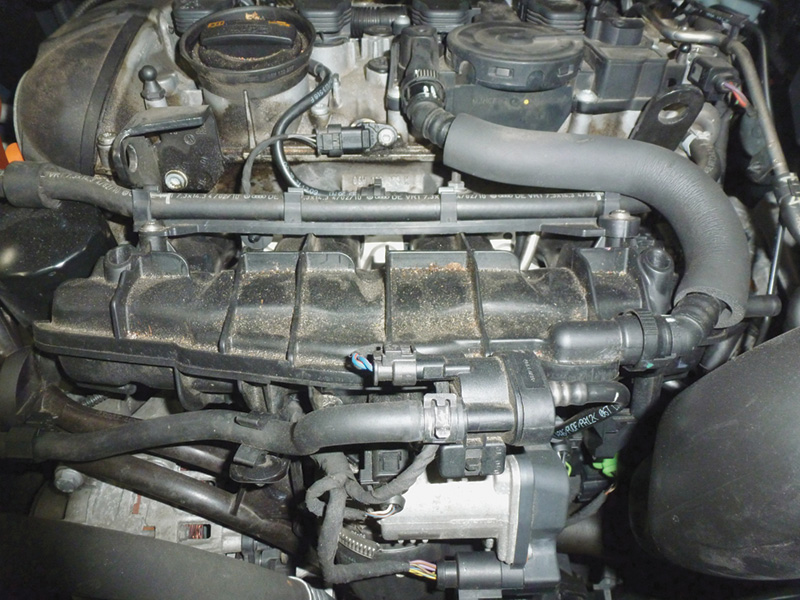
Throttle body, intake
The motor-driven throttle body works hard to keep the engine running, constantly varying its angle to hold a steady idle or drive normally. It also is strained by the volume of air coming through a forced induction engine, as well as carbon buildup, which can affect the ability to hold a steady idle. This is a busy motor, with muliple internal position sensors, as well as a very fast motor to drive the throttle.
If there is a throttle fault, the most common complaint is a check engine light, accompanied by the EPC light on the cluster. In severe cases, the vehicle may have zero throttle input.
The most common DTCs for the throttle body are P545, P0121 and P0221. Always check for service bulletins. In this case VW has released a bulletin, 01 12 14, recommending a re-pin of the throttle connector.
Any time the throttle body is removed or disconnected, adaptation is necessary. Using your scanner, select engine (1) followed by measuring blocks Group 98. Enter basic settings to begin the adaptation. This process takes about 30 seconds and ensures the throttle is properly aligned and ready to go. Always have a stable voltage supply while using a scanner. Low voltage can, and will, cause issues with sensors and many vehicle systems.
The variable intake on newer VW engines is used to increase efficency and promote better idle characteristics. At idle speed, the internal flaps remain in a closed position. To help the idle, increasing speed and boost allows the flaps to open fully, increasing air flow.
A common failure with the intake manifold is the position sensor. When this fails, the P2015 fault will be stored. There have been many issues with this intake sensor, and VW has also issued bulletins pertaining to this. Check bulletins! If the position sensor is found to be faulty, the entire manifold must be replaced. And always replace the intake gasket during the process. Just like the throttle, the intake must be re-adapted. With your scanner, select engine (1) group 142, followed by basic settings. This allows the intake to do a full sweep and calibrate runner positions.
Carbon deposits

Some technicians have reported excessive carbon buildup behind the intake valves, particularly in models years 2006, 2007 and 2008. Such deposits can be caused by excessive oil consumption, malfunctioning crankcase breather systems, poor fuel quality, and even by the very nature of direct fuel injection which, by its design, does not have a cleansing action behind the intake valves as would occur on port injected engines. There are several TSBs, including 00-16-02 and 01-16-02 that relate to fuel additives or premium fuel that can help prevent carbon formation.
Here are the steps needed to remove such deposits:
- Remove intake manifold to expose back of intake valves.
- Disconnect and remove coils, spark plugs, and place rags over spark plug holes.
- Starting with cylinder #1; ensure intake valves are in closed position.
- Pour approximately 1 oz. of carbon dissolving cleaner behind each intake valve on #1 cylinder. Note: Do not overfill or allow product to reach valve guides.
- Let cleaner soak then scrub #1 intake valves using a small wire brush, wooden picks, or any other device which will not harm the valve finish.
- Remove dirty cleaner with Mityvacâ„¢ or similar vacuum tool.
- Repeat cleaning procedure as outlined in steps 3-6 for remaining cylinders.
- If valves require further cleaning, repeat steps 3-6 for affected cylinders.
- After all intake valves have been cleaned, crank engine using starter to remove possible residual cleaner in combustion chamber.
- Reassemble intake system.
- Road test and verify no DTCs before releasing vehicle.
TSBs
With new technology being introduced, different types of failures and issues have arisen. Examples involve direct injection and electric motor driven components. They increase efficiency and power but have drawbacks as well. As manufacturers deal with these issues and implement fixes, it is up to the repair technician to stay up-to-date and aware of known problems. One of the best ways to educate yourself and help diagnose vehicles is by using Technical Service Bulletins (TSBs). Many common problems are addressed in bulletins and include diagnostic procedures to verify issues. Simply spending a few minutes with a bulletin can save hours of headaches. Use these to your advantage to diagnose and repair vehicles properly.
Download PDF


0 Comments