The title of the first installment of this eminently-helpful series was, “From Seven Circuits to the Race Track: Carb Basics, Racing Fuel Injection, and Holley 4150 Tuning Tips.†Well, the concept has evolved and grown in the interim. This time, Greg walks us through chokes and cold running.
When we last left our little atmospheric fuel mixer we were looking at the fuel bowl, float, and fuel levels. We’ve discussed the needle and seat and the desired window position relative to the incoming fuel, and setting the dry and wet float levels. The goal of this series really isn’t to cover in great detail all the engineering of the carb, but we will cover some relevant parts of the operation that are often left to the imagination. The goal is to talk about the basics of setup and adjustment, to give a new racer or restorer the kind of information that allows him or her to overhaul and set up a carb for operation. Lots of folks have written thousands of words about where and how the fuel and air are mixed and delivered, and all of that is very helpful. If you really want to understand carbs, however, you’ll need to grab a smoke machine (not a cigarette like we did in the bad old days!) and a carb and smoke the passages to trace the fuel and air path for yourself. If you’re going to understand them that’s what it takes, in my opinion.
Float levels (and the carb attitude itself — the angle at which it operates) are critical to consistent fuel delivery. The level in the bowl is your first major point of calibration since that level determines the level of the fuel in the main well. That’s important because that level sets the spill height — the distance fuel travels before being pulled over into the delivery channels that serve the idle, transfer, and main circuits. Setting the float level correctly every time helps achieve a consistent fuel delivery rate, and some carbs have very specific directions about float level adjustment. For example, if you look closely at the float in a Rochester Quadrajet, you’ll see a line cast into the float near the toe end of the float body. The directions specify that you adjust that particular float level against that cast-in line. Other carbs may have directions just that specific as well, and contrary to popular belief, instructions are NOT just one man’s opinion, particularly where engine performance is concerned! Certainly, for some things modification or deviation from the written word is standard operating procedure, but in other instances you are better off following the best recommended practices as outlined in the instructions.
Bowl levels and volumes allow for slosh, tip, and turns, and they are just large enough to house the float while allowing enough drop to control incoming fuel and consistent spill heights. Fuel levels set the first layer of calibration and setting them exactly the same every time helps you achieve repeatable results.
Getting it Started; The Choke Circuit
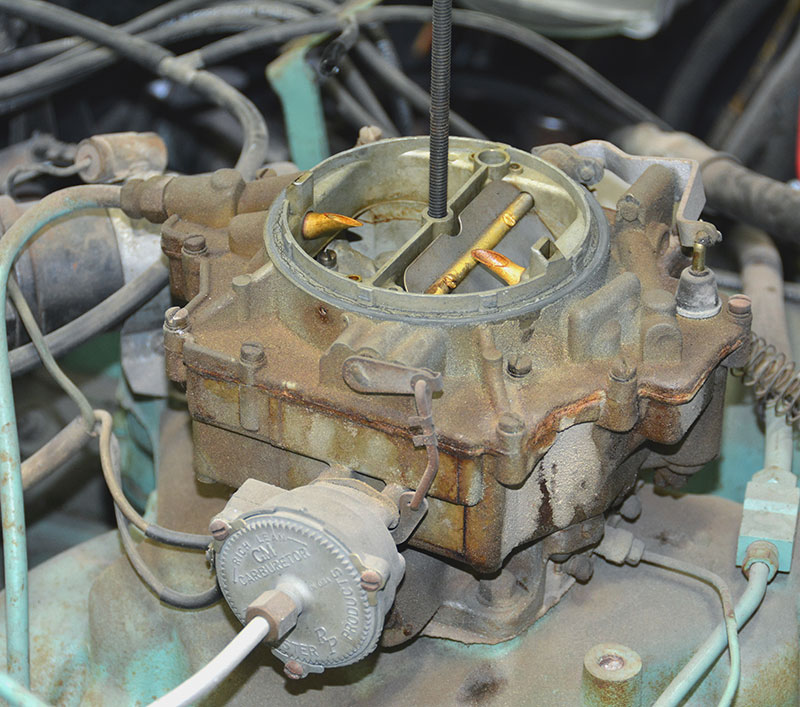
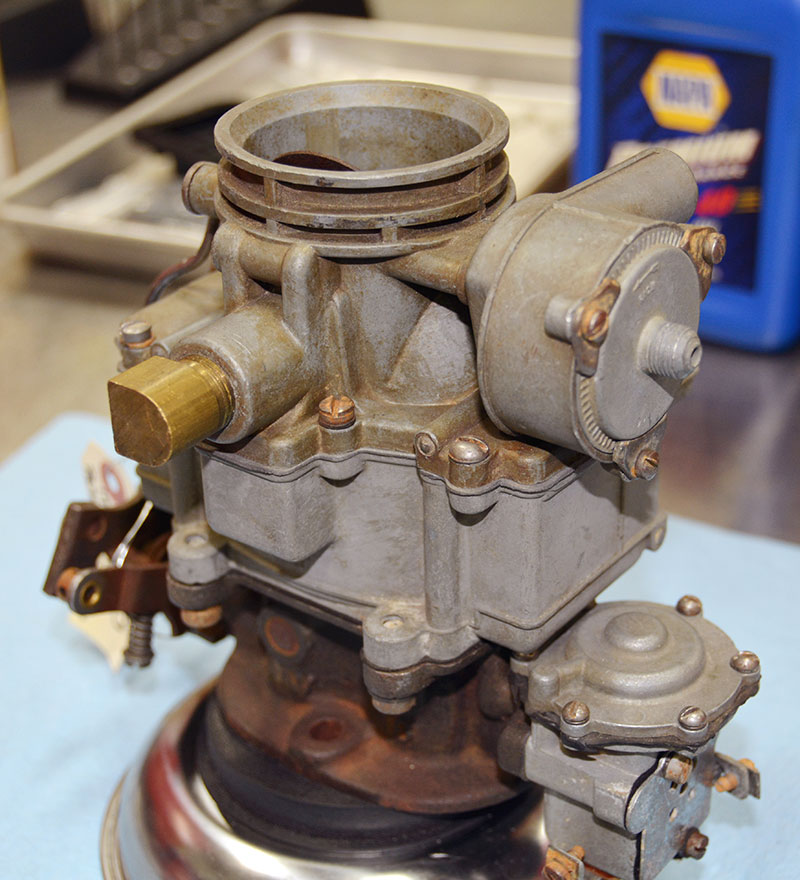
Following our timeline forward nearly two decades, this 1956 Buick uses a Rochester four barrel and once again the major design features are largely unchanged from our 1939 example. If you look carefully, you can see that the amount of offset in the choke valve is more extreme and that is all part of the engineering considerations taken into account with engine displacement and the style or type of choke, but overall the form and function are arguably identical.
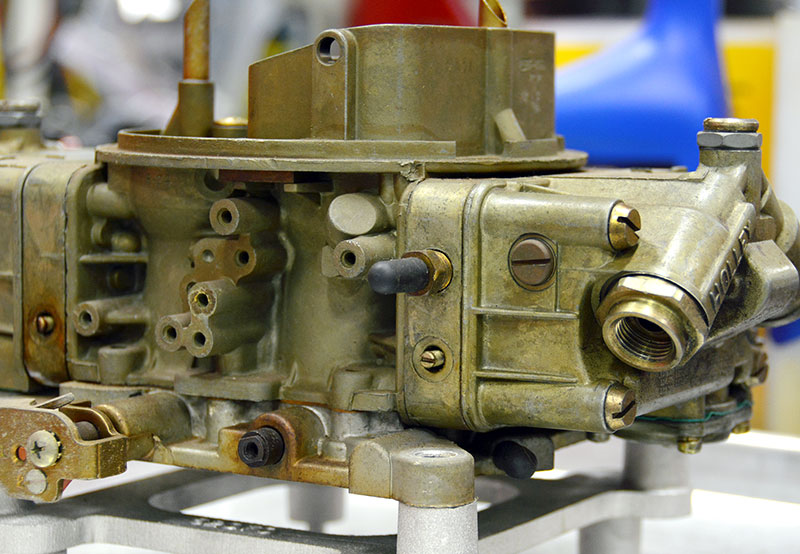
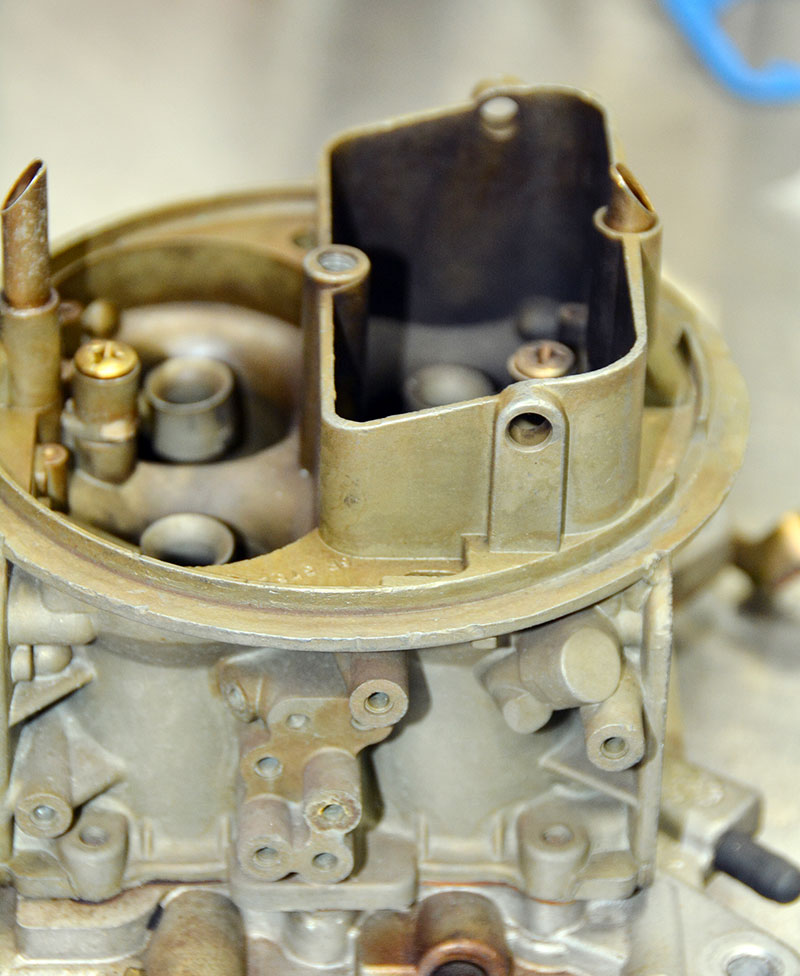
Most performance carbs don’t use a choke circuit. The air horns are shaved clean and contoured for maximum smooth flow and all choke provisions are removed.
You don’t really need a choke to start a car as long as you understand that you’ll have to pump the pedal a few times and that driving it in cool temperatures will be a real challenge until the engine temperature comes up. For street applications, you may or may not choose to use a carb with a choke. I’ve done it both ways and either way works.
Like every carb system, chokes are subject to abuse by folks who don’t really understand what the system does and how it operates. For some reason, mechanics, both professional and homegrown, love to tinker and twist all the knobs of a carb without really understanding what they do and how they work. Before we delve into the choke system itself, I’d like to touch on a couple of points that are often overlooked on street and performance applications and how these frequently overlooked things may seem like a carb problem when one doesn’t really exist.
One of the most common complaints on carb-equipped vehicles centers on cold and warm-up operations that result in stalling, hesitation, and cold-backfire with throttle movement. With performance carbs, this is often greatly diminished because they tend to include richer calibrations, but it still comes up on some applications. If you work on a build exhibiting these complaints, check outside the carb first for three things: timing, intake heat, and inlet air routing. Base timing and vacuum advance timing (or lack thereof) will greatly influence cold or half-warm engine response.
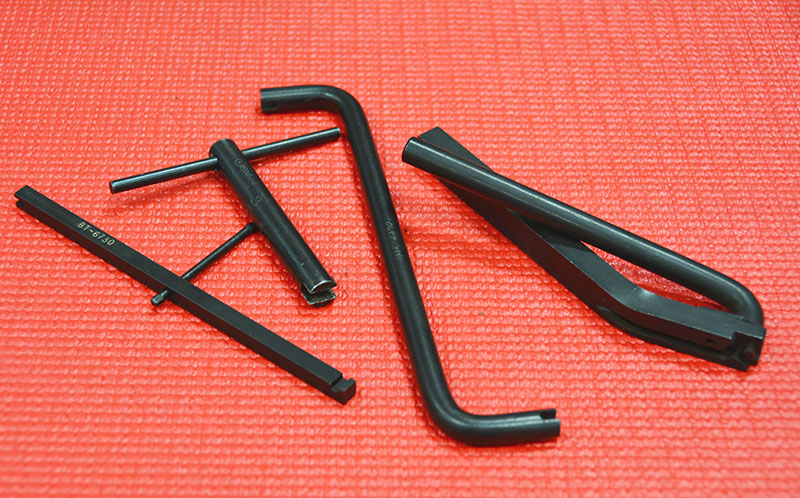
When the external choke pull-off made its appearance, so did the various external rods and connection parts. There are some pull-offs that use an internal screw or adjuster, located on the port end, usually a small slotted screw, or more commonly a socket head or Allen screw. Adjustment for most external choke breaks involves bending and twisting the connecting rods, and this can be trouble if you don’t invest in the tooling needed to bend without inducing lateral displacement. You don’t have to have the tooling; if you’re careful with a set of duck bill or stout needle nose pliers you can certainly bend the linkage into adjustment, but you only want to shorten or lengthen the linkage, you do not want to bend it inboard or outboard from its original operating plane because that will almost surely cause it to bind up as it moves through full travel. If you plan on doing a lot of carb work, look for these kinds of tools on eBay or other online sources. They are mostly obsolete and older techs are often selling off their vintage tools online.
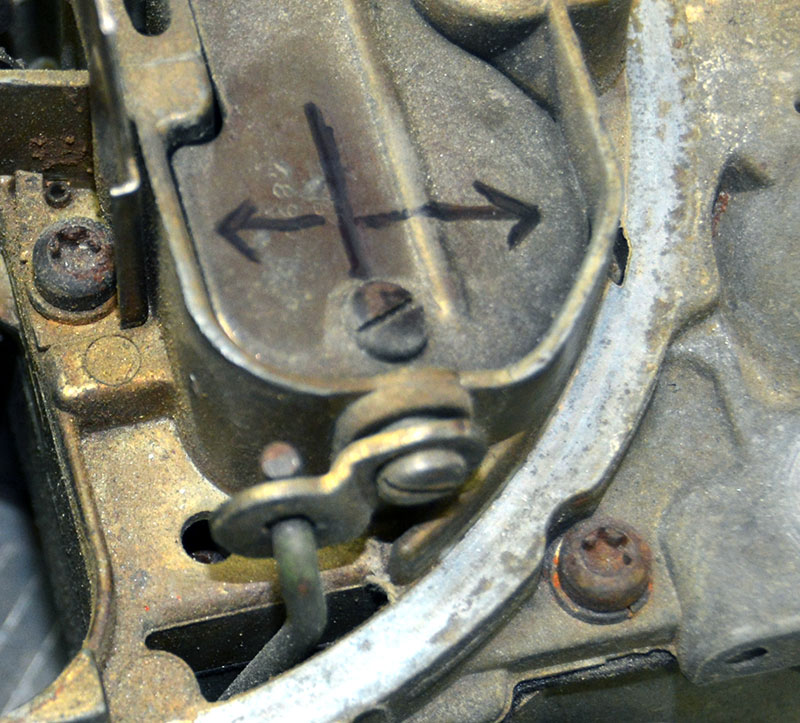
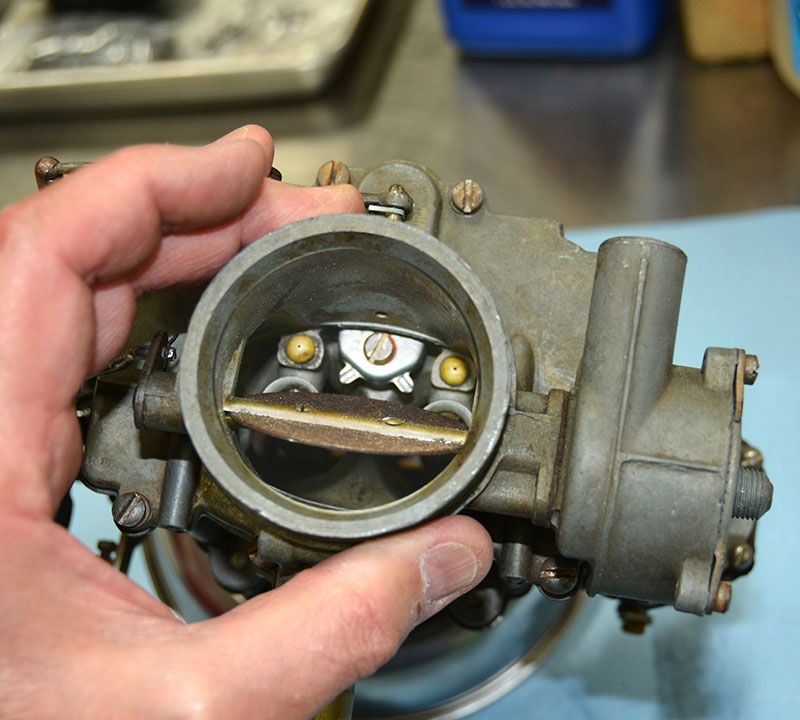
I’ve drawn a line that lies along the choke valve shaft and arrows that indicate the difference in offset fore and aft from the choke valve centerline. This is a critical component of choke valve calibration, control, and cold and mid-warm engine operation. In-rushing air applies more rotational force in the opening direction because there is more plate area on the side that forces the plate to open. Every carb balances the plate against the spring to provide a means of variably enrichening the engine with changing air speed.
This offset also allows you to clear an engine out that has loaded up — if you hold the throttle wide open the inrushing air will blow the choke valve open and lean the engine out, which will clean up the plugs. The plate area percentages are not fixed. Some carbs have more offset, some less. It depends on the choke spring strength, the linkage and the leverage it exerts, and if there is a choke pull-off on the carb. The only tuning you can do on the choke plate is to drill it. I have, in the past, had to drill 1/8-in. holes in both throttle plates and choke plates to correct either throttles that were jacked open too far and pulling transfer circuit fuel, or chokes that were too rich due to modifications of the main, idle, or transfer circuits, or fuel quality, or both. You can tune anything — you just have to think your way through what is happening and at what stage of operation it’s happening.
See if the intake heat crossover is blocked (and on any serious performance build, it will be). If the intake is cold, then the required 15-20% intake vaporization rate might not be possible during those times when the block and head temperatures are also cold. You’ll need to be aware of inlet air temperatures, too. In terms of performance, cold is what we need for charge density, but for drivability, it creates a world of trouble depending on the volatility of the fuel you buy. If you have to tune the choke to make a cold performance engine run well until it’s warmed up, it can be done, but remember to advise your customer to give the engine twenty minutes or so of run time after the choke comes off before thundering on it because you’ll need that much time for combustion to clean the plugs up to prevent misfires, glazing or “hard fouling†the plug, which would mandate a plug change. You need a minimum of twenty minutes anyway because you should never throttle up any car, performance build or daily grocery-getter, for at least that long because the oil isn’t up to temperature and the rate of wear during hard cold engine operation is extreme.
Basic Choke Operation and Tuning
A cold engine starts out with an air/fuel ratio of 14.7 to none — all air, no fuel. The choke sequence utilizes both the accelerator pump circuit and the choke system circuit. As you pump the pedal once slowly to the floor (about two seconds down and up), the moving throttle allows the tension of the thermostatic choke spring (which winds and unwinds with temperature) to close the offset choke valve in the air horn; the accelerator pump squirts one shot of fuel through the open throttles, which wets down the intake manifold floor while the choke spring through other linkage picks up the fast idle cam that holds the primary throttle plates partly open.
On an engine that retains it, there may also be a heat riser valve controlled by another thermostatic spring, or the valve may be controlled by a thermostatic vacuum switch and engine vacuum. The valve is closed on a cold engine and opens as the engine heats up and the intake manifold floor temperature rises.
These valves divert exhaust gas through the heat crossover passage in the intake manifold and starts to warm the floor of the intake to promote uniform fuel vaporization. In most performance applications, this valve will no longer be present, but if you’re doing performance or muscle car restorations where most of the original parts and systems are still operational or restored, you’ll need to confirm that the heat riser works as it was originally designed and you’ll also need to confirm that the intake manifold crossover passage remains open and unobstructed. These passages are notorious for gathering carbon to the point where no exhaust gas can flow and the cold intake floor virtually guarantees all kinds of hesitations, backfires, and cold drivability issues. Now, if you’re upgrading or eliminating those intake heat systems, you’ll need to remember to enrichen the choke system and the accelerator pump system, which falls under the next phase, tuning or adjusting the choke circuit.
Picture This
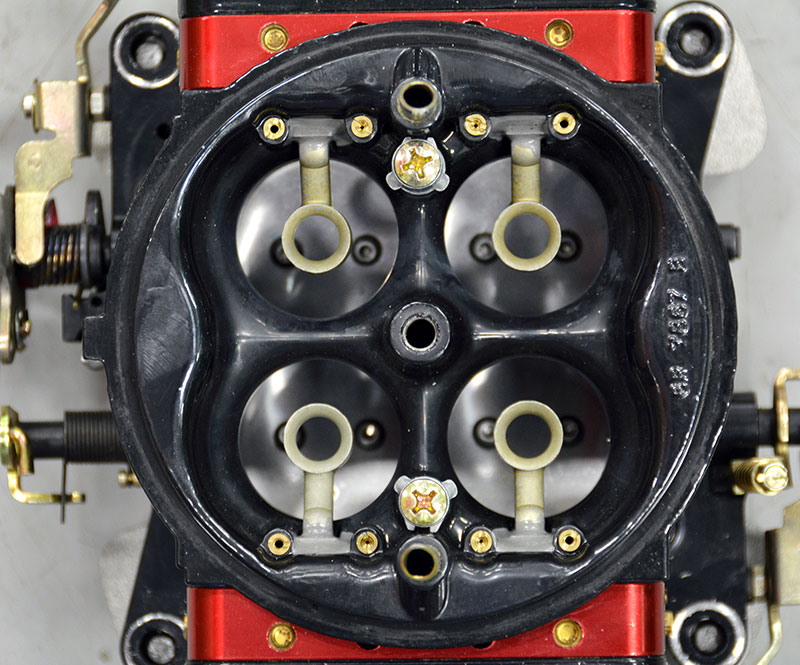
For racing or serious street applications, this is what you’re looking for. That air horn left in place is more restriction than the offset choke valve and shaft, particularly with an air cleaner installed. Air has mass and anything with mass and motion has inertia (a body at rest tends to remain at rest and a body in motion tends to remain in motion — AND, it tends to want to maintain its direction of motion).
Making air move up and over the air horn is the problem, so the solution is to remove the air horn and blend the venturi into the body of the carb so that the air makes a smooth uninterrupted transition into the engine. The air horn is shaved and the throat contoured on a flow bench to get the most positive effect out of removing the air horn and choke valve.
Once the offset choke valve in the air horn closes and the engine is cranked, the dance begins. The offset choke valve should have enough tension on it at full cold to remain completely closed or to “bounce†slightly open during engine cranking. Which is does depends on temperature. This is where experience comes in because it’s hard to quantify when enough is enough and when too much is too much until you’ve seen it.
Assuming that you’ve got good plugs, a good ignition system, good fuel, and a good engine capable of developing decent closed throttle cranking vacuum readings (anywhere between 4 to 5 in. Hg and 10 in. Hg), then every passage that has access to fuel inside that carb primary is now begin subjected to enough vacuum to create flow and a shower of gas erupts into the primary bores. Fuel mixture ratios go from 14.7 to none to “holy cow we’ve got a LOT of gas here!”
Why are we dumping so much fuel into the engine? Because on a cold engine almost no vaporization occurs and the fuel must be vaporized to ignite. To get enough to vaporize at cold temperatures and low air flow rates, you’ve got to put in far more liquid to hit the vapor level needed to get the fire started.
As the liquid pours into the intake, a small amount vaporizes as it’s stirred by splashing out over the boost venturi and off the throttle plates and splashing off of the intake floor. Once enough of the fuel is vaporized, the engine briefly hits and starts to run. Here’s where as a carb tech you need to start paying attention. At this moment, the air/fuel ratio is high, engine cold friction is high, engine and air temperatures are low, vaporization rates are marginal, and as air flow increases through the engine that closed or nearly closed offset choke valve is yanking fuel out into the inrushing air by the boatload. If you don’t get the engine rpm up and stabilized and the offset choke valve pulled open a bit, you’ll flood the engine and smoke the plugs.
To begin controlling all this chaos, three things come into play: the difference in the area on one side of the choke valve versus the other (hence “offset choke valveâ€), the increased engine speed caused by the fast idle cam, and the fact that the choke valve is partially opened by a choke break or choke qualifier. Whichever you call it, it’s fully adjustable.
Everything Affects Everything
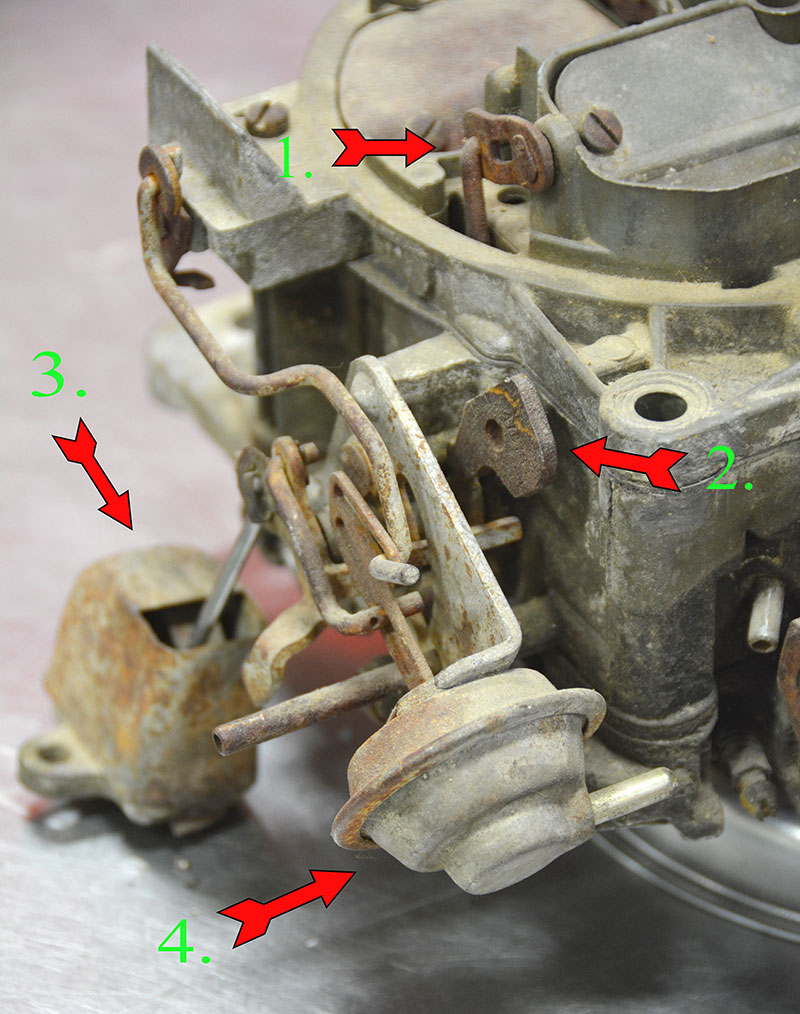
I rattled around in my parts bin and found this old girl for you. This is a remote choke Rochester Quadrajet carb. In this photo, I’ve numbered the offset choke valve operating linkage (1.), the fast idle cam (2.), the remote intake mounted choke thermostatic spring (3.), and the choke pull-off (4.). The remote-mounted choke coil relied on intake manifold heat crossover heat to unwind the coil and disengage the choke. Needless to say, a plugged crossover passage or inoperative heat rise system was often the problem, and unless you took the temperature of the crossover you’d go off chasing carb problems where none existed.
If you ever need to check the crossover temperature, it runs about 100 degrees less than the right hand exhaust manifold temperature if you shoot both with an infrared thermometer. And now you know why fuel control is so hard on engines with heated intake systems. All that heat causes all sorts of percolation and hot fuel handling problems.
Tuning the choke system isn’t really that hard, although you may need to keep the car over several cold days to get it just right.
If you change jets or trim air bleeds or fuel restrictors, it affects everything under the offset choke valve. So in my opinion, it’s best to make sure your idle, transfer and main circuits are all fully tuned before working on the choke.
The choke spring provides the motive force needed to move the choke valve closed and to operate the linkage that lifts the fast idle cam to the high step. The linkages must be clean, aligned and not all bent out of shape by a prior repair attempt. The entire linkage and choke valve from the choke spring housing out has to be “floppy-sloppy†loose and free without any drag or excess friction or stickiness. The choke valve should fall open if the choke spring is removed and the fast idle cam should fall off the high step without any outside effort. If you are working with a remote choke spring mounted to the intake manifold, the same criteria apply. The operating rod from the thermostatic coil to the choke linkage must be clear of all obstructions and not drag on the choke spring cover.
How It Qualifies
Once the engine starts, two things “qualify†the choke and pull the air-fuel mixture back. First, the air rushing past the offset choke valve applies more pressure to the area of the choke valve that lies forward of the choke valve shaft than the area that lies behind the choke valve shaft (assuming a normally mounted single carb installation) because there is more area on one side of the shaft than the other. The spring now becomes a balancing force attempting to hold the choke properly positioned against a variable flow of air created as the driver moves the throttle; during mid-temperature operation the choke valve will close slightly as air flow drops and open slightly as air flow increases, and as the choke spring warms up the amount of force exerted by the spring drops and the choke valve slowly moves fully vertical and fully open.
Second, a part known variously as a choke pull-off, choke break or choke qualifier pulls the offset choke valve part way open using engine vacuum to on either a rubber diaphragm or on a choke qualifier piston located inside the thermostatic coil housing, setting the rich mixture ratio best suited to the fast idle rpm determined by size of the steps on the fast idle cam and the air flow through the offset choke valve.
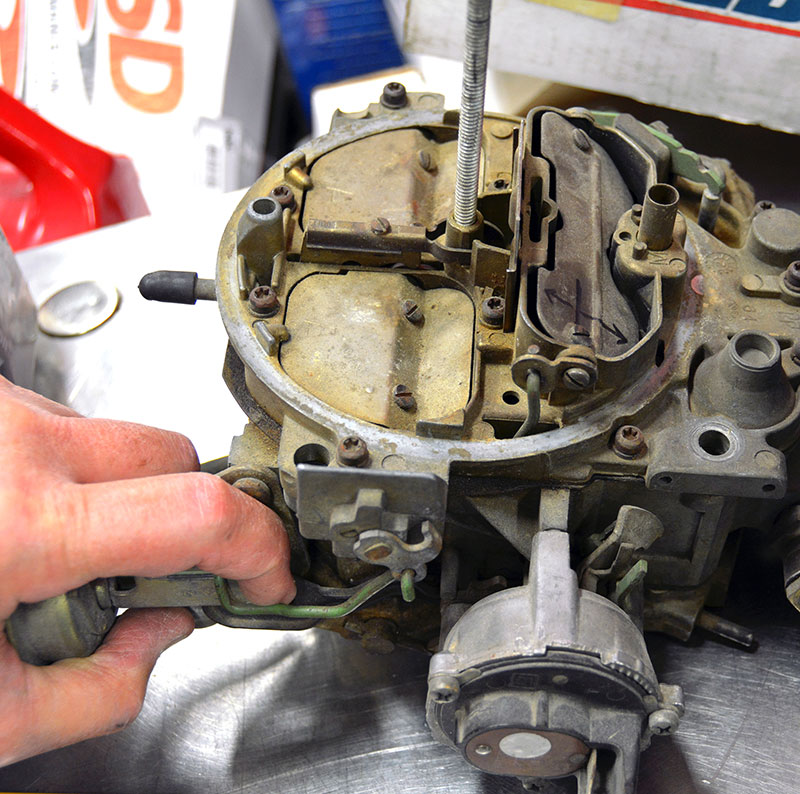
This Rochester is a later model and features an integrated choke housing and rear mounted pull-off. As you can see, this unit has an electric heater and in this case it has a thermostatic control for the heater. The pull-off is blown, so I’ve pushed it back for demonstration purposes. You can see that the offset choke valve is open against spring pressure. Normally, there is a choke pull-off setting measured from either the upper or lower edge of the choke valve to the air horn opening and you can use either a pin gauge or a drill bit to set the prescribed distance.
The linkage from the pull-off that is holding the secondary air valves closed is readily apparent, but the linkage that operates the fast idle cam and choke valve isn’t so obvious. So, I’m pointing to it with my index finger. It winds around the bowl section and connects to a linkage hole located in behind the choke housing.
An improperly adjusted choke break can be found by listening to the engine once the break pulls in. If the engine loads up and starts to run rough, you’re too rich and the break needs to pull the offset choke valve open a bit more. Too lean and the engine will start and die, sometimes repeatedly. Your adjustments may also require that the fast idle speed be tuned up or down, particularly when idle, transfer, or main fuel metering has been changed from stock for your application.
The choke break also typically pulls the fast idle cam off to the second step once the engine starts since as the engine warms the internal friction normalizes and the intake floor is warming so the need for more throttle opening to encourage vaporization diminishes.
Tuning Tips and Tricks
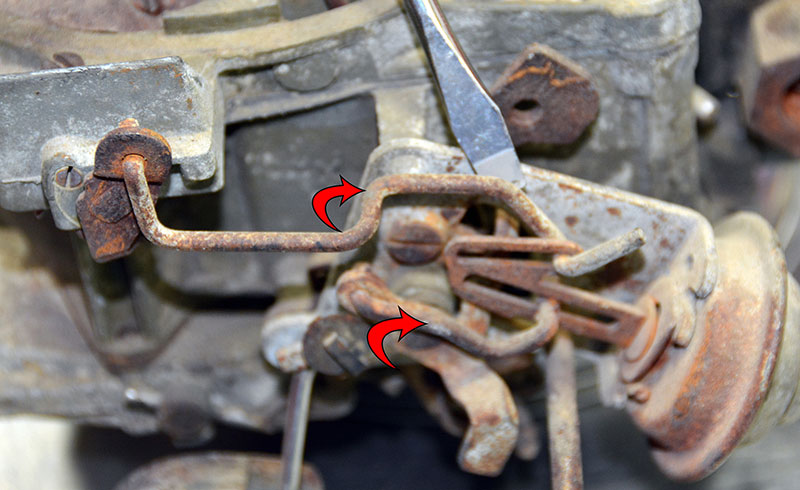
A close-up of the pull-off on our remote choke-equipped Rochester shows us that the pull-off acts to lock out the secondary air valve and to also open the offset choke plate. The upper link is how you adjust the air valve lock-out, and the lower link is the one you bend to set the choke pull-off opening on the offset choke valve in the primary barrels. As I said, a pretty crude way of doing things, but if you do it correctly it’s very effective and repeatable.
Obviously, we have a lot of tools available for tuning these days, from five-gas analyzers to wide-band air/fuel ratio testers. When it comes to the choke, I still rely on old-school methods rather than modern technology, in part because it’s hard to keep your five-gas filters clean if you run it in the tailpipe of a cold, rich engine repeatedly, and a wide-band can foul. Plus, you have to drill the pipe and weld in a bung, which may or may not suit your application.
At the end of the day, cold engine operation is best tuned by the startup and the cold-to-full-warm-up drive. You should be able to get in a cold car, hit the gas twice, turn the key, wait fifteen to twenty seconds and pull away without loading up, rolling black smoke, or hesitating. I always start out my tune by going right to the factory recommended settings. For stock applications, the factory settings, performed precisely and in the correct order, will fix about 95% of your cold start issues.
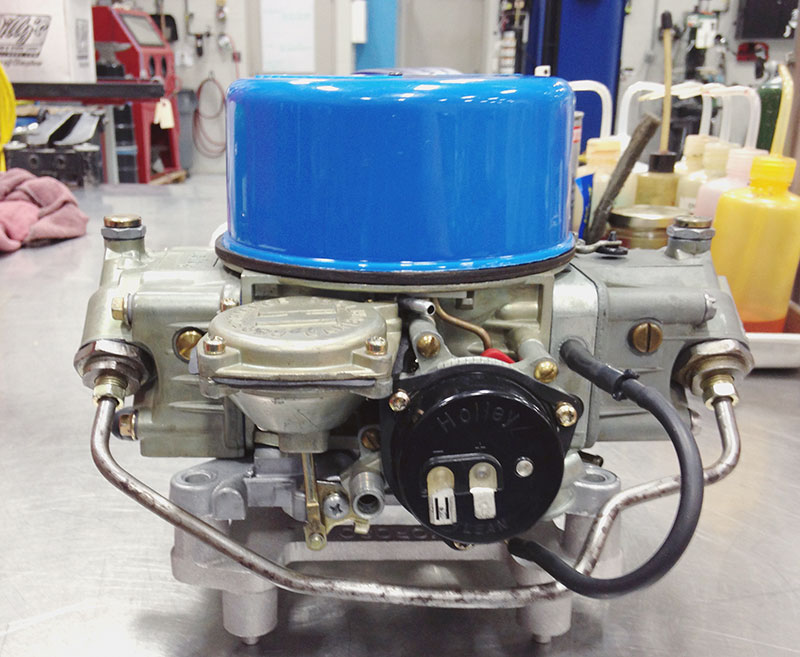
This is actually a stock carb off a 1969 Ford, and it shows you something interesting. Not only does it use a left inlet with a transfer pipe down the right side, it also uses both exhaust manifold heat and an electric choke. Like our later model Holley carb shown elsewhere in this feature, it also uses a pull-down piston located under the choke spring cap to qualify the choke once the engine starts.
The takeaway here is that there are lots of ways to skin a cat and you can find a lot of examples of just how that skinning happens if you end up working on older vehicles. Basics are basics, though — remember to note when and where your performance falls off and then work on those components that are in play during that specific period of engine warm-up.
Chugging or loading up, black smoke, or plug fouling tells on itself — it’s too rich. Less choke spring tension, a little more fast-idle speed, or more choke pull-off will move you from rich to lean. If you have a problem, pay attention to WHEN in the cold start cycle it acts up. If it’s right at start-up, begin with the choke pull-off and possibly the fast idle speed. If it goes rich on pull-away, you need less choke spring tension, or perhaps you’ll need to figure out a way to delay pull-off drop out. Remember, that pull off is operated by vacuum and as you open the throttle the vacuum falls and the pull-off becomes less effective. Some pull-offs incorporate a restrictor, typically in the form of a smaller hole formed in the vacuum port, to delay pull-off drop out, and that is also tunable. Just remember, it’s hard to put the hole back to size once it’s drilled too large (but if you measure and record the diameter first and you’re handy with a soldering iron, you CAN solder the end shut and re-drill the hole — don’t ask me how I know that).
If it starts hesitating half warm, increase the choke spring tension a bit if you can get away with the increase without loading up when you’re trying to drive away fully cold (this is where pull-off drop out tuning can help). Sometimes an orifice in the vacuum line will slow the rate that a vacuum operated pull-off drops away if you hesitate on pull-away but have no symptoms during the warm-up phase. Never lose sight of the fact that the ignition system and timing have to be right, and use a non-contact infrared thermometer or FLIR camera to check intake heat or air cleaner heat if the car is still running it.
The last recommendation I have is that you never use any kind of lubricant on the choke or choke linkage. Clean your parts with a good quality carb cleaner, blow them dry and leave them dry. Lubes tend to gather up dust and create a sticky mess that causes the linkage to bind or react sluggishly.
In the next issue of Performance Technician, we’ll continue our walk down memory lane as we get into the remaining five circuits and how we can adjust, tune, or diagnose them.

still looking for part one
Thanks for bringing this to our attention, JW. Here’s part one: From Seven Circuits to the Race Track