
Restoration services offer a great opportunity for those possessing the patience to oversee such large projects. It’s not as easy as they make it look on TV. In fact, those TV shows do more harm than good to the real practitioners of the art.
It takes more time, more money, and more skill that can be demonstrated in a half-hour or hour TV show, and real shops don’t have a team of 10 working on the car with a support team of 10 more working in the background to gather up parts, do research, secure rare and hard-to-find NOS parts, and co-ordinate shipping and receiving. I’m sure there are a few such shops around, but for the most part those shops are more fantasy than reality, and they are financially rewarded for their TV show far more than what is made from the work itself. This can be seen in all those shows where they started out in some dump with few tools and ratty equipment and now are surrounded by multi-million dollar buildings and assets.
This car came to us from an east-coast rust-belt state and had suffered from a mid-eighties resto-mod build, complete with an updated 440 engine in place of the original 383, a fiberglass snorkel hood, and murdered out chrome and body colors. For the day, it might have been fine, but by today’s standards it was dated and poorly done, with little thought given to the overall value or preservation of the original car.

It’s just my opinion, of course, but I think the 1969 Plymouth Roadrunner and Super Bee were some of the most beautiful cars ever built. I just love the lines of these cars! They have sexy hips and waists and long contoured panels with just enough detail in them to draw the eye. Of course, there were a lot of really beautiful cars back then — but this is a favorite. Even with the line-destroying snorkel hood and strange accent line it’s a work of art. These cars were light and fast for their time, although it’s fair to say that they were nearly all traction limited, so the real as-built potential is pretty hard to determine. The real problem is that they were of an early unibody design, lightly built to compete in the horsepower and performance wars of the late sixties, so exposure to salt and weather did a number on them. In fact, finding a pristine example in the salt regions is all but impossible. It’s so bad around here that even the heavy K-members rotted away!
Our predecessors drilling holes through the floor pan to mount the “roll bar†and “racing seats†didn’t help matters and neither did the quick “spray and pray†paint work done that left a fair amount of corrosion around the window openings and lower lip of the trunk lid. This is an original one-owner car — purchased new in 1969 and still owned today by that purchaser — so it was a real honor to be chosen to put this old beauty back to right. As you’ll soon see, it wasn’t without its challenges!


 There is a multitude of opportunities in restoration and resto-mod work. You have the engine to refurbish or replace, along with the electrical, wiring harnesses, possibly 6V to 12V conversion work, transmission, clutch, and differential work, brake work or brake upgrade from original to disc or upfitted disc, steering repair or replacement or upfitting from recirculating ball to rack and pinion or manual to power, as well as body work, paint work, frame work, trim and interior work, and chrome and stainless work. The best part of doing this kind of project is that unlike the commercial side where the car is seen as an appliance, in the restoration and resto-mod world it’s seen as a passion. Or, like this Roadrunner, as a part of the family. People will cheerfully spend their money on the things they want, while resenting spending money on those things that are seen as just another necessary evil of modern life.
 The first lesson for anyone getting into this end of the business is that you absolutely must be brutally efficient at organization and storage. These projects can take a year or two or more depending on the year, make, and model of the vehicle involved because you can literally spend a month running down some rare part! Even on old cars there are absolute TONS of parts! The very first time I did one of these projects I nearly ended up in a state of high anxiety thinking about how in the hell I was going to get all this put back together into something resembling a car. It’s amazing what you can get used to if you just refuse to give up.
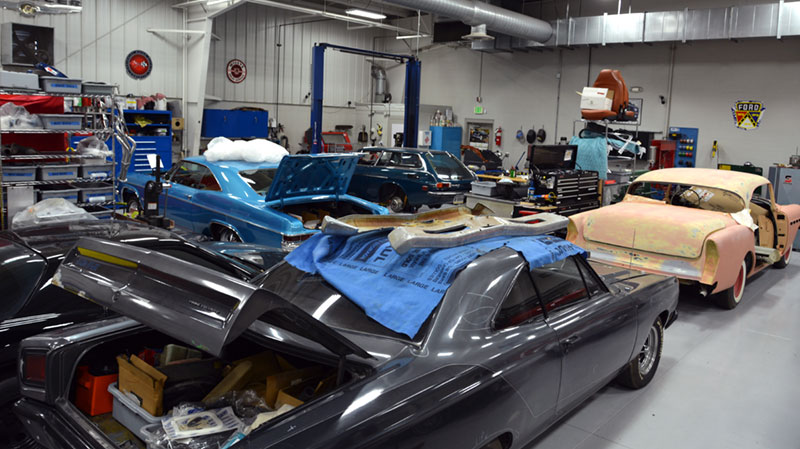 Nuts, bolts, brackets, fasteners, clips, and trim bits take up a lot of room. Rolling shelving is a must, and we use “S†hooks for hanging big parts, a bunch of restaurant bus tubs for mid-sized parts, and cooking sheets in full sheet, half sheet and quarter sheet along with cheap garbage bags to bag up all the pieces on a tray or in a tub once they are all cleaned, painted, and prepped for reassembly. We have fixtures for subassemblies and everything has to be labeled. The rest of the story: No matter what you do, you will lose something — don’t ask me how, but invariably some little part or piece gets away no matter how careful we are. It just drives me crazy and every time it happens we add to our storage and organization systems. If this keeps going it won’t be long and we won’t have any room for cars in the shop…
 Once the car is brought in, we always start with an “as-arrived†evaluation to see what we think we have to work with. In addition to a physical inspection of the sheet metal and mechanicals, I recommend a road test, if it will run, and a compression test, a cylinder leak-down test, and a cold and hot engine oil pressure test. These are good and reasonable first steps, but you should be fully aware of the fact that this is merely the “first approximation,†and you should let your customer know that as well.
Our initial talk about this car involved just removing the mechanicals, fixing the body, and returning it to its original color and interior, but as this project progressed we uncovered a greater number of problems than expected and the job grew legs. Not uncommon — and it’s a conversation you have to have early on. There is simply no way to know how deep the rabbit hole goes! You must establish how you’ll communicate, and how and when you’ll know to stop work. We bill monthly and instruct our customers to call us and put a stop-work order on the car if they become uncomfortable with anything we’re doing or suggesting, or if the project becomes too expensive.
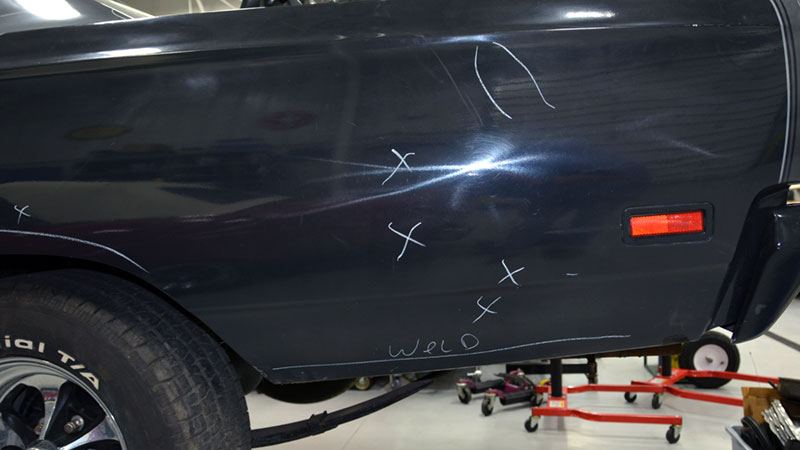
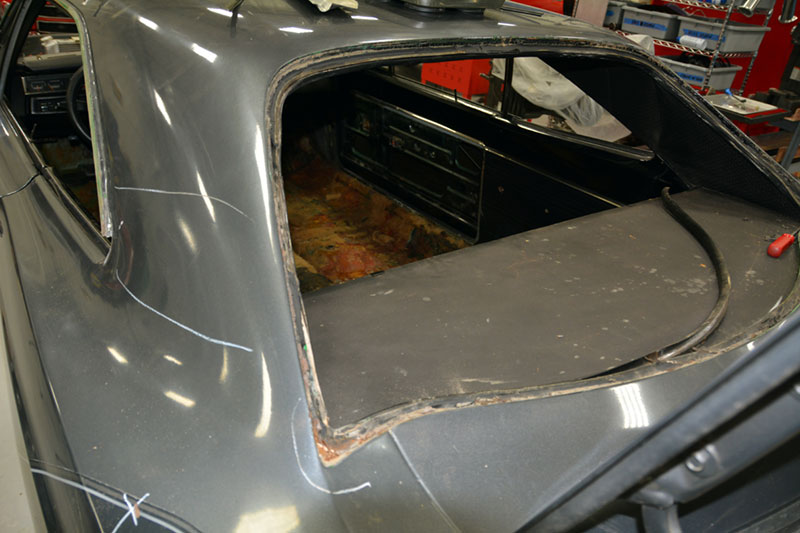 We suggest that you start out measuring the gaps around all the openings, doors, hood, and trunk and record them. This will tell you if the body is damaged or sagged, or if prior repairs were poorly done. Running a good filler detector over the car is a good plan if you suspect that there’s been a prior body repair. You’re battling time, miles, the history of the car, and the hands that have been over the car before you saw it. In some cases, the prior work is quite good and in other cases it’s not as good as we can do with today’s improved technology and paint products. On this car, there was considerable rot in the windshield frame opening (typical for older cars — it’s one area that seems to show up rusted more often than not on sixties-era cars) and the quarter panels had been replaced and were still in reasonable condition. The gaps and body lines were good, but we had a lot of dents to iron out and there was some older body work to fix. Also, the inner lip of the rear wheel openings were cut away at some point to accommodate larger tires. Since both the inner and outer rear wheel houses were in bad shape, fixing the missing lip only required a bit of fabrication and repair to the previously replaced quarter panels, which we cut off the car and reinstalled once the floors and wheel houses were replaced.
 This is more of the kind of thing you just don’t want to see. Cutting up the stock seats (or in the case of the front seat, tossing them out in the trash) created one hell of a problem because finding decent donors for this car wasn’t easy. We found some really nasty old stuff out there, but it took a lot of time, money, and effort to bring them back from the dead and get them recovered. You can see the asking price for that old used bench front — and believe me, it was just as nasty on the bottom side as on the top. Mickey and all his friends had made it their home and outhouse for a few years and after peeling off the old seat materials there was considerable time and effort put into blasting, powder coating and recovering the seat with period-correct seat covers. If you’re put off by mouse poop, urine, or their rotting mortal remains, you might want to stay away from restoration work! The little varmints love old cars as much as we do. Which reminds me, always wear a mask when dealing with their former domiciles until you can get to the scrub and bleach phases because they can carry and leave behind some nasty things like hantavirus in their feces and urine and that is not something you want to have to deal with — it’s serious.
 On the plus side, we did fine the original build ticket stuffed into the springs of the rear seat base! We gently removed and preserved it for the customer so he now has documentation showing exactly how the car was born.

 |
 |
 |
 |
 |
 |
 |
 |
 |
 |
Here are a few “before†pictures so you can see where we started from and what it took to get it back to what you’ll see later on in this feature series.
The car only had a few hundred miles put on it since the last build. Like a lot of folks who hold onto original cars, raising a family and work took precedence over driving the old girl every Sunday to get an ice cream cone. The car arrived with a 4.10 gear in it and that’s what we put back in it, but truthfully with all that brute torque produced by the 440 engine that’s in it now it doesn’t need that kind of gear and the gas mileage is atrocious. On the plus side, it will dig a rut if you jump on the fuel! I’m sure that’s what contributed to the car sitting around so much and being driven so little over the last 30 years.
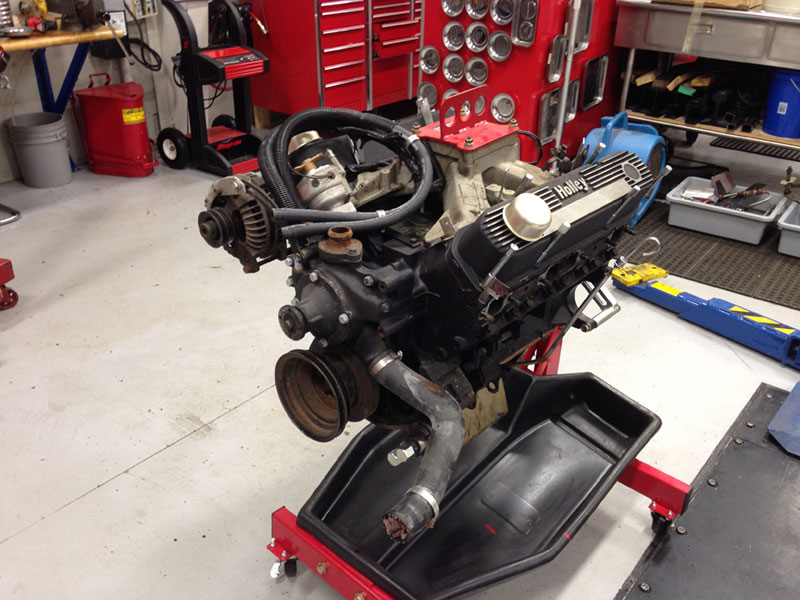
The engine-driven fuel pump was removed and an electric installed back in the trunk, and the battery was relocated to the left rear, presumably for left rear preload like one would expect on a racecar. I think this is overkill given the power level of this car. You can clearly see where they took some cut-off scrap pieces and slapped them against the bottom of the floor pan to mount the roll bar, and while they installed the Oberg filter they didn’t wire in the warning switch for it. The exhaust wasn’t done real well either.
The use of an engine oil cooler seems over the top for a car that’s not an endurance racer, and the transmission cooler appears to be smaller than what I’d like to see since the aftermarket aluminum radiator hasn’t got one in it.
Under the hood, it’s dated and tired looking. I’m not a fan of leaving wire tie ends long where trimmed. I like them cut flush so you don’t end up cutting yourself on them as you work on the engine And I’m not a fan of just grabbing a handful and locking them on regardless of color. I like to use black ones on black harnesses — otherwise they stick out like a sore thumb. I want them to disappear, not become a focal point when you open the hood.
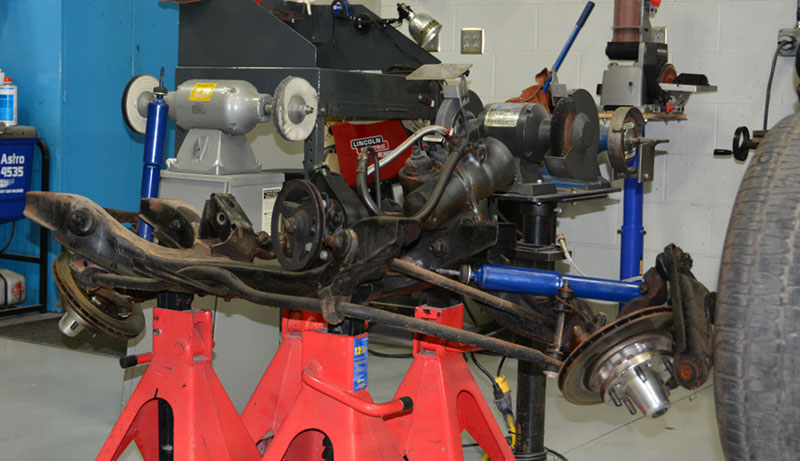
The suspension appeared to be original, with all of the ball joints, rubber bushings, tie rod ends and steering idler and pitman in the kind of condition you’d expect for having been in service for 48 years. This is one of those things that confuses me a little bit: Why stuff a giant engine and gear in the car and neglect the steering and suspension? Even in the eighties slapper bars were old school, and with all the original rubber left in place it steered like a worn-out old car. The brakes in the front were updated with a small version of Wildwood manual hydraulic disc brakes, which while a bit small for my tastes worked well, but the proportioning valve wasn’t adjusted with sufficient forward bias so stopping the car quickly became a rear-tire-dragging screeching panic attack as the rear end tried to pass the front. Again, slapping parts on the car without thinking it through just leaves me confused, and I just don’t see the point of it. On the plus side, we had a few good bits to work with so other than some time and effort and a few new rubber pieces to install we were able to put a like-new 1969 Roadrunner back over the road. As you’ll see later, we updated the upper control arm and the steering gear with parts from Firm Feel and this car drives like a new one now. If you’ve ever driven an original early Roadrunner you’ll remember that it’s pretty vague feeling — the steering is like a stick in a bucket of mud — but with some positive caster and a stage-two steering gear in it, it’s really nice to drive now.
 Once the preliminary evaluation is done, the mechanical systems start coming out of the car. As mentioned, originally we were going to just reseal the engine, transmission, and differential and run all of them again since they only had a few hundred miles on them and most of the leaking was just from sitting so long. As we pulled them out we started noticing a few problems: the differential wasn’t built right, preload was gone, and backlash was non-existent. The transmission was represented to be a TCI unit, but inspection revealed that it was full of swarf and pulling it apart revealed that it was just a stock unit with stock parts and new paint and a sticker, so we contacted Cope Racing Transmissions for a replacement (if you’re a Chrysler guy and need a seriously-robust 727, Cope is your man — this thing SHIFTS!).

 We pulled the engine pan to begin the reseal process and as a matter of routine checked the side clearance for each rod pair. Since this was supposed to have been a custom build done just after a few hundred miles of use (but several years ago), I was shocked to discover that the five-six rod pair rattled around pretty badly and that it had over .040 in. of side clearance! Pulling the bearing caps told the tale: What we had was a badly beaten-up used racing crankshaft that showed signs of having been welded up, and it was already turned .030 in. rods-.030 in. mains under!

 This was represented to have been built with brand-new parts, but it was clear that someone took the new crank and “donated†this old used-up race-weary crank in its place thinking that no one would find it or know the difference. I’d like to tell you that this isn’t commonplace, but I can’t. If you intend to do this kind of work for people you should start every conversation with all new customers explaining the idea that they may not have what they think they have, and that the seller they dealt with may have misrepresented the truth so that when this kind of thing is discovered you won’t be the bad guy in the equation.
 I’ve seen this to some degree on virtually every build we’ve been privileged to be a part of, so I think we can safely say the odds of your buying something that’s accurately represented are pretty small. If you’re buying a car at an auction or online or from a private seller you should ask to see all of the documentation and photos of the build because people are selling “frame off restorations†dirt cheap and they are far from frame-off or restored. In fact, more than a few of them are rattle-can restorations and poorly done even at that. Buyer beware is the phrase of the day.
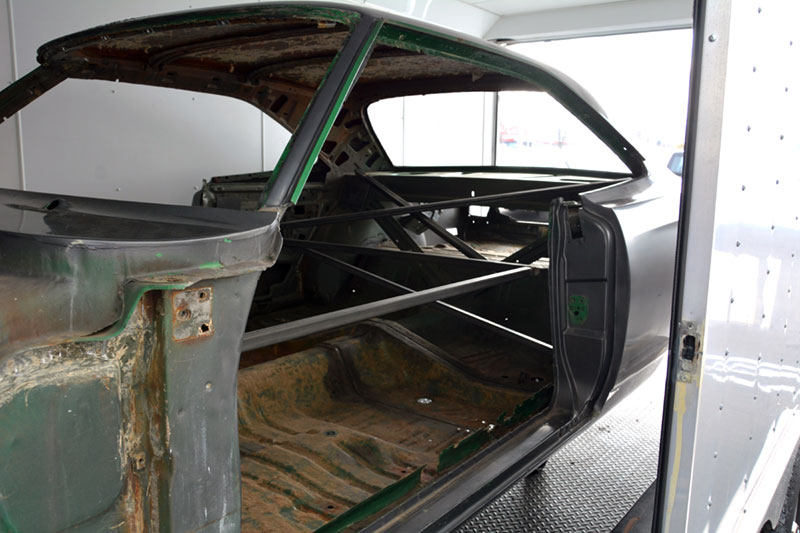
 The three most common ways to clean paint and rust from a car body, and each can be used in the restoration business: sanding, media blasting, and chemical dipping. Sanding is labor-intensive, can’t be used in tight spaces or in the confines of a welded structure, and makes a hell of a mess. If you get in a hurry and build a lot of heat during the sanding operation, you can warp the sheet metal adding labor to the job when the damage has to be repaired.
 Media blasting comes in various forms: wet/dustless, dry, CO2, glass, walnut or other organic media, aluminum oxide, and baking soda come to mind. Baking soda looks good, but it’s alkaline and will need to be carefully neutralized to keep it from causing corrosion. Glass and aluminum oxide can create the same problem with heat as sanding, and it takes a careful and disciplined operator willing to adjust and tune pressure and volume to keep from warping the body panels — something production shops will only do reluctantly, if at all. Dipping is the best solution because it gets into all crevices and cavities, and once stripped the body is dipped in a neutralizing solution that stops the chemical activity of the stripper preventing future problems.
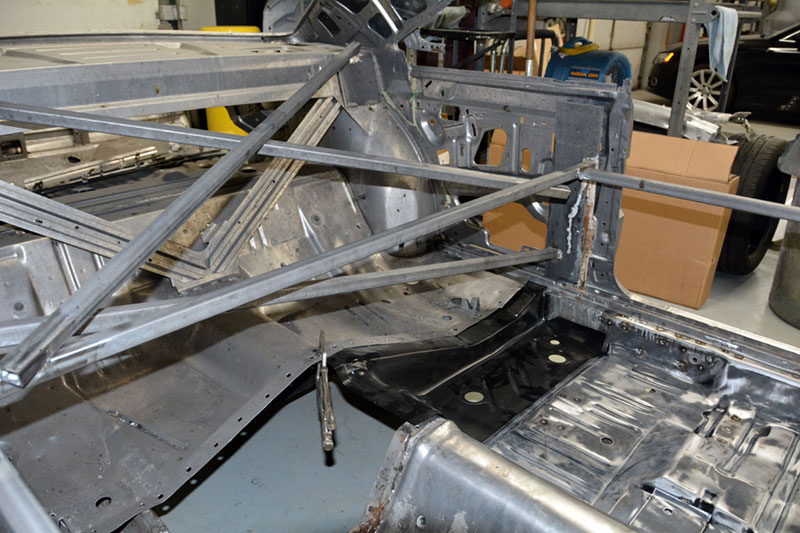
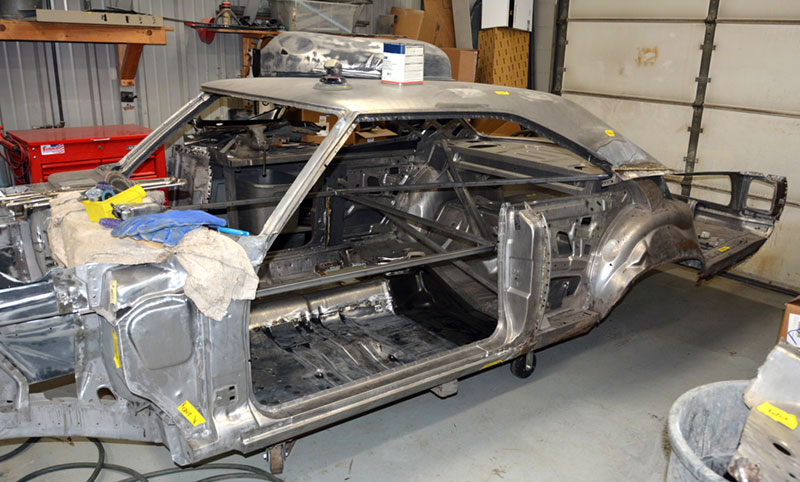 Because this is a unibody and because we knew that most if not all of the floor pan would have to removed and replaced, we constructed an internal bracing system to keep the body stable during transport and the lifting and dipping processes. We’ve tried doing this a couple of different ways and the way we’ve landed on is shown. We weld several pieces of plate steel to the body, then tie in the support bars to those plates. The supports have to run front to rear, high and low, and on the diagonal to provide the strength to prevent bending, bowing, and twisting. The only mistake we made here was we forgot to drill drainage holes in the support bars and stripping solution or neutralizer slowly leaked out for a day or two after we got the car back. We won’t make that mistake again.
 If you pay attention to how this was done you’ll see that we intentionally mounted the support system high enough to allow work access under the bars so we could drill out the pan spot welds, remove the floor pan in sections and weld in the new sections before removing the bars. The dipping process shows the rust, the pitting, the margin around the damage, and removes most plastic body fillers — or at least loosens them enough that they are easily knocked off the body. The lead seam on the sail panel was melted out and the brazed seam on the quarter panel was MIG welded to make the quarter panel whole again. During the entire process you’ll see notes stuck on the body reminding us of something left to fix or do, or some critical dimension that was removed with the offending sheet metal.
 A quick look at the pile of scrap tells the tale — there’s most of a car sitting there and that doesn’t include all the various small patch panels that were custom cut and fitted around the window openings, lower truck deck and other areas where total replacement wasn’t called for, but bits were in bad enough shape that they needed to be replaced. Stay tuned, there’s more coming next issue!


0 Comments