
Windage, clearances, load, and the advantages of dry sumps
In the last issue we began this discussion with the traditional wet-sump engine oiling system and looked at some of the challenges involved in making it work reliably in high-performance engines and in applications where the forces exerted on the vehicle were sufficient to cause the oil in the sump to move away from the pickup.
When you need to go dry
As power levels and G-forces increase, even the best wet-sump pans equipped with all the tricks such as custom-built high tech pumps, dams, diverters, and swinging pickups are challenged to keep an adequate volume of oil and suction head pressure supplied at the oil pickup. Erratic oil control on the suction side under violent operating conditions can result in severely aerated oil or low oil volumes being supplied to the engine bearings with predictable results.
In any engine, volume is king (two gallons a minute at idle up to 12 gallons a minute or more at full operating speed), and the pressure we all observe and monitor is the result of the right volume shoved into and through the correct bearing clearances while using the proper viscosity for your particular application. You needs as much pan depth as can safely be run to provide the capacity and pan volume needed to keep the pickup fully covered under one to three inches of oil (or more) without running the pan into the track – and you need engine oil clearances consistent with your application.
 |
 |
 |
 |
 |
 |
| Installing a dry sump system can be an exercise in patience. All of the dry sump builders and suppliers are good about offering technical help and installation advice with the sale, which is a good thing because as-supplied it resembles nothing if not a jigsaw puzzle with the box top that should show the completed puzzle missing. On the bench or engine stand everything looks real easy, but once you factor in the chassis, headers, steering shaft and gear, and suspension, things tighten up dramatically. Don’t be surprised if you find yourself spending a day or two just finagling hoses, fittings, and mounts to get to a field-workable solution… I say “field workable†because the design has to be simple enough to repair in the pits should a leak develop, or some other repair show up that requires removing parts of the dry sump to accomplish. A best -practice is to tack weld bushings and spacers to brackets when you can so they won’t disappear in the grass during repairs, for example.
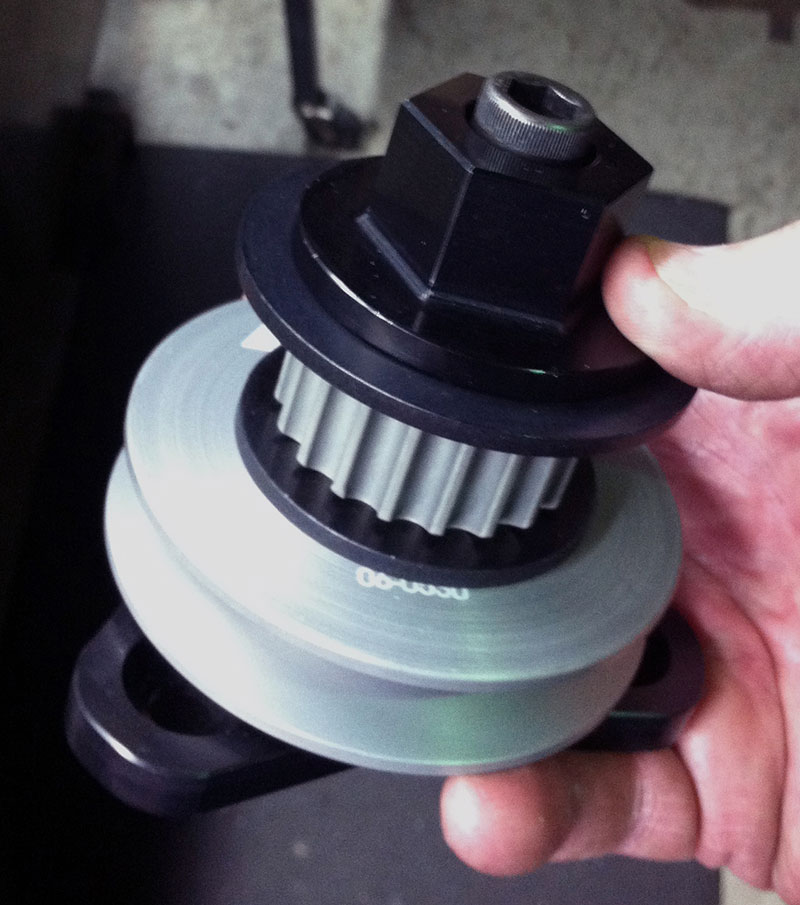
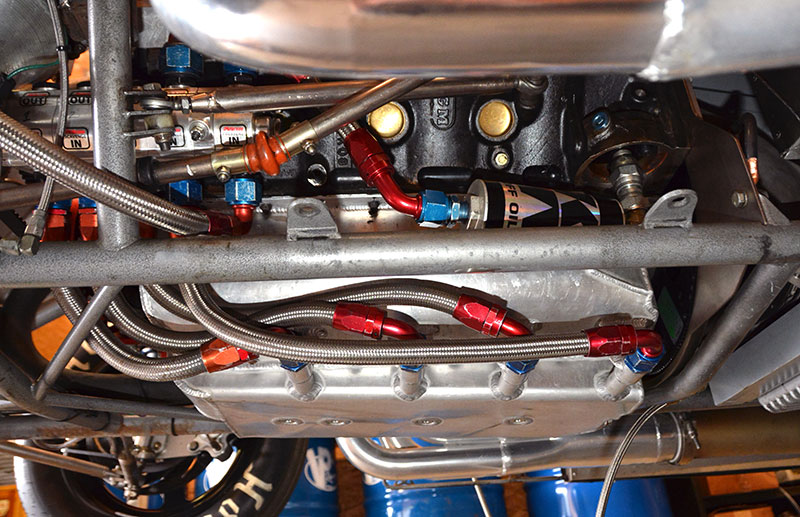
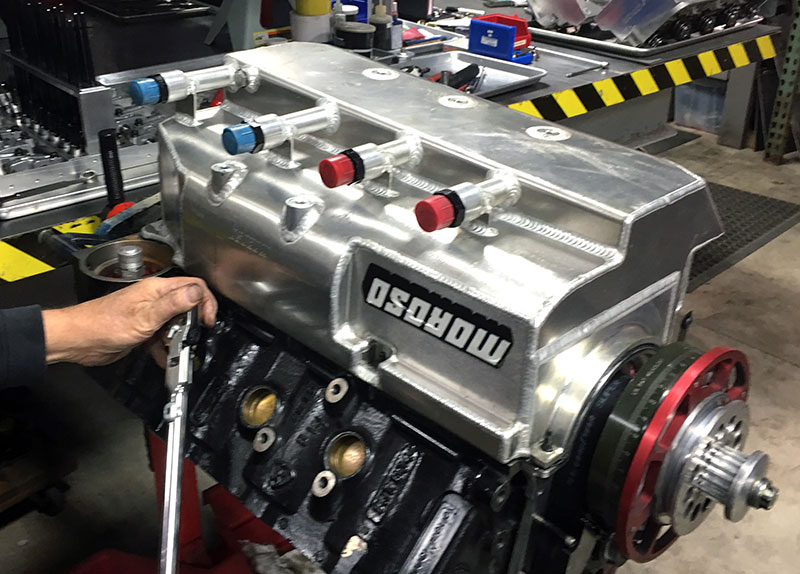
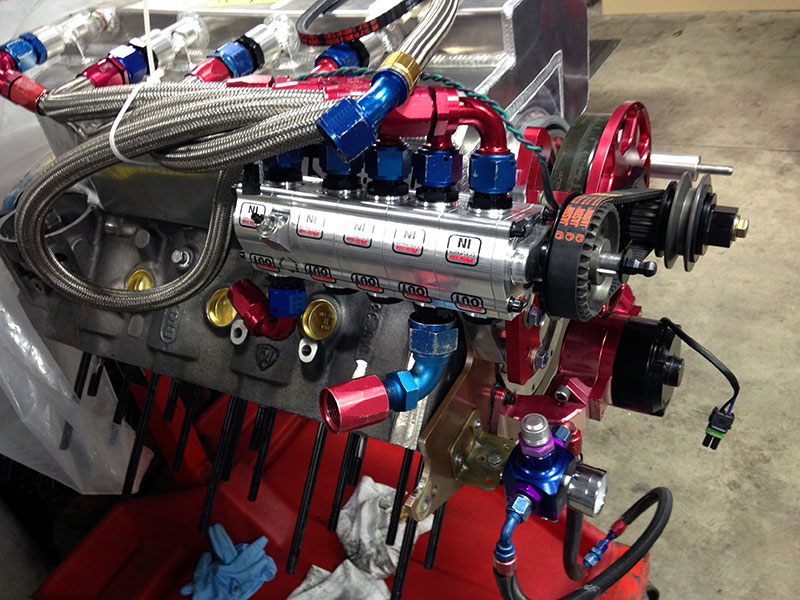
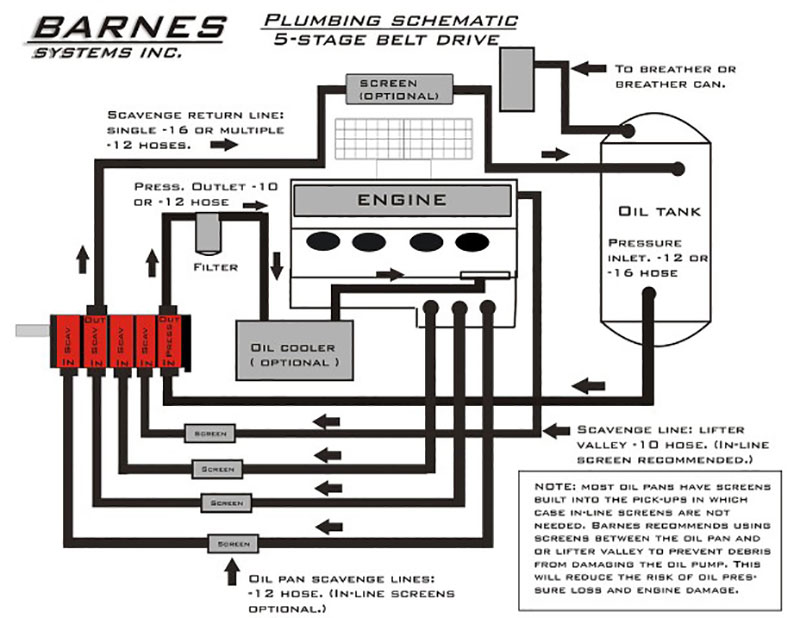
Some things can’t be changed, like the pump relationship to the crankshaft because that’s where you’re getting your driving power for the pump. The pump can be mounted on the left or the right, and even if an oil pan isn’t readily available for a right hand mount (and for some applications it isn’t), you can always have a pan made for your application for a little more money. It’s a good practice to mount the crankshaft drive parts to the crank nose followed by the pump to the block and get the pump drives aligned, the belt installed and adjusted, and once all the spacers and bracketry are worked out it’s time to buy about a hundred AN fittings from 180 to straight (only a slight exaggeration because you either misplaced them or lent them to your buddies and never got any back in return), and start part two — the fun of trying to figure out how to connect every scavenging port on the pump to those on the pan and where the pressure line has to run to get oil back into the engine to feed the galleries. On most racing blocks, there are two or three places to plumb in: on the back bell housing skirt near the top of the block, at the oil filter mounting pad, and in some cases a provision is made above or near the oil filter pad for access. If access is tight at the oil filter mounting pad, look around for another point you can plumb into. The last lines to worry about are the scavenge discharge to the oil tank and the suction from the tank to the pressure section. Since the scavenge sections have a common manifold inside the pump, you can move the scavenge discharge line along the top of the pump body by removing section plugs and installing a fitting into the location with the best access, or move the section with the fitting if you must. If at all possible, keep the scavenge discharge as far to the rear of the pump as you can. The suction into the pressure section is on the bottom of the pump, so it’s often more accessible. Take a look at any one of the pump photos and you’ll see it. Now that you see all the bits needed, you can understand why a dry sump system is expensive and why getting it all installed and routed the first time can test your patience! |
|
Tiny spaces and lube thickness
.")
There is almost no way that I’ve found to have these hoses made up off site. It’s such a cut-and-try process you just have to figure them out as you go. You will become expert at hose makeup if you start running a dry sump. Unless you love the sight of your own blood, you shouldn’t even think about making up hoses without the tool kits from Koul Tools that we’ve featured before. You’re either going to buy Band-Aids by the truckload, or these tools — your choice (the tools are cheaper and less painful).
Clearance start from .00007 in. to .0015 in. for a daily street driver to .006 in. (or a bit more!) for a Top Fuel, and as the clearances open up the viscosity of your motor oil must increase. There are exceptions to viscosity following clearances and there’s some power to be made by running lighter oils, but that’s something only recommended for someone with a very comprehensive engine building and monitoring program.
For commuter vehicles, you might run a 0W-20 multi-grade in a factory-built engine with main and rod bearing clearances on the order of .0007-.002 in. For a carbureted racing engine or performance street engine, it might be anything between 10W30 and 20W50 at .0025-.0035 in. For blown alcohol, you would expect to see something along the lines of a straight 50W at .0035-.005 in. clearances, and for a Top Fuel car, you might be at a straight 70W with clearances at .006-.0075 in. Monitor your bearing condition and your oil pressure gauge to determine what combination is needed to keep the little monster alive. What’s important to note is that as the power levels escalate the clearances increase to allow a safety margin for the distortion and bending forces that grow with torque and rpm because no matter how good the parts are there are physical limits and sooner or later you’ll overrun part strength and need the extra clearance to compensate for that.
More clearance means more volume demand in gallons per minute, as delivered by the oil pump, and more volume means more windage and a faster emptying of the pan, which means you need more pan volume. It’s like a row of dominoes set up on end: Once the first falls, they all fall in sequence.
 |
 |
 |
 |
| It’s important to follow the plumbing recommendations of the pump supplier. Line sizes are not optional if you expect to get the best results from your installation. In general, you would like the largest oil tank you can fit into your car and still mount it so that the suction feed fitting at the tank is higher than the suction inlet at the pump pressure section. Larger systems afford you more tank “dwell time†for de-aeration and/or more reserve to make up for loss or consumption. There are size limits of course, not the least of which is weight and the expense of carrying a larger quantity of oil, but bigger is better, within reason. | 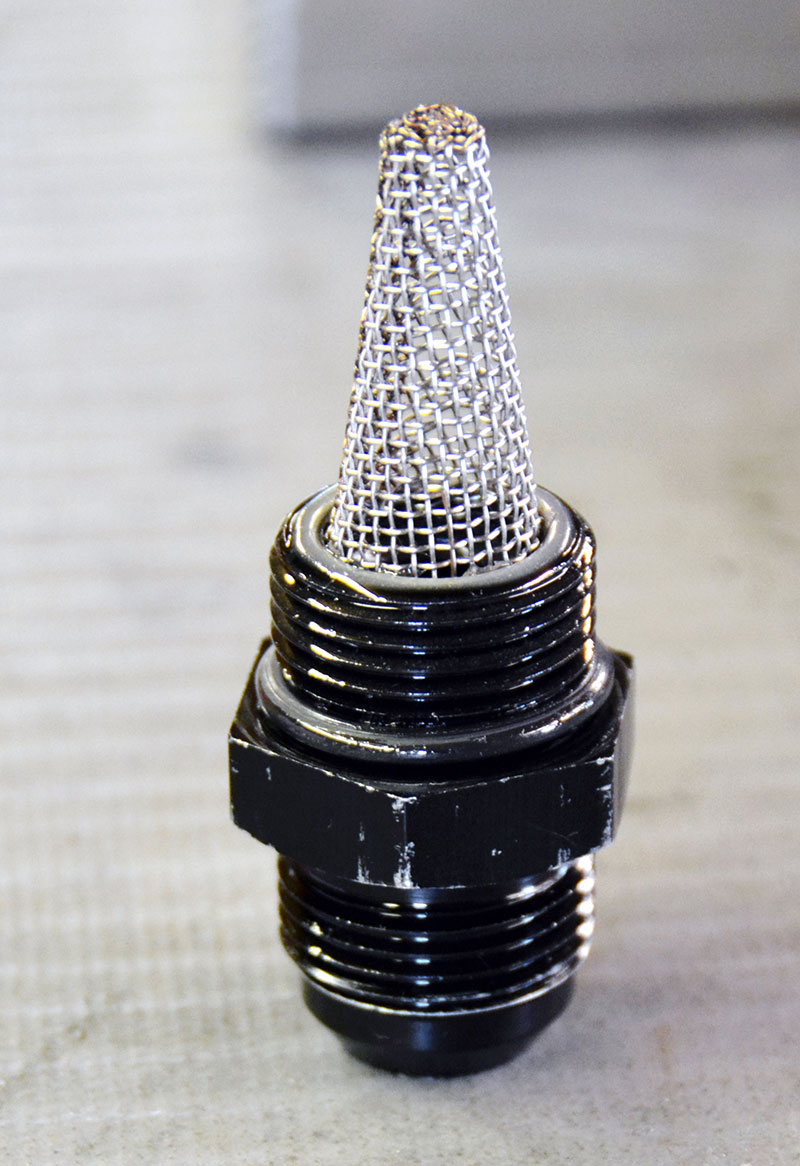 |
| Oil tanks should be filled to about 2/3 full and checked with the engine running to allow sufficient head space for de-aeration. If you’re using a remote breather, make sure to mount one large enough so it is at least as high as the oil tank breather fitting and check it between runs for oil carryout. Tanks may or may not have an integral breather welded in. Screens should be mounted on each scavenge line and a filter mounted between the oil pump pressure section and the engine. If you choose to run a small micron oil filter, you’ll need to check it after every racing weekend to monitor engine health, particularly after you freshen up the engine. Once everything seats in and the engine is happy, it may be possible to ease up on the schedule, but keep an eye on that oil pressure for any sign of drop that would indicate a restriction and possible problem. | |
Bearing loads and bearing clearance
There’s another point to consider when it comes to clearance that’s not directly related to oil pumps, or pressure and volume demands: the load footprint on the bearing. The closer the shaft diameter and the bore diameter into which it fits, the wider the footprint the shaft has on the bearing. Think of it as points of coincidence. If the shaft were 1in. and the bearing four in., the loading area would be very close to a line contact where the two touched because the arc described by the one inch shaft would quickly depart from the arc of the four-in. bore. As the shaft size increases to four in., the footprint widens out as the bore and shaft sizes approach the same dimension until the shaft is at full contact at all points on the circumference. Of course, it won’t turn at this point, but in terms of shaft and bearing contact surface area it’s as good as it gets.
Normal recommended bearing clearances are .001 in. for every inch of diameter, so a crankpin clearance on a 2.200 in. journal should be .0022 in. — with a half a thousandths taken off for a tight build (assuming you tailor the build to fit the clearance) and a half thousandths added to the dimension for a loose build. So, on the tight side, the bearing clearance should be .0017 in., and for a loose build the clearance should be .0027 in.
These are, of course, general rules and are not cast in stone, but at least they give you a starting point.
Most builder’s subscribe to the “looser is better†theory of engine building, and for the most part that works because loose is definitely safer. But, if you’re running premium parts, if the crank is stiff, true, properly polished, and machined and you’re running a dry sump there may be some power and or durability to be had by closing up the clearances. The only way to know is to start where you’re safe and slowly creep up on tighter clearances while periodically inspecting the bearings.
Suction head pressure
To continue what we started in the Tech Minute last month (The Physics of Lubrication) we should briefly talk about suction head pressure required and suction head pressure available. A pump moves what it moves because of differential pressure and nothing moves if the pressures are equal on both sides of any pipe, which we have to account for and adjust for on both the suction and discharge side of the oil pump.
Wet sump systems consist of an inlet side and a discharge side, and suction head pressure is what moves the oil through the screen into the pickup and piping and on into the pump. This discussion will be important in both wet and dry sump applications and in our article in this issue concerning the use of a vacuum pump on the engine.
Suction head pressure is the result of the difference in pressure (between crankcase pressures, typically atmospheric pressure, plus the liquid head pressure plus maybe a bit from blow-by) and the low pressure created by the pump. The weight of the fluid column and the air pressure in the crankcase are what cause the oil to move. You will also have some loss to overcome caused by the viscosity of the oil and the friction of the screen and piping, so the lesson to take from this is that there must be a large-enough pickup opening, a reasonable pickup screen wire and hole size, and as big a suction pickup pipe as you can fit.
Without differential pressure, the oil stalls in the suction feed line and none moves through the pump — it actually ends up vaporizing and cavitating to the point where no liquid movement occurs. The exact amount of suction head pressure required in an engine isn’t well documented, at least not that I’m able to find. Engineering manuals suggest that you’ll need at least 3 psi, but I don’t think I’d be comfortable with any less than six pounds per square inch of suction head available on a wet sump and four pounds on a dry sump engine.
Fun like this costs money
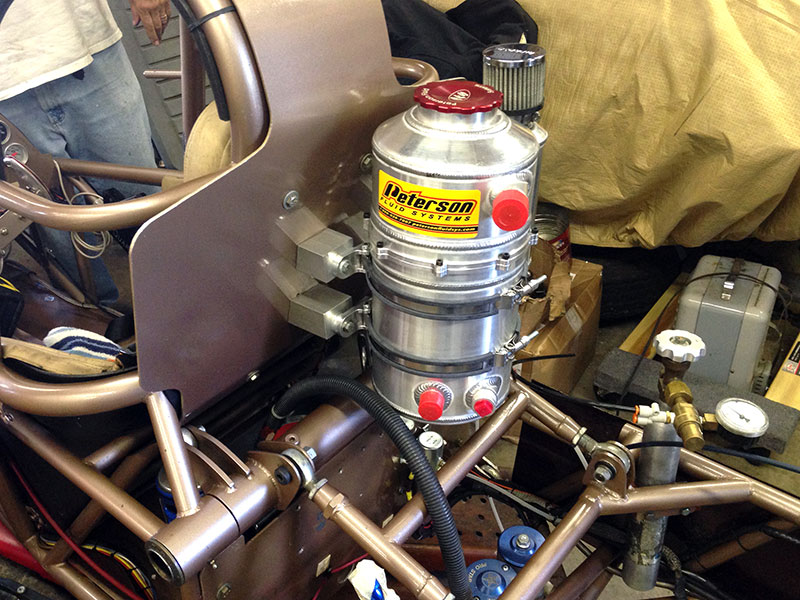
Dry sump oil pumps, pans, lines and tanks are a major investment on any racing engine. Costs are typically in the $3,500 to $5,000 range for a complete system as installed, depending on the manufacturer, number of stages, tank size and design, lines, drive mandrels, pulleys, belts, and brackets. While this seems expensive, it’s important to remember that this is the system that keeps all those viciously destructive parts from sawing the block in two as they try to escape.
Dry sump systems fix a lot of the oil control, Cavitation, and windage and aeration problems by pulling the oil from the pan through any one of up to seven or eight sections of scavenging. Because oil caught up in the reciprocating parts has mass and viscosity, it creates a horsepower-robbing drag as it’s strung out between the rotating members and stationary members sharing the space under the pan. Think of the oil as a hundred tiny little hands reaching out trying to grab hold of the walls of the bay, the skirt of the block, and the walls of the oil pan as it swings past, riding the crank and rods. Scrapers, screens, baffles and diverters that strip and control the oil along with the rapid evacuation of oil from the pan by multiple scavenging sections reduces the amount of oil captured and held by the crankshaft and therefore dramatically reduces the frictional loading presented by the oil.
Frictional losses occur everywhere in an engine — gas flows, oil flows, rubbing components, drive components, rings, chains and pistons — if two of anything move opposite one another, there’s going to be a friction, friction loading, and a frictional heating component involved. The first thing a dry sump does for you is provide you with superior control and rapid evacuation of the oil from the pan. The second thing it does is provide you with a massive volume of oil over which to spread both temperature and contamination, and as a very important side effect, it provides a means to strip the air from the oil before it’s reintroduced into the engine by using elements in the oil tank designed to separate the air from the oil and by providing more dwell time for the air to separate.
Aerated?
One of the more serious side effects of windage is aeration because air-filled, frothy oil won’t support high bearing loads consistently. The reason oil works as it does is two-fold. First, because it’s non-compressible and acts like a solid in the bearing-shaft interface, and, second, because at the molecular level it acts like tiny ball bearings that roll easily against their neighbors. Air IS compressible and has no support at the molecular level, so mixing oil and air and pushing it into a bearing will lead to high rates of bearing wear and failure.
Other advantages include a very low pan profile for ground clearance, adjustable oil pump volume through the use of different pulley ratios, externally adjustable oil pressure, expandability should the need arise (a longer drive shaft, added sections, and longer tension rods are all that’s needed to add a section), and the fact that most dry sumps pull a partial vacuum in the crankcase, which increases horsepower (see the vacuum pump story for more on this). Another nice feature is that with a dry sump it’s relatively easy to pre-heat the oil using in-tank heaters, and it’s easy to prime the engine before each startup by slipping the belt and using a drill on the drive end of the pump. The more power you make and the closer you are to the edge the more important bringing the oil up to temperature is and the more important it is to prime the engine every time it’s sat for longer than a day. Oil works best when warm, and some oils drain from the bearings of a hot engine quickly. Heating the oil and priming the engine is just common sense if you have that capability.
Installation of a dry sump system can be an exercise in cut-and-try engineering, particularly if you’re retrofitting a system onto an older race car. The tank, breather, lines, and pump and brackets all have to be mounted and fit to the engine and to the chassis, and that can often be a real challenge. The best advice I can give you is shop, talk to fellow racers for recommendations, be patient, and read, read, read all the paperwork and instructions and technical literature you can find online before committing to a supplier. There are a hundred variations on brackets, tanks, mounts, and drive systems, so doing a bit of research before purchase can save you countless hours of fabricating, cutting, and welding later. I’ve included a source guide for you below that will help you get started. While it’s not comprehensive, it’ll give you a good idea of what’s out there.


0 Comments