Many Advanced Driver Assistance Systems (ADAS) do not set trouble codes that alert you to the need to calibrate or reset them after repairs. Here are tips to help you catch them before returning the vehicle to your customer.
“It worked fine until after your collision repair.†If you’ve heard that recently, chances are it is because your technician was unaware that he or she must recalibrate the device in question after any event that disconnects power, sometimes even after repair of an unrelated component.
Advanced Driver Assistance Systems (ADAS) from Mercedes-Benz use camera, radar, and sonar sensor technologies to collect information about nearby vehicles, pedestrians, lane markings, and potential obstacles. They measure distance and vehicle trajectory for assessment of potential collision risk. These inputs are also used for control module calculations of the amount and direction of braking required for effective collision avoidance or impact reduction.
Depending upon which and how many of these technologies are on a given model, there may be dozens of sensors and modules in various locations around the vehicle. ADAS technologies may be mounted on the windshield, embedded in front and rear bumpers, in side mirrors, behind the front grille, in the rear decklid and in other locations around the vehicle.
Mathematical precision
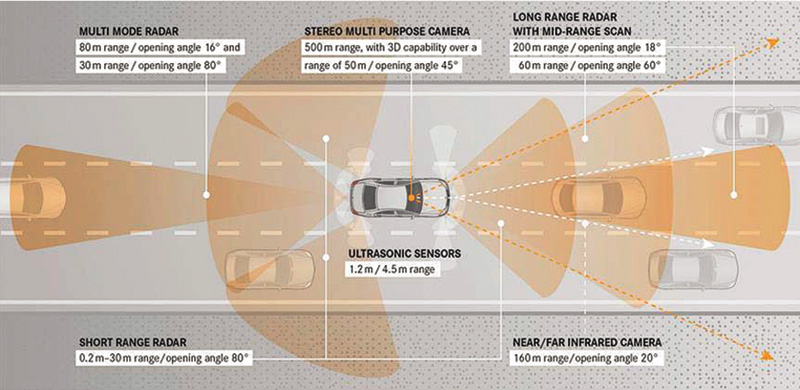
Advanced Driver Assistance Systems (ADAS) on Mercedes-Benz vehicles use a variety of imaging technologies, including regular and infrared cameras, short and long-range radar, and ultrasonic sensors to make drivers aware of potential hazards. These imaging technologies also provide input to control modules that activate braking to slow, stop, or alter the direction of the vehicle to help avoid or reduce the damage of a potential collision.
Distance and trajectory data is useless if the camera, radar, sonar, or other sensing device is mounted improperly. If a camera or radar device is mounted in a windshield or bumper just a few degrees offset from its factory specification, the detection area it records two or three hundred yards down the road may be in the wrong lane. For both collision risk assessment and mitigation strategies, all imaging and sensor technologies must be mounted with pinpoint accuracy.
After every repair, you must check that any ADAS or other sensing devices are functioning properly. Recalibration is simply a way to confirm that these imaging and sensing devices have been mounted with the required mathematical precision.
Powerful and vulnerable
The perimeter locations of the imaging and sensing devices for ADAS enhance coverage and expand the area they can “see†ahead, behind and to the sides of the vehicle, but also makes them highly vulnerable to collision impact damage. After repair, you’ll have to reset or calibrate the ADAS component to ensure that it is positioned properly and communicating with its control module.
Similarly, if you remove or replace a bumper, windshield, or other component on which an ADAS device is mounted or embedded, you must at minimum re-calibrate, and depending on whether or not it sustained damage, replace the ADAS device. Disconnecting an ADAS sensor or control module from its power source requires a re-initialization or recalibration, much like a power failure at home requires you to reset the clock on your microwave or other plugged-in digital devices.
Fault detective
Many ADAS devices do not set a trouble code if there is a problem. So, how can you tell which devices are on the vehicle, and whether or not any need repair? First, access the list of what ADAS components may be on the vehicle. In the Mercedes-Benz Workshop Information System (WIS), enter the VIN and click on the Datacard icon at the top of the web page. This will open a list of all of the features on the vehicle, including all ADAS components.
Alternatively, plug your XENTRY STAR DIAGNOSIS tool into the diagnostic connector on the vehicle. In addition to showing a list of the as-built configuration of the vehicle, it will allow you to read any trouble codes that have set, activate sensors, and troubleshoot ADAS or other components. You could try using an advanced aftermarket scan tool, but it will not have the factory as-built information for newer model year vehicles, and there is no guarantee that it will be able to communicate with every sensor or control module needed for troubleshooting ADAS devices.
At minimum, you may now be able to develop a short list of ADAS and other components that you suspect are most likely to have been affected by your repair. This applies to both collision repair and to the side effects of disconnecting or replacing ADAS devices as part of accessing or repairing nearby components. Even changes to the suspension, use of tires of a different diameter than the factory originals, or work on the steering system can have indirect impact on where a camera or other imaging device is pointed, as they may alter suspension level or ride height.
For example, the camera, radar, and sonar devices we’ve mentioned above must be calibrated after replacement or repair. They are used by multiple ADAS technologies (if so equipped) on the E 350. This includes Cruise Control, Lane Keeping Assist (Code 476) and Active Lane Keeping Assist (Code 238), COLLISION PREVENTION ASSIST and COLLISION PREVENTION ASSIST PLUS (Code 258 up to MY2014), DISTRONIC PLUS (Code 233) and DISTRONIC PLUS Steer Assist (Code 266), Blind Spot Assist (Code 234), Active Blind Spot Assist (Code 237), Brake Assist PLUS (Code 268), or Brake Assist PLUS cross-traffic (Code 269), PRE-SAFE brake (Code 271 or Code 300), Rear-end PRE-SAFE (Code 253), and Traffic Sign Assist (Code 513).
There are trouble codes that may set for cruise control problems, but not for many of the other ADAS components on the above list. If you see any of these codes on the vehicle data card or in the list, and you replaced or disconnected from power the imaging device related to the code, check that those devices are functioning properly. If any are not performing as specified, check your Mercedes-Benz repair manual to see if there are any calibration, initialization, or activation procedures required after repair or replacement.
Below are a few examples of specific scenarios in which calibration or initialization is required.
Multifunction Camera
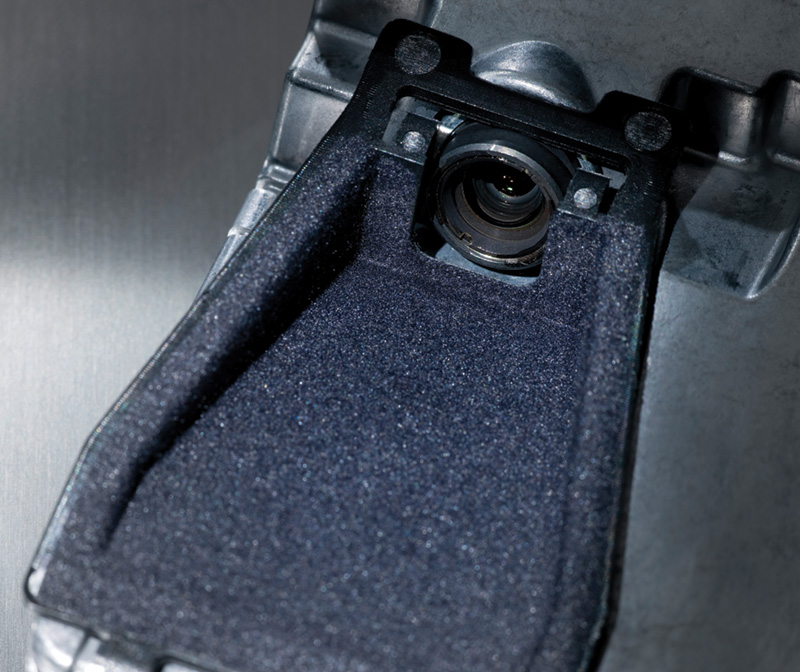
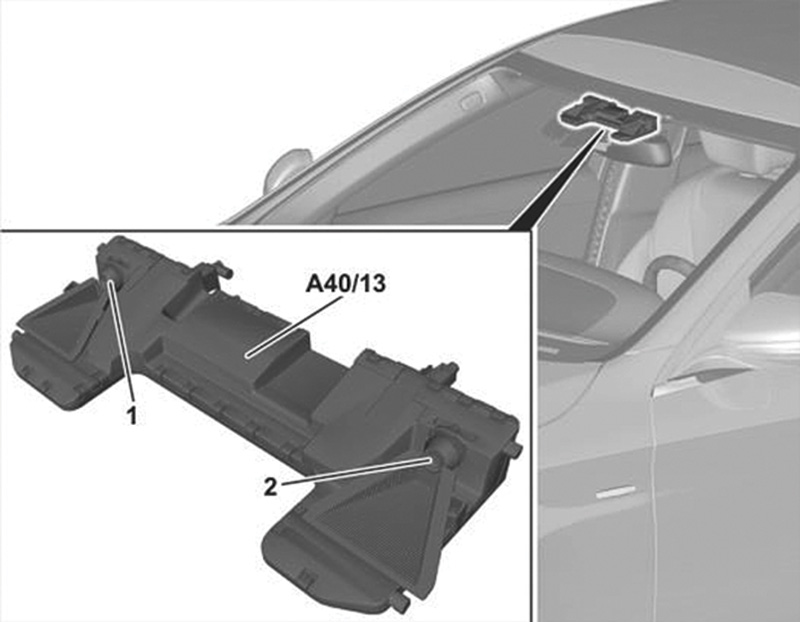
A multifunction camera is used on many Mercedes-Benz vehicle models for a variety of driver assist systems, including Active Lane Keeping Assist, DISTRONIC PLUS with Steering Assist, Brake
 Assist Plus, Adaptive High Beam Assist and Intelligent Light System, and Active Body Control. The multifunction camera must be recalibrated if you are installing a new camera, control unit, or cable from the camera to its control unit.
It must also be calibrated if the camera has been disconnected or removed. For example, if you are replacing the windshield and either installing a new camera, or reinstalling the existing camera on the new OEM glass, calibration is required.
 |
 |
|
Single or dual-unit versions of the multifunction camera, depending on the driver assist applications on the vehicle, are mounted on the windshield near the roofline. |
|
Backup Camera
You must calibrate the backup (reversing) camera after any of the following events occur:
- Replacement of the backup camera control unit.
- Removal of the backup camera.
- Any collision repair that could potentially alter the camera mounting angle in the trunk lid, as this may have altered the camera viewing angle.
- Changes to the suspension which influence ride height.
- Removal or replacement of the steering angle sensor (SAS).
You will need a calibration fixture (stand) and target, a laser, and the XENTRY Connect diagnostic system.
DISTRONIC PLUS
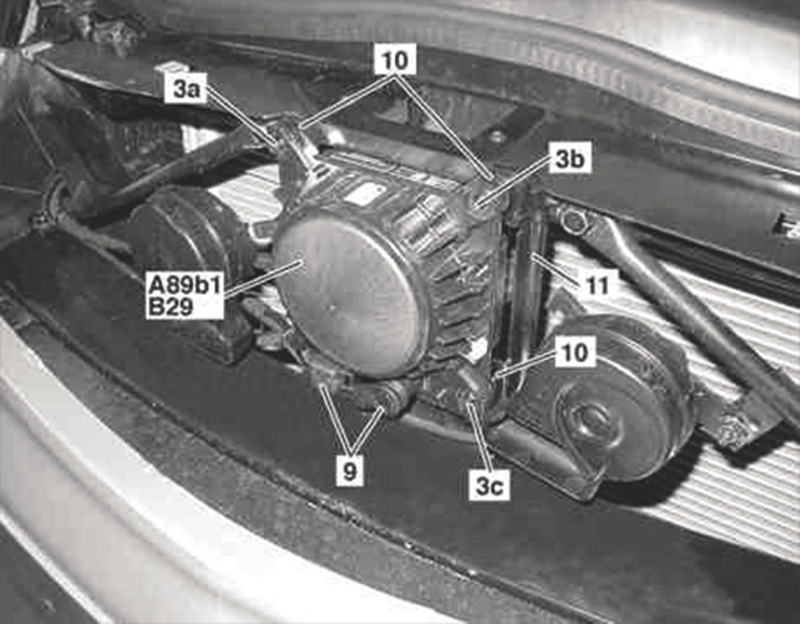
The DTR radar sensor (Code A89b1 in this image, for vehicles with non-arched type radar sensor, B29 for the arched type) is the heart of the DISTRONIC PLUS system. It must be adjusted not only if it has suffered collision or mechanical damage, but also if the vehicle has had suspension alterations that affect ride height.
DISTRONIC PLUS (DTR) uses front long- and short-range radar technology to regulate vehicle speed and distance relative to the vehicle immediately ahead. Initialization of the DTR control unit is necessary if the control unit is replaced or disconnected from power during any procedure. Because the DTR uses lateral and longitudinal acceleration data inputs in its calculations, it must also be initialized after replacement of the yaw rate and/or rotational speed sensors.
You must adjust the DTR radar sensor after replacement of the DTR control unit, or if the sensor has sustained any mechanical damage. Front collision repair, alterations to camber, track width, caster or alterations of the vehicle height at the front or rear axle, are all additional reasons you must adjust the DTR radar sensor.
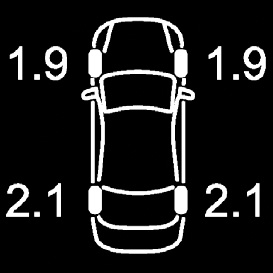
Tire pressure is often different for the front and rear tires. In that case when you rotate them rear-to-front, you’ll need to adjust pressures to maintain tire performance within normal parameters, not to mention keeping the TPM happy.
Tire Pressure Monitoring System
Were you aware that tire rotation requires you to re-activate the tire pressure monitor (TPM)?
Wheel replacement, installation of a new pressure sensor on a given tire, or simply adding or releasing air to bring a tire within pressure specification limits are all events that require activation of the TPMS.
|
Use current |
|
Confirm with OK |
|
Once you’ve adjusted tire pressures for each wheel, then tell the TPM control unit to accept the new pressure for a given tire as its baseline value. |
The TPM must also be re-activated after every tire rotation. The inflation pressure specification is different for front and rear tires. For example, if you rotate a left rear tire to the right front, you must adjust the pressure to the appropriate level for each wheel that moved. Without pressure adjustment, the controller sees that the pressure is off for one or more tires, and presents a TPM error warning message in the dash.
Activation is easy, and less costly than throwing parts at the problem. Once you’ve made the appropriate pressure adjustments, you simply press “OK†to confirm with the TPM control unit that they are the correct values for each tire, and the system is re-activated. However, because TPMS technology has evolved, there are at least three, and possibly more, different activation procedures for Mercedes-Benz models from the early 2000s up to the present. Check in the Mercedes-Benz Workshop Information System (WIS) for the TPM activation procedure that is appropriate to the model you are repairing.
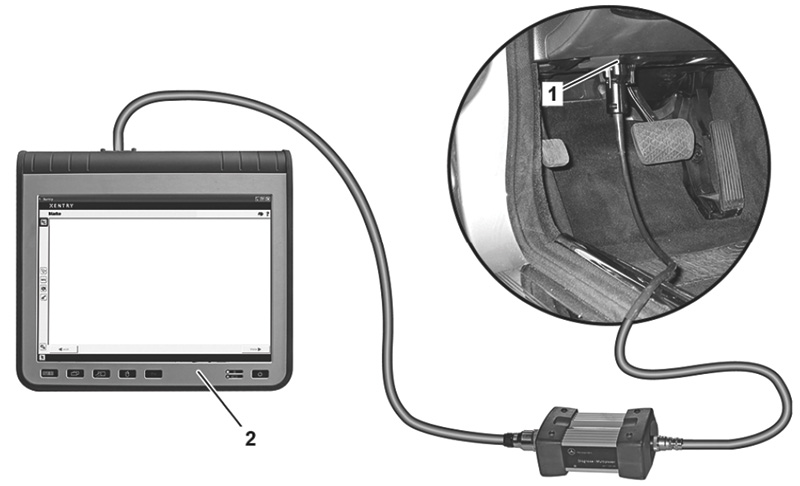
Once you start the Mercedes-Benz STAR DIAGNOSIS tool, shown here plugged into the diagnostic connector on the C-Class (chassis series 204), STAR DIAGNOSIS provides step-by-step, menu-assisted test and repair procedures for any faults it identifies on the vehicle.
If your repair requires you to disconnect or remove and reinstall components such as the ABS controller or other electronic control units, those devices also must be checked for function after re-assembly. In some cases, a test failure will cause the setting of a trouble code that will indicate the need for initialization or calibration of the device. If no code is set even though the device fails a function test, check your Mercedes-Benz repair information for initialization, calibration, or reset instructions.
After you have completed any required calibration, initialization, or reset procedures, scan again to verify your repair was effective and complete. You can then delete from the diagnostic trouble code memory any stored faults which may have been caused by disconnecting wiring or by simulation during testing. Connect your Mercedes-Benz STAR DIAGNOSIS tool and read out and erase the fault code from memory.
With these hidden calibration requirements taken care of, now you can invite your customer to come and pick up the vehicle.
System Recalibration/ResettingEven if the vehicle shows no warning lamps (MILs), systems may need calibration following repairs. This guide is not comprehensive, not guaranteed accurate, and will not be updated: Check the available service literature and tools (e.g., WIS, XENTRY, etc.) for the specific system(s) and vehicle in question. The Option Code list for a specific vehicle can be found in the Vehicle Data Card, available in several online systems, such as VeDoc, EPC, WIS and VMI. System names may vary. “MU†means Model Update.
|


0 Comments