

It’s best to have a game plan before you start. Before you even break out wiring diagrams or test equipment, it’s a good idea to ask the customer under what circumstances the problem occurs.

This test with 000.0mV across the fuse shows a good fuse and no amp draw.
Parasitic draws can be the most challenging automotive problems to diagnose. So it’s best to have a game plan before you start. Before you even break out wiring diagrams or test equipment, it’s a good idea to ask the customer under what circumstances the problem occurs. For example, does it only happen when ambient temperature is hot? Or cold? Only when the engine is hot? Or cold? Things like that can help you save time. It’s also a good idea to always check for TSBs before you dive into a problem.
The most important tool you have is not in your toolbox, it’s your senses and your brain. Obviously tasting isn’t a great idea, but your other senses are a good place to start. All diagnostics should start with a thorough visual and audible inspection. For example, don’t waste a lot of time looking for an electrical problem when the floor mats are soaked or there’s aftermarket equipment that might be causing the problem. You may have to pursue that first.
Sometimes the best “second step†is to call the customer and explain the condition. If they don’t want to address underlying issues, you’re done with almost no investment in time. Make sure you are authorized for your time before you start. It’s best to log and document every step you take to justify the bill. Take pictures. Print wiring diagrams from bmwtechinfo.com and write your notes on them. Print scan tool results. Besides helping to justify the bill, documentation makes it easier to return to where you were if you are interrupted.
It’s a “best practice†to perform a “charge/start system test†as part of initial testing. The test includes a battery test, alternator DC and AC voltage tests, alternator loaded output along with the starter current draw test. Any basic electrical system problems need to be repaired before going further. There have been times when computer related problems are actually caused by excessive AC leakage in the charging system corrupting the memories of the computers.
The same is true for induced signals inside a harness, especially a harness that has been modified. Always look for “previous work†and damaged wiring or connections. Maybe it has corrosion or broken wires that affect all or part of the electrical system. Sometimes that is the cause of the parasitic draw and the diagnosis is done. Also, current only flows when a circuit or system is “on†and under load. So testing only voltage available with the system off can cause you to believe everything is good when it is, in fact, breaking down under load. When testing voltage drop to powers and grounds, go to the load first. When testing computers, test at the computer plug.
The other area to address before actually getting to the “problem†is codes and residual problems. Connect a factory level (GT1 on the older cars, ICOM through bmwtechinfo.com or Autologic are typical) scan tool and perform a “short test.†As with the “charge/start system test,†problems here need to be addressed before continuing.
A classic example is an E90 328i that comes in with a lot of problems. The “short test†reveals 20 network, defective module (checksum) and voltage codes in 14 modules. Use the “short test†and those codes as a direction finder for how to progress. Does it have a new aftermarket battery? Is it programmed/coded as the correct type (lead acid or AGM) and the correct amp hour rating? Has it been registered?
Typically in a case like this, the “new†battery has already been cooked (it is often the wrong one anyway) and this has to be fixed first. Use BMW batteries because modern BMWs are sensitive to power quality. In a case like this perform a “software reset†while the old battery is out. This is done by disconnecting the battery and connecting the positive and negative cables together through a 10 ohm resistor for 15 minutes. Theoretically all stored power should release in milliseconds, but BMW recommends 15 minutes so any “latched†or controlled systems will draw down to zero. Also networks need “signal silence†for 15 minutes to reset.
To start discussing parasitic draw testing you need to understand the different types of test equipment, their strengths and weaknesses. Now it’s time to begin the actual testing. There are different ways of measuring current draw. The direct way is to use a digital multi-meter (DMM or DVOM) in series between either the positive or negative battery cable and its battery post. Typically these meters have a 10 amp slow blow fuse which is quite expensive. At very low amperage numbers however these meters are the most accurate and reliable way to measure current draw.
The indirect way of measuring current draw is with an inductive amp clamp. Inductive current probes take advantage of the unique relationship between current flow and magnetism. Electrical current produces a magnetic field in proportion to the current flow. Conversely, a magnetic field sweeping over an electrical conductor will induce current flow. That is the principle behind how generators and motors work. It’s important to understand this relationship to be able to correctly diagnose electrical issues. Most amp clamps are not very accurate below 50mA and they’re also sensitive to EMI (electromagnetic interference), so you have to keep things like drop lights and power cords away from them while you’re testing. Also, it’s important to zero the clamp when it’s positioned close to the actual wire which will be measured to cancel the interference.
The advantage of inductive current probes is that you can measure current draw without having to first disconnect anything from the circuit. The act of opening the circuit might make the draw disappear due to the “unlatching†of a computer driver or relay. The sophisticated way to measure current draw is to use a scope in flight record mode with an inductive amp clamp.

The setup screen on the Fluke 98, shown here, matches the switch position on the low amp probe. Now it will be on the correct scale.
Different current probes have different voltage output for the same amperage readings (they measure current, and output a voltage to the DVOM or scope in proportion to the current reading). Always make sure that you know exactly which scale you are on. For example, a 20mA rating which is a good number might look like a 200mA reading which would be excessive, and the reverse could also be true. Many scopes will have a setup feature that allows you to tell it which amp probe scale you are using so that the milliamp number on the scope is accurate.

This is a FLIR image of a relay that stayed on. Note it’s 149 degrees F!
Before you start actual “electrical†testing there is one other step you can take — a quick scan of the car with an IR (infrared) gun or FLIR (infrared imager). All current consumed has to produce “something†— light, noise, motion or heat. A quick scan might save tremendous time by locating the heat. Infrared imagers are dropping in price, but shop carefully. There is a wide range of features and accuracies in these tools.
The limitations of using infrared are related to access. If the FLIR can’t “see†the heat source, there won’t be an image. Also any other heat source or heat drain can be misleading so make sure the car isn’t in direct sunlight, over a heat source or subject to any type of external heating or cooling. Conventional FLIR images don’t look like “visual spectrum†images so there is a learning curve with an infrared imager. Some newer imagers overlay the infrared over a conventional picture to make component identification easier.
OK, there are no codes, the charge/start system is perfect, there are no visible heat sources and it’s time to start testing. To test with a DVOM, install an in-line fuse holder with a 7 1/2 amp fuse in series between the meter and the battery cable. That way if
the load exceeds the fuse rating, only the cheap fuse blows instead of the expensive one inside the meter.
Next hook up a jump pack to the jumpstart points under the hood. Open the doors, hood and the trunk but close all the latches so the car “thinks†the doors and trunk are all closed. This way you have total access to the car but it can be asleep. Place a shop rag in each closed latch as a reminder to prevent damage from someone closing the door or trunk lid on a closed latch. Depending on the symptoms, you may have to remove under dash or other covers for easy access to suspected components.

The amp probe can be on the positive or negative cable since the current is the same throughout the circuit. Negative cables are usually easier to reach.
Use an inductive amp clamp to make sure it’s asleep so you don’t blow the fuse right away. If you use a graphing meter or scope in flight record or min/max trend plot modes, the process of “going to sleep†will be clearly outlined. Be patient. Some parasitic drain problems are from modules being “pinged†repeatedly. That way, while the car is going to sleep you can be doing something else and see a record of how fast things were shutting down. This will also allow you to see if something is cycling the car back awake again periodically, a valuable bit of information. The training PDFs at the bmwtechinfo.com website (BMW Training) are an often overlooked source of information on network structure and system operation.

This “flight record†screen shows that the car went to sleep in less than 3 minutes and is now at 37mA draw.
Once you are sure that the current draw is low enough to use direct measurements, start the setup procedure. Disconnect, typically, the negative battery cable and install your DVOM in series between the cable and the battery post. Now disconnect the jump pack. The car is asleep on its own battery but the current is running through the DVOM.

Note the meter is hooked up between the negative battery post and ground.
Place your meter on the high amperage setting (10 amps max) with the leads in the amp plug (by the way, always remove the leads from that socket immediately upon completing the test so you don’t blow that fuse when you go to check voltage the next time you use the meter). If the amperage draw is low, say 40mA, you have an acceptable drain and it’s time to figure out what changed. If there is an unacceptable drain now, start the tougher part of the diagnosis.
Here’s the part where you have to make up your mind. What kind of testing are you going to do? If it’s a fairly large draw you can start by using a FLIR thermal imaging device or IR gun (Raytek etc.) to see if any of the fuses or modules are warm.

Note the test leads are disconnected and the voltage is wavering.
Unlike the first FLIR/IR gun quick check, this time remove cover panels for maximum viewing of heat sources. Be sure the vehicle is in an enclosed garage with no extra heat sources, wind, or other disruptions to the temperature. Covers have to be removed first as the FLIR or IR gun is only looking at the temperature of the surface directly in front of it. If you don’t find something quickly then go to doing voltage drop tests across the fuses with a second DMM so the first one can stay in place. This is done using the millivolt scale on a voltmeter and looking for extremely low numbers of voltage drop across the two terminals on the back of the fuse. First hold the leads in the air and you should see “ghost voltage.â€
Note the test leads are disconnected and the voltage is wavering.
This shows up on the meter as a low level, rapidly changing voltage number. It can be used to show an open circuit. Check your meter by touching the positive and negative leads together – you should see 000.0mV.

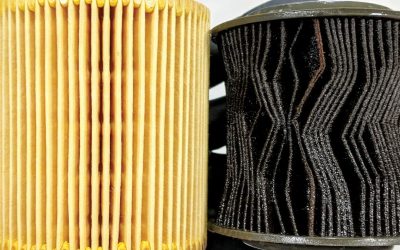
This test shows 000.6mV across the fuse which means there is an amp draw.
Once you connect the two leads to the fuse pins you should see a number, either 0.000 (just like the leads touching each other) for no current flow or some very low millivolt number that indicates a voltage drop across the fuse and therefore a drain on that circuit. If you still see ghost voltage when connected to the back of the fuse then the fuse is blown since there is no reading to indicate a complete circuit.
Not all circuits have fuses which are readily accessible, so if you still don’t find anything then it’s time to study the wiring diagram and figure out where the hidden stuff is. If you find a circuit that has a draw, look up what devices are on that circuit and generally use the strategy of looking for the easy stuff first. If it’s a tough one, then go to the wiring diagram again for locations of splice packs or other access points so that you can split the system and figure out which sub-circuit is affected. By disconnecting one terminal at a time from the splice pack it’s easy to find the offending circuit and then the faulty component or shorted wire.
Some of the hardest faults are intermittent problems. The first question that comes to mind with an intermittent problem is “are there any codes?†The second thing to consider is “under what circumstances does the intermittent problem occur?†If you can’t duplicate the circumstances it will be extremely difficult to diagnose the problem as it may never appear for you.
Sometimes, if it’s very intermittent, the cheapest diagnostic procedure is to replace a part. The problem with that diagnostic process is there’s an investment made with no idea of when or whether you will have a confirmation of the repair. This is a hard thing to sell to customers and can make the shop look unprofessional or incompetent. Also, on modern BMWs, modules may be VIN identified so they can’t be switched from one car to another for test purposes. In those cases you can’t just put it in the car, test it, and then put it back on the shelf or back into the donor vehicle.
If you suspect the module due to a trouble code or some other symptom, the first thing to test is powers and grounds to that module. Any problem in power or ground must be addressed before other problems can be taken care of. Test for voltage only with the module/circuit under load. Standard specs are no more than 200mV drop on powers, 100mV on grounds and 50mV on signals. Heavy loads will normally be higher. Healthy circuits will be much less.
Often times the power/ground is the problem. If not, there are two possible causes. The usual suspect is a bad control unit, but the other cause is some condition that keeps a control unit awake when it should be asleep. Those are the ones that can eat our lunch as an industry. So before condemning a control unit for staying awake, put a scope on any data buss that is tied to that computer and look for “communication,†which is a square wave or regular high/low waveform. Ring shaped busses will stop working when a control unit is removed, so the normal strategy is to remove the suspect unit from the buss and see if the parasitic draw is still there.
If the draw is still there, the controller is at fault. If the draw disappears, some other device on the buss is sending the signal. This is an area where you really need to read the system operation information in the training PDFs at bmwtechinfo.com. This may be the only source for this information, so make a habit of downloading and reading them whenever you are on the website. Star or hub and spoke busses can often have individual modules removed without crashing the buss. In those cases, the standard strategy is to disconnect one computer at a time until the problem stops. However you have to be careful. Only disconnect modules with the ignition off, and be careful not to damage electronics with static discharge. Wear a static strap when testing low voltage circuits. In CIP cars you may have to program or code other modules besides the “broken†one. When running a test plan always follow every step.
When you have found and repaired the problem you’re not done until you clear codes, drive the car and re-scan to confirm no other problems are lurking to bite you later.


0 Comments