
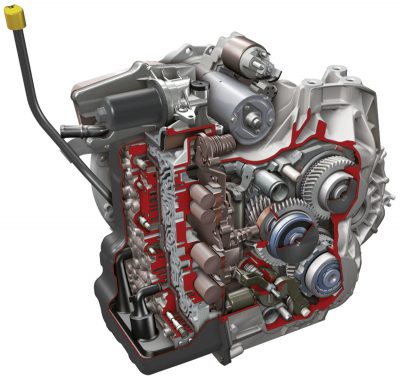
We at StarTuned have already explained the inner workings of the amazing 7G-DCT transmission, as found in the CLA and GLA front-wheel drive models. Nearly the same gearbox is used in several AMG models, like the GT – mightily beefed up, of course, but with essentially the same design. While we believe that knowing how it works is a critical step towards diagnosis, it is unlikely that you will ever have either a CLA owner or a GT-S owner come in with a gearbox problem. Let’s face it, these things are nearly bulletproof.
What you will see, and often, are owners of said cars asking for maintenance, like a simple oil & filter change. Taking the 2014 CLA model as an example, Mercedes-Benz recommends a transmission oil and filter change every 60K or six years, and a four-year-old car is likely to be approaching that mileage. Some of the AMG models, like the CLA43 AMG, call for trans maintenance every 30K. The point is, you’re going to start seeing these cars in your shop, and it’s time you learned about how to properly care for these gee-whiz boxes before you earn yourself the honor of buying your customer a new one.
Unlike automatic transmissions as recent as the 722.6, when doing something as simple as refilling the fluid you really need to follow the correct procedure exactly, or there’s a pretty good chance you’ll end up with too little or too much fluid. As you might guess, the wrong fluid level is bound to cause problems for your customer, and, by association, you.
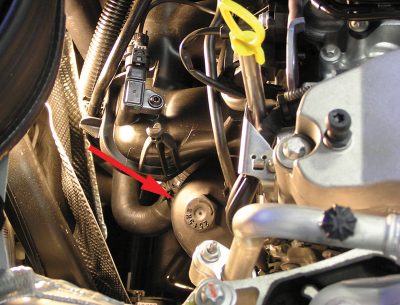
To start with, the 724.0 7G-DCT automatic transmission has two oil filters, and both need to be changed at the same time. The first one is more or less where you would expect it: In the oil pan. Of course, the oil pan itself is not where you expect: Instead of being on the bottom of the transmission housing, it’s on the front side, held on by eight screws. Other than the slightly odd location, it’s a fairly ordinary job to replace it, and access to the pan bolts is pretty good. The second filter is just above the oil pan, on the front top of the unit inside what looks like a shrunken engine oil filter housing. Unscrew that to get at the quite small cartridge filter.
As you might suspect, unscrewing the oil pan lets all the oil out. So you don’t get a soothing oil bath, there’s a drain plug (equipped with a permanent magnet to catch any loose swarf) located on the bottom of the transmission housing.

Looking at WIS document AP27.00-P-2702NK, “Automatic transmission fluid and oil filter change,†the first steps are done from above. Start by bringing the engine up to normal operating temperature (at least 176°F/80°C) and removing the key from the ignition for safety. Prop the hood open with the hood prop – well-understood by technicians used to working on Japanese cars, but quite unusual for Mercedes-Benz – and unscrew the small round oil filter housing. You’ll want to take out the air filter housing for better access. Just be careful with the spring clip for the hose: Never pull on the eyelet, or you’ll damage the spring. While you are still up top, remove the three screws from the top half of the oil pan.
Lift the car in the air, remove the under-body paneling (be sure to read the WIS instructions for an AMG model, or things will get broken) and the bottom section of the sound insulation, and drain the oil using the drain plug. Be sure to check the magnet to see the volume of metal shavings captured. For the first oil change, expect to see a bit of “fuzz,†a light covering of particles on the magnet from normal wear of new transmission parts. If you see any significant quantity at the first oil change, or more than a few particles in subsequent oil changes, it’s a sign that it might be time to look more closely for abnormal wear problems.
It’s a good idea to capture the drained oil in a container that allows you to measure how much came out. We’ll get to that in a moment. Once the oil is barely dripping, remove the five screws from the bottom half of the oil pan, and remove the old filter.
Clean the sealing surfaces of the oil pan and drain plug carefully and thoroughly with a perfectly clean, lint-free cloth. We all know that transmissions are very sensitive to even the smallest amount of contamination, and this unit is no different. We have found that degreasing the sealing surfaces with any kind of spray only leads to problems because it’s hard to keep the spray from going where it’s not supposed to. A good alternative is to spray the solvent onto a clean cloth and wipe the surfaces. We are fond of using 91% isopropyl (rubbing) alcohol for this — it’s inexpensive and does a super job.
After cleaning off the drain plug, check it for damage and (assuming it’s OK) reinstall it with a new seal ring. The work instruction states the tightening torque is 30 N-m, but you’re always well-advised to re-check the specs yourself.

Insert the new oil filter carefully, as it has two fittings that plug into the transmission housing. Reinstall the oil pan (a new gasket is mandatory) starting with the bottom five screws. As with transmission pan bolts since forever, with their ‘lighter-than-finger-tight’ torque spec, these are no different: If you don’t want the oil pan leaking, tighten to just 8 N-m and no more. Reinstall the under body sound insulation and panel and bring the car back to the ground.
Up top, install the top three screws and tighten them. Clean the oil filter housing, install the oil filter cartridge and a new seal ring, lubricating it with some new trans fluid. Tighten this to 25 N-m, the same as most oil filters, but again verify the number yourself in WIS. Reinstall the air filter housing, using some isopropyl alcohol as a rubber lubricant to avoid damaging the rubber guides.
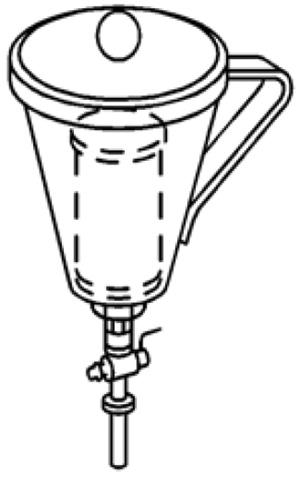
Unlock the oil dipstick tube cover and remove it. Note when reinstalling: The part number for the locking pin on the filler cap is A140 991 00 55 — keep a few in stock. Using a clean transmission funnel (like Mercedes-Benz tool W126 589 12 63 00), pour in about four liters of new fluid as a starting point. It is important to use a clean funnel, not just to be sure no particles get through, but to be sure that remnants of other kinds of fluid don’t get mixed in. If your shop has the practice of allowing the funnel to drain out after each use, you should be fine.
If you happen to be working on a CLA43 AMG equipped with engine M133, Model Year 2016 or later, you need to put in a transmission fluid additive (A001 989 94 03 09) following the instructions supplied with the additive pack. Failing to do this will lead to transmission damage. Put in the entire additive pack, and mark the dipstick cap with a white dot (signifying the additive was installed).
Now comes the hard part: WIS simply states, “Check oil level and correct if necessary.†Fine, but the devil is in the details. Taking a look at WIS document AR27.00-P-0100NKB, we see that the procedure is extraordinarily detailed and precise. According to one Mercedes-Benz engineer, there’s a very good reason for this: “This transmission is really sensitive to oil level, and under- or over-filling by as little as 50 milliliters can cause noticeable shift quality issues.†What this means is that you can’t just measure what came out and put the same amount back in, otherwise you risk a comeback.
The reason we measured what came out is to get a better feel for how much more we might need to add to get to the right level, but we didn’t account for the losses in the filters or through micro-leaks. That quantity is likely within 200 ml (1/5 liter) of what you need, but sorry, that’s just not close enough.
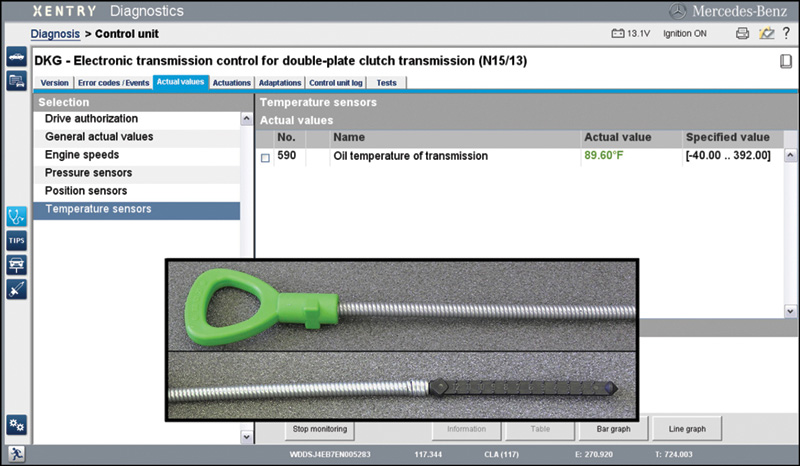
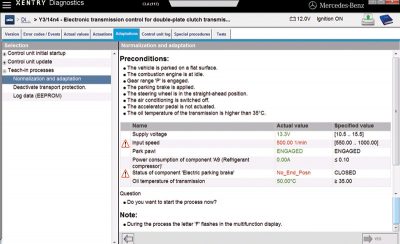
The key to success here is measuring the oil level at a precise temperature (plus or minus 3.6° F). The work instruction gives measurement values for either 40° C or 70° C, with a tolerance of only 2° C. To be clear, an oil temperature of 43° C is simply no good and will lead to an incorrect oil level. The Mercedes-Benz engineers aren’t fooling around, and you’d best heed their advice. XENTRY measures the oil temperature for you, so that’s the best way to be sure you are doing it right.
Before getting to the oil level measurements, you need to warm up the transmission oil. Since the transmission also needs to have any air purged from the system, call up the “Rev up†and “Purge†procedures in XENTRY and let them run. That should get you nearly to the right temperature, but allow the engine to run with the trans in neutral without touching the throttle, otherwise XENTRY might cancel the process and require starting over.
Once the oil hits 40° C, you have about two minutes to take your measurements. Using the special tool dipstick W168 589 01 21 00, check the oil level carefully at least three times. Add fluid (using the transmission funnel) as needed to get to the specified marking (50 ml of fluid will raise the level by 1 millimeter) and check the fluid level three times again. The correct dipstick reading is in the WIS document, and depends on both temperature (you can also measure at 70° C) and vehicle model. In the USA, the CLA250 and CLA250 4MATIC models both have the same values: Marking 4 at 40° C and marking 5 at 70° C (do we even have to say that you should verify this yourself?).
Adding the fluid (often more than a full liter) will cool down the fluid inside a little, allowing you to take that second (and hopefully final) measurement still at 40° C. The alternative is to wait for the temperature to go up to 70° C, or stop everything and restart it after allowing a while to cool down. But move fast because you don’t have a lot of time.
Once everything is set properly, reinstall the oil filler cap and lock.
The ATF used by the 724.0 has Mercedes-Benz specification 236.21. You can get this at your local dealer under part number A001 989 85 03 09. You can check for alternatives yourself at the Mercedes-Benz BeVo website (https://bevo.mercedes-benz.com/index.php?language_id=1).
NOTE: This site has specs for all Mercedes-Benz approved fluids, not just trans fluid.
Shell Oil sells an approved version under type DCT-M1, but we haven’t found anyone selling it in the United States.
Most of the time, that’s all the maintenance you’ll need to do.
Mercedes-Benz has issued a Service Information cautioning to avoid flashing the transmission control module unless specifically instructed by a technical document or XENTRY. If everything is working fine, don’t mess with it by flashing, or you might get yourself into a deep hole.
In those rare cases where everything is not working fine, there are a few things to try before digging deeper. The first is to check the fluid level, which you already know how to do. Remember how sensitive this automatic transmission is to oil level?
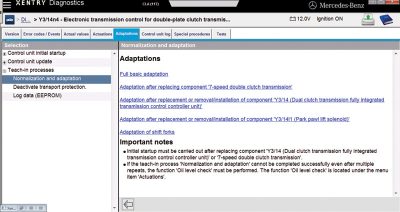
If there’s a shift-quality complaint, use XENTRY to perform a Shift Fork Adaptation. The transmission oil temperature needs to be raised to 35°C/95° F or higher, and you have to apply the service brake throughout the entire procedure. Once started, it runs automatically and takes only a few minutes to complete. It’s not harmful to perform this adaptation, so don’t worry if you’re not sure you really need it.
If there’s a more serious problem, it could be that the transmission is in limp-home mode. The customer will definitely get a message in the instrument cluster, along with a Check Engine MIL in most cases. Depending on the fault, limited driving can be available, since as we know from our previous article, the 7G-DCT consists of two sub-transmissions that are independent of each other. Since both sub-transmissions are required for Reverse gear, this gear might not be available.
Instrument cluster error message “Reversing not possible, Service Required†means just that, but allows for limited driving ability.
“Transmission malfunction, stop vehicle†means something more serious has occurred, and the car should be towed to the workshop.
“Transmission malfunction†alone, without anything else, means the transmission has overheated. If gentle driving, allowing the trans to cool down, doesn’t restore normal operation, suspect the electric auxiliary oil pump.
“Without gear change, service required†means a park pawl system error. The transmission will engage Emergency-P when the key is removed and will need to be towed.
For any problems you encounter, assuming the oil level is okay, the next step is to read out the Diagnostic Trouble Codes using XENTRY, which will give you your first clues as to the cause. In some cases, you may encounter an intermittent fault, which can be (temporarily) cured by cycling the key.
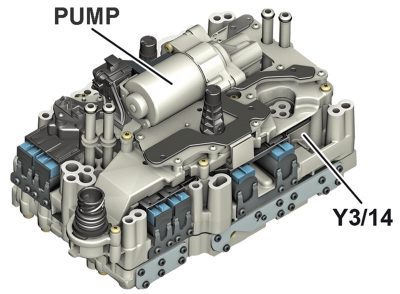
One last note: If you find yourself in the position of having to replace the transmission controller unit, you need to know of Service information SI27.00-P-0021C, which tells us that some vehicle equipment codes might be missing from the vehicle data card in the Electronic Parts Catalog. This will lead to identifying the wrong part number for the controller unit Y3/14, the control unit Y3/14n4, or the complete transmission. To be certain of ordering the correct part, read out the “MB Hardware Object Number†of the control unit Y3/14n4 using XENTRY (this is shown on the Quick test), and reference the information in the SI to determine the correct spare part numbers. Also, in the supremely rare case where you are replacing either of these parts, you really need to read the work instructions to avoid damaging the parts.
So that’s maintenance in a large nutshell. We can’t over-emphasize how persistent the Mercedes-Benz engineers were in describing the oil level check procedure. All we can say is that it will pay to do it right, because doing it wrong will surely cost you.
Download PDF 〉


0 Comments