

It’s a system shrouded in mystery and it’s easy to misdiagnose. Let’s take a look into the evaporative emissions system and the various DTCs that it can cause. Though it seldom causes noticeable symptoms, it’s still a system that needs attention. Whether it’s to protect the environment, to appease the state inspector, or just to turn off that MIL on the dash, a solid EVAP diagnostic understanding is a tool in your belt that will make you a more valuable technician.

Prior to EVAP monitoring, this canister would not directly cause a check engine light. Short of being physically damaged and causing a vacuum leak, you might never notice when it develops a fault.
In the automotive world acronyms run free and wild, but not this time. EVAP is actually not an acronym; it’s an abbreviation for EVAPorative emissions. EVAP, as we now know it, began with the inception of the OBDII standards in 1996. To sum it up simply, it’s a system designed to deal with the vapors generated in the fuel tank so as to not let them escape into the atmosphere, adding to pollution. Instead, the fumes are channeled into the intake manifold and burned, insuring none of the fuel is wasted.
The idea didn’t start in 1996; it can actually be found in vehicles dating well back into the 1960s. The monitoring of the system is what our concern became when OBDII was introduced. The previous systems seldom consisted of more than a vapor canister and some vacuum hoses. Now we have purge valves, vent valves, breather filters, multi-chambered vapor canisters, tightly sealed yet still vented fuel tanks, and a vast array of interconnected plumbing to contain the fuel vapors. The end result is an air tight system that ensures that even trace vapors of gasoline will find their way into the engine to burn.
Most of the time, the first sign you have an EVAP problem is the illumination of the MIL on the dash. A concerned customer may be wondering if their vehicle will leave them stranded. With rare exception EVAP problems will be symptom free, and often they will be driver caused.
A very common way the EVAP system fails is simply a loose or inappropriate (aftermarket, locking, etc.) gas cap. P0456 is the code for EVAP leaks. This is such a common problem that as of model year 2011 Nissan vehicles have their own special warning system on the dash indicating a loose gas cap. After a fuel fill-up the ECM monitors the EVAP system specifically to identify that the system is sealed. Should a vapor leak appear immediately after a fill-up the driver is warned with a LCD display “loose†or an amber light that looks like a fuel pump handle with a fuel cap missing. The fix is easy, just check the seal on the gas cap and either install it properly or replace it with a genuine Nissan cap. Aftermarket fuel caps are not that much cheaper than the factory part, yet often cause problems. It’s a good idea to start by looking for a factory cap when diagnosing any EVAP leak code. Other possible causes for EVAP leaks are rolled, pinched, or cut o-rings on the gas cap.
Maybe a little less known is that topping off at the gas pump can also cause a problem. This is simply misuse of the vehicle. As a safety feature, the pump and fuel tank are designed to work together to stop fueling when the tank is at capacity. Back pressure is created in the fuel tank when refilling reaches about 90 percent of the space in the tank. This back pressure is sensed by the fuel pump nozzle that will stop the pump with a loud click.

When the computer sets a code indicating the fuel tank pressure isn’t changing when it should, this quick test will verify the fuel tank pressure sensor is actually able to change. While observing the fuel tank pressure sensor PID, give the filler neck a quick shot of air. You should see the FTP value change quickly. Just remember, be gentle, you’re not trying to inflate the gas tank like a balloon.
At this point, well-meaning, intelligent people lose their common sense and continue pulling the pump handle trying to force more fuel into the tank. The result is that the 10 percent of the space in the fuel tank reserved for vapor is filled with liquid fuel that can and will find its way into the vapor lines and eventually saturate the vapor canister. This is worse than it sounds. The canister can eventually fail internally, sending charcoal debris through the system and potentially causing thousands of dollars in damage. This can also cause many pitfalls for technicians trying to diagnose an EVAP code.
As far as faults that will set a DTC are concerned, the EVAP system integrity testing is relatively simple, and falls into two basic types of systems; those that run the test when the engine is running and those that run the test when the engine is off.

Quickly confirm the fuel tank pressure sensor is actually working properly by applying a small amount of vacuum while watching the sensor voltage on the scan tool. A failed pressure sensor can fool the ECM into thinking the canister vent valve isn’t closed when it actually is.
The first uses the purge valve connected to intake manifold vacuum to draw negative pressure on the fuel system. This seals the system after the engine is turned off to create a vacuum as the fuel system cools. Both systems then measure the amount of vacuum decay and use that data to determine if the system is leaking. By either of these methods it is possible to find a leak smaller than a pin prick. The system will also test that all of the electrical components (solenoids, valves and sensors) are functioning. Simple, right? There are some later systems with a few extra components that increase efficiency but the basic idea is the same.
The EVAP system is designed to identify leaks, so many of the codes you’ll be diagnosing will involve finding these leaks. The most efficient way to find EVAP system leaks is to use a smoke machine. This device blows smoke-impregnated pressurized air into the system that will find its way to the leak. All the technician has to do is seal the vent side of the system and follow the EVAP lines with a bright white flashlight and identify where the smoke is coming out of the system. Many of these smoke machines also have a flow meter on them allowing you to identify how much of a leak the system has.
There are ways this method of testing can fail. Sometimes the leak can be small enough that it is nearly impossible to spot. An example might be a gas cap with a very small leak. The smoke machine has to push all the air out of the gas tank before the smoke will reach the leak at the cap. Intentionally filling the system with smoke before testing may help with this kind of problem. Connect the smoke machine at the service port or purge valve, then remove the gas cap to fill the system with smoke. When smoke comes out of the filler neck simply put the cap back on and start looking for that leak.
The smoke machine cannot always find the leak. It is possible to have a small leak that is only present under vacuum and does not show up under pressure. These are a bit more difficult to nail down. Using the divide and conquer method will often help you narrow in on your problem.
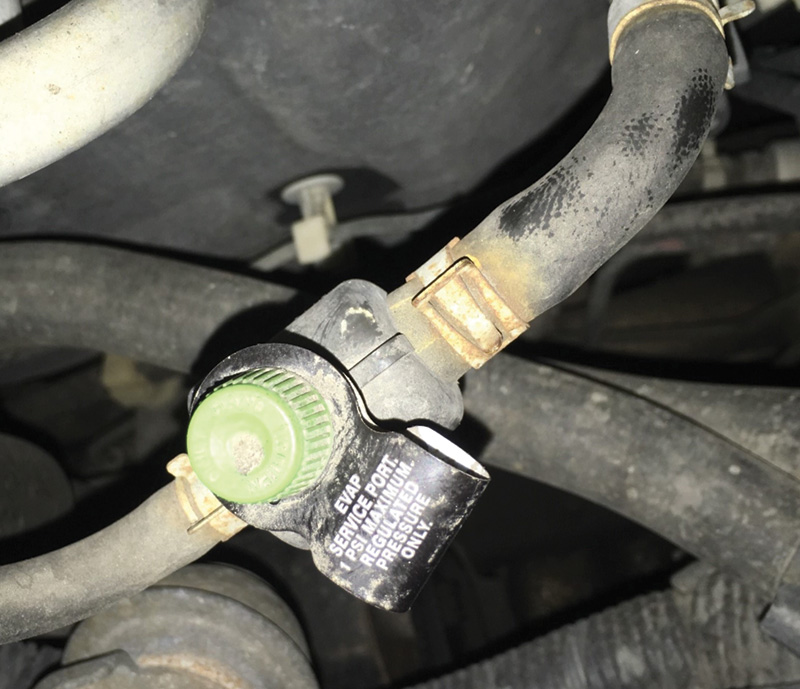
This is a port designed to give access for external EVAP emissions integrity testing and diagnostics of the system. Pay special attention to the warning as smoke machines that aren’t designed for EVAP can cause damage by over pressurizing the system.
Find a connection near the middle of the system, maybe at the vapor canister. Test one half of the system at a time by applying vacuum with a hand held vacuum pump. If the vacuum bleeds off you know your leak is on that side of the system. Next, find a connection half way through the side with the leak and test again. Eventually you will narrow your search to a point that you can either replace the leaking part or you determine that the connection you are testing is the point of the leak.
After the repair, put the system back together and confirm that the leak is fixed. It seems obvious but it’s important to re-test after the repair, even if you are sure you found the leak. It is possible to create another leak during the repair or testing process or have more than one leak in the system. Pay close attention to the valves at either end of the system. The vent valve, often mounted to the charcoal canister, has been known to leak under vacuum and seal under pressure.

Even at full pressure the smoke machine is indicating a significant leak, greater than 0.040â€. Simply follow your nose for the baby powder smell of the smoke, then narrow in on the leak with a bright white flashlight.
There has been some confusion lately about DTCs related to the EVAP system. As an example, code P0448 indicates a malfunction in the vent control valve. What makes this really confusing is that many of the aftermarket diagnostic tools and data systems will define this code as “EVAP system vent control valve short circuit.†In many, if not all cases, not only is this misleading as to the nature of the fault, it also won’t be the actual problem.
Common culprits are Frontiers and Xterras from the early to mid-2000s. The actual code for a vent control valve short circuit is P0447. Although some circuit problems may present with a code P0448, it is more likely an indication that there is a restriction in the inlet air of the EVAP system. The restriction could be a kinked hose, blocked filter (packed with dirt/dust), or a canister filled with liquid.
The reason we will see this code more frequently in the Frontier, Pathfinder and Xterra, for example, is in the nature of the vehicle. Dust, dirt, and water from off road driving are very likely suspects in a fault leading to P0448. In cars, a more likely culprit might be the vent valve itself. The least likely cause, in either case, is an actual circuit problem. Not to say it isn’t possible, just unlikely. Check for TSBs as well. 2005-2007 Pathfinders have a TSB (NTB07-060a) to upgrade the EVAP vent with a filter to prevent these kinds of failures.

Specifically designed to prevent water and dirt from entering the EVAP system, this filter is good but not perfect. Years of driving dirt roads, deep puddles and trails can lead to clogging and even a DTC. Keeping the nature of the vehicle in mind may lead you to a quick answer in your diagnosis.
The ECM sends the signal for the vent valve to open, then, using logic circuits, sees insufficient change in the fuel tank pressure sensor. The ECM sets the code P0448. Assuming a failed valve may get you a quick fix or you might find yourself explaining to the service writer why the P0448 code came back. Although a vent valve stuck closed may be the cause, so can a clogged vent filter, dust filled canister or even an obstructed vent hose. By simply disconnecting the vent hose from the vent control valve, one can simply blow air through the filter to check for any blockage.
A clogged canister can be a bit more involved. On vehicles like the Frontier, Pathfinder and the like, it’s easy enough to take the canister out and weigh it. Actual weight will differ between models, but a heavy canister means there’s stuff in it that shouldn’t be. Typically a canister should weigh less than 5 lbs. with the vent valve and pressure sensor attached.
On some vehicles it can take up to two and a half hours, (in a 2005 Maxima for example) to get the canister out to weigh it, so this might not be the first test you want to do. Blowing through the vent hoses may be a better method. In either case if dust, charcoal, water or liquid gasoline comes out of the canister or hoses, it’s time to replace the canister and look at how the foreign material got in there as well as clearing any debris from all the EVAP lines.
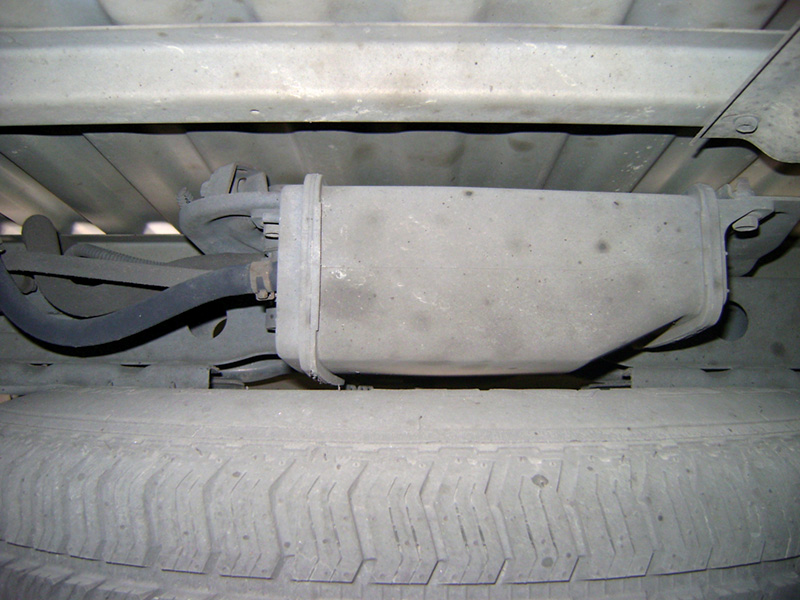
This Frontier has a charcoal canister that is relatively easy to access and weigh. When full of gas, dust, or water it can nearly double in weight, indicating it’s time to replace it.
The purge volume control valve, or purge valve, is the control device on the engine side of the equation. You will often hear this valve actuating with the hood open and the engine idling. After a minute or so of start-up you’ll hear a rhythmic ticking from the valve as the ECM pulses it on and off to create negative pressure in the EVAP system.
Issues with the purge valve typically fall into two categories; either it is open when it shouldn’t be, or it’s not open when it should be. Although it is possible to have a ECM failure in the purge valve driver, the culprit is almost always the valve or hoses to it. Occasionally you will find a wire harness problem, and there is an easy way to eliminate that possibility right off the bat. Using a noid light (usually for fuel injector testing) and commanding the purge valve on with your CONSULT III Plus, observe the light. If it flashes you know your wire harness and ECM are good.

Identifying the purge valve is easy, it’s the valve closest to the EVAP service port. This is where you will be starting to test for codes P0441-P0445. Three connections to this valve are the electrical connection to the ECM, the vacuum supply hose to the intake manifold, and the vacuum hose to the EVAP system.
After you have eliminated the wire harness and ECM as possible causes with the “noid light†test (or simply hearing the purge valve work, for that matter), testing the purge valve itself is pretty easy. Simply disconnect the vacuum hose to the canister side of the valve and connect a vacuum gauge in its place. To make it easy to identify, it is the side with the green cap inline.
Now start the engine and observe the vacuum gauge. If you have a significant vacuum reading and the valve is off, you are looking at a bad valve. Unplug the electrical connector to confirm there isn’t any possibility the valve is being activated inadvertently and you can be confident in condemning the purge valve.
The other side is just as easy, just command the valve on with the scan tool. If you don’t have vacuum you know the problem is either the valve or the vacuum source to it. It’s important not to assume the vacuum supply from the intake manifold is good simply because the hose looks good. Pull the vacuum hose off the purge valve and confirm you have good vacuum. At this point it’s safe to assume the purge valve has failed internally.
You can also test the electrical integrity of the valve with a simple ohmmeter. Since there are only two contacts on a typical purge valve, simply measure the resistance between them. Although the actual specifications may vary, if it’s between 10-20 ohms you’re probably OK. A valve that has failed electrically will most often read as an open circuit as opposed to an internal short.
One last parting thought to consider is the root cause of failure. Any time you find a failed EVAP valve or pressure sensor, it’s really important to look inside the valve and lines for signs of debris. As mentioned earlier, if the vehicle has been habitually overfilled at the gas pump, the charcoal canister can degrade and send charcoal through the system damaging the valves.
You may change a faulty purge valve only to have the customer return in two weeks with the same code stored when the charcoal in the lines damages the new valve. Noticing the debris will allow you to clean the lines properly, replace the vapor canister and even advise the customer about proper refueling etiquette with a very tangible handful of “this is why we don’t top off.â€


0 Comments