Hang pads? Most upscale shops have junked their brake lathes, but do you always have to replace those discs during a reline? Mercedes-Benz engineers give us the truth.
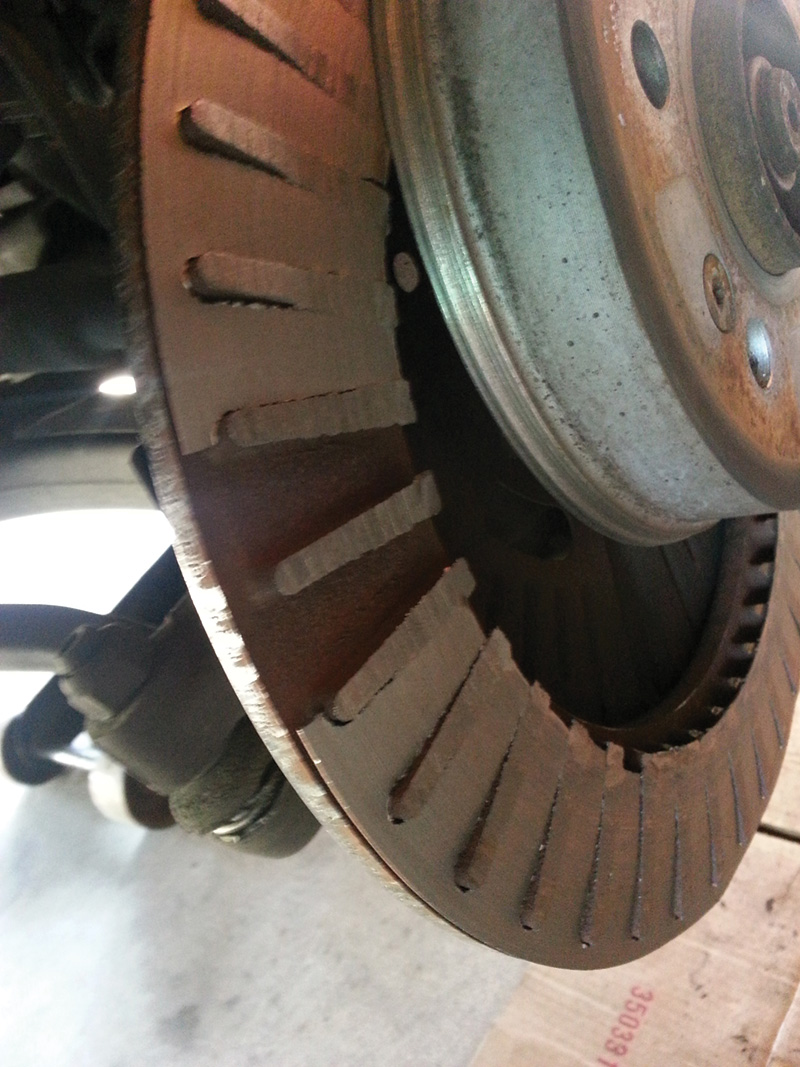
We’ve seen this kind of neglect more than once. NEVER let your customers get to this dangerous point.
From the point of view of easy work and profitability, some of the best jobs we see in the shop involve brakes. Aside from “A†and “B†services, nothing’s better. We’ve sold our customers on the benefits of brake fluid replacement – some only after a caliper froze up – and hanging pads is fast and profitable. Doing it wrong only saves a few minutes compared to doing it right, so let’s look at what it takes to keep our customers able to stop on a dime.
It all starts with brake pads, of course, but there is quite a bit beyond that. Before we start, though, let’s make it clear that we’re going to talk about typical brake systems with ordinary materials: No carbon fiber racing brakes today, sorry.
StarParts
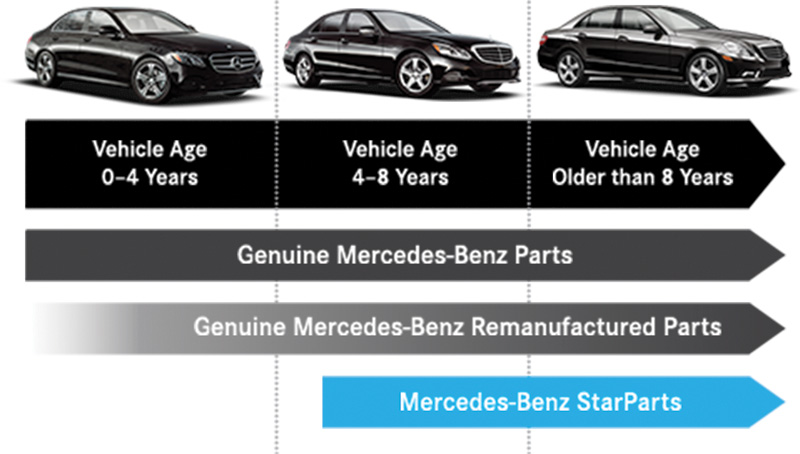
Mercedes-Benz StarParts are value-oriented alternatives for vehicles five years old and older. Parts available include brake pads and discs, wipers, filters, and spark plugs, and carry a one-year parts and labor warranty. Ask your dealer about StarParts.
The first step is to make sure you get the right pads. Sure, aftermarket suppliers can offer something that’ll work, maybe even made by the same OE manufacturer, but we’ve found that the genuine Mercedes-Benz pads always fit perfectly, are not likely to exhibit brake squeal, and last longer than the bargain brands. We’re not sure if you’ve heard, but Mercedes-Benz now sells an alternative line of parts, known as StarParts, that costs less, but still delivers the same performance and proven quality that Mercedes-Benz is known for. Indeed, StarParts might surprise you with its value, so be sure to ask your local Mercedes-Benz dealer’s parts professionals about them. They’re designed for models five years old and older, exactly describing many of the vehicles your customers drive.
According to Mercedes-Benz, StarParts are less expensive because they use alternative materials (such as copper instead of iridium for spark plugs), do away with extra features (such as the wear indicator for wiper blades), and focus on volume by reducing variants so the same part can be used across multiple models. While our shop splits the savings with our customers, this could be a way to offer exceptional discounts while still increasing your profit — a win-win.
Threads
So, once we have the pads in hand, it’s time to evaluate an often-overlooked component of the braking system: fasteners. In the typical brake system, we have several fasteners, most of which are specifically called out in the work instructions to be replaced each time they are loosened. Mercedes-Benz calls these “Single-Use Fasteners,†and has issued specific guidelines for them.
If we look at a new set of caliper bolts, we always see a little spritz of a plastic material, often blue in color, near the tip of the bolt. You might be tempted to replace this with a dab of blue thread locker, or more often simply ignore it and just retighten the bolts, but this is a grave mistake. First of all, you would probably agree that Mercedes-Benz stands for safety, and those Swabian engineers not only won’t compromise on safety, they also wouldn’t spend an extra “Pfennig†if they can get away with it. That’s true here, too. That blue plastic, Polyamide in this case, has different holding characteristics from liquid thread locker.
Scientific studies over the years have shown that even a properly-torqued fastener can loosen over time (improperly-torqued fasteners are even worse, so why aren’t you using a torque wrench already?). To compensate for this, thread-locking systems are used for critical fasteners. In the brake system, three particular fasteners that are designed for single-use only come to mind: The caliper bolts we just mentioned, the small screw that holds the brake disc to the hub, and, for some models, the sliding pins that guide the caliper along the frame.
We are not unaware of the realities of the repair business — it’s a rare day when we’ll stop a repair because of a fastener that looks nominally okay. But a word to the wise: The legal world is getting tougher every day, and who do you think they’re going to come after when there’s an accident? We’ve heard anecdotally of a shop that’s out of business now because a caliper bolt loosened and came out several months after the shop did a brake job. The customer survived the accident, but is now a quadriplegic, requiring constant nursing care. Think your insurance policy is big enough to cover that cost for this 34 year old mother-of-three for the rest of her life?
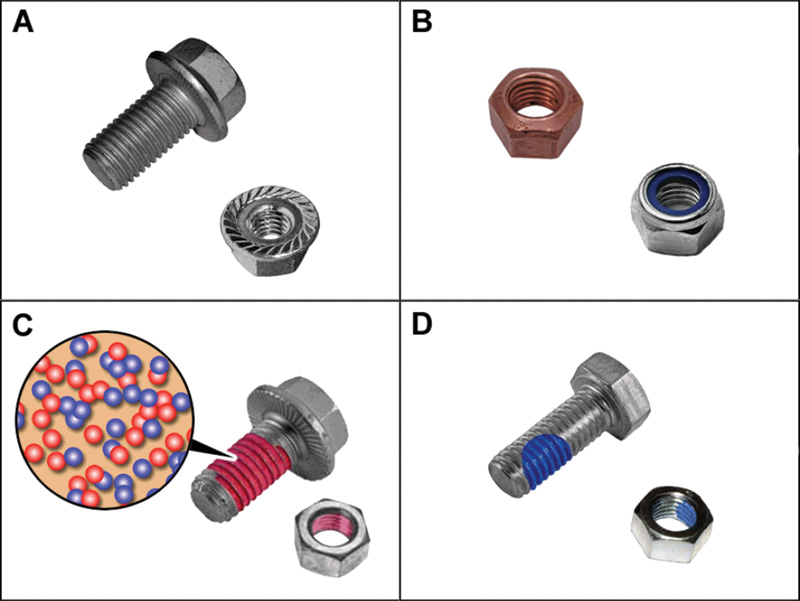
Mercedes-Benz uses four basic types of single-use fasteners: A. Locking splines B. Self-locking nuts C. Microencapsulated screws and nuts D. Polyamide coating. Types A, B and C must always be replaced after they have been used. Type D can be re-used if not damaged unless specifically prohibited in WIS. Be sure to review the WIS document AH00.00-N-0001-01A for an explanation of how to recognize and work with these fasteners.
All for the cost of four bolts, under $10. Studies have shown that customers who have fatal accidents generally do not come back as repeat customers.
Mercedes-Benz policy is that the technician should be able to recognize single-use fasteners (and this goes beyond brakes) and replace them every time they are loosened. The Workshop Information System (WIS) document AH00.00-N-0001-01A, partly reproduced here, explains what to look for and how to handle each type of locking system you might encounter. Also, in some cases the work instructions in WIS specifically state to replace a particular fastener.
In addition to ensuring the safety and durability of your customer’s car, and the good sense of following the manufacturer’s recommendations and instructions, the mandatory replacement of single-use fasteners is a source of profit. It might not pay for that safari to Africa, but it’ll keep the coffee pot full.
New discs?
Do those brake discs really need to be replaced? The answer to that is easier than you think. If the customer is not complaining about brake pulsation, juddering or other problems, AND the brake disc wear area is above the minimum service thickness, AND there are no cracks, scoring, or corrosion, then no, they don’t need replacement. But if you have a customer complaint, Mercedes-Benz does not recommend a brake lathe to “true-up†the discs — just replace them. It’s been this way for at least 30 years. As a side note, we’ve found the cost for a pair of new discs to be about the same as a set of pads, at least for the models we do most of our work on, so cost isn’t usually a concern. Also, you get to subtract lathe time from the price.
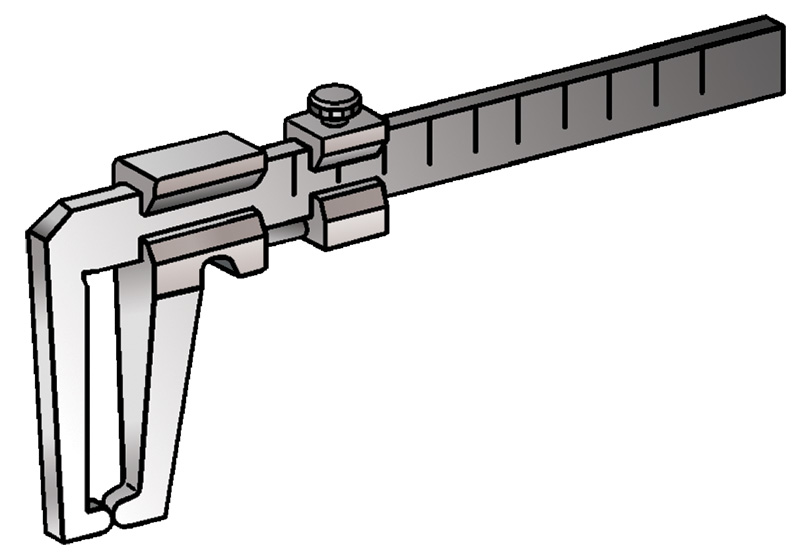
Mercedes-Benz offers special tool W140 589 00 19 00 to measure the thickness of brake discs. The “bumps†on the Vernier caliper jaws allow you to get past the edge lip and measure where the brake pads contact the disc.
We doubt that anyone working on cars does not know all about the concept of minimum brake disc thickness, but let’s cover it anyway because it’s important.
The manufacturer of a brake disc is obligated by law to mark the disc to show the minimum thickness of the wear surface. Any disc at or below this minimum thickness must be replaced, again by law. There is another measurement, known as the service wear limit, which is thicker than the minimum. This is the thinnest the disc may be during a brake service. This limit accounts for the expected wear of the disc during the life of the pads, so the disc does not fall below the minimum thickness before the next brake service. Too-thin brake discs can fail, by cracking or breaking under load, and lead to an accident.
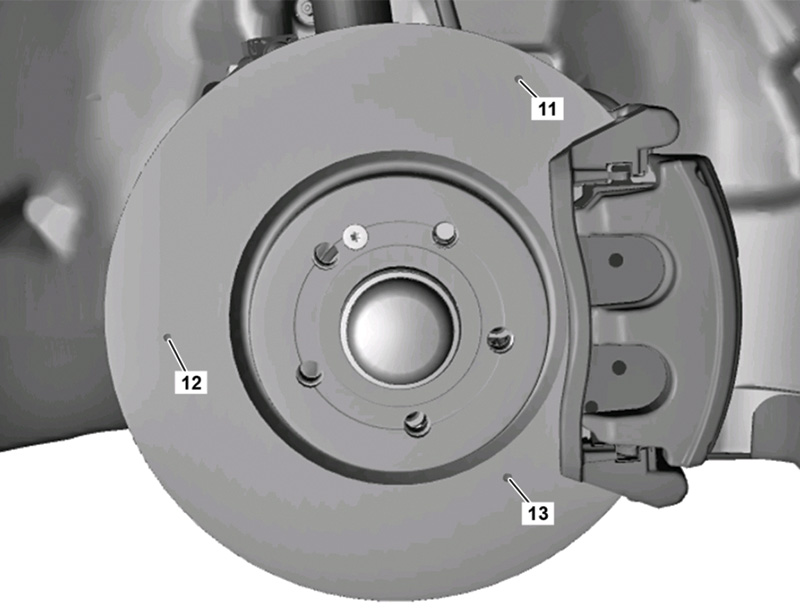
As of the Model 205 C-Class, Genuine Mercedes-Benz brake discs have three wear bores. The outer (11) and middle (12) indicate wear. As long as both are visible, new pads can be installed (assuming no other problems). The inner bore (13) indicates the absolute wear limit. If visible, the disc can still be used (again assuming no other problems) with the current pads, but new pads may not be installed.
At every brake service, you always need to measure the brake disc thickness. Mercedes-Benz sells a special tool to help with this, but is not the only source. Always make sure you’ve zeroed-out the caliper, then measure the wear surface thickness, preferably in a few places. Compare your measurements to the minimum thickness stamped or engraved on the disc “hat,†and replace any at or below the minimum. Also check in WIS for the minimum service thickness, which is somewhat thicker than the minimum, and again replace anything that’s too thin.
In newer Mercedes-Benz models, specifically Model 205 (C-Class) and onwards, brake discs with wear bores were introduced. Check the three wear bores: If only one wear bore is visible, the disc can still be used with the current brake pads, but new pads may not be installed. If all three wear bores remain visible, the disc may be used and new pads installed (in both cases, as long as it has no other problems, of course).
Composite rotors
In practice, we have found brake discs to be okay for two sets of pads. There are exceptions, of course, but most of the time every other brake job needs new discs.
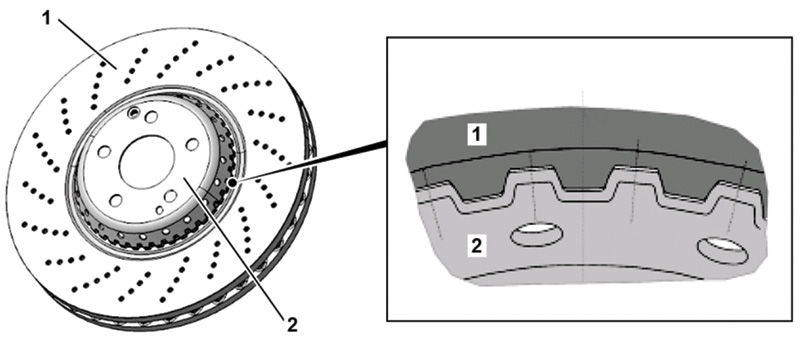
A composite brake disc consists of the wear plate (1) and a steel “hat†(2). They are joined by a splined connection (inset) that is very strong in the direction of rotation, but which can become disconnected with improper handling such as impact, rough treatment, or trying to turn the steering using the wear plate.
We’re all familiar with steel brake discs, and since they were invented they generally came in two types, solid and vented (some of which are cross-drilled), although some exotic types such as ceramics do exist. More recently, Mercedes-Benz has come out with a new type, which is known as the composite brake disc. In composite construction, the wear portion of the disc is the familiar steel or iron casting, while the central “hat†is made of stamped steel. This allows for a much lighter rotor, improving not only unsprung weight (and ride comfort), but also fuel economy and emissions.
These composite rotors need to be handled with far greater care than the traditional type:
- Never carry them by the hat or central hole, only by the outside rim.
- Always leave them in their packaging box until just before installation.
- Never allow them to be treated roughly, or set down on the hat.
- Protect the anti-corrosion coating of the hat, and avoid impacts or scrapes.
- Avoid shocks or impacts to the brake disc.
- Never use the brake disc to turn the wheels against steering resistance.
Improper handling can damage these discs and make them unusable.
Process and cleanliness
Removing brake pads is usually straightforward, especially if you follow the manufacturer’s instructions in WIS. Before we start, we always put on a dust mask. We don’t know about you, but we’re tired of blowing black gunk from our noses for a day or two after a brake job, and this stuff can’t be doing your body any favors. There’s no asbestos in brake pads any more, but a dust mask is a small price to pay for comfort. We like the ones that have two elastic straps and carry at least NIOSH N95 rating, but you should research your own Personal Protective Equipment (PPE) needs.
The first step is always making sure the brake fluid reservoir has enough head room to accommodate the brake fluid you’ll be pushing back into it, although opening the bleeder and routing the old fluid into a bottle as you push the pistons back will reduce or eliminate that. Depending on the model and brake system, you’ll probably remove a spring clip, remove the sliding bolts or caliper bolts (depending on the type of caliper), and retract the piston(s) far enough so that the pads can be slid out. If the outer pad has a brake wear sensor, disconnect that first. Transfer it to the new pads at your workbench if it’s in good shape.
Use the Mercedes-Benz brake caliper piston retraction tool to push the piston(s) back into place, flush with the caliper. Be extra careful to avoid pinching the rubber piston bellows with the tool during the process. Avoid using a pair of screwdrivers, big pliers, and other home-grown methods to retract the piston: Just a little extra pressure on one edge or the other can tilt the piston in the bore, ruining it. The tool is relatively inexpensive, lasts forever, and works like a charm.
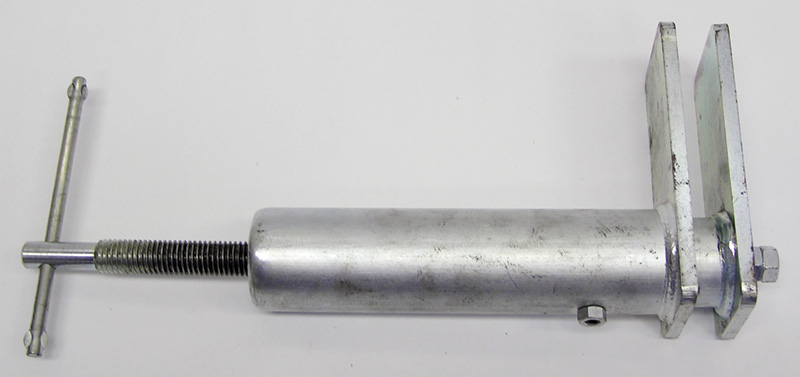
If the piston is reluctant to retract, it’s likely rusted internally and frozen in place. Get a new caliper. Some vehicles allow the replacement of a single caliper, while others mandate that both on the same axle be replaced at the same time. Check WIS.
Also remember to discuss the importance of brake fluid flushes every two years with your customer, because
it is the absorbed moisture in the fluid that causes rust on the internal parts of the brake system. Today, it may be the caliper, but eventually those brake lines and other components could fail, especially those expensive ABS components.
Check the brake disc thickness and, if at or below the service wear limit, lift off the caliper, supporting it carefully with mechanic’s wire to avoid causing external or hidden internal damage to the brake hose, and remove the worn disc.
Now is a good time to clean things up, a step we have seen ignored by many shops. With a steel brush and a HEPA vacuum cleaner to help manage the dust, brush away the built-up grime, corrosion, and dust. In an ideal world, the caliper, carrier and surrounding components should be as clean as new when you’re done. Of course, be careful to avoid damage to the rubber brake caliper piston boot. With the same brush, scrub the corrosion off the wheel hub to preclude mounting errors that can lead to wobble, and also the inside mating surface of the wheel.
With everything clean, put on a new set of gloves and install the new disc, using a new disc bolt. There’s the temptation to re-use the old one – after all, with a wheel mounted it can’t come out – but remember that paraplegic mother of three? Cheap insurance for about a buck.
Finish with a flourish
Following the WIS instructions, apply the correct brake grease in the correct locations, then reassemble the caliper and pads to the axle. Don’t forget the brake wear sensor, if equipped. When reconnecting the wear sensor, be sure to route the wire correctly. It should not be able to touch any metal parts, especially the rotor, even when the pads are nearly worn out. Take a second to make this right, otherwise your customer will return with a brake wear indicator lamp on when the wire makes contact with something it shouldn’t.
Triple-check your installation, and tighten all the fasteners with a torque wrench. Re-install any dust caps. Before putting the wheels back on, do a quick visual check of the area. Do the tires need to be rotated? Any shock absorber damage or leakage? Cuts on the inside of the tire sidewall? Suspension components okay? No damage to the bellows? Remember, your customers are likely not an automotive expert like you, so they count on you to look for anything that might keep their most valuable possession, their car, safe and reliable (some may argue that your house is your most valuable possession, but your car gets you to work so you can afford that house. In a pinch, you can sleep in your car, but your house can’t get you to work. Safe and reliable is why customers come to you, and not the quickie-lube for their work.)
Reinstall the wheel, starting the screws by hand. In our shop, we run them in with a battery-powered screwdriver and finish the job with a torque wrench. While torque-limiting extension bars might seem like a good thing, and we guess they are better than a plain extension on your impact gun, they can’t match the accuracy of a torque wrench. Your customers will appreciate your doing it right if they ever have to change a flat tire.
Anyone can hang pads, and anyone can go above and beyond to do it the right way. In most cases, your customers might never even be able to tell the difference, but writing out the details of what you did (including your inspection of other components, and your findings) on the repair order will make sure they know you took the time and care to do it right. And that kind of service will keep them (and their friends) coming back, again and again.
\ Download PDF 〉 \

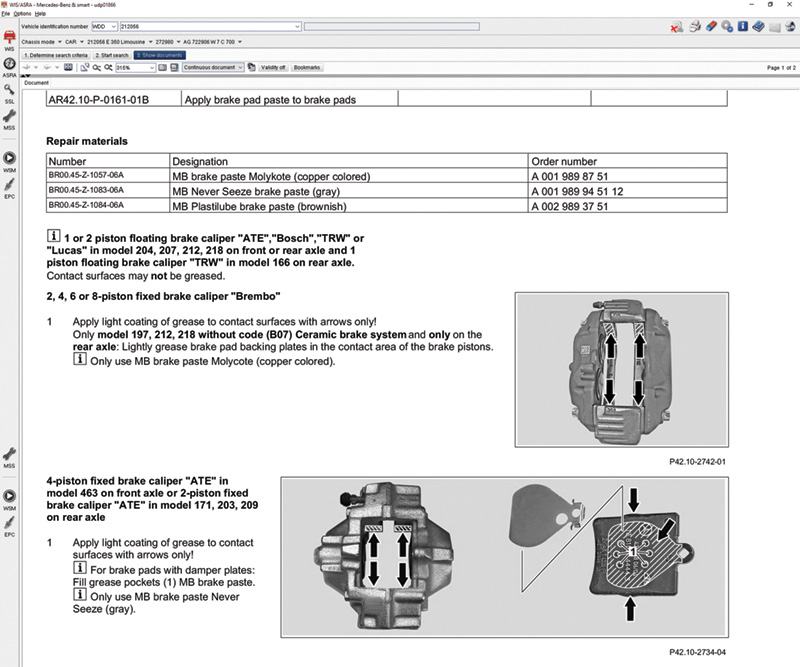 A part of the WIS document explaining the how, where, and what of greasing a caliper. Not all systems use grease, and greasing incorrectly can lead to noise and other troubles down the road.


0 Comments