
The secrets of perfect installation of movable glass.
Some of our customers don’t care about wind noise, but a few are extraordinarily picky. We don’t blame them, either. They’re driving a Mercedes-Benz, after all, and the interior should be as quiet as a church. Most of them, however, get really upset with water leaks, and understandably so. Both of these annoyances are often caused by the same issue: mis-adjusted glass. Let’s take a look at both finding and fixing these often elusive problems.
Sedans and wagons rarely have wind noise complaints, mostly because the doors have a full frame around the windows that supports the glass at all four edges, minimizing the chances for any kind of gap to open up and cause a problem. Coupes, cabriolets, and roadsters are a different story: They depend on the pressure of the glass against a compliant rubber seal to prevent air and water leaks, and this pressure comes from a correctly installed and adjusted glass window.
Movable roof systems add to the complexity, since the soft top or hard top can also fall out of alignment and open a gap. We’ll take a look at a few different models, but, of course, our usual advice to look up the correct procedure for your specific vehicle in the Workshop Information System (WIS) still applies.
Before we can correct the adjustment of door glass, we need to find, unambiguously, the exact location of the air or water leak. Complicating things are the facts that air noises can appear to be coming from places far from the actual source, and that water drips downhill, but is also influenced by the movement of the vehicle so can appear to be coming from a location also far from the source.
The key to finding the leak is to duplicate the customer’s use conditions. Press the customer to give you the symptoms and operating conditions as carefully and precisely as possible. Of course, this is a standard technique that is needed regardless of the type of repair, but it is especially important with these kind of harder-to-find complaints.
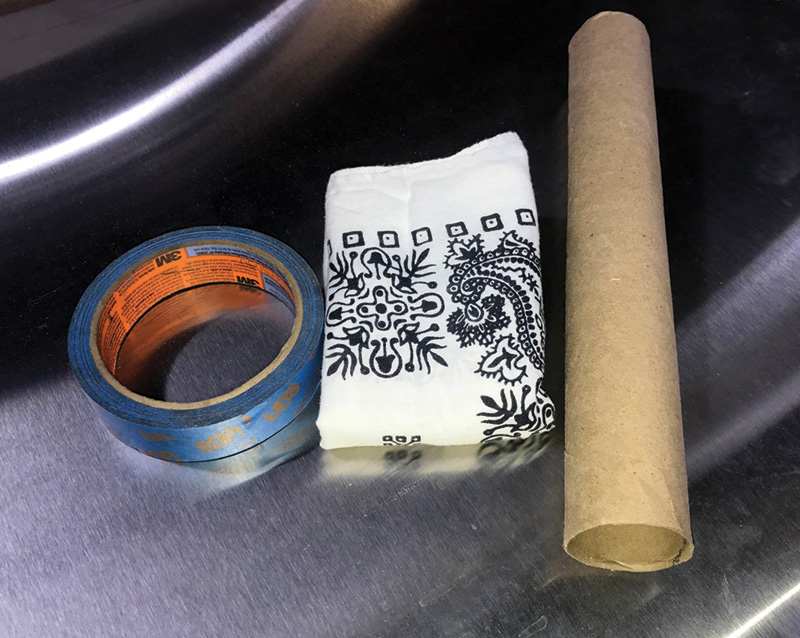
If possible, take a test drive with the customer. Bring along a handkerchief and a cardboard paper-towel tube: The handkerchief is used to cover suspected leak areas, which will noticeably dampen the noise. The tube is used as a hearing aid to better pinpoint the source of a leak. Of course, have the customer drive the vehicle while you use these tools — nothing’s worse than crashing your customer’s car. Likewise, when you’re troubleshooting after the customer has left, have someone else drive so you can focus on the leak and he or she can focus on driving. Just like texting and driving, doing this kind of work alone is extraordinarily dangerous, to both you and others on the road.
Another part of your diagnostic toolbox is a roll of wide painter’s tape. Use this to mask off seams around the glass, doors, mirrors, anyplace that can contribute to air noise. Tape is also useful for water leaks to temporarily waterproof an area while water testing.
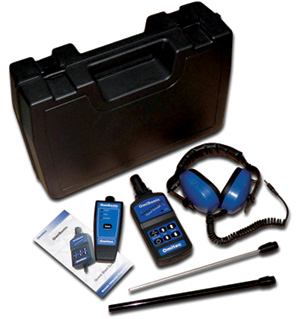
Mercedes-Benz recommends the use of an ultrasonic leak detector for finding leaks. The typical method is to place the ultrasonic transmitter inside the vehicle and use the detector and headphones to listen around seams and gaps. Since the ultrasonic sound waves have a smaller wavelength than normal audible sounds, they “fit†through tighter gaps and will help you locate even the tiniest leaks.
The Mercedes-Benz recommended kit is the OmiSonic Ultrasound Diagnostic System. Included in the kit are not only the ultrasonic transmitter and receiver with headphones, but a variety of sound probes to focus the search as closely as needed. There are other, similar, choices on the market, in varying price ranges, some under $100. For a shop that might need to find a leak (including in vacuum, pressure, and fluid lines) the better-quality systems are worth the money, but for occasional use you can often get away with a cheaper tool.
The ultrasonic tool can also help find water leaks, as the gap needed for water to get in will always be larger than the gap needed for air to cause a problem. In many cases, though, a good water test can help a lot. There are a few tricks we’d like to share with you when conducting a water spray test.
The first is to try to find the leak without water. Water is obviously wet, and needs additional precautions that a visual or ultrasonic test does not. Then, line the inside of seams with paper towels, held in place with that painter’s tape. This is not only to keep the interior of the car from getting wet, but to help visually verify the leak. The large rolls of continuous paper towels often found in restroom dispensers are best because the type of paper shows water much better than household paper towels.
During the water test, spray a small area – maybe just a foot long – with a forceful stream of water for at least a minute, then wait several minutes to see if water has penetrated into the car. If you spray everywhere, you really won’t accomplish much other that verifying that a leak exists because you can’t be sure where the leak is coming from. If you go slowly and do it right, you’ll only have to do it once, meaning time will be saved.
Before we leave the topic of troubleshooting, we have to remind you of the possibility of clogged drains: The A/C box drain, the sunroof drains, and any engine compartment drains should always be checked since even in a sedan this can be the cause of a wet floor mat.
In a roadster, before performing any window glass adjustments, make sure that both the door and the hard top are correctly adjusted. The door is checked by looking at the body gaps, which should be even and flush around the door. The roof profile is checked with a template available as a special tool borrowed or bought from your local Mercedes-Benz dealer. Don’t skip this step because with an incorrect roof profile it is impossible to adjust the windows correctly.
Once we have the door and the roof squared away, it’s time to deal with the seals. Check them by eye and by touch for even the slightest imperfection. Replace anything that’s not quite right. By the way, this goes for windows in full-frame doors as well. Feel the window channel with a finger tip, and if you find a high or low spot, take care of it. This is also the technique for automatic closing windows that self-reverse at times. Find the imperfection in the window channel and correct it. Back in the days of the W140 S-Class, the first model with automatic window closing, we remember a service bulletin suggesting the use of a “hard wooden wedge, such as oak, to open the window track†if needed. An armstrong method indeed.
The next step is to put the window into what is known as the “Basic Position.†WIS describes the exact method and measurements for each model, but the procedure is usually about the same, and does not always require you to remove the inner door panel. You’ll find the work instructions for “Adjust crank window on front door†in service group 72. Basic tools you’ll need include a body feeler gauge, painter’s tape, pencil, measuring calipers, a very long T25 driver, and the special Concentric Socket Wrench (W209 589 00 09 00).
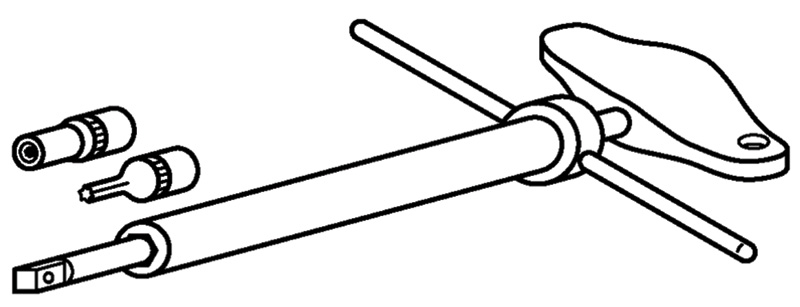
This wrench is absolutely worth buying, even if you use it only once. It’s a socket for the locking nut that is concentric with the bit for the adjustment screw. Tightening the locking nut after adjusting the screw requires the screw to be held in place, nearly impossible without this tool, and trivial with it.
Here we’ll outline the procedure for a Model 207 E-Class convertible, as explained in WIS document AR72.10-P-1950EC, but other models are similar, differing mainly in their precise dimensions, but some models have a somewhat different procedure depending on how the window lifter mechanism is configured. Once you start the procedure, you have to go all the way through it to be sure the window is fully adjusted.
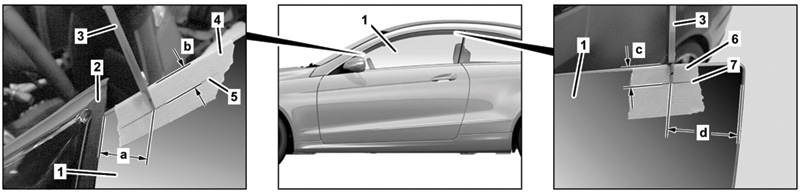
The first step in the E-Class is to remove the window sealing rails and the inner door lining. Refer to the image “Adjustment bolts.†Remove the “duct tape†sealing circles (3, 5) from over the adjustment bolts (4, 6) and, with the door window switches temporarily reconnected, lower the front window until the bolts can be seen through the holes.

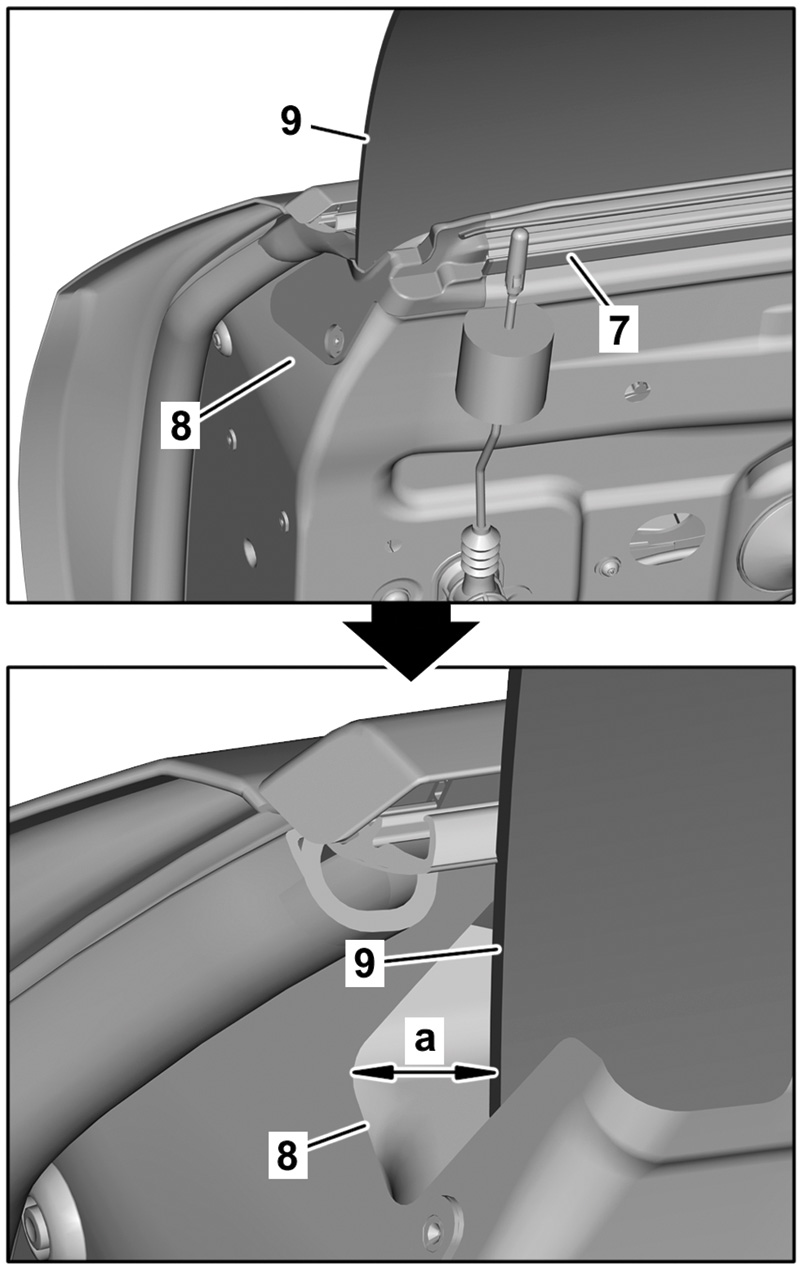
Set the basic position in the “X†direction by measuring the gap from the very rear of the window glass (9) to the edge of the metal door frame (8) as shown in the image. Dimension “a†should be 16.5 mm as measured with your calipers. If it’s not correct, loosen the adjustment bolts and move the window so that the dimension is 16.5 mm, then retighten the bolts. Replace the sealing circles and, reconnecting the door switch, completely close the window to complete the Basic Setting.
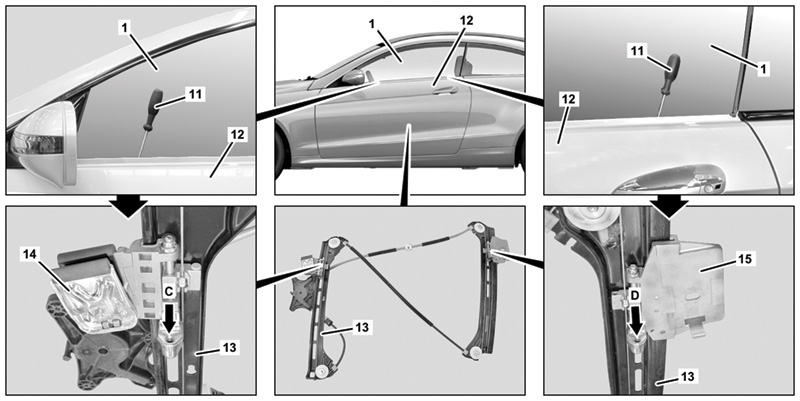
Next, adjust the glass height, the “Z†direction. Start by marking some reference lines on the glass. Put a piece of painter’s tape near the front top edge of the glass, and another near the rear top edge of the glass. Measuring down from the top, mark a line (“bâ€) 10 mm down from the top edge, about 25 mm from the mirror triangle rubber molding at the front, and a line (“câ€) 10 mm down, about 40 mm from the rear edge. Close the front door, and with the window switch connected, close the glass completely. Then open the door, causing the glass to move downward slightly to the ‘short stroke’ position, and disconnect the door switches.
With the glass in this slightly lowered position, close the door and use an 8mm feeler gauge to check the distance between the rubber roof seal and the line on the tape. Starting with the front, turn the adjustment screw, if necessary, to achieve a distance of 8 mm. Repeat for the rear. The adjustment screws for front and rear are accessed through the gap between the outer door skin and the glass, along the window track, down several inches. Clockwise lowers the glass, counterclockwise raises it.
Once the adjustment is correct, reconnect the window switch and move the window up and down several times. With the glass raised, disconnect the switch, close the door, and re-check the adjustment. When all is set properly, remove the tape from the glass and proceed to the tension (“Yâ€) adjustment, which is the tilt in and out.
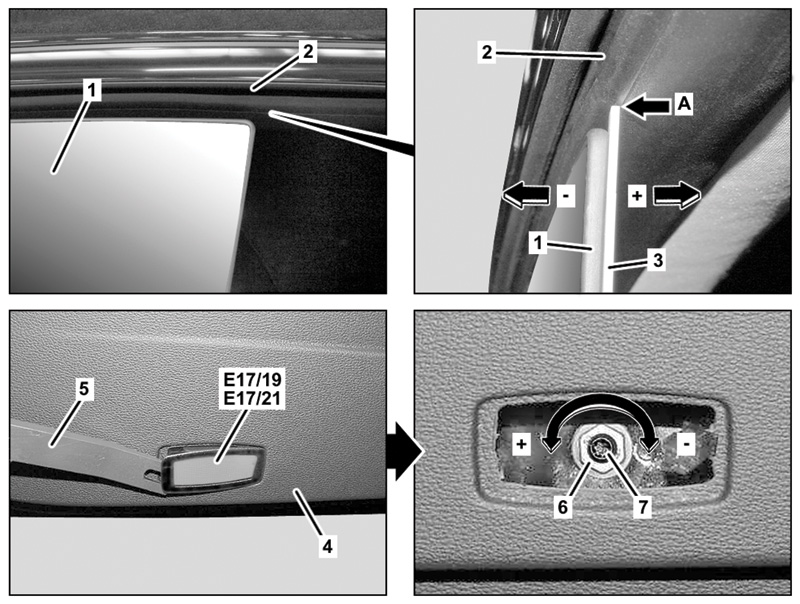
Reconnect the window switch and move the glass a few millimeters below the short stroke position so it does not move up when closing the front door. Disconnect the switch and close the door. Measure the distance near the rear corner of the glass from the inside of the window glass (1) to the inner edge of the groove in the top sealing frame (A) using a feeler gauge (3) as shown. For the 207 Coupe, the dimension is 2 to 3 mm, while for the cabriolet the dimension is 6 to 7 mm. If adjustment is necessary, open the front door and place the concentric wrench on the adjustment screw (7) and locking bolt (6). Note that this is also accessible without removing the inner door panel by removing the door-mounted lamp (E17/19 for example) by prying at the rear.
Loosen the locking nut while holding the adjustment screw steady, then turn the adjustment screw, clockwise to move the top of the glass outwards (-), and counter-clockwise to move the glass inwards (+). Once the adjustment is correct, hold the adjustment screw steady and tighten the locking bolt to 9 Nm. You’ll be opening and closing the door a few times as you make this adjustment.
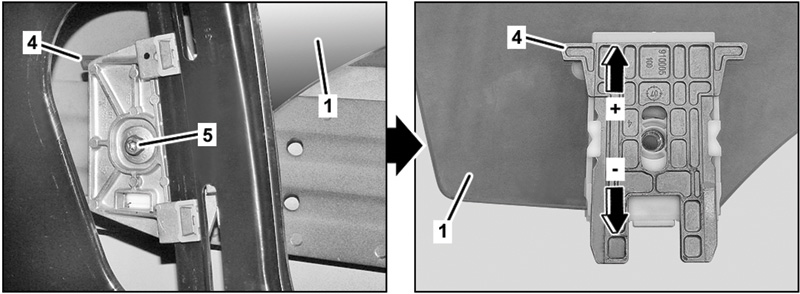
If you feel the adjustment screw is starting to get tight, stop! It only moves so much, and forcing it will strip the threads. If this happens, the wedge shim (4) on the rear of the window lifter mechanism must be adjusted to get enough range for the screw. Loosen the bolt (5) and move the shim up to move the glass outwards and down for inwards. Retighten the bolt (9 Nm) and repeat the adjustment screw procedure.
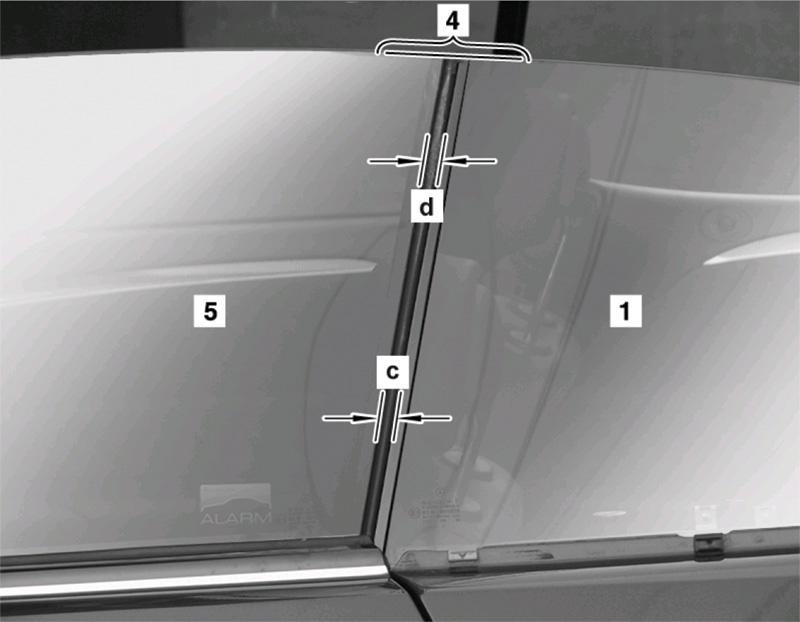
The last step is to adjust the rear window glass to meet the front window glass, if necessary. Close both side windows completely and check dimensions “c†and “dâ€. The dimension specification is 9 to 10 mm for both. If this needs adjustment, there’s a fairly involved procedure to follow, detailed in WIS document AR67.30-P04200-05EA.
We hope this introduction to movable glass adjustment to address wind and water leaks has been informative and helpful. By its nature, the process is somewhat complex and, thankfully, rarely needed. We chose the 207 E-Class model because this process is very typical of these adjustments, but each model has its own specific dimensions, settings and procedures, so please consult WIS to find the ideal method to use for the vehicle at hand.
Download PDF 〉


0 Comments