
Designed to make the unauthorized use of the vehicle difficult or impossible, the DAS has been proven to reduce vehicle theft. Here’s how it works.
Since 1992, some kind of electronic immobilizer system has been installed on Mercedes-Benz vehicles. Designed to make the unauthorized use of the vehicle difficult or impossible, they have been proven to reduce vehicle theft. Named Drive Authorization System (DAS), Mercedes-Benz is currently in the 6th generation of the 4th major version of these systems. In this article, we will explain how the system works to aid in troubleshooting. Here’s how it works.
The electronic SmartKey was introduced with DAS3 (3rd generation), an electronic key that completely eliminated the mechanical tumblers in the ignition switch. New generations of DAS4 have eliminated the ignition switch, in favor of a button on the dash, a system called KEYLESS START. DAS4 was first introduced in the 231 (SL) in early 2012, and was adopted by Models 166 (GLE/GLS), 207 (E-Coupe/Cab), 212 (E-Class) and 222 (S-Class) as of Model Year 2014. In vans, DAS4 was introduced with the Metris in MY 2015 and the Sprinter as of MY 2019. All subsequent new models are equipped with DAS4 now.
In German, the term Fahrberechtigungssystem (FBS) is directly translated as Drive Authorization System. In some of the Mercedes-Benz literature, you may see it referred to as FBS, although DAS is used most often. Don’t confuse this with the Diagnosis Assistance System (DAS), which is a version of the diagnostic software used with older vehicles in the XENTRY Diagnosis system.
The Two Sides of DAS
In principle, DAS has two nearly independent functions: vehicle access and engine starting. In DAS4, vehicle access uses radio frequency (RF) signals exclusively, unlike DAS3 which also used infrared light. As an emergency function, two lock cylinders, one for the driver door (beneath a cover) and one for the trunk, also allow vehicle access.
Engine starting is accomplished when either the vehicle key is inserted into the Electronic Ignition Switch (EIS, or in German EZS) or the key is located within range of the vehicle and the Engine Start button is pressed. The DAS4 system performs its communication routine and, when all involved control units agree, the engine is started. More on that in a moment.
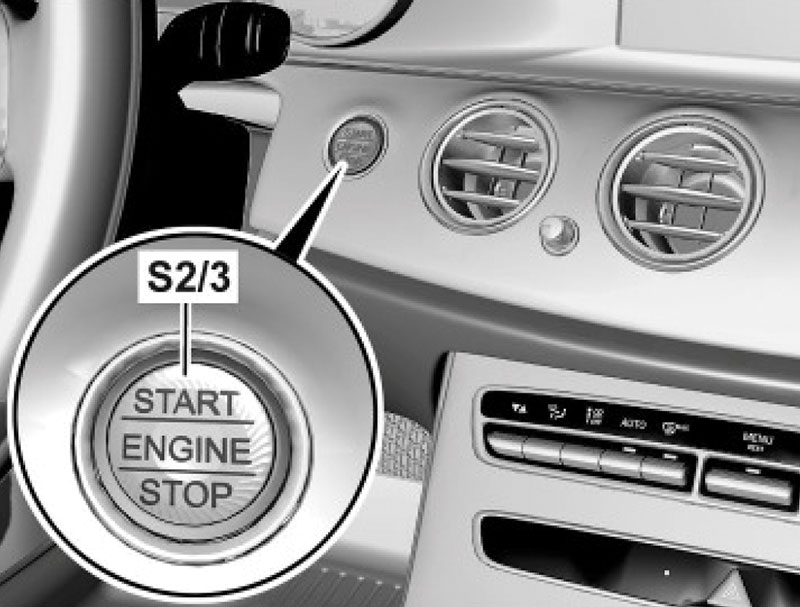
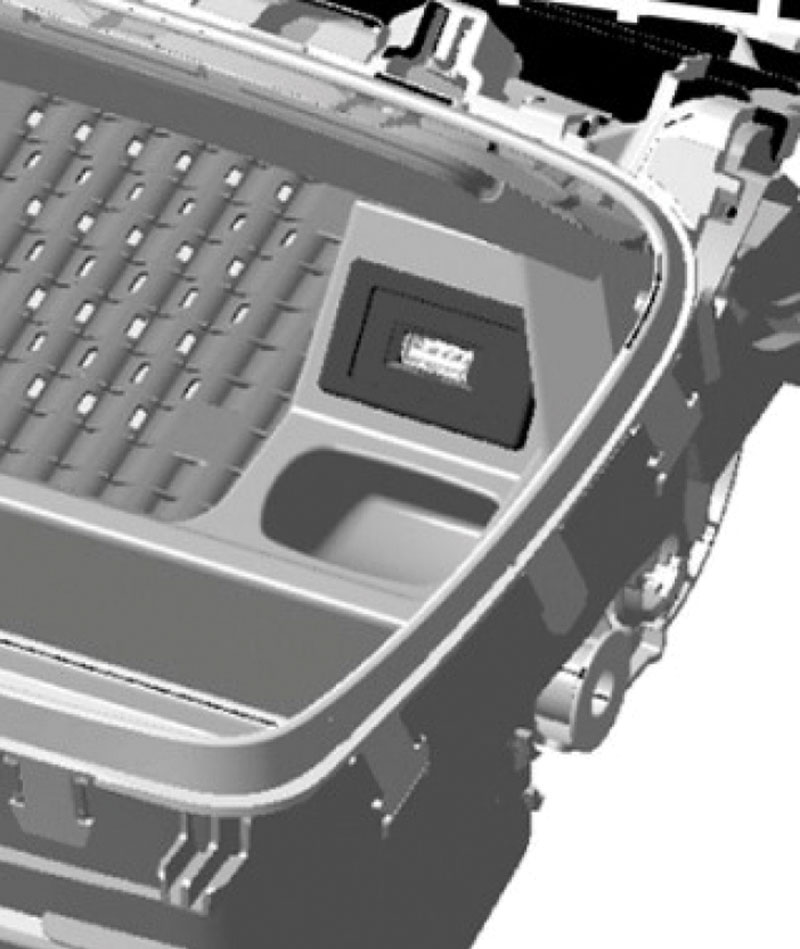
In earlier versions of DAS4, the engine-start button is a simple piece of plastic, with no electronic functionality at all, that can easily be removed from the EIS, revealing the familiar SmartKey slot. Starting with the model 213 E-Class in model year 2017, the button is a permanent part of the dashboard, and the EIS has been relocated to the driver’s footwell, inaccessible to the customer. Mercedes-Benz calls this DAS4 Generation 6. To allow for vehicle starting even with a depleted key battery, there is a special position in the console, near the ashtray, where the key can be placed.
System Design – Engine Starting
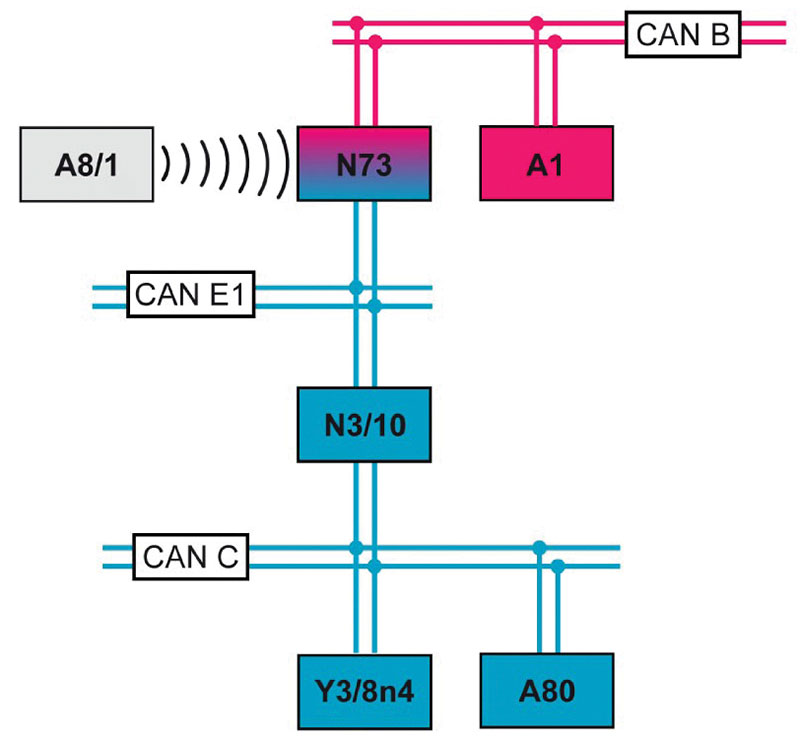
DAS4 is a composite system of five control units, each of which has a unique role in the overall system. Aside from the SmartKey, these control units are all networked via CAN Bus and share encrypted messages. We will take a brief look at each of these:
- Electronic SmartKey (A8/1)
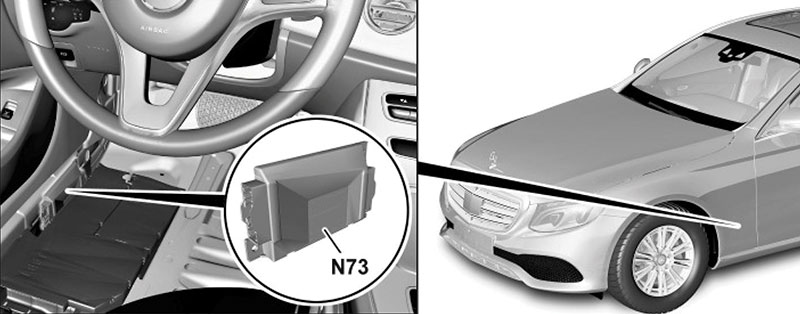
- Electronic Ignition Switch control unit (EIS, N73)
- Engine control unit, ME-SFI or CDI (N3/10 or N3/9)
- Fully-integrated transmission control unit (ETC, Y3/8n4)
- Intelligent servo module (ISM, A80)
- The Instrument Cluster, while not TRP, also participated in the DAS4 system
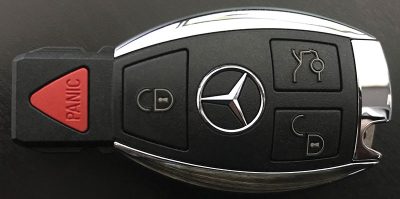
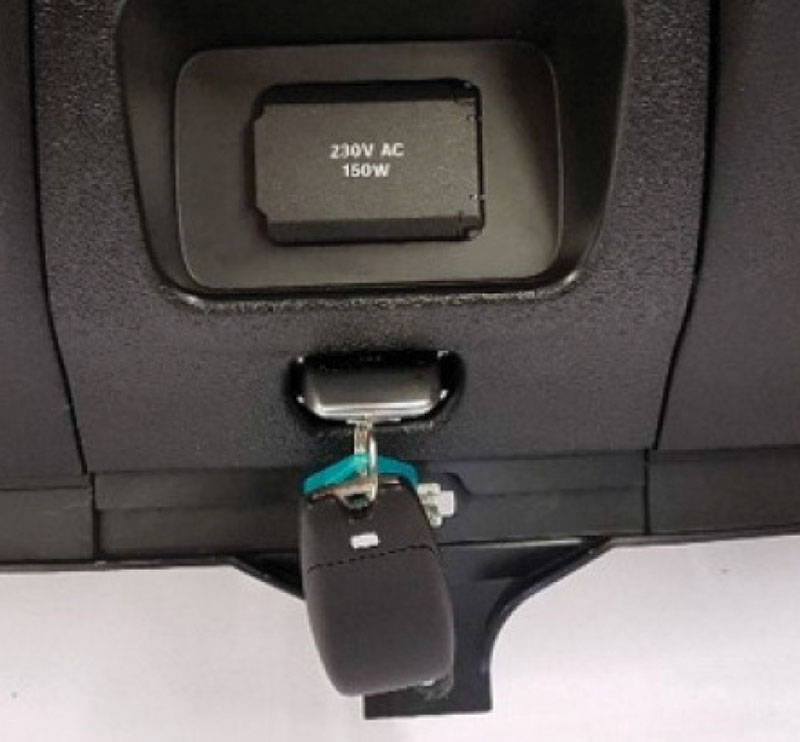
The SmartKey transmitter key is similar in appearance to the DAS3 key, but with updated internal electronics having greater security and computational speed. The SmartKey has several functions, such as locking and unlocking the vehicle, as well as starting the engine, which is what we’ll focus on here. More details are found in the vehicle owners manual.
Before we move on to engine starting, here are a few common troubleshooting tips concerning SmartKeys:
If there is any complaint involving key function, ask your customer to bring in all available keys. That way, you can isolate a faulty key, or be sure the correct key number is ordered as a replacement.
If your customer complains that the key has reduced range or is inoperative, check the battery (a single CR2032 button cell). Press and hold any key button: After a brief pause, an LED will light briefly to verify the battery is good. When replacing the battery, avoid touching it, since skin oils can interfere with electrical flow. We use a clean paper towel to handle the battery.
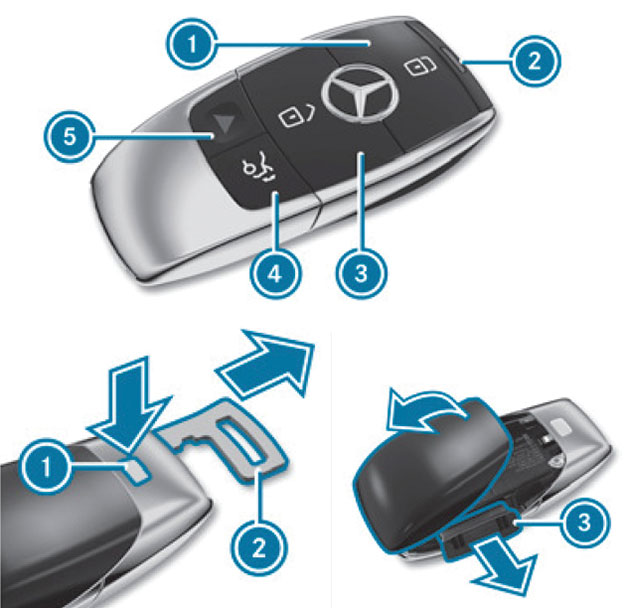
The Generation 6 SmartKey has a KEYLESS GO disable function: Pressing the lock button twice disables KEYLESS GO until a button on the key is pressed. If the lock button is pressed twice inadvertently, your customer may not realize it and complain that KEYLESS GO stopped working.
Electronic Ignition Switch
The Electronic Ignition Switch (EIS) has two basic forms: DAS4 Generation 5 (Gen5) has an EIS that looks just like the DAS3 EIS, mounted in the dash. The Gen6 EIS is mounted in the driver’s footwell, inaccessible to the customer, and the engine-start button (S2/3) is mounted in the dashboard.
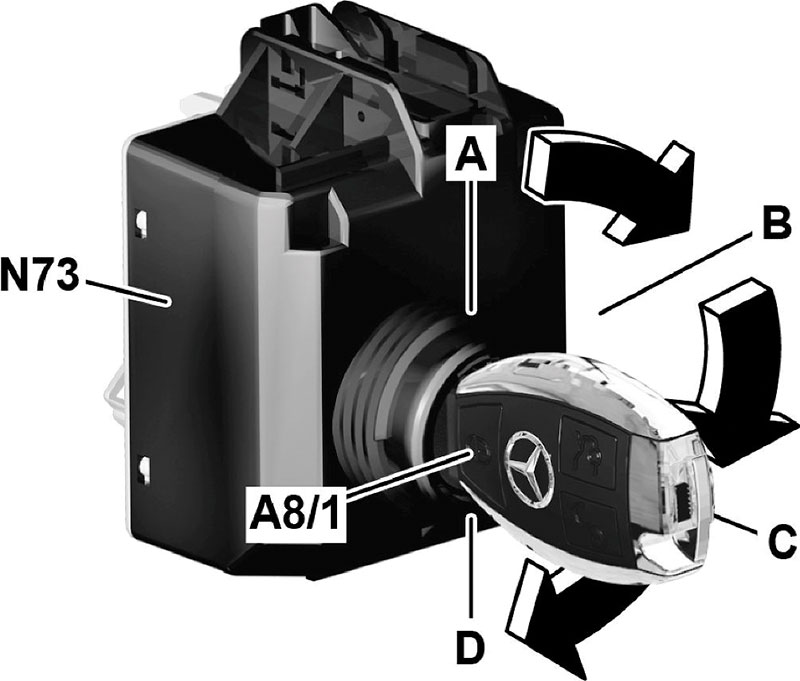
The conventional EIS has four positions, labeled A, B, C and D in the image to the right. When a SmartKey is inserted into the EIS (Position A) Circuit 15C is switched on. The inductive coil surrounding the key is energized, providing enough energy for the key to send its code to the EIS through an infrared LED in the tip of the key. The EIS receives and decrypts this signal in a fraction of a second, deciding if the key is correct for the vehicle. If the key is not correct, a message is displayed in the instrument cluster.
When the key is turned to Position B, Circuit 15R is switched on. The status of Circuit 15R is communicated to control units via the interior CAN Bus and chassis CAN 1. Most accessories are then available for use, such as the radio and power windows.
If the key is turned to Position C, Circuit 15 is switched on. Again, this is communicated via CAN. At the same time, the EIS sends a coded number to each of the other DAS4-relevant control units in turn. The control unit perform a calculation on the number and sends the result to the EIS. The EIS compares the answer with its own calculation results on the same number and, if they match, that control unit is released for operation.
The actual communications are encrypted and somewhat more complicated than described. Although one can see these messages on a CAN bus, it is of no value: As long as normal CAN Bus diagnosis methods (voltage measurements, no short-to-ground or -power) show no faults, it is safe to assume the CAN Bus isn’t the source of a problem.
The last step in starting the engine is to briefly turn the key to Position D: This energizes Circuit 50, engaging the starter and starting the engine. The Circuit 50 signal is sent redundantly via discrete wire and CAN Bus signal to the ME-SFI (or CDI) control module, which ultimately controls the starter. The redundancy helps ensure the engine can be started, but a fault will set a diagnostic trouble code.
Button Starting
If the engine-start button is inserted into the EIS, its behavior changes. Vehicles with the Generation 6 system behave the same way: With the brake pedal NOT pressed, the first button press is equivalent to Position B, and the second press equivalent to Position C. If the brake pedal is pressed, the first push starts the engine. In both cases – position C or engine running – another push switches the ignition off.
In the Gen 6 system, the encrypted data is exchanged between the EIS and SmartKey at the first press of the button using Radio Frequency signals: The EIS wakes up the SmartKey using the KEYLESS GO or KEYLESS START antenna system, and the key responds by transmitting its data to the EIS. If the SmartKey does not respond, a message appears in the instrument cluster: “Place key in marked location.†There is a hidden inductive coil in the stowage compartment, although the exact location may vary between models. Laying the key there allows the vehicle to be started, although there is a short delay — a few seconds — while sufficient energy is delivered to the SmartKey for it to be able to respond.
Note that many newer models incorporate the KEYLESS GO system within the EIS. Refer to the Workshop Information System for model-specific details.
Process differences between DAS3 and DAS4
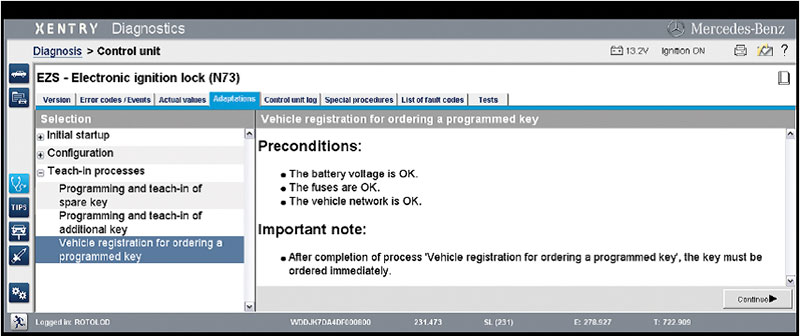
For a replacement EIS, the blue programming key (known from DAS3) is not used: Instead the programming of a new EIS takes place with your XENTRY Diagnosis system and XENTRY Flash access.
Unlike the pre-programmed keys used with DAS3, in the DAS4 system, keys are programmed in the vehicle, using XENTRY Diagnostics and requiring special programming rights, only available to select dealer personnel. A two-step process is used: First, the vehicle must be ‘registered’ to the online Daimler server using XENTRY Diagnostics, which anyone with a XENTRY system and a working key can do. Then, within 72 hours, the new key must be programmed, but this requires special permissions.
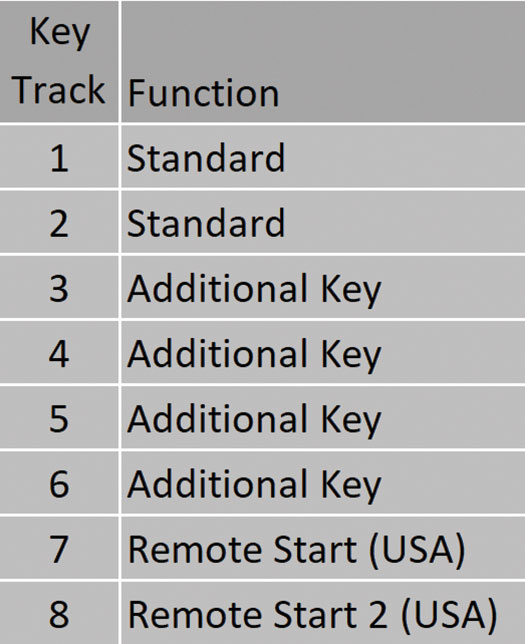
As with DAS3, there are a maximum of 8 keys (‘tracksâ€) that can be active at any moment, and a total of 3 copies of a track can be made. Speak with your dealer to determine which replacement keys can and cannot be ordered. It helps to know which keys you already have, which can be determined by inserting each key into the EIS and reading out its track number using XENTRY Diagnostics.
In the case where all keys are lost there is no way to switch the ignition on and therefore the vehicle cannot be registered, the dealer can use the so-called Fallback Process: After completing a small pile of paperwork, Daimler performs the registration, allowing a key to be programmed. A pre-programmed key can also be purchased, but again, even MBUSA cannot program a key at their Parts Distribution Center until the vehicle has been registered. Of course, the mechanical key blade is still cut at the PDC.
So if it seems like your dealer is giving you a hard time on ordering a key, they aren’t — the process is just a little more complicated.
Replacing DAS4 Components
If a careful and complete diagnosis proves that a new Electronic Ignition Switch, Engine Control unit, Transmission Contact Plate, or any other DAS4 component is needed, you can of course bring the vehicle to your local dealer to have the work done, but if you are a registered Vehicle Security Professional (VSP) using the Secure Data Release Model (SDRM) administered by the North American Service Task Force (NASTF), you can buy any of these parts from your dealer and install it yourself.
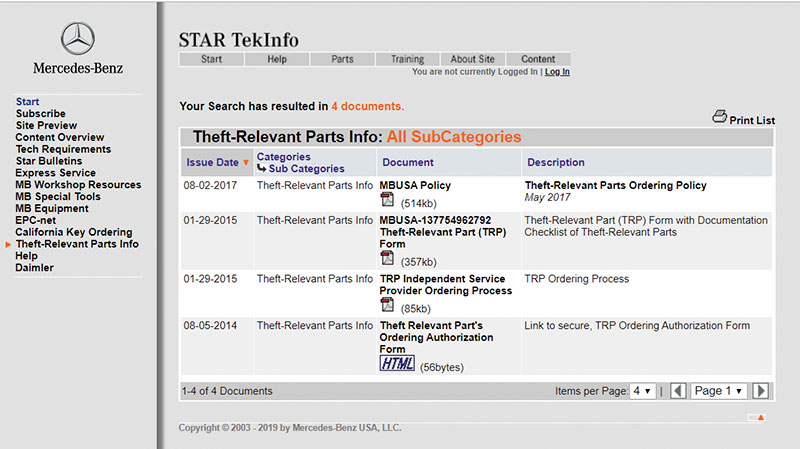
According to the MBUSA TRP policy, VSPs can buy the following parts ‘over the counter’ by submitting a parts purchase request via the startekinfo.com website. You can also find the policy document there. Just visit the website and click the Theft-Relevant Parts Info link.
- Electronic Ignition Switch (EIS/EZS), including those with integrated central gateway
- Electronic Steering Lock (ESL/ELV/ESCL)
- Electronic Selector Lever module (EWM/ESM)
- Transmission Control Unit for 722.9 (VGS, TCM) including the 722.9 Repair kit
- Intelligent Shift Module (ISM)
- Engine control module (ME-SFI, CDI)
Note that all other TRP items, aside from keys, may be sold ‘over the counter’ to any vehicle owner or authorized representative. It should go without saying that certain paperwork is required, but only what is needed to ensure that no crime is being committed and you can positively identify yourself.
OK, so you bought a new DAS4 thingamabob and you want to install it. Although the complete procedure is explained in the Workshop Information System, the short version of the process goes like this:
- Purchase and install the new component. Return the old one to the dealer.
- Program the new component using XENTRY Diagnostics and online XENTRY Flash rights (standard for all users of XENTRY Diagnosis systems obtained through Mercedes-Benz USA).
- Perform version coding of the component.
- Personalize (teach-in to DAS) the component.
Ordering TRP
We at StarTuned have heard stories of other Independent Service Providers (ISPs) having to jump through hoops to buy TRP from their dealer. It doesn’t have to be that way.
First off, if the part you need isn’t restricted to Vehicle Security Professionals (VSPs) as listed in the MBUSA TRP Policy, just visit your dealer with the correct paperwork and buy it. Couldn’t be simpler.
If the part needed is one of those that is VSP-only, you can become a VSP. While we admit the process of registering with NASTF (nastf.org) may appear difficult, it really is not. Read the info on their website, watch the videos (there are dozens!), complete the registration forms and send it all in. After a few weeks – there’s a background check involved – you’ll get your VSP credentials.
Honestly, anyone in the car repair business should do this. VSP credentials are not limited to Mercedes-Benz. Virtually every automotive manufacturer in the United States uses the VSP program as the basis for selling theft-relevant parts.
So, what “paperwork†is needed by your dealer to sell TRP? It’s in the MBUSA TRP policy:
- Proof of vehicle ownership (Original registration or title)
- Owner’s proof of identity (Photocopy of driver license)
- Authorization: An original signed letter from the owner authorizing you to buy TRP for their vehicle. For VPSs, the completed D-1 form can be used for this.
- Your proof of identity (Your original driver license)
Mercedes-Benz does not want to get in your way as you repair your customer’s vehicle, but they are keenly interested in preventing criminals from stealing their customer’s property. Surely this is also in your own best interest as well. So if you ever have any questions that aren’t answered by the TRP Policy, just ask your dealer — they are happy to help.
Download PDF


Our shop was able to complete the VSP authorization certification process recently.
Once we were certified the application for TRP ordering came another hurtle.
One tip that we found out, which we would like to share, is: When processing a Mercedes-Benz TRP request, you should submit the NASTF-VSP SDRM D-1 vehicle security request AND the StarTek TRP request forum ON THE SAME DAY. Otherwise the StarTek TRP request will get lost and not be dispatched to your Local/Regional Mercedes-Benz part distributor (Dealer parts counter).
Having copies of all the needed proof of identification materials handy (copy of customer drivers license, customer signed authorization forum/s etc..) will also aid in expediting the TRP order process.