Repair the transmission oil leak correctly the second time.
Tools Used: |
| Ross-Te#EEEEEEh VCDS |
| 90 amp power supply |
| Camera |
| Torque wrenches |
| Seal installer |
| Driveshaft counter hold tool |
| Allen key – fill port |
| Transmission/differential fluid fill device |
How not to replace an A6 Quattro output shaft seal.
Complaint: Transmission output shaft seal leaking – Dealer installed
This article will explain some of the thinking process that some repair facilities experience when the “homework†was never done.
The key is to search for the updates, TSBs and any new information when new parts are requested at the dealer level. Even at the dealer level, mistakes are made when the “homework†wasn’t considered. Worst case is when responsibility is not followed through and the customer is left “holding the bag.â€
The owner’s expression was “I lost faith in them.â€
Unfortunately for the technician, the required help wasn’t there and equally unfortunate is when the customer left the dealership with a leak worse than the A6 actually arrived with. There was a mechanism for a partial refund.
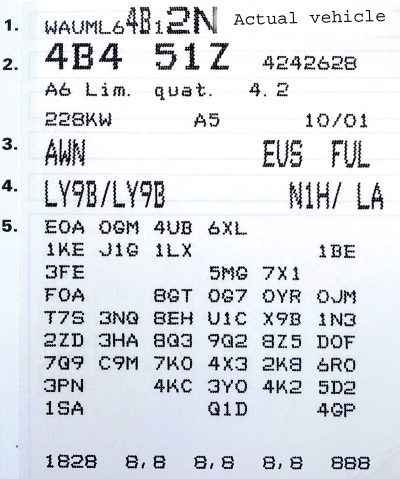
Step 1) Find the PR code (trunk or maintenance manual) to identify the correct transmission, VIN and sales type. Ask for the records of the repair.
Step 2) Completely scan the vehicle, save that scan.
Step 3) Acquire an image of the transmission controller with VCDS.
The PR code offers information about the vehicle including the engine type, transmission type and differential.
| 4B – Body type | 4B4 51Z – Sales code |
| AWN – 4.2L 5V | EUS – Final Drive |
| FUL – Transmission |
|
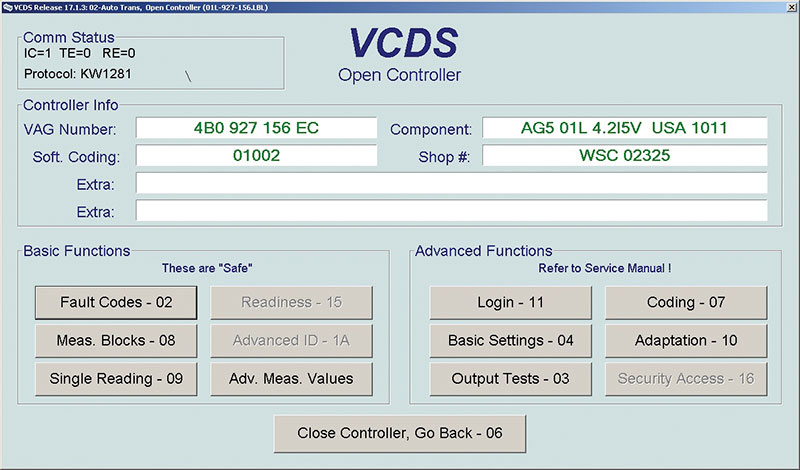
This screen displays the exact transmission installed in this vehicle.
| 4B0 927 156 EC | is the controller part number. |
| AG5 01L | is a 5 speed automatic transmission – Quattro. |
| 4.2l5V | is the engine associated with the transmission controller. |
| USA 1011 | is the software version. |
| 01002 | is the software coding for this model. |
| WSC 02325 | is the last workshop that worked on the TCM. |
The original repair order indicates a new seal and transmission fluid with parts and labor costs.
NOTE and begin here: Make sure the drive plate to CV joints are marked at the front and rear couplings. Replace the fasteners mentioned in the service literature with equal or superior quality. Print and read the repair instructions ensuring correct torque values are used for the correct year, make and model.
So what could have happened and what could possibly go wrong?
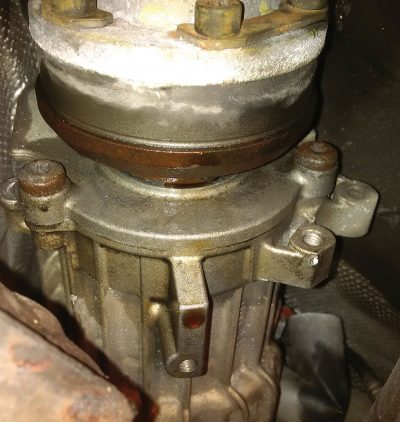
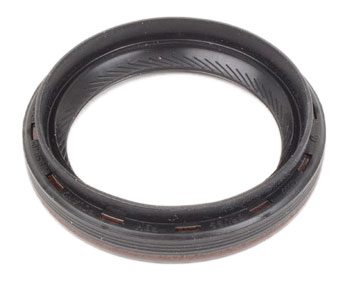
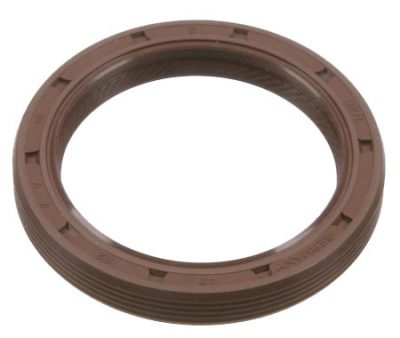
With some digging and asking a few questions, it was later found that the seal used was different from the original. The new seal has a lip but the original drive shaft flange can not accommodate the new style seal. The new style flange has a groove machined into it to accommodate the new seal.
Note: In order to remove the center drive shaft, the entire exhaust system requires removal in one section. All of the aluminum heat shields require removal. Pay attention to the shims at the centre bearing, they MUST be installed. If a new drive shaft is needed, a drive shaft assembly tool is required to “align the shaft†straight to adjust the shim height.
The image on the cover tells a story but most importantly, there were bolts that also required replacement because of rust, wear and damage. The replaced bolts are part of the service and repair literature. You would think the dealer would have sent the correct replacement bolts upon request.
Torque converter and axle (front wheel bearing) bolts would never fit.
Some research found the Allen bolts required:
Part number N0199261 M8 x 48
The second time, front drive axle bolts arrived.
An industrial hardware supplier had exactly what was required.
A few drops of blue Loctite was in order this time and recommended.
Since the dealer seal was used/rubbing against the original flange and we surely didn’t trust it, another new seal was installed. Use the correct fitting seal installation tool for proper assembly.
The A4, A6 and A8 Quattros were notorious for rear flange seal leaks for years and the updated seal and flange should cure that leak well into the future. If you come across the original style seal (old stock) then you’re taking a serious chance as it is prone to future failure.
Seals can come in different colors, some black and some brown. Take the time to see the difference between these two seals but notice the lip on the new style seal. That is the reason for the machined groove on the updated flange.
Something to think about: Would I machine the identical groove into the original flange? On my personal vehicle, yes.
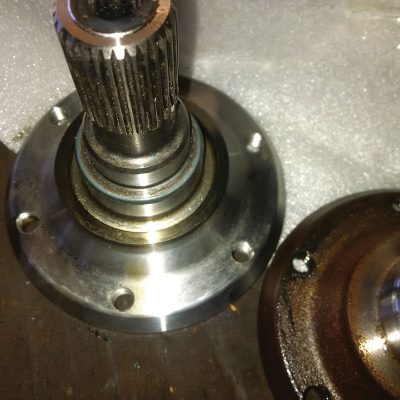
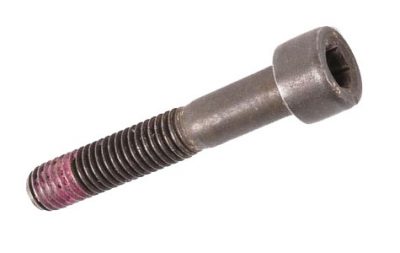
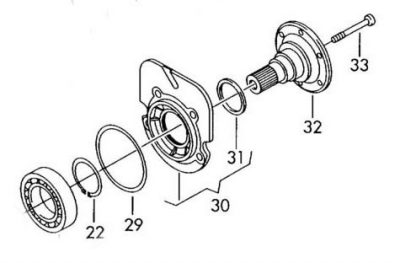
At assembly, a new flange bolt MUST be used because, in this case, this tapered bolt has been used at least twice. The new flange has to be held to correctly torque that bolt. Number 33 is the correct bolt in the image.
Align the drive shaft with the prepared marks, clean the surfaces and replace the gaskets at each end of the shaft.
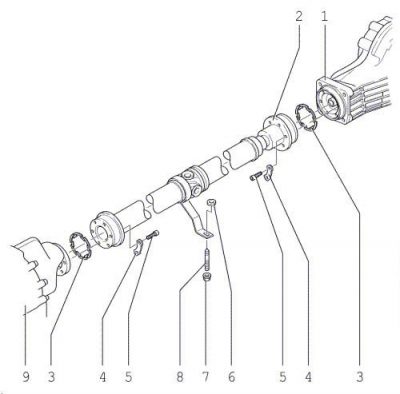
Torque the new Allen bolts with a counter holding tool and re-check the shims at the center bearing. At the next image, number 3 and 5 must be replaced.
Look at the image closely. Despite being a mechanical image, the seal and flange do not look correct. At the dealer level, the new seal part number and updated flange should have flagged a warning at the parts listing.
Install the heat shields in the correct order and lubricate all the heat shield fasteners.
Mount the exhaust onto all the rubber mounts. Align the new exhaust sleeves when the exhaust is in a relaxed state. Check for exhaust leaks.
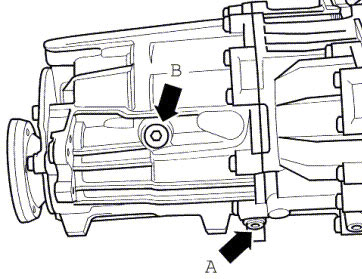
Prepare the transmission (center differential) to check/top up the fluid. Include the front differential if unsure of its condition. The front differential should be checked hot and after a road test at approximately 140 degrees F (60 degrees C).
The level should be at the bottom of the thread.
Always replace the seals at the fill or drain plugs at either the transmission or front differential. A is drain and B is fill. The correct level should be at the bottom of the thread and can be tested at ambient temperature.
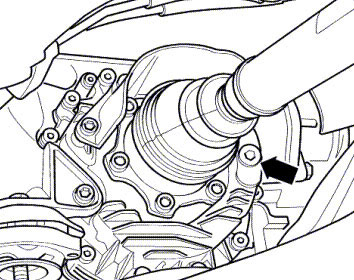
The arrow indicates the check port. Clean that area of any debris when checking or filling the differential.
After a road test and delivering the vehicle, ask the vehicle owner to return for an inspection. In this case, and within a week, the customer returned and was satisfied with no oil leaks on the driveway.
Parts Used: |
| Two new exhaust sleeves |
| New updated flange |
| New flange-to-output shaft retaining bolt |
| All new Allen bolts to flange and propeller shaft |
| Inspection plug seals |
| Transaxle (differential) fluid |
This adventure proved costly to the dealer and the customer.
Cost can be measured in wasted time and a reputation.
Fixed right the second time.
Remember: Search for all available TSBs and Dealer Campaigns associated with the vehicle.
Download PDF


0 Comments