
Rattles and startup noises? While Mercedes-Benz arguably makes the longest-lasting engines of any carmaker, eventually parts wear out. Find out fast if cam timing has jumped.
Timing. That term has been around since the internal combustion engine was developed. Today it is still a crucial component of the modern day automobile engine. There are several key factors when we talk about timing in a car’s engine. The time the spark occurs to ignite the air/fuel mixture in a gasoline powered engine. The timing of the fuel injection (gas or diesel) as it relates to the piston and valve orientation, and timing of the valve train as it relates to the crankshaft position. Huge advancements have been made in how we measure and trigger all these timing sequences, cam and crankshaft position sensors, hall sensors, cam phasers, etc. But the dynamic impact of proper timing is the same: If the timing of all these components is not dialed in exactly, the vehicle will not run right. We will primarily address the latter of these timing components here: crankshaft and camshaft correlation in Mercedes-Benz engines, and the use of timing chains, tensioners and other components to accomplish this extremely critical task.
Evolution of the timing chain
To produce useful work, the combustion must take place at the end of the compression stroke of the engine cycle. Following the power stroke the exhaust valve must be opened to clear the cylinder of spent exhaust gases. The job of the timing system is to cause these various operations of the engine cycle to occur in precisely the correct sequence, at precisely the correct time.
In early engines, the timing had to be correct for the engine to simply run, in today’s modern engines precision is paramount in terms of fuel efficiency, emissions and power. According to NASA one of the first internal combustion engines to use a chain system was the Wright brothers’ 1903 engine. It consisted of a drive sprocket, chain, camshaft sprocket and a small tensioning wheel. Previous engines used a gear system. Obviously, the chain system allows for greater distancing between the drive sprocket and cam sprocket, which allows for overhead valve operation. The downside is, of course, wear: As the chains and sprockets pile up the miles, there is the inevitable occurrence of chain, sprocket and tensioner wear and failure.
Modern advances
Having camshafts with fixed lobes does not allow for change in the dynamics of timing, which limits optimal performance to a narrow speed range. Valve timing in the internal combustion engine generally represents a compromise with regard to the requirements placed on torque, power output and fuel economy. The need for a system to be developed to address this compromise became more evident in the latter part of the 20th century due to the demand for better fuel economy and the environmental concerns we began facing. This, combined with a thirst for ever more power, made it necessary for this technology to be developed and evolve into the sophisticated variable valve timing (VVT) systems such as those found in Mercedes-Benz vehicles today.
The simplest form of VVT is cam-phasing, where the phase angle of the camshaft is rotated forwards or backwards relative to the crankshaft. This causes the valves to open and close earlier or later, but the camshaft lift and duration cannot be altered with a cam-phasing system. Mercedes-Benz began utilizing cam phasing in production cars in the 1980s. Achieving variable duration on a VVT system requires a more complex system, such as multiple cam profiles or oscillating cams which we see on some of the latest Mercedes-Benz vehicles. The M272 and M273 engines were popular engines using this technology.
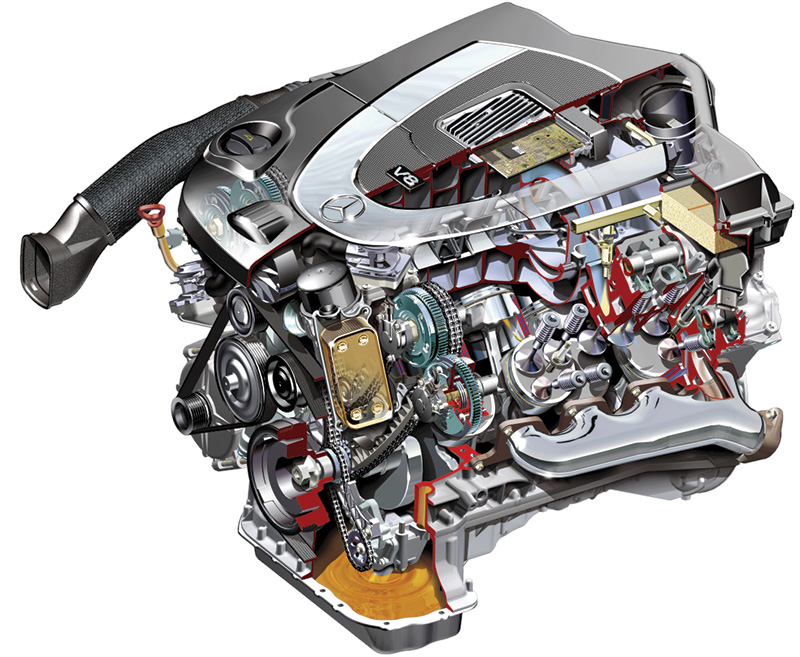
The M272 and M273 engines are in the older models, but many are still on the road today and you will certainly see them in your shop. On these engines, the intake and exhaust camshafts can be adjusted continuously by up to 40 degrees. The infinitely variable adjustment of the camshafts is carried out by patented, electro-hydraulically operated vane adjusters mounted on the front end of the camshafts, with integrated control valves. Solenoids to operate these valves are located in the front of each camshaft. The solenoids actuate the control plunger on the vane-cell adjuster according to the performance-map-related duty cycle. Depending on their position, more or less oil pressure flows from the hollow camshaft to the oil galleries of the vane-type adjuster.
Since oil pressure is one of the control mechanisms, the quality of the oil and the history of maintenance is paramount to the longevity of the components. Failing to consistently use Mercedes-Benz approved engine oils, possibly with infrequent oil changes, can lead to a host of problems. Since there are many factors and components in this system, solenoids, etc. you may experience several different trouble codes related to faults in the timing system. We will primarily focus on the actual chains, cam adjusters and mechanical components as they relate to timing problems.
DTC 1200 and/or 1208
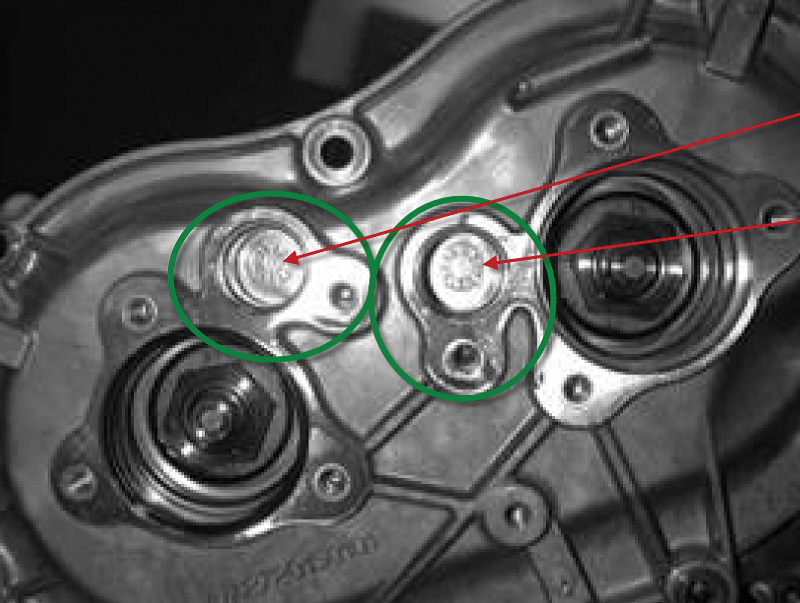
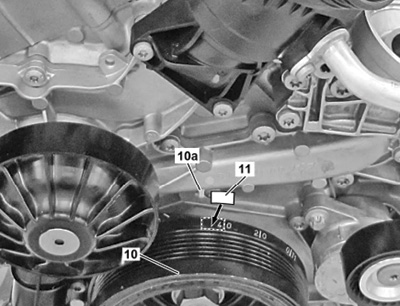
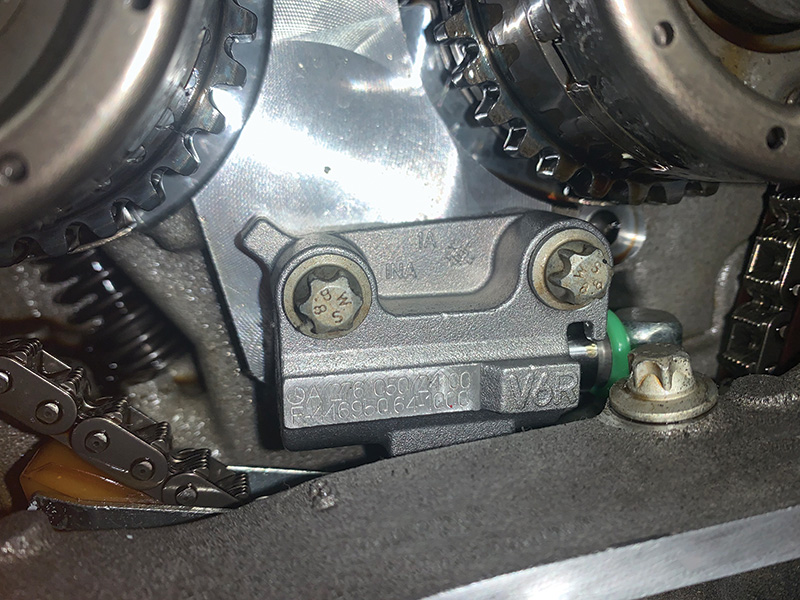
Say you run a code scan which shows these codes and find that after the fault memory is erased and the engine is restarted the fault codes return immediately. This is due to a problem with the positioning of the timing-chain-driven camshafts and their relationship to the crankshaft. The cause may be a worn sprocket on the balance shaft on the M272 engine, or a worn idler gear on the M273 engine. To confirm this you will need to do a quick cam timing check. Remove all the camshaft hall sensors and rotate the crankshaft balancer to the 305 degree mark with the front cover pointer. Now you can check the impulse wheels to see if they are properly lined up. The stamped numbers on the impulse wheels should be centered perfectly in the camshaft hall sensor openings. If you find that they do not line up properly it is time for some disassembly for further inspection. Note that you may have to rotate the crankshaft a second revolution to see the stamped numbers.
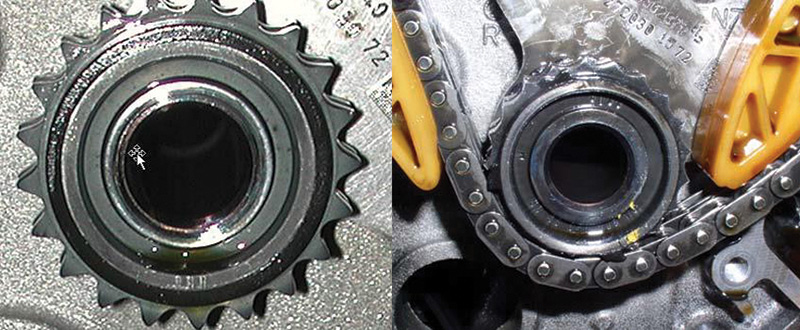
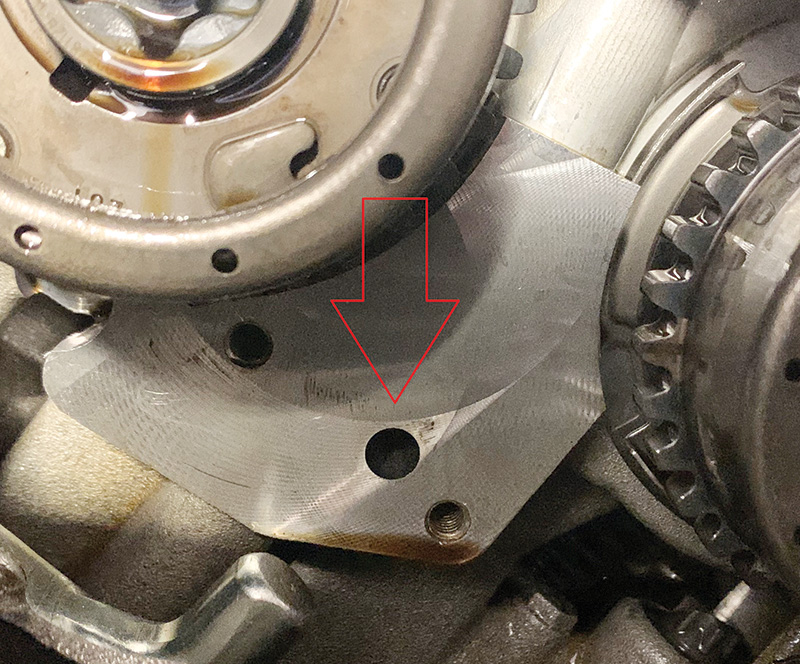
Remove the right timing case cover on the engine and, using a borescope, perform a visual inspection of the teeth on the balance shaft sprocket (M272) or the idler gear (M273), depending on which engine you are working on. If you read out those fault codes, the teeth will likely show some wear as seen in the photo. This wear is causing the misalignment of the camshaft timing and the cause for your DTCs. In rare cases a stretched timing chain might be the reason for the fault codes when the sprocket doesn’t show any evidence of wear.
If the gear is worn, it will require replacement of the balance shaft on the M272 engine or the idler gear of the chain drive on the M273 engine. It should be noted that at this juncture you need to do a serious evaluation of the entire engine and vehicle. Since this is a 25-hour plus job, consideration of a Genuine Mercedes-Benz replacement engine may be warranted. Note that Mercedes-Benz offers complete parts kits for the job: See XENTRY TIPS document LI03.30-P-050027 for the part numbers.
M276 engines
The M276 series was introduced in late 2010 and replaced the M272 V-6 engine line. Most engines in the new series are turbocharged, however the 3.5L M276 was available in both turbo and naturally-aspirated versions. You will find this engine installed on S350, CLS350, ML350, E350, W204 C350, and several other models.
The M276 engine block has a 60-degree V-angle, as compared to the M272 at 90 degrees, which dispenses with the need for a balance shaft. The M276 engine has aluminum alloy cylinder heads with four valves per cylinder and dual overhead camshafts driven by a two-stage chain drive system. There are three gear chains, each of which is equipped with hydraulic tensioner. All four camshafts have hydraulic vane-cell camshaft adjusters for independent variable valve timing of the intake and exhaust valves. Valves are actuated by low-friction roller cam followers. Combine all this complexity with some mileage and a lack of maintenance and you have a recipe for noise and or timing problems.
Rattle upon startup
Some of the M276 and M278 Mercedes-Benz engines can develop a telltale rattle sound upon start up. The noise is essentially chain or adjuster rattle, but the cause can be any combination of the following: poor oil pressure to the secondary chain tensioners upon start up, failed chain tensioners, failed camshaft adjusters, stretched (worn) timing chains and/or damaged timing chain guide rails. The installation of oil check valves to help maintain oil pressure in the tensioner is required for all repair options regardless of the component being replaced.
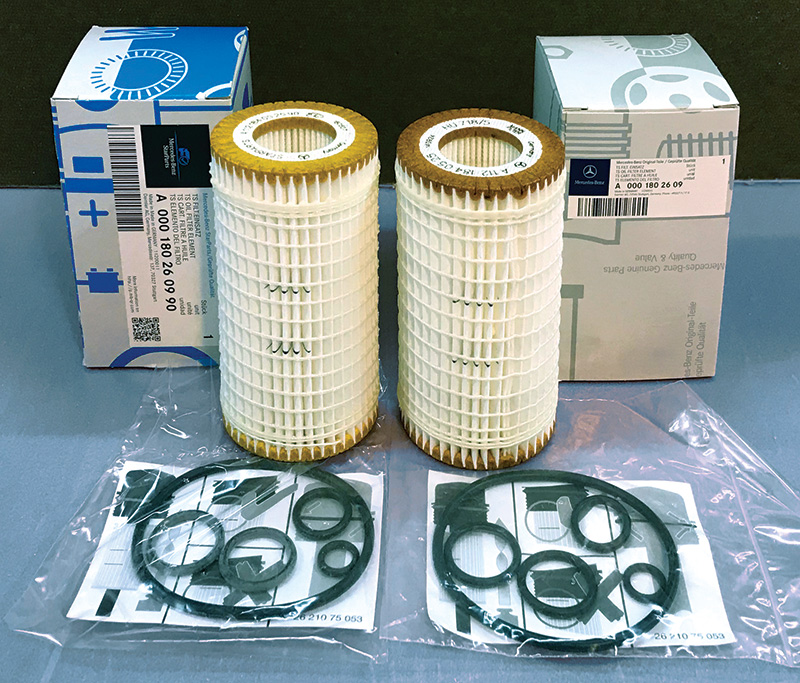
As in the M272 engines, with the tensioners relying upon the system’s oil pressure, it is important that oil and filter maintenance is performed as scheduled, using Mercedes-Benz approved oil and filters. While Genuine Mercedes-Benz oil filters are not that expensive, if cost is concern for your customer, consider the Mercedes-Benz StarParts line: These are lower-cost alternatives to common maintenance parts, saving money where it doesn’t matter (such as packaging and labeling) but still delivering the outstanding performance (and carrying a warranty!) expected from Genuine Mercedes-Benz parts. Ask your dealer about the StarParts line or visit mbwholesaleparts.com/starparts.
Complaints of a rattle noise should be verified and then begin with an oil pressure test. Mercedes-Benz WIS document AR18.00-P-1250EL states that the oil temperature for this test should be at least 100 degrees C (212 degrees F) which is quite hot. Since the customer complaint is typically noise upon startup when the engine is cold it makes sense to get a cold reading as well. There is a screw plug either on the oil filter housing or the timing cover: Take your oil pressure reading there. Be sure to replace the sealing ring when done. With a warm engine you should have 0.9 to 1.1 bar oil pressure at idle, which will be somewhat higher with cold oil. What is important is to see immediate oil pressure upon starting the engine, in order to eliminate oil pressure (or lack of) as the culprit.
On a cold engine, rotate the crankshaft by hand and listen for clicking noises in the camshaft adjuster area. Sometimes the adjusters themselves are the cause of the noise. Start the engine and, using your Mercedes-Benz XENTRY Diagnostics system or another factory-compatible scan tool, actuate the camshaft adjusters. Movement will be noticed in both the camshaft position data on the scan tool, and in how the engine runs. If you have no movement, verify the proper operation of the solenoids before condemning the adjusting gears.
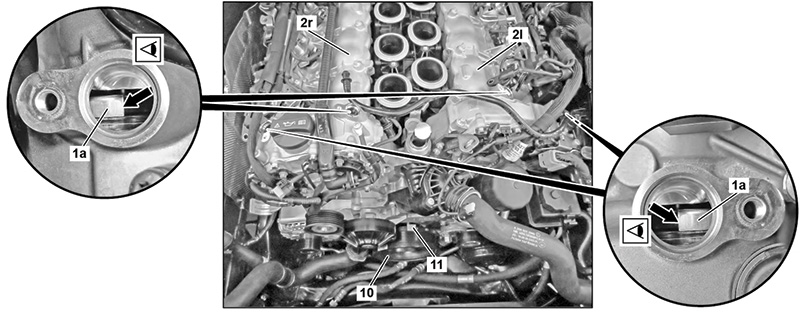
If you perceive proper operation of the camshaft adjusters, then proceed with a manual check of the engine timing. This operation is outlined in WIS repair operation AR05.20-P-6010EL. Start by removing all the hall-effect sensors on the camshaft housings. Note that some models will have a 53 degree mark on the crankshaft pulley and some will have only the 40 degree mark.
On these engines to correctly check the timing you will need to place a 17 mm width of adhesive tape to the pulley at the 40 degree mark, effectively giving you the mark that is missing for 53 degrees. Rotate the crankshaft center bolt in the direction of engine rotation to the 53 degree mark after TDC on cylinder one ignition stroke (which can take a second turn of the crank). Now you can check the basic position of the camshafts through the opening provided by the removal of the cam sensors. If your timing is off, barring no one has been in before you and set up the camshafts improperly then you most likely have some chain stretch, worn components or tensioning failure.
Rattles can also be found in the secondary chain tensioners, or check valves failing to keep proper tension on the chains. XENTRY TIPS document LI05.10-P-056435 outlines the procedures for dealing with rattles in this area. This calls for replacement of the secondary chain tensioners on left and right, and installation of a check valve in the oil supply bore of each secondary chain tensioner in the cylinder head on left and right. Very early engine serial numbers may not have the check valve installed. The document points out that to solve the rattle issue you might need to only install or replace the check valves.
It’s worth pointing out, however, that many repair bulletins and articles are dealing with lower mileage, generally in-warranty vehicles, and they have prescribed certain service actions based on that premise. Most of the vehicles independent service providers can be expected to have significantly higher mileage. In these cases, it would be wise to consider replacing the tensioners, as well as the check valves, if you are trying to provide the longest-lasting repair for your customer. Even the TIPS document goes on to say that if the tensioner and check valve replacement doesn’t repair the noise — keep digging! Experience has shown that the cam adjusters themselves can be the source of the rattle even though they appear to be operating normally.
Tensioner and check valve replacement is a fairly easy operation. You will need to remove the charge air cooler to gain access, but you do not need to remove the cylinder head covers or the lower timing cover. The repair is outlined in WIS document AR05.10-P-7800EL. You will need to remove some other components to gain access to the tensioners such as the oil filter housing for the left side tensioner. Once you have removed the respective front cover, you can set the engine up to the 40 degree mark ATDC for the side you are working on and remove the tensioner. Two single-use bolts hold it on, be sure to replace them. Why? See the “Single-use Fasteners†article on page 16 of this issue.
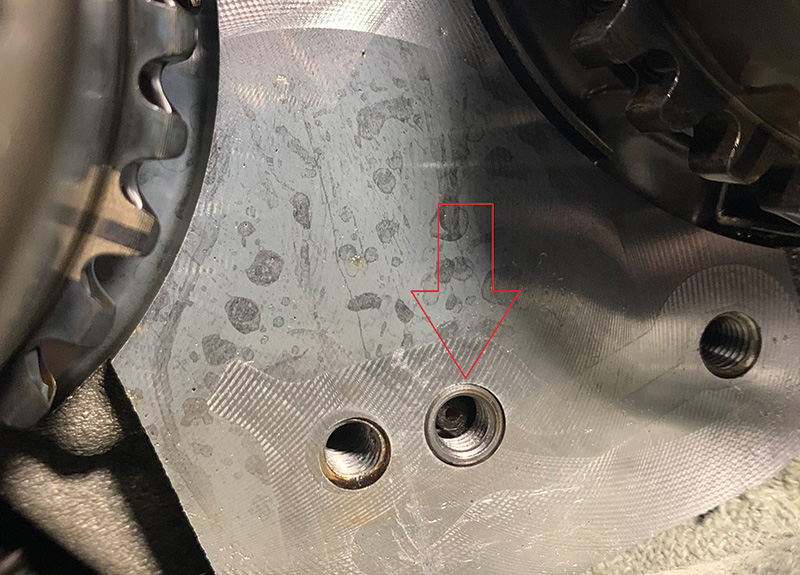
Upon removing the tensioner you will have access to the oil feed hole where the check valve is installed. Inspect the hole: Some are straight in and some are stepped, and each uses a different valve. Install or replace the valves; for the price, we are way too far into this to not do that.
Camshaft adjusters
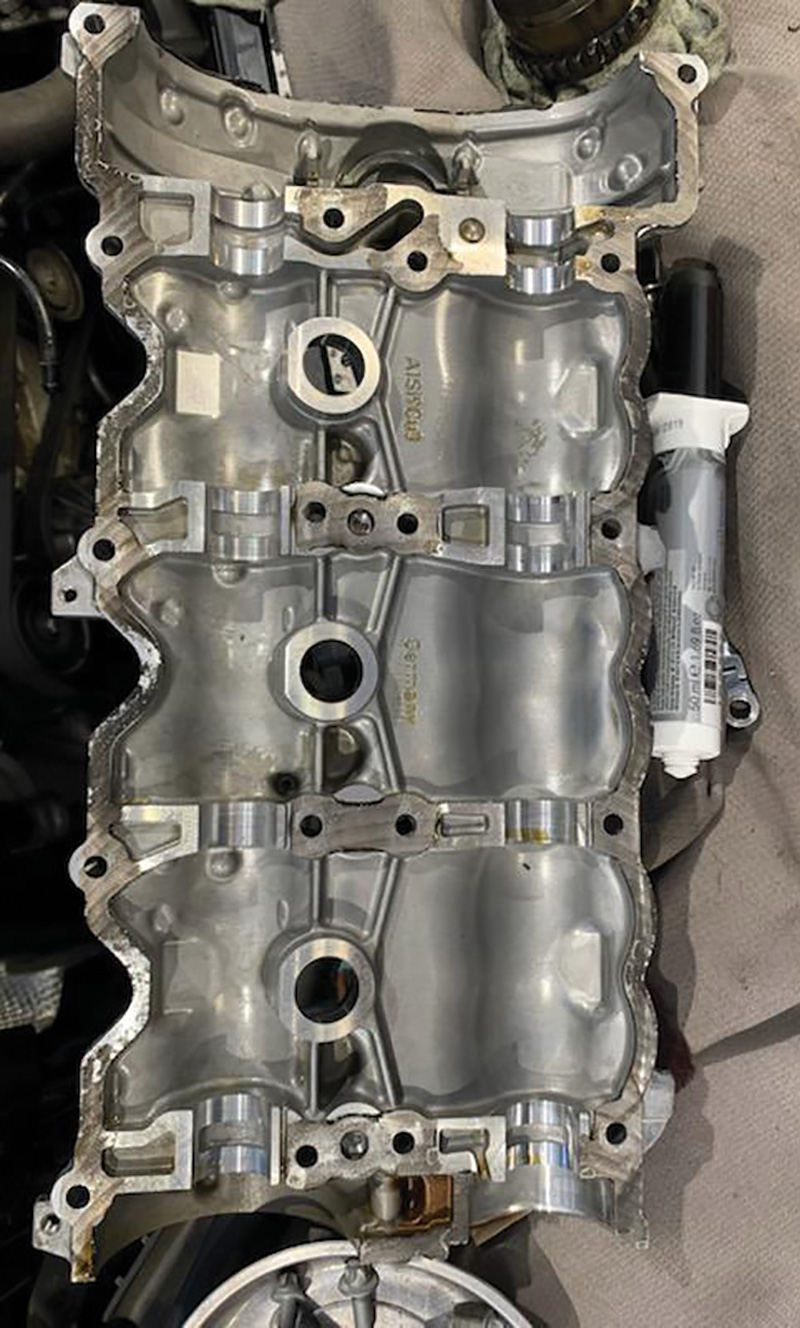
As the XENTRY TIPS document states, if upon replacing tensioners and check valves you still have rattle it is time to continue with your diagnostics. The camshaft adjusters can be tricky to diagnose, but if you crank the engine over by hand while watching the adjusters with the front access cover off, you might be able to hear an audible “click.†Replacing the adjusters is a more difficult operation. WIS repair document AR05.20-P-7201FH lists steps to replace the adjusters. You will need to remove the cylinder head covers for the respective camshafts and mount a special hold down tool for the camshafts, since the valve covers are also the camshaft upper bearings.

Remove the chain tensioner to give some slack to the chain, then loosen the center bolt for the adjuster, which is also the adjuster control valve. You will need an assistant to hold the back of the camshaft to help with loosening and tightening of the control valve. Note that this operation is performed with the engine set at the 40 degree mark.
As we mentioned before, chain stretch (which is really wear) can be the problem, particularly in high-mileage vehicles. Be sure to evaluate the situation thoroughly in such circumstances. It may be wise to purchase and install all the timing components for your customer; chains, guides, tensioners, adjusters and check valves. Check with your Mercedes-Benz dealer for the availability of a component kit. Nothing is more frustrating to you and the customer to have a noise return in another part of the timing system.


0 Comments