
Inspection, proactive service recommendations. What to expect? And, what about those glow plugs?
Sounds like a crime novel, doesn’t it? Intrigue, mysterious plots and storyline twists reminds you of your favorite ‘whodunnit!’ Some of the vehicles you may see in your shop with this mysterious condition may indeed feel like a crime has been committed, especially when you are tasked with cleaning up the mess. A simple Google search for “black death†with regards to diesel injectors (not the plague) will ultimately turn up dozens of videos, blog posts, and other information on the problem. Not to worry though, with the right tools and information, plus a preventative approach, you can feel confident in servicing Mercedes-Benz diesel injectors.
The Evidence
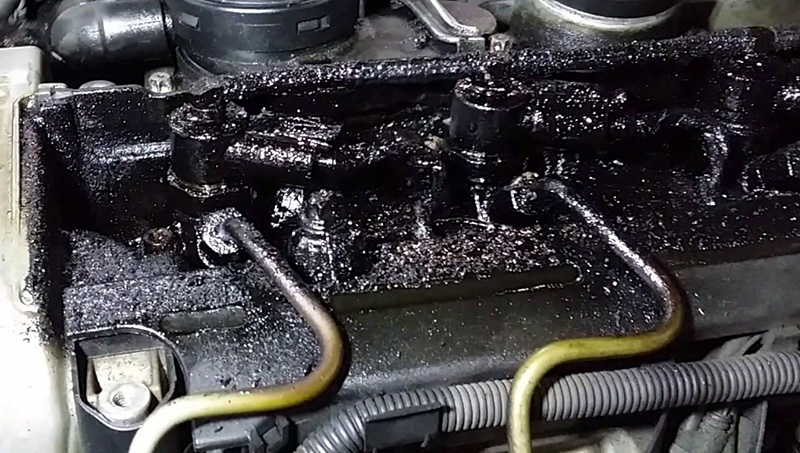
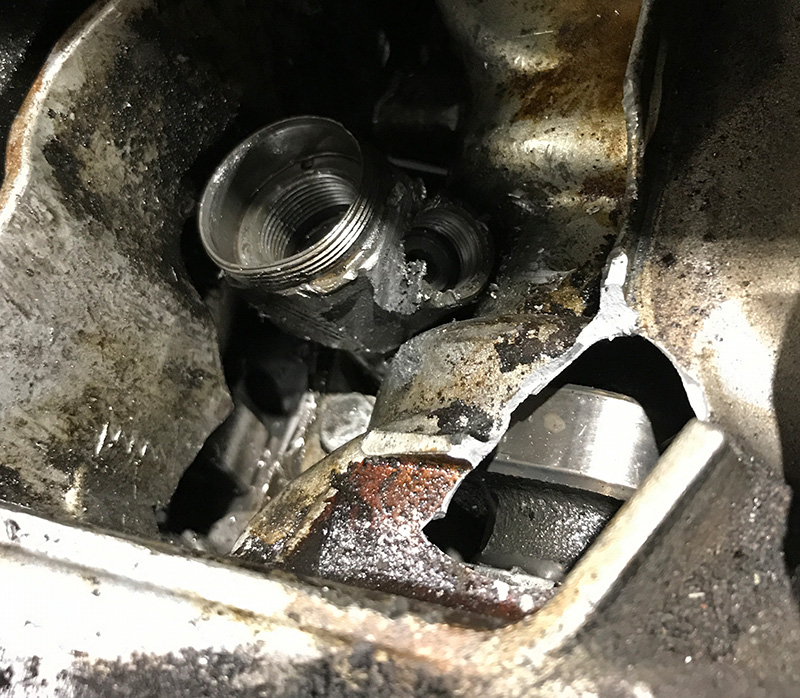
The Black Death is a mechanical issue involving the vehicle’s fuel injectors, specifically their seals. It is aptly named due to the thick, nasty black carbon buildup around the fuel injector. On a Sprinter you will find this under the plastic cover, sometimes filling up the whole cavity around the injectors. Since the injectors seat directly in the combustion chamber, the seals have a critical task of keeping the combustion gasses contained within the chamber. These leaks can arise from a few different causes including worn out, incorrect or improperly-installed seals. This black carbon deposit is extremely hard and at first glance you might think the engine is ready for the morgue! In some worst-case scenarios it may look like someone melted plastic, added roofing tar and poured it over the injector cavities.
Where It All Starts
Most of you are familiar with the diesel injector but let’s take a closer look at the modern common rail injector and its history. The advance of the common rail system in particular gave engineers the freedom they needed to reduce exhaust emissions even further, and an added benefit of lowering engine noise. The particular design of common rail, with its injections of fuel as several pre-, main- and post-injections, allows the engine and the injection system to be matched to each other in the most efficient manner possible. In the common rail accumulator injection system, the generation of the injection pressure is separate from the injection itself. A high-pressure pump generates in an accumulator – the rail – a pressure of up to 1,600 bar (over 23,000 psi), as determined by the fuel system designer, independently of the engine speed and the quantity of fuel injected. The fuel is fed through rigid pipes to the injectors, which inject the correct amount of fuel in a fine spray directly into the combustion chambers. The CDI control unit controls perfectly all the injection parameters – such as the pressure in the rail and the timing and duration of injection – as well as performing other engine functions. The very first common rail system used in a production car was introduced by Mercedes-Benz in 1997 in their W202 models and had a control pressure of 1,350 bar. Injectors have come a long way since that introduction.
In its simplest form the common rail injector works like this: as high pressure fuel enters the injector, the pressure throughout the injector is equal. The injector solenoid is energized by the control unit, pulling the control plunger up. The control plunger releases a small amount of fuel and creates a pressure differential within the injector, causing the lower pintle to come off its seat. As the pintle moves upward, fuel is injected into the cylinder. Injector solenoid current is then turned off, allowing the valve to reseat and stopping fuel flow.
The newest technology goes beyond this. Delphi’s Direct Acting CR system uses a patented direct-acting concept in which the injector needle is set in motion directly by a piezo-ceramic actuator instead of an electromechanical solenoid. The piezo-ceramic actuator directly operates the needle valve of the injector for initial lifts, such as those obtained in pilot injections, and a motion amplifier is used to help complete the lift for large injections. This enables the injector to spray fuel into the combustion chamber faster, with improved spray momentum and accuracy, and at higher pressures (up to 2,000 bar). It also provides extremely fast opening and closing of the needle valve, independent of injection pressure. With needle velocities exceeding 3 m/s (triple that of earlier systems), the direct acting injector allows seven (or more) injection events per engine cycle. In its heavy truck line, Mercedes-Benz has introduced the X-Pulse common rail injection system with pressure booster.
Regardless of the type of injector or system used, one thing is certain: you have to seal those combustion gases in. Any leaks past the injector causes combustion chamber residue to build up at the top of the injector. So it is important to know exactly how these injectors function, as you will be removing them in order to service the seals.
Look for the Signs
So how to tell if you have a leaking injector, and should we be replacing the seals proactively? The answer to the first question is look and listen. Sometimes a leaking injector will make a hissing or slight compression whistle or chuffing noise, especially under acceleration. This is the sound of combustion gasses leaking past the injector. Also removal of the plastic engine cover is needed to make a visual inspection. If the seals have been leaking for any amount of time you will see the evidence of the Black Death under the cover. If caught early enough it may merely be “wet†looking at the base of the injector(s). Sometimes this might only be oil from a leak or oil spill so you need to verify the leak. Some techs use a light soapy water spray while the engine is running to allow them to see if the escaping gasses blow bubbles. Also WD-40 is another product some techs use. The idea is to find a way to see if those gasses are bypassing the injector seals, which will be evident right at the base of the injector. Fluid at other parts of the injector, the rail connection and/or top nut may be indicators of the injector itself leaking.
Obviously if you have a severe case of black death you won’t be able to see anything but the gooey mess (see photo). The injectors are not screwed in to the bores but rather clamped in under pressure which puts a crush on the copper seal. Over time, with expansion and contraction, normal wear begins to work on the copper seals and once the combustion seal is compromised there’s no going back.
Should you be proactive and recommend to your customer to replace their injector seals? Absolutely! Most techs report seeing evidence of leaks anywhere from 60k to 100k miles. Certainly at first sign of leakage you should recommend immediate replacement of all the injector seals. This will save your customer cash in the long run and lots of headaches on your part if the repair is delayed. Your customer may want to talk you into just doing the one or two leakers but I guarantee they’ll be back in a year with another leak saying, “didn’t we already fix those?†The seals and bolts are not expensive.
The Procedure
You will want to consult the Workshop Information System (WIS), XENTRY or Startekinfo.com for the latest repair notes but replacement of the seals is fairly straightforward.
Here is a tip that can save you some headaches: For most jobs you obviously like to start with the engine cooled down, as it’s easier and more comfortable to work on, but for servicing injectors you want that baby hot! Start by removing all the hold-down screws. These screws are long and torqued to yield, meaning they tend to seize in the head. Having the aluminum head nice and hot definitely makes the difference between snapping one off or having it come out straight away.
Heating the engine is the first thing to do after you remove the cover(s) to gain access. Then very carefully remove the fuel rail. Remember this is a high pressure system so take all the necessary precautions to keep yourself safe, including relieving pressure in the system. The engine needs to be off at least 30 seconds before cracking open the injector unions. Be sure to cap off the lines to prevent contamination.
The piezo injectors operate at a dangerous voltage level. Be sure the key is off and several feet from the vehicle (especially in KEYLESS-GO models). As a safety measure, disconnect the crankshaft position sensor. Disconnect and remove the fuel return lines and, with a twisting-pulling motion, remove the injector. If you have caught the vehicle in a state before the injector seal ring has failed for very long then this will work out pretty smoothly.
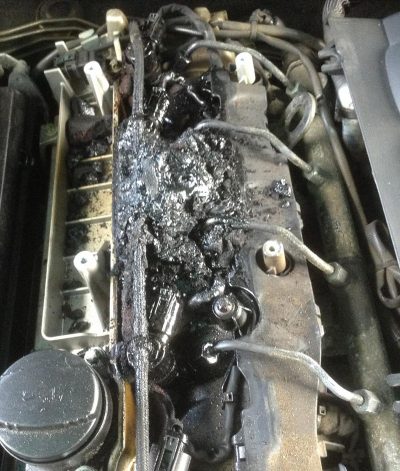
If you’re looking at a serious Black Death case then you are in for a bit more work. You or your service adviser will want to give the customer a heads up for what lies ahead. Anything from extra hours cleaning to a new cylinder head could be possible. Dissolving the crud can be a huge chore and sometimes some of the foam insulator is melted in with it. Some techs use acetone and or carb cleaner and let it sit overnight. Then using a steam cleaner you can remove much of the carbon. Also some techs have reported using a non-acidic oven cleaner to dissolve the crud. In extreme cases like the photo you will need to carefully chip away at the stuff before you do any of this. Using a shop vac you can remove the chunks you break loose.
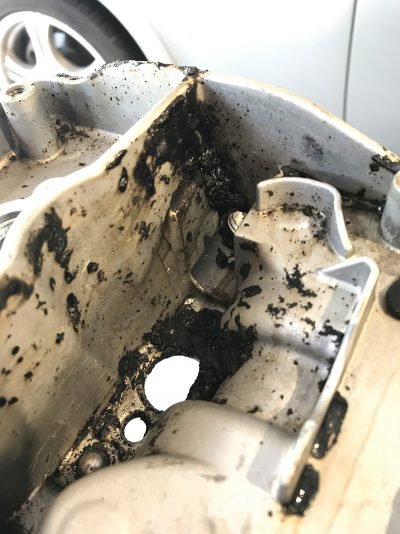
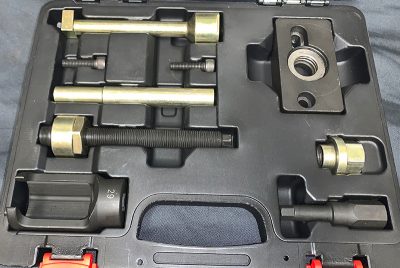
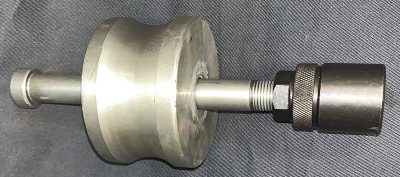
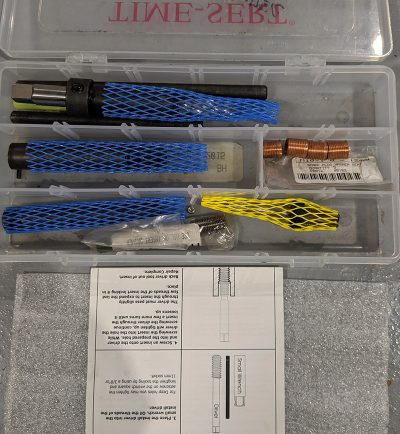
After you have cleaned the engine enough to gain access to the injectors you can begin removing them. Remember a hot engine will aid in this, not only with the hold down bolts but with the injectors themselves. They will be really stuck in their bores from the carbon. It will be tricky to loosen them all while the engine is warm as each one will take some time. There are a number of special pullers available for removing stubborn injectors. Some use a slide hammer approach which can work well if you have enough overhead access. Sprinter models don’t have enough room to use these though. Some use a cross bar approach which use the threaded portion of the injector top to pull the injector up. We’ve seen techs make their own puller with a piece of unistrut and some bolts from the hardware store. You will need a M14 X 1.5 pitch coupling nut to make this work, which may be hard to find. Except for the slide hammer procedure, a major drawback to these is they leverage against the valve cover which is fairly thin aluminum and can crack. Be prepared for this. If you have to use this extraction method on piezo injectors you’ll need to replace them with new ones. A vehicle with 200k plus with really stuck injectors may warrant a new head.
Installation
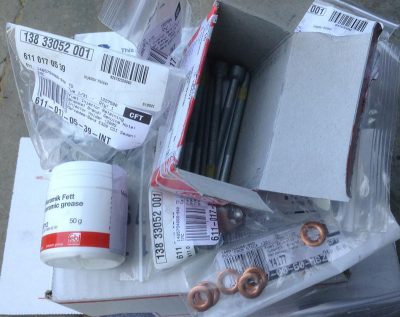
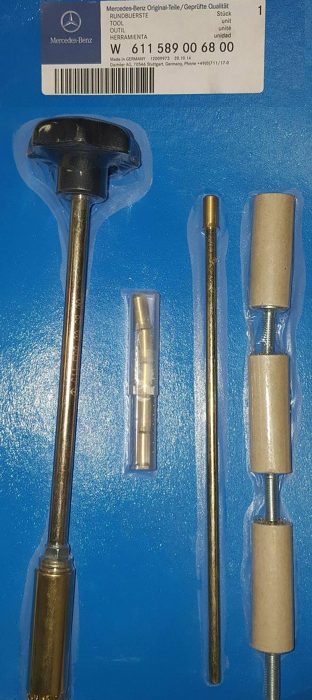
Ok you’ve gotten the injectors out, either the easy way or the hard way. If you are reusing the injectors make sure you mark them for replacement in the same cylinder. What’s important next is making sure the bores are surgically clean and the injector seat face is perfect, otherwise you’ll be doing this again too soon. Be sure to remove the seal ring from the injector well if it didn’t come out with the injector. If not too soiled, clean the injector well with woolen brush W651 589 01 68 00. Use a clean, lift-free cloth to remove as much dirt as possible first. WIS advises that ‘clean’ bores don’t need to be sealed against debris, but the brush set W611 589 00 68 00 comes with a brass plug just for that purpose, and you are well-advised to use it. Clean the seat face of the injector with a brass wire brush, being very careful not to contact the nozzle tip. Coat the injector thinly and evenly with a special grease available from Mercedes-Benz. Install the new seal and use new bolts for the tensioning clamps. We recommend cleaning and possibly chasing the hold-down bolt threads, being sure to blow out all debris from the holes: the hold-down bolts are torque-to-yield and you don’t want any dirt interfering with your clamping force. A good practice when finished is to turn the engine over by hand to be sure nothing has entered the combustion chamber that could cause damage.
Reprogramming
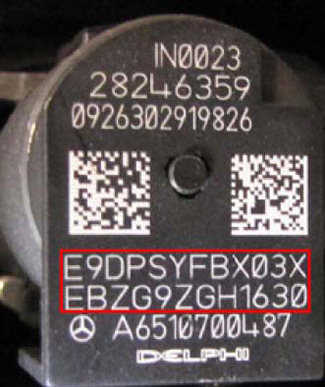
If you have to replace the injectors, it is necessary to program the CDI engine control unit with the new injector quantity compensation codes, printed on the injector body. In Engine OM642, this is a seven-digit code. In other models, such as with OM651 engines, they have 20 to 24 characters (framed in red on the photograph).
Using a XENTRY or other factory-compatible scan tool proceed as follows:
- Key on, engine stopped.
- Battery voltage greater than 12 V.
- Start the function.
- A dialogue box will display the programmed injector codes, select “OK.â€
- Select the injector to be programmed in the dialogue box then select “OK.†If the injector code is correct, close the function.
- Enter the new injector code in the dialogue box and then confirm by selecting “OK†to finish the programming sequence.
- Repeat for all injectors.
Use numbers and capital letters only. Only the following characters are valid: 0 1 2 3 4 5 6 7 8 9 A B C D E F G H J K L M N P R S T U W X Y Z (Note the missing letters I, O, Q and V, removed to ensure no confusion with digits).
A dialogue box will indicate if the programming sequence has succeeded or failed. If the function fails, check the test conditions and correct any faults found.
Glow Plugs
We won’t spend any time here on diagnosis of glow plugs, instead focusing mainly on replacement and problems that may arise with that. One important comment: Using an aftermarket scan tool can show false codes, so beware in such a case: Always verify any findings with a component test of each plug, the wiring, and the controller, regardless of which kind of scan tool you use. Your XENTRY Diagnosis system will guide you through these test steps.
Ceramic glow plugs are very sensitive to impact shocks which can cause invisible damage (hairline fractures) to the ceramic element and possibly lead to engine damage. Care in handling is of utmost importance, if you drop one, replace it! Be aware of poor packaging and only use original Mercedes-Benz glow plugs.
As with the recommendation on injector replacement, when changing glow plugs get the engine hot. Some can get stuck and you don’t want to have to try and remove a broken glow plug in the head. Warming the engine helps the head expand a bit and aids in loosening the plug. The service manual gives a recommendation to stop at 25 Nm if the plug won’t come loose. Usually it’s not the threaded portion that becomes lodged but the plug body itself. If you can just break it loose a tiny bit and spray some penetrating oil on it and then drive it for a good distance you may have success, and some technicians just start with the penetrating oil as a preventative measure. There are many tools available for removing a broken glow plug and repairing the cylinder head, but you really don’t want to go there if you don’t have to. Remember an ounce of prevention…
So there you have it. Every diesel that comes into your shop should be inspected for any injector seal leakage, since earlier action ends up being the best action. The Mercedes-Benz WIS has the right procedures for these jobs, but cleaning up after an injector leak takes time, patience, perseverance and plenty of solvent. And for glow plugs, while most of them come out without trouble, you just have to break one in the cylinder head to understand why you take the time to get the conditions as optimum as possible before starting.
The whole point is building your customer’s trust that you’ll always be looking for those little things that could end up as a big problem. Keep their cars happy, and they’ll be customers for life.


Black death in Mercedes-Benz diesel injectors indicates carbon buildup around the injectors due to leaking seals. This hardened carbon can cause poor fuel atomization, loss of power and possibly injector failure. If left untreated, it can spread, making it difficult to remove damaged injectors and cylinder heads. Early detection and replacement of worn seals minimizes engine damage.
The preventive piece is critical–every air filter change on the V6 gets an injector inspection for leaks. Yes, I pull the soundproofing foam every time. The I4 is every time the cover is off, super simple.
Bottom line, the dead give away is anytime that rotten smell of burnt engine oil is noticeable, it’s time to go looking for leaks. I personally hate the smell and as a result I’ve kept my V6s absolutely dry on top, changing the turbo inlet seal anytime the yoke is off and with every air filter change, along with the upper end of the right intercooler line seal is worthless and leaks too. Staying ahead of these leaks makes smelling the injector tip leaks that much easier, especially on the V6–incidentally, the aroma was most notable after driving from under the wheel wells when on the V6 when the injectors leak!
Good luck getting the average owner to notice these signs.
Correction, Upper end of the LEFT intercooler line, the seal leaks and the right line tends too rupture.
Thanks for your comment. Additional feedback from our writer “Oil leaks can contribute to some of the mess under the covers but it’s the leaky injectors that cause the hard nasty stuff.”