

Here are tips for diagnosing BMW computer-controlled Intelligent Headlight technology, including intermittent or flickering lights, lens cracks or condensation in housings, and plugged headlight washer nozzles.

BMW Intelligent Headlight systems feature adaptive lighting technology that responds to different driving conditions. The state-of-the-art lighting provides better illumination for night driving, highlights pedestrians and potential obstacles in the road and, depending on the BMW model, reduces glare into the eyes of oncoming drivers.
These computer-controlled lights may experience rare problems such as flickering while driving, flashing on and off at ignition startup, trapping moisture inside the headlight housings, and developing cracks in the lens covers. We’ve collected a few tips to help understand the causes and show where to find repair information.
Unless otherwise noted, all repair information in this article is based on instructions found in various Service Information (SI) bulletins published by BMW. Refer to the BMW Technical Information System (TIS) for model-specific repair procedure details.
When following any of the tips provided here, always connect a BMW-approved battery charger/power supply (refer to BMW SI B04 23 10 for list of approved chargers) before starting repairs to the LED headlight system. A steady power supply is absolutely critical to the success of any effort to reprogram, encode, or initialize a control module after repairing an adaptive headlight system. Note that charging parameters must be set manually by the user, and procedures vary based on the battery type and which charger is used.
1. Headlight flickers while driving
On BMW F-Series vehicles produced up to September 2014 with option 552 (adaptive LED headlights), you may get a customer complaint that the headlight on one side flickers on and off while driving. The problem, which applies to the BMW X5, X3, 4 Series Coupe, and 4 Series Convertible, may be intermittent. Check the TIS bulletin SI B63 09 14 “LED Headlight Malfunction†for details.
This situation is typically caused by a poor connection, not a defective headlight. The connectors at either the LED headlight or the LED main light control module (LHM2) end of the circuit could be loose.
The low or high beam headlight could be affected. If it is the low beam, the system will store an 805980 fault code. An 805981 code is set for a high beam problem.
A poor connection could also cause faulty communication between the headlight and the LHM2, even if the headlight is not failing. In that scenario, the controller receives function status signals that don’t match factory performance parameters for the headlight. Code 8044BB sets if the right-hand LHM2 receives an implausible low beam function status. A code 8044BA is stored if the left-hand LHM2 sees low beam data that does not match specifications.
When any of the four codes mentioned are stored, a Check Control message indicates that a problem exists within the parking or driving light system.
Repair procedure
Perform a vehicle test using ISTA. The ISTA scan tool software offers powerful BMW and Mini vehicle diagnostic (ISTA/D) and reprogramming (ISTA/P) capabilities, plus vehicle identification assistance for highly specific information searches and guided troubleshooting. Refer to the BMW Tech Info website for subscription details.
If communication fault codes have been set in the Body Domain Controller (BDC), in the Footwell Module (FRM), or in the LED main light module (LHM2), work through the repair procedures for those codes first. Eliminating a communication error may clear up other problems without requiring replacement of the control module or other major component.
If checking and repairing any communication faults does not eliminate headlight operating problems, perform the BMW test plan (“ABL_DIT_AT6300_BDC_LED_SCHW†in ISTA) to swap the left and right LED main light modules. You will have to pull the front bumper (ISTA repair 51 11 156 “Removing and installing front bumper panelâ€) to access the LHM2 modules.
If the problem moves to the opposite side when you swap the LHM2 modules, the module that the error follows is defective and must be replaced.
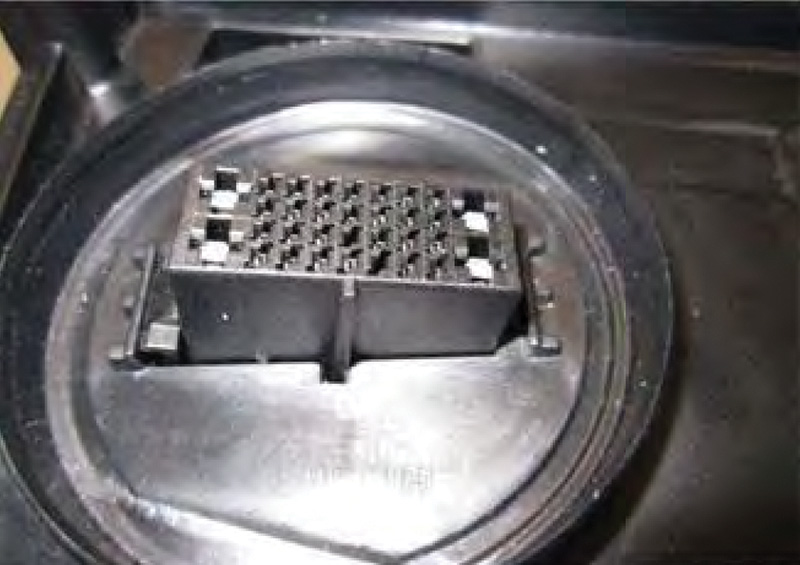
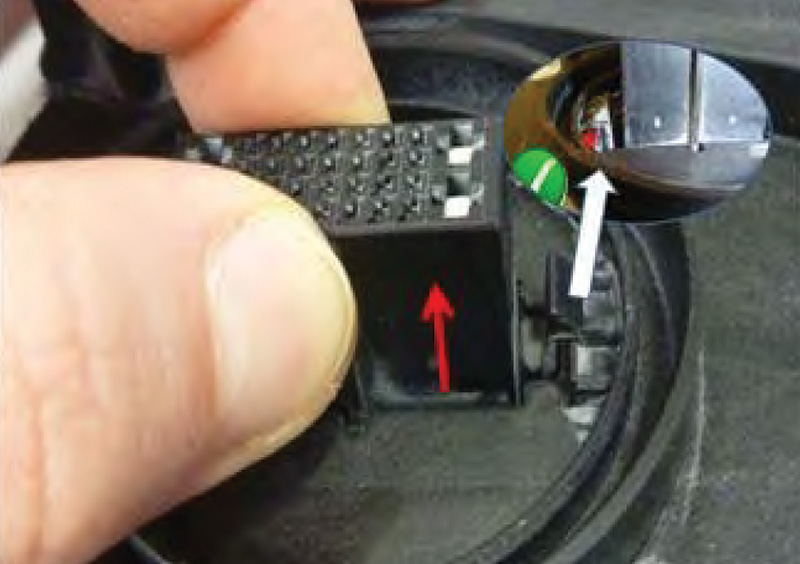
If the lights function correctly after switching the LHM2 modules to opposite sides, check to make sure the connector on each LED headlight is properly positioned and not loose. Remove the LED headlight. Push its connector down, then pull it back up until it locks into place. Do the same for each headlight.
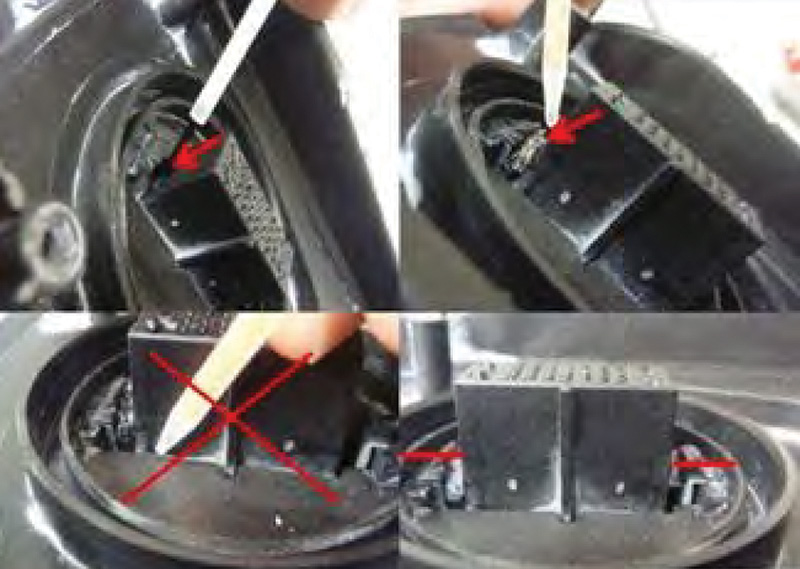
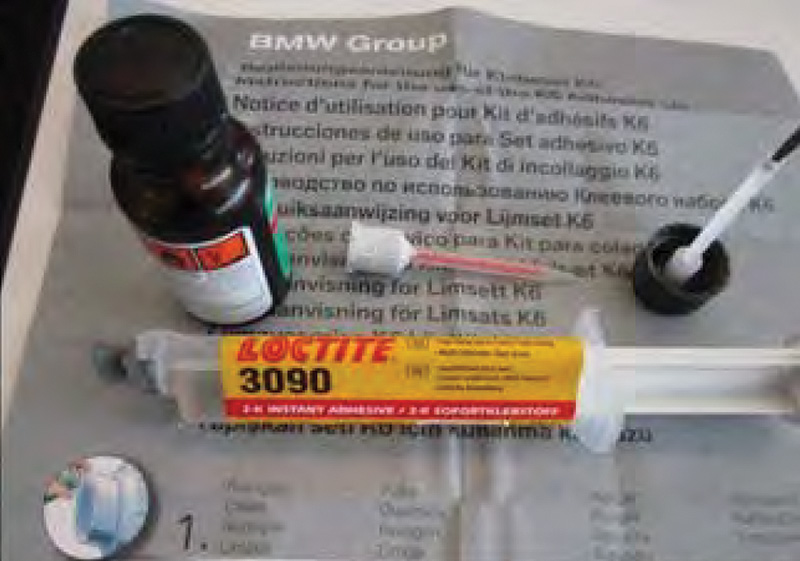
To prevent the connector from becoming loose again, apply an adhesive to the locking tab before reinstalling the headlight.
2. Low beam flashes briefly after startup
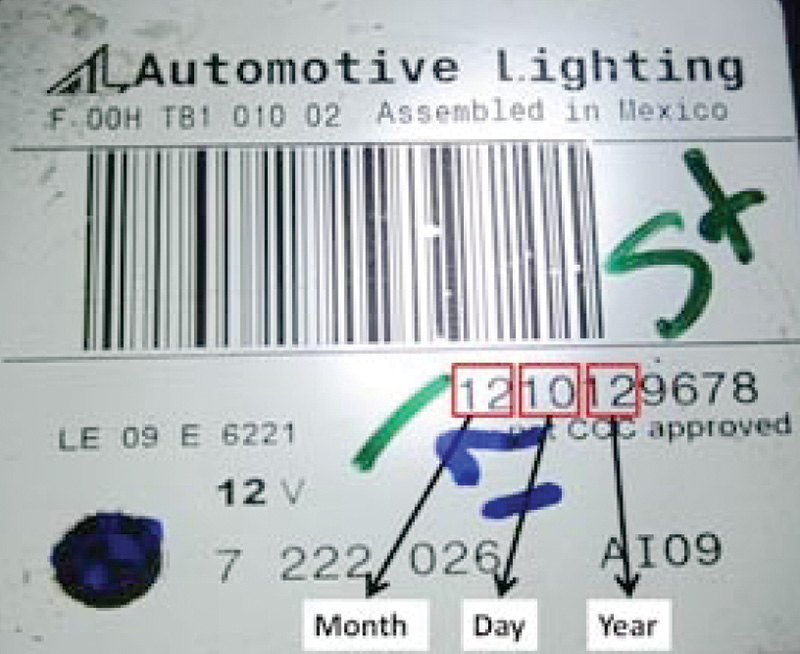
On BMW F-Series vehicles produced from August 31, 2008 to July 9, 2014 with option 552 (adaptive LED headlights), the LED low beam headlight may flash briefly once the ignition is on. The problem applies to the BMW 7 Series Sedan and Sedan LWB, 6 Series Coupe, Gran Coupe and Convertible, 5 Series Sedan and Gran Turismo, and the X3 (F25).This issue can occur each time the vehicle is started. See the TIS bulletin SI B63 11 14 “LED Low Beam Flashes Briefly After Ignition Switched ON†for additional details.
When the LED low beam headlight begins flashing on and off, the system may store one or both of the fault codes 0xDA1411 or 0xD9D411. Both faults reflect a problem with the operational status of the headlights. The codes are set when the operating function signal that is transmitted from an LED main light (LHM2) module is invalid or does not fall within parameters set in the control module software.
The cause of the problem is typically a faulty LHM2.
Repair procedure
Diagnose the fault by performing a vehicle test using ISTA/D. If both fault codes 0xDA1411 or 0xD9D411 have not been set or stored by LHM2, follow the diagnostic instructions in the ISTA/D test plan. If the test shows that both codes have been set, replace both LED main headlight modules.
To access the LHM2 module, pull the front bumper (ISTA repair 51 11 156 “Removing and installing front bumper panelâ€) and remove the headlight assembly (ISTA repair 63 12 140, “Removing and installing left/right headlight – LED technologyâ€).
Remove the LHM2 per ISTA repair instruction 63 11 800, “Replacing LED main light module left.â€
Reprogram the control module
After installing a new LED headlight, you must reprogram the control unit to enable communication with the replacement light. In the ISTA/P program/encode menu, select the control unit you replaced (LHM2_R or LHM2_L), or both, to initialize.
NOTE: ISTA/P will automatically update coding for all programmable control modules that are not already using the latest software version. For more information on programming using ISTA/P, refer to CenterNet/Aftersales Portal/Service/Workshop Technology/Vehicle Programming in the BMW TIS.
3. Stress cracks in headlight lens cover
Second-generation BMW F25 (X3) models produced from September 30, 2010 to June 21, 2012 may experience stress cracks in the headlight lens covers. See TIS bulletin SI B63 03 13 “Stress Cracks in Headlight Lens Covers†published in March 2013 for details.
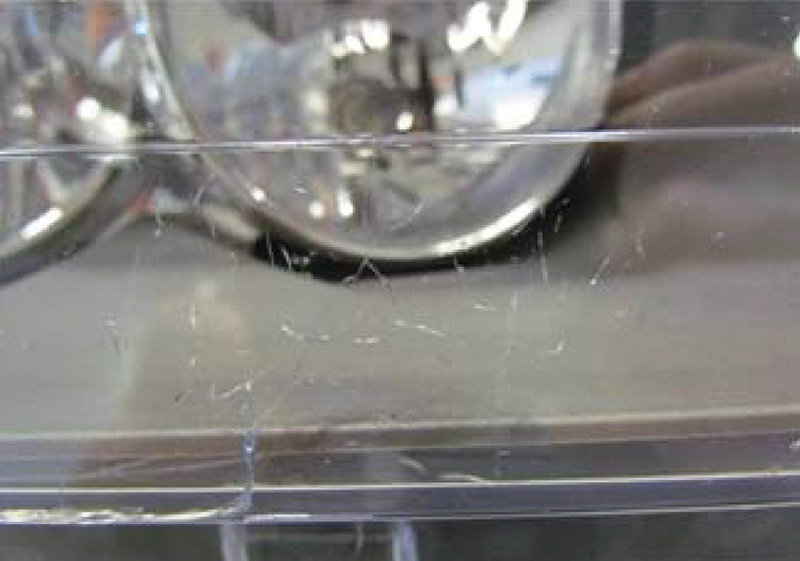
This fault in the lens cover material has two different potential causes. One is bump stops (pedestrian safety buffers) that are cracked, misaligned, or missing, and cause the front of the hood to weigh down excessively on the headlight lens cover. Another source of stress is old design hood lip seals that may press too tightly against the top of the headlight housings when the hood is closed.
Repair procedure
Replace only the headlight on the damaged side. Refer to ISTA REP 63 12 010 “Removing and installing or replacing headlight†for repair instructions. Install only a headlight produced on or after November 10, 2012.
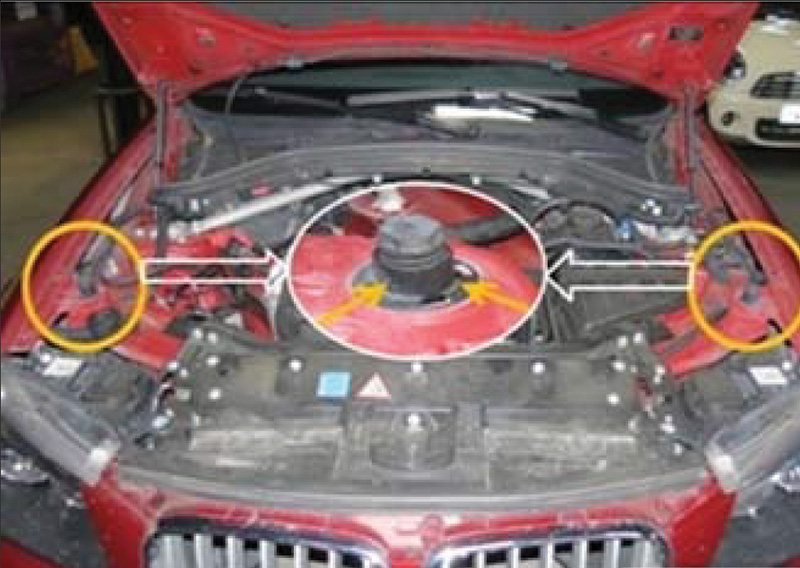
After replacing the headlight, check and replace any cracked, misaligned, or missing bump stops. Refer to ISTA REP 51 23 “Installing/Replacing bump stops†for procedural details. NOTE: Ask for the vehicle’s recent repair history. The bump stops may be out of alignment due to an incorrect previous repair.
Beginning with June 20, 2012 production of the F25, BMW introduced a new dual-chamber, reinforced seal designed to prevent the front lip of the hood from applying excess pressure on the headlight housings when closed. If you are working on a vehicle with the pre-June 2012 seals, replace them with the new design. After your repair, check to make sure the hood does not come into contact with the headlight housings.

4. Condensation or water droplets inside the headlight housings
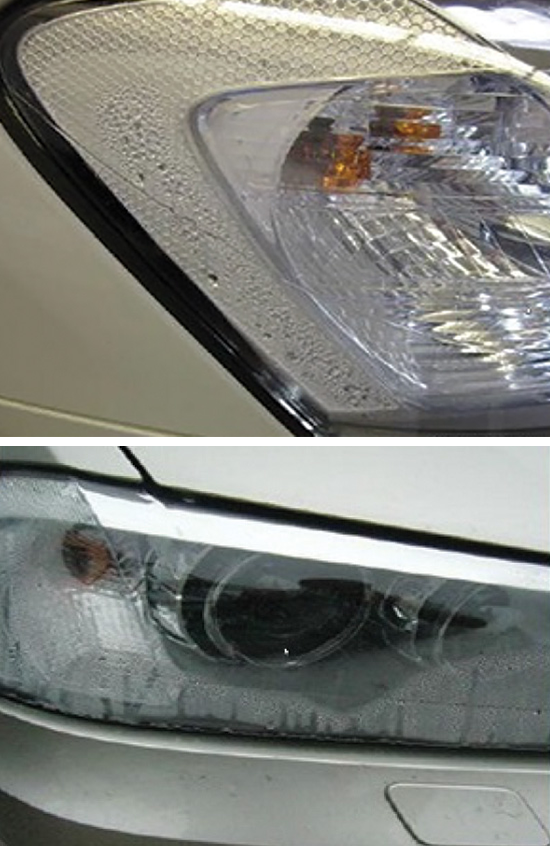
A customer may complain of moisture inside the headlight assembly. Your inspection will reveal either a fine condensate mist or large droplets of liquid inside the headlight housing. Look for TIS bulletin SI B63 05 16 “Headlight Assemblies Have Visible Internal Moisture/Condensation†for further details.
The problem and repairs discussed here apply to all BMW headlights in all BMW models, including the i3, i8, and the 7 Series Hybrid.
This problem can be caused by either a moisture leak into the headlight housing or condensation. How can you tell which has occurred? A leak will appear only on the headlight side that has a weakened seal or cracked housing. If the problem is due to condensation, you will see misting in both headlights. Additionally, a leak shows large droplets, while condensation appears as a fog or mist.
Condensation is natural
All air, even that inside a sealed compartment such as a headlight, contains some amount of moisture in the form of water vapor. Condensation occurs because cool air cannot hold as much moisture as warmer air. A quick chill in the weather can cause a temperature differential between the inside and outside of the headlight, creating ideal conditions for condensation to develop.
When warm, moist air inside the headlight touches the cooler surface of the lens cover, the air cools, and some of its water vapor condenses onto the surface. The same principle is behind the formation of condensation on the inside of windows in your home, which you’ll notice more in the cooler months than the summer. So condensation is a natural process, not a defect.
An easy fix
If the headlight lens is cracked or a seal is failing, replace the damaged component. If condensation is the problem, the solution is to dry out both headlights. See BMW TIS Service Bulletin # SI B63 05 16 (published in March of 2018) for repair procedure details.
Run the high beam to clear out the condensation. If after 30 minutes there is still a mist inside the lens, open all the service covers in the headlight assembly and, using a hot air blower, dry out the light. Do not let the temperature exceed 80 degrees C (176 degrees F).
After the repair, check your work. Make sure that the headlights function properly. If you see lime scale, crusty edges, or other permanent water stains on the lens, replace the affected headlight.
Reassemble the lens cover and attachments on the headlight. Make sure that the seals and rubber grommets are in their correct locations and are firmly seated. Reinstall the headlights per the instructions in the BMW TIS.
5. Headlight cleaning nozzles leak
When a customer complains of washer fluid leaking from the headlight cleaning jets on a BMW F25 (X3), the cause is typically calcification of minerals in the solution. The hardened material prevents a seal from seating properly, and allows fluid to leak from the nozzles. Information in this bulletin (SI B61 14 16) applies to vehicles produced up to March 31, 2015.
The solution is to replace the windshield washer reservoir and filler pipe, flush the system, and then install new washer nozzles, in that order. You don’t want to place new jets in until all other components have been flushed.
Repair procedure
You’ll need three different repair instruction documents.
- ISTA/AIR 6171061 “Replacing washer fluid reservoir for windscreen washer systemâ€
- 6167122 “Removing and installing/renewing right high-pressure nozzle of headlight cleaning systemâ€
- 6167120 “Removing and installing/replacing left high-pressure nozzle of headlight cleaning systemâ€
When done, refill the system with 5 liters of windshield washer cleaning fluid. Verify that the headlight cleaning function works and check that the nozzles do not leak.
Always check for bulletins
All of the information in this article was extracted from service bulletins published by BMW. The Technical Information System (TIS) at www.bmwtechinfo.com is the best source for factory-approved diagnostic and repair information. Use it and help your customers keep their lights on.


0 Comments