Save time and effort. It’s easy to use.

Ever assemble a piece of IKEA furniture without following the instructions? How’d that turn out? Well, the same principle applies to reassembling a German car after a collision: The instructions are there for your benefit — ignore them at your own risk.
Okay, you’ve been doing collision repairs for decades, right? And the cars always go out looking good, hardly any customer complaints, and you almost never need the instructions, am I right? I mean, how hard is it to pop in a new quarter panel or adjust the door? You can probably do it in your sleep.
But how sure are you that those repairs are as safe for the customer as the original? Did you do the least amount of work to accomplish the result? Hit any ‘gotchas’ along the way? Scratch your head wondering how to approach a seldom-seen repair? There’s a better way, and it not only takes just a few minutes, but can actually save you time, money, effort and other troubles down the road.
The Mercedes-Benz Workshop Information System (WIS) contains all the work instructions for any work on a Mercedes-Benz vehicle, including virtually all collision repairs. Whether you’re stitching together a new frame rail or just hanging a new fender, the tested, approved and unarguably best way to approach that repair is documented in WIS.
Getting access to WIS is easy: If you are a Mercedes-Benz Certified Collision Center, you already have access through your included STAR TekInfo subscription. (See our series of articles starting in the September 2020 issue of StarTuned to learn more about the advantages and benefits of – and requirements for – getting certified). If you need access to STAR TekInfo, just visit startekinfo.com and sign up. Subscriptions for as brief as a single day are available at reasonable prices.
If you’ve never used WIS, or have been mightily confused by trying to find some information, then the rest of this article has been designed to ease your concerns.
Skipping ahead for just a moment, collision repair documents in WIS follow a predictable pattern of three major documents. As an example, from the ‘main’ document for replacing the rear outer wheel well, we see links to three major documents: First, removing the damaged section and preparing the vehicle for the replacement parts. Second is a document explaining how to prepare the spare parts for installation. Finally, the third document explains the installation and finishing process for the repair.
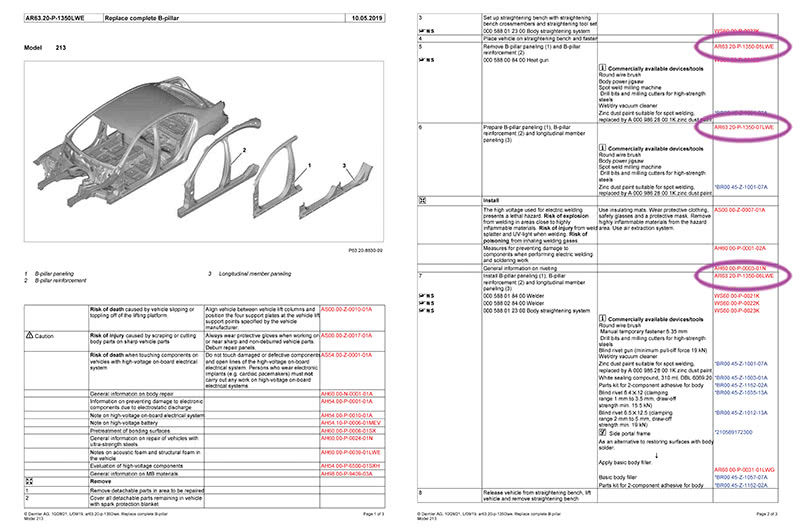
So, for example (using a 2018 E300), under “Replace complete B-pillar†(AR63.20-P-1350LWE), we find (in addition to dozens of reference documents, safety warnings and minor sub-procedures) documents AR63.20-P-1350-05LWE (Remove B-pillar paneling and reinforcement), AR63.20-P-1350-07LWE (Prepare B-pillar paneling, reinforcement and longitudinal member paneling) and AR63.20-P-1350-06LWE (Install B-pillar paneling, reinforcement and longitudinal paneling). Three somewhat complex steps, but shown in great detail along with materials and equipment needed. Just a few minutes’ reading, but it can save you considerable time during the job.
Other kinds of repairs, as found in a typical workshop, often only have a single document, for example “Remove and install rear shock absorber†(AR32.25-P-0110LW). However, in virtually every case, the main document refers to several sub-documents, which often refer to additional sub-documents. It can get confusing, but most of the sub-documents are for simpler tasks, such as “remove rear wheel,†which might not need to be printed out.
Document Numbers
In the above paragraphs, you’ll note that we also mentioned the document number for each of the operations. These document numbers follow a predictable pattern, and are unique to each document. The first two letters are the Information type (described further below). “AR†is for repair instructions, for example. The next 4 digits are the service group and subgroup; 62.20 is “Wheelhouse†under “Front end and fire wall.†The next character shows the type of vehicle; P is for passenger cars. The last digits are the same for every document of the same title, with the different models accounted for by the last letters such as LWE. Any information after those last numbers (such as “-05†just before LWE) indicates a sub-document to a main document.
If you know the document number, you can go directly to it by typing the number (no punctuation is needed, meaning “ar6220p1350lwe†will work) into the “Direct search by document number†box near the top of the screen.

How to Find WIS Documents
In general, there are four steps to finding any document in WIS:
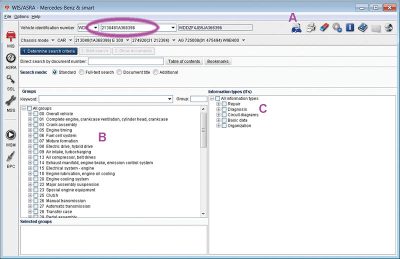
- Identify the vehicle: Normally, just type in the 17-character VIN (see Figure 1). There are other options, but they are rarely needed.
- Identify the Service Group(s): There is a list of service groups that appear, and each has several sub-groups. For collision repairs, most information is found in groups 60 through 65. There’s also a search feature if you don’t know the group number. We will discuss groups in greater detail in just a moment.
- Identify the Document Type(s): In general, selecting “All information types†is the best option. You might want to narrow the search, and we’ll show you how in just a moment.
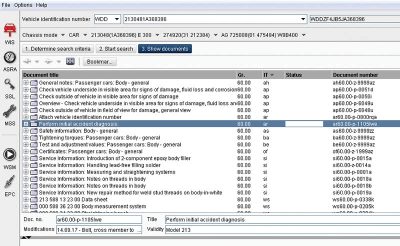
- Select the specific document: After clicking Search, a document list appears (Figure 2). Select the document you want to see and open it by double-clicking.
Navigating the document and user interface in WIS can seem challenging, but it is not nearly as complicated as it first seems. Take a look at Figure 3 as we explain the features.
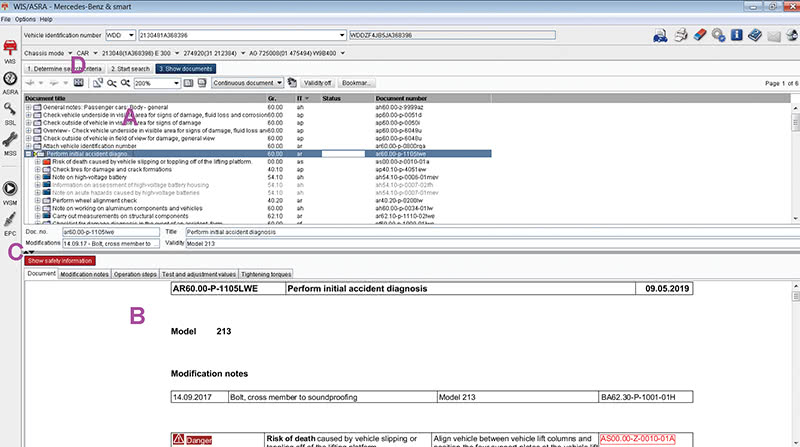
In the Document window (A) we see all the documents found by our search, here using the example of Group 60 and “All†Information Types for a 2018 E300 (W213 chassis). We’ve double-clicked a document (Perform initial accident diagnosis, document number AR60.00-P-1105LWE) and it has opened in the Viewing Pane (B) below. While it is possible to click and drag the separation bar (C) upwards to see more of the document, it is a best practice to simply click (D), the “Show/hide Hitlist†button (alternatively, you can press the F9 key), which results in a display as seen in Figure 4; the document list is minimized.
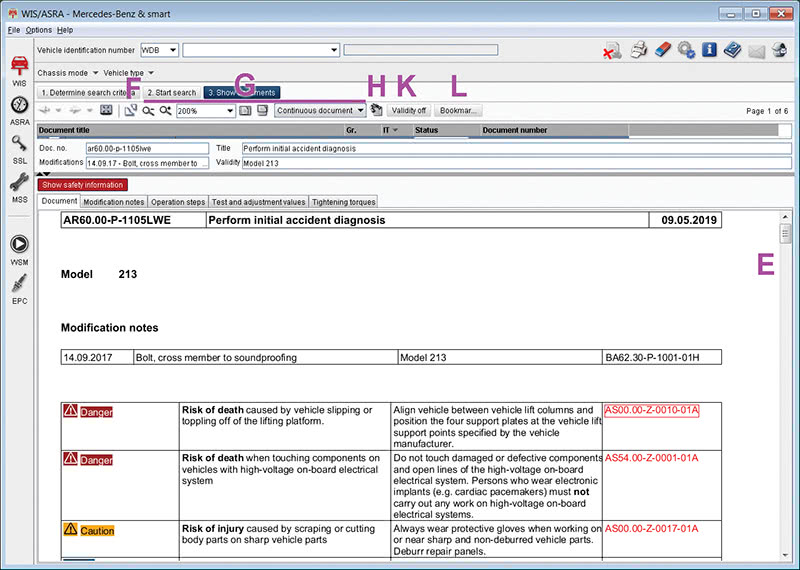
At this point, you can scroll up and down (E), ‘tear off’ (F) the document (which opens it in a new, separate window), enlarge or reduce (G) the document display size and adjust how it is displayed (there are several buttons and boxes for this, try them to see their effect), perform a full-text search (H) within the open document, turn off the VIN filtering (K) or create, show and delete Bookmarks (L). Mastering these controls are essential to efficient use of WIS but in reality it takes only a minute or two to understand once you’ve used them.

Navigating within a WIS document is also easy. Often you will find that a document you are viewing has links to other WIS documents. These are hyperlinks, which can be clicked to go directly to the new information. The link color has meaning: A red hyperlink leads to a different document that is relevant to the VIN you’ve entered, a blue hyperlink leads to another section of the same document you are viewing, and a gray hyperlink leads to a different document that does not apply to the VIN. See Figure 5.
If we click a hyperlink, the Document History buttons become active. These work like the back and forward buttons in a web browser: The back button goes back one step, for example. Using these buttons, you can always return to the original document from where you started. It may take some getting used to, burrowing into documents and then backing your way out, but eventually it becomes second-nature. If you get lost, just click the Show/Hide Hitlist (D, Figure 3) to get back to the initial search results.

In the upper right corner are several useful buttons, refer to Figure 6 to see what each of them does. And, in the upper left, you’ll see the Help menu: Any time you’re not sure about what you are seeing, open the help system to get a quick answer.
So far, identifying the vehicle is an easy step: Just enter the VIN. Now we need to find the service group with the information we need. While some of the group names are obvious – 42 (Brakes) is one such example – the content of other groups can be a little less so.
Look closely at the group list (B, Figure 1) and you’ll see every main 2-digit group number has a little ‘plus’ sign next to it. If you click that, the group opens to show the subgroups. See Figure 7. If we focus on collision repairs, most of the mechanical repair documents are found in groups 60 through 65, and interior non-structural parts in Group 68. Let’s take a closer look at what is in each of these groups:
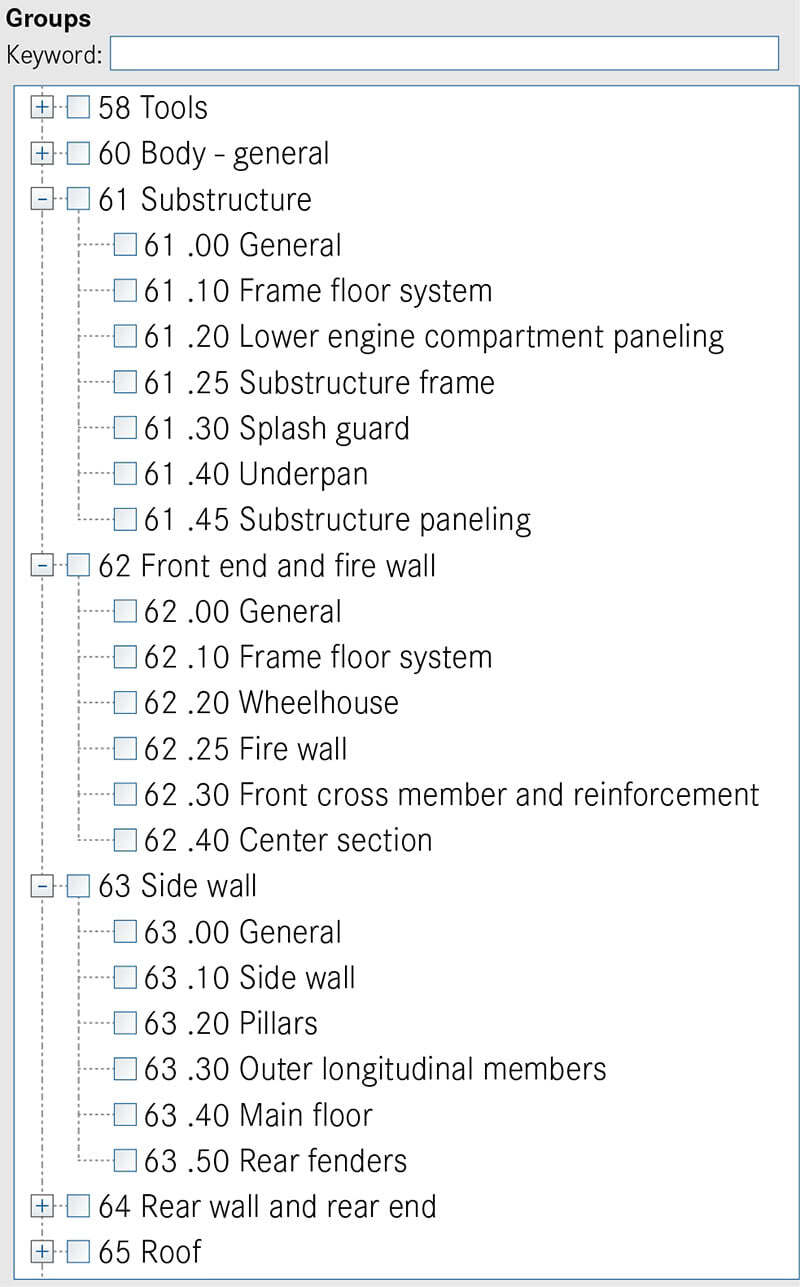
Group 60: Body, General
This group covers widely-applicable documents such as accident diagnosis and vehicle damage checks, safety information, and test, adjustment and fastener torque values, as well as special tools and workshop equipment.
Group 61: Substructure
Substructure includes underbody paneling and cross struts.
Group 62: Front End and Fire Wall
This group includes the front end, fire wall, front wheel wells, frame rails, crossmembers and strut towers.
Group 63: Side Wall
In addition to the A-, B- and C-pillars and longitudinal members (rocker panels or side sills), this group also includes the rear wheel well and fender.
Group 64: Rear Wall and Rear End
Includes the trunk floor, rear bumper crossmember, shock absorber mounts, rear axle crossmember, rear end of the trunk opening and rear wall.
Group 65: Roof
Sheet metal and frame parts above the top of the door line. Does not include sunroof (group 77) or soft top (group 78) or hard top (group 79) information.
Group 68: Interior Equipment
This group includes information on removal and installation of interior trim panels and equipment, including paneling inside the trunk. This is a fairly large group that includes instructions for everything from the ashtray to the rear shelf covering. This group can really help avoid damage to plastic and wood trim parts.
Group 88: Detachable Exterior Parts
All the exterior ‘bolt-on’ parts are in this group, including hood, trunk, trim, mirrors, fenders and bumpers. Most important here is the information about body gap alignment and specifications.
Other Groups
For other repairs, scroll through the groups to see what they contain. Or you can search (see next page) to help figure out which group has information on a particular system or component. If you know which service group(s) you need, just check them off. If you’re not certain, you can expand a group to see what it contains by clicking on the “+†symbol to the left of each group.
Some other collision-relevant groups include group 32 (suspension), group 33 (front axle), group 40 (wheels and alignment), group 72 (doors) and groups 97 (body sealing) and 98 (paintwork).
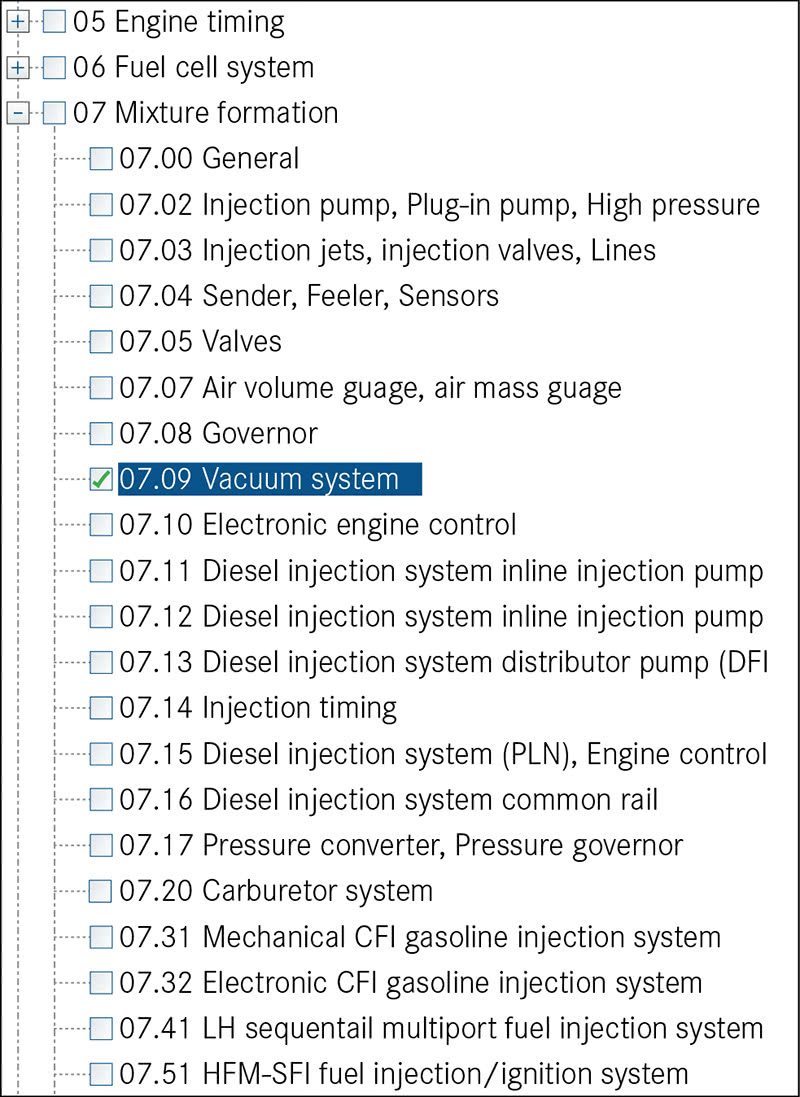
It may be helpful to identify the specific 4-digit service group and subgroup, particularly in larger groups like 07 (Mixture formation, essentially the engine management system) or 54 (Electrical), to help narrow down the number of documents displayed. For example, if you’re looking for information on the engine vacuum system, selecting only group 07.09 will help keep the number of documents you need to scan to a reasonable value.
Keyword Search for Groups
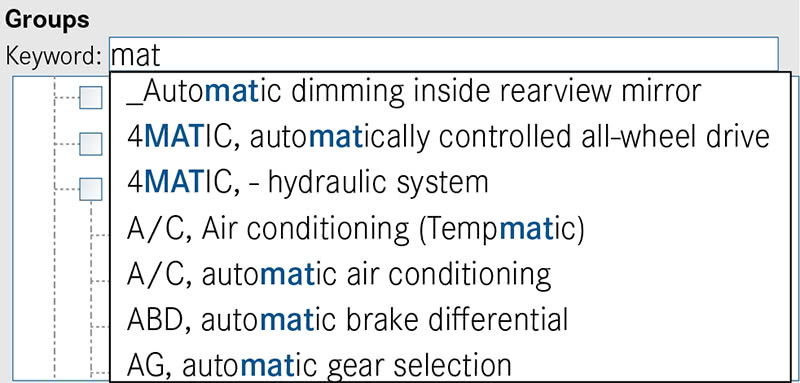
You can also use a Keyword Search for most vehicle systems. The Keyword search identifies all entries that match the letters typed, so typing in “mat†will bring up entries for 4-MATIC, Automatic Transmission, Pneumatic system and Floor Mats for example. If a keyword search doesn’t bring up the result you expect, try a different keyword.
There are several other search options, including a Full Text search of all WIS documents. For the most part, we rarely use these search features, as we’ve become familiar with the service groups and what they contain. But every once in a while, search comes in handy. To learn more about the different search features and how they work, open the Help menu and see the information there.
Information Types
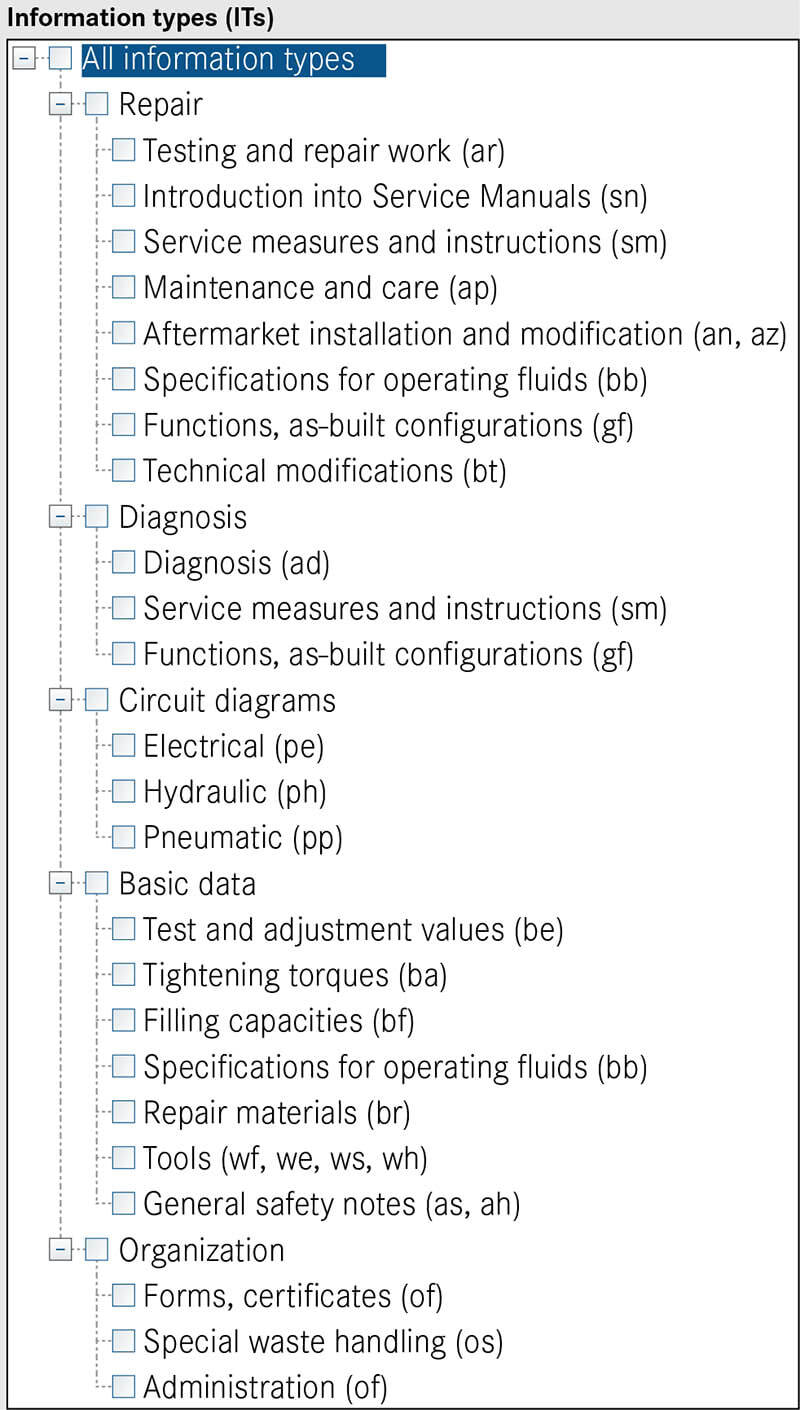
Although there are several Information Types (ITs) available (see Figure 8), in nearly all cases just selecting “All information types†will deliver a reasonably-sized search result list. In the collision groups, there are often many pages of Mercedes-Benz Special tools listed; if these are overwhelming and not needed, uncheck the box next to “Tools†under the Basic data section.
As mentioned above, document type AR (Repair Instructions) will cover nearly all of the documents you’ll likely ever need. But you never know what you might miss, so our recommendation is just selecting “All information types.†(See Figure 8.)
Icons Used in WIS
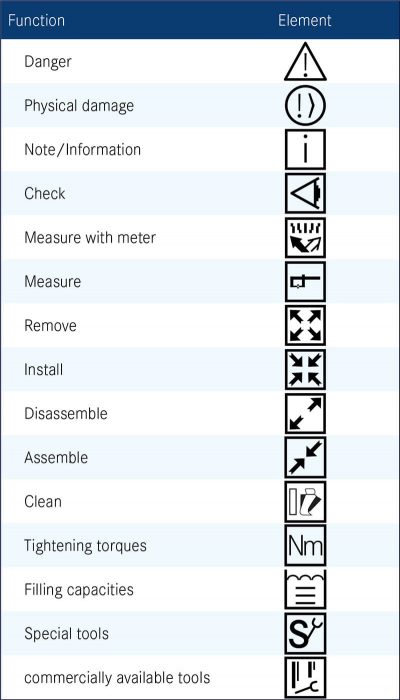
WIS documents contain many symbols (Figure 9), to help improve understandability for those whom language is not a strong point. These symbols mean the same thing in every language, and being familiar with them can help you better understand what it is they are asking you to do.
In our shop, we have a computer station dedicated to WIS, and there’s a high-speed printer connected. Since WIS is always on, it takes only a minute to find the documents we need and print them out, and then perhaps another 5 minutes to read and understand them. With a good idea of the general repair plan, we go at the work and keep the printouts handy for reference during the job.
In the under 10 minutes it takes to use the WIS documents, we have sometimes found an hour or more in time savings on the job. Some of the savings come from avoiding the removal of too many parts, having the correct repair materials at hand, minimizing the effort expended to perform the repair properly, and having the confidence to proceed without wondering if we’ll end up boxing ourselves into a problem.
One Last Point
While we always hope that our customers never get hurt in any collision, we know that those same customers have spent the money for a Mercedes-Benz to ensure they have all the safety the engineers can build in. We also understand how some collisions cannot be avoided, and people can get hurt. In the unlikely case that someone gets hurt in a vehicle you’ve repaired, you can be certain that some lawyer is going to carefully investigate whether those repairs were in any way faulty or contributed to an injury or death.
In a case like that, by pointing to your consistent use of WIS and following the manufacturer’s repair instructions as a normal matter of business, you have one of the strongest arguments to protect you from liability for an improper repair. While it may never happen to you, if it does, the consequences can be devastating. Just stick with the Mercedes-Benz Approved repair procedures in WIS and rest easy.
The Mercedes-Benz Workshop Information System is a valuable resource for all kinds of repairs, including collision repairs. It is easy to find the relevant document if you understand the simple steps to finding it. Just a few extra minutes spent reviewing the manufacturer’s approved procedure can save you time and effort in your work, ensuring a proper repair with maximum efficiency. If you have questions about WIS, stop by your dealer’s service department; they’ll be happy to share their expertise with you.



0 Comments