
Ease of manufacture, shear strength and aesthetic body lines are only some of the reasons Mercedes-Benz uses chemical bonding for joining body panels. How can we duplicate an OEM panel seam?

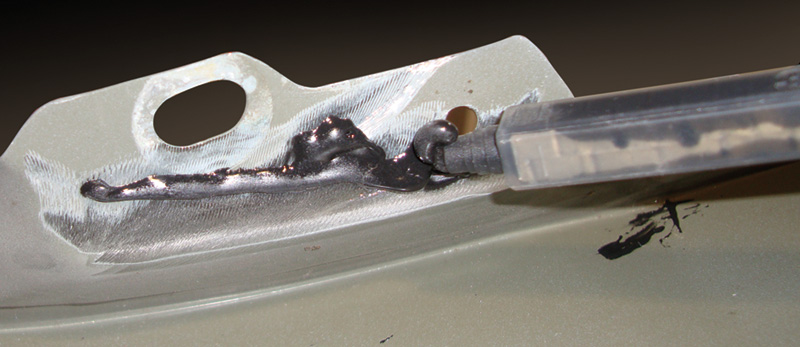
A kit is available through your Mercedes-Benz parts supplier that will allow you to bond panels using adhesives. Notice the two static mixers with pink tips. Before attaching the mixing tube, squeeze out one inch of material. After attaching the tube, squeeze out another inch to equalize the amounts.
Take a moment to stand still in this day and age and you’ll notice the incredible changes taking place in many aspects of our lives. Continue to stand still and you will become obsolete. We need to keep up with the technology just to break even.
The automotive body repair industry has seen tremendous changes over the past five years. New construction, new application and new materials are all used in an effort to make vehicles lighter, stronger and safer for their occupants. When such a vehicle is involved in an accident, the crumple zones and shear points the engineers created come into play. The result is a passenger cabin with minimal intrusion and distortion, and, hopefully, an outer body that’s repairable. Traditionally, metal panels were joined using various welding techniques that depended on the application. Inner structural panels were welded together and outer panels and other body components were mechanically fastened, either by riveting or bolting.
Glue ’em Together?
With modern vehicle construction, there are places that are too difficult to get to (or “blind,†meaning access is impossible) to use mechanical fasteners or spot welders. Also, different kinds of materials need to be attached, so welding is no longer an option. Chemical bonding adhesives may work well in situations like these. Another often-overlooked benefit of chemical bonding is the reduction of vibration and noise between mated panels, even those that are riveted or bolted. The technology of chemical bonding has expanded within the past few years, so there are many different types of adhesives used in the collision repair industry. Each type has its own characteristics that are more suited to some jobs than to others. You need to know these details if you are going to offer factory-like construction in your repair. If the vehicle’s structural integrity depends upon chemical bonding, you need to maintain this construction integrity in a collision repair.
Different Types of Adhesives
You are not limited
to using chemical bonding only on
panels that are not bolted or riveted. Applying a bonding agent to mechanically-attached panels reduces stress, fatigue and noise from flexing.
As mentioned earlier, there are many different types of bonding adhesives for use in the automotive body repair industry. In the past, cyanoacrylate (or, “Krazy Glueâ€) was used for minor repairs to tail light assemblies and mouldings. It dries very fast, even faster with a drying agent or adhesion promoter. The mechanical characteristics of this glue are generally not suited for automotive applications, however. It is a very thin liquid and doesn’t fill gaps satisfactorily. As a result of being thin, it doesn’t work well with porous materials, either, but it can be used in low-stress minor repairs on metal or plastic just make sure you have a tight fit with minimal air gaps.

Follow the adhesive manufacturer’s instructions for
surface preparation. Metal panels may need to have their galvanic coating removed before the panel is applied to the structure. At the same time, care needs to be taken not to compromise corrosion resistance at the repair area.
Next, there are bonding glues. These are usually epoxy-type adhesives, but can also be composed of acrylic or methacrylate compounds. These adhesives are strong and well suited for automotive applications. They apply as a gel/heavy liquid so they tend to stay where they are applied. Being thicker, they fill surface irregularities fairly well when bonding panels. They are not as temperamental as some other adhesives, but there are some conditions we need to know to get the best performance out of them. The number-one thing to understand is that these bonding adhesives dry by chemical reaction. You will usually see an adhesive compound mixed with a hardener similar to that used with body filler. This chemical reaction usually occurs best at 75 deg. F. and will take about an hour or somewhat more to dry. It will take roughly four hours to fully cure, but you can continue repairs after the first hour. Acrylics may dry faster, but their strength limitations should limit them to smaller repairs.

First, squeeze one inch of bonding material out of the tube, then install the static mixer and discharge another inch to “equalize†the mixture. This will ensure equal and properly mixed adhesive material.
Urethane adhesives are also useful in automotive applications. While not as strong as epoxy bonding glues, it can be used for larger plastic repairs found on bumpers, brackets and/or backing panels. It can also be used for grille, headlamp assemblies, moulding and emblems. It is thicker than cyanoacrylate, so it fills gaps well and stays where it is applied. It does have a very short working time of under a minute, so be prepared to fit components together quickly. It is a two-part adhesive that needs to be mixed before application.
The Application Process
As in any collision repair, surface preparation is often the most time-consuming step. It is always a good idea to remove as many layers of coating as possible so the adhesive can bond to the mechanically strongest surface. Different bond agents are available for metal and plastic attachment. Follow the instructions of the adhesive manufacturer regarding bonding surfaces preparation. In any event, you will need a clean surface to begin. Start off by cleaning with soap and water. Follow up with an astringent used in plastic prep. This provides an oil-free surface that will not contaminate adhesive chemicals. Sandpaper of 180 grit will provide an optimal surface for the adhesive to bond to. It is very important that all the loose material from sanding be removed before application. Thoroughly clean the surface once again with prep cleaner to prepare for the adhesive application.

The two-part adhesive plastic housing fits into this applicator gun. The gun is necessary if you’re going to use the new applicator kit. Its small size makes it ideal for smaller patch panel and full panel bonding.
If an epoxy requires a two-part mix, don’t just “eye†it. Use a glue gun with a static mixer. It is merely a plastic tube with groves that direct the adhesive mixture together for proper consistency. Before installing the static mixer, “equalize†the mix by forcing about one inch out of the tube. Then, install the static mixer and again squeeze out a small amount of adhesive. This starts off the mixing process correctly. Depending on the application, apply a bead about 10 to 13mm wide at the panel contact points. While the chemical reaction is occurring, you’ll notice that heat is being generated. This is normal. Remember how long the working time of your adhesive is. Since the reaction is temperature sensitive, you can control it to some extent by heating or cooling the area. Heating will speed up the drying process. You can use a heat lamp and bring the area up to about 140 deg. F. Apply the panel to the vehicle and make sure of its alignment with other body panels. Do not pull up on the panel to reposition it. Instead, slide the panel into its proper position.
Clamping

Mercedes-Benz requires all chemical bonding to be supported by some mechanical attachment such as spot welding. Or, when attaching dissimilar metals, you can use these special structural rivets, which are available from your Mercedes-Benz parts supplier.
During this time body repair panels should be clamped together to hold them in the proper position, force the adhesive into surface irregularities, and squeeze out excess adhesive. Many automotive bonding agents contain glass bead, which provides a heavier consistency. Once again, this helps fill gaps and maximizes the surface area of the bond, which leads to more strength. This is a result of a material’s “bond line control,†which is its ability to maintain thickness under clamping forces. Use as many clamps as you can fit and make sure they hold the panels tight. At this point take a clean rag or acid brush to remove any excess adhesive material before it dries. Of course, once it dries it will be a lot harder to remove. If you can, schedule your work so you can let the bonding material cure overnight. As mentioned earlier, you can heat the area to reduce the curing time if necessary. Once the adhesive is fully cured, you can continue with your repair. With a proper bond, you have returned the structural integrity of the vehicle as close as possible to its pre-collision state. Proper repairs not only affect crash worthiness in future accidents, but also the resale value of your customer’s Mercedes-Benz, although these points are often overlooked. Your peace of mind comes from knowing you performed the best job you could.Â


0 Comments