Mercedes-Benz timing chains and tensioners last and last. But, given the tremendous number of miles people put on these vehicles, they will need attention sooner or later
In order for a four-cycle engine to work, there must be precise coordination among the intake, compression, power and exhaust strokes. Advances in engine technology have helped increase performance throughout the rpm range. Variable intake manifold runners optimize air intake velocity, variable valve timing has broadened the power band, and variable lift further fine-tunes air intake and exhaust flow for even greater performance, efficiency and economy. Regardless of how high-tech intake and exhaust events have become, maintaining basic cam/crank timing remains essential.
Keeping Time

Your paid subscription to www.startekinfo.com will allow you to access WIS
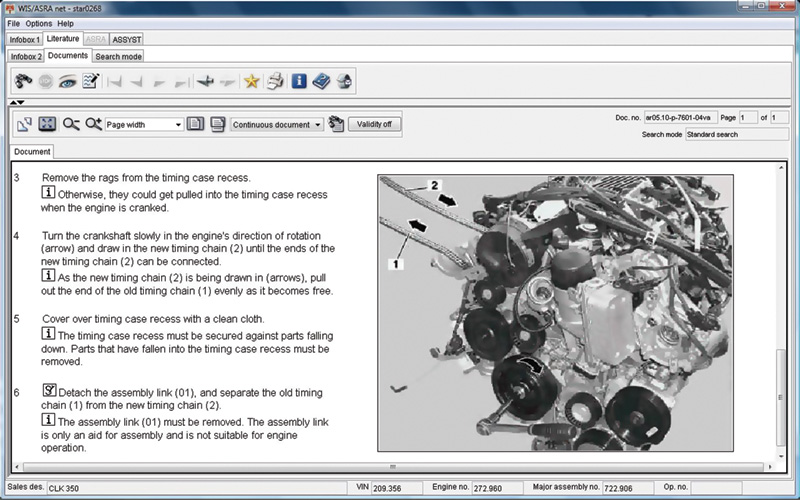
documents. Here the correct step-by-step procedures are laid out for you. You are also linked to pages that let you know what special tools you will need. The procedure for drawing in the new chain is pictured here.
Mercedes-Benz vehicles have always excelled in sound engineering and reliability. From Formula 1 to Indy cars, Mercedes-Benz engines have always been in the top tier. The same engineering principles that are used to create a reliable race engine are also used for production vehicles. One steadfast belief held by the company’s engineers is in the reliability of the timing chain. The valve trains found in large six cylinder, V8 and twelve cylinder engines naturally have more mass to move than those of little fours. This puts undue stress on the camshaft drive mechanism, making a timing belt marginal, and making replacement at regular intervals necessary. On the other hand, in a properly-maintained vehicle timing chains and related hardware can last well over 200,000 miles. Eventually, however, wear will reach the point where diagnosis and replacement will be needed, so you have to know how to perform the job properly. This is usually not too difficult a task providing you had the correct tools, and any shop specializing in Mercedes-Benz vehicles should have such items as a chain pin remover/installer.

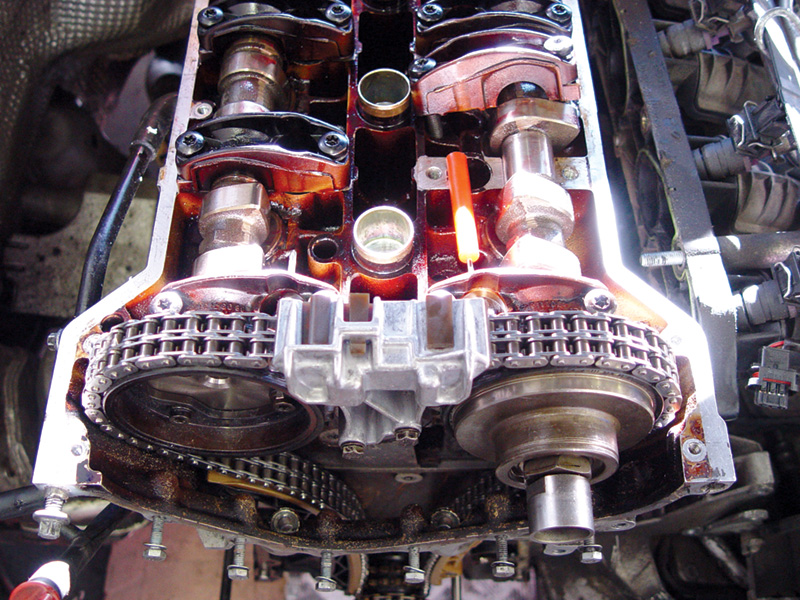
On this 111 engine, if the camshafts are in their home position you will be able to install a cam positioning tool in the backs of the cam sprockets. The screwdriver indicates the location of one of the holes (intake cam). Notice how the intake and exhaust cam lobes are facing one another. This gives you a ballpark idea that you have the timing close.
First Scenario
Typically, you will need to deal with the timing chain because of noise from a stretched chain or weak tensioner, or because the cylinder head must be removed for whatever reason. Either way, the timing chain has to be removed and put back into proper synchronization upon reassembly. In the case of noise, the job is not as daunting as you may think. Mercedes-Benz has service procedures that make this a relatively simple task. Many Mercedes-Benz engines have the timing cover cast as one unit with the block, so the cover cannot be removed to access the timing chain.
There is a straightforward procedure, however, that makes replacement possible anyway. The first step is to remove the valve covers. Also remove the spark plugs to make it easier to turn the crankshaft by hand. You may want to start with the engine at TDC, it’s not really necessary. In most Mercedes-Benz “Checking Engine Timing†procedures, you are asked to rotate the crankshaft to a specific point on the pulley. This is usually not TDC, but a specific degree mark past TDC. If you are so inclined, you can apply paint marks on the cam gears and adjacent marks on the timing case cover to check your work once you have changed the timing chain.

Look at the intake cam on the right and you can see the camshaft timing adjuster. Since the engine rotates clockwise, you need to turn the adjuster counter-clockwise all the way until it stops, then engage the timing chain.
The next step is to use the chain separating tool to force out the two pins of one outer link. This will break the chain and leave two sides of inner links exposed. Install a service master link on the chain leading into the upper portion of the engine. Use one pin to attach this link to the upper side of the chain currently installed in the engine. Connect the other half of the service master link to the new replacement chain. You should now have one long continuous chain half installed in the engine. Grab the lower half of the old timing chain coming up from crankshaft toward the passenger side camshaft and pull. While doing this, rotate the crankshaft pulley clockwise. This will draw in the chain. It is critical not to rotate the engine counter-clockwise at any point in the repair. If you do, the chain tensioner will collapse and probably allow the chain to jump teeth on one of the sprockets, thus throwing off valve timing. If you continue to rotate the engine clockwise you will eventually draw in the entire section of new double-roller chain and once again see the service master link.
At this point, you must remove the service master link as it is only intended to be used during service. Install the permanent link with a chain link pin installer. The tensioner may be pushing on the chain hard enough as it comes up from the crankshaft that the two ends won’t meet. So, you can loosen the tensioner to help with the installation of the permanent link. Don’t take the tensioner out all the way as this may allow enough slack for the chain to jump time. The permanent link outer plates need to be installed and a chain rivet installer must be used to stake down the roller pins just like those of the other links. Rotate the engine several times by hand and watch for your paint marks to be sure valve timing is correct.
At this point it should be safe to remove the tensioner and either install a new one or reset the old one. Resetting the tensioner is critical. As you ran the new chain in and the old one out, the tensioner’s spring pushed outward to take up the slack in the chain. If you were to leave it in this position, the chain would be far too tight. In severe cases, this can snap off a cam sprocket! To reset the tensioner, remove the center cap with a hex key socket, and the pre-load spring will fall out (watch out for the aluminum sealing washer). These are hydraulically-assisted tensioners that require engine oil pressure to add tension as engine rpm rises. The pre-load spring pushes on a piston that in turn pushes on the chain tensioner guide. The piston ratchets outward to apply tension. Once it ratchets out, it will not return even with the spring removed. So, remove the whole body of the tensioner, pull the piston out and away from the pre-load spring cap.

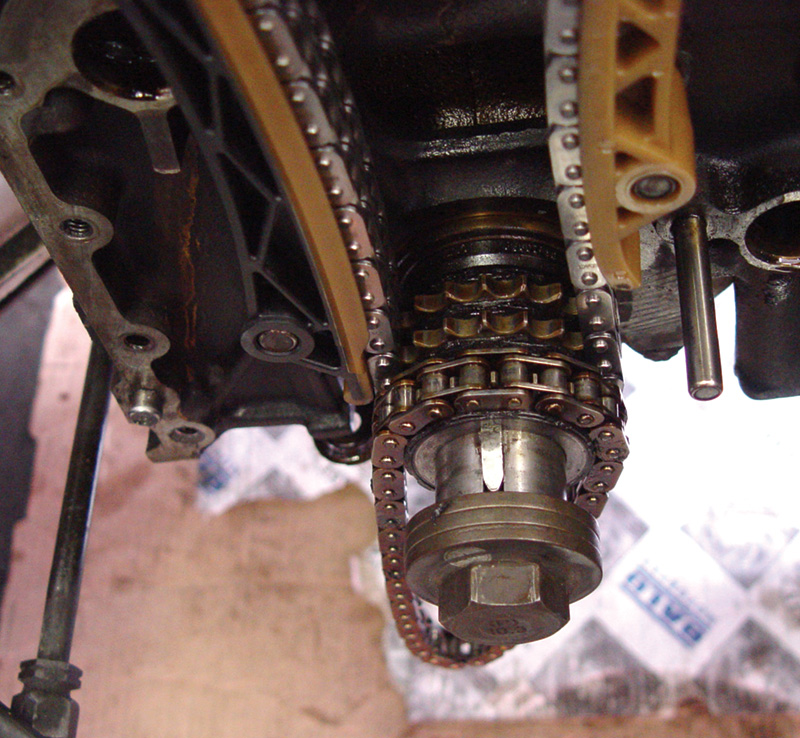
Mercedes-Benz usually times its engines at a position other than TDC. In the case of this 111 engine, the timing pulley should be set to 20 deg. after TDC. This puts the keyway in the crankshaft at just about the 12 o’clock position.
Now, you should be able to line up the cams.
Now you can mount the body of the tensioner into the timing case cover, making sure the aluminum sealing washer is properly installed. Put the piston into the opening of the tensioner body followed by the pre-load spring, then install the cap over the spring and thread the cap into the tensioner body. Some force will be required to compress the spring, which is necessary to keep the chain tight enough for start-up. Once the engine is running, oil pressure does the job. That’s why it’s important to replace both aluminum sealing washers even if you’re reusing the old tensioner. By the way, when ordering a new tensioner you should be aware that it does not come with the threaded cap, so you will need to use the cap from the old one.
Second Scenario
If more extensive service work such as a cylinder head R&R is performed, it may be easier to simply remove the timing chain as one unit. Start by removing the tensioner. You can then remove either the camshaft timing sprockets, or the camshafts themselves, depending on the particular engine. For instance, on the M272 motor the timing chain only drives the intake cam, which then drives the exhaust cam by means of gears. In this case, the cams will have to be removed to access the timing chain. Drop the oil pan to access the crankshaft sprocket and you will also have access to the chain guides. After removing the tensioner, valve cover(s), chain guides, cam sprockets and oil pan, you will be able to remove and replace the unbroken chain. This procedure also requires some special tooling since you have to properly align the camshafts and crankshaft.
Over the years, Mercedes-Benz has used several different ways to assure that the camshafts and crankshaft are properly synchronized — too many to be thoroughly explained in a magazine article. So, we will provide a simple overview. There are usually a few types of special tools to lock down the camshafts. Some enter through the rear of the sprockets. An alignment pin passes through a hole in the cam cap and a hole in the sprocket. With variable valve timing comes the important step of setting the intake cam sprocket to the home position (retarded). Hold the camshaft itself in the locked position with a wrench and twist the camshaft adjuster in the opposite direction of timing chain rotation, which results in the retarded position. If there is any question of a camshaft adjuster not moving freely, now would be the time to change it. The use of non-approved oils in these engines can cause sludge build-up and jamming in the adjuster mechanism. This can lead to misfires, poor idle and the MIL/CEL coming on. On newer engines, special tools bolt down to the valve cover flange on the head, and tabs lock into the cam sprocket, but these will be covered in future articles. Generally, the crankshaft is located a few degrees past TDC and is not locked down.
Closing Up
With the timing chain and camshaft adjuster in the proper position you can start re-installing the chain guides, oil pan, valve covers and tensioner as outlined earlier. It is always a good idea to rotate the engine by hand several times to verify all components are properly timed and that the chain meshes smoothly. The final step should be to install the spark plugs and fire up the engine, allowing time for oil pressure to reach the tensioner before accelerating.


0 Comments