 Before a Jaguar can be cat-quick, it must get out of park. With sophisticated electronics these days there must be coordination among shifter modules and transmission range switches. Let’s look at this S-Type and see what’s involved.
You might get this statement from your dad: “In the old days, we used to pull a shift lever, and, through a series of linkages, put an automatic transmission into gear.†Well, the times they are a-changing. Modern vehicles have no shift linkage. The shift lever sends input signals to some sort of steering column control unit that then passes on the signal through the CAN bus to the transmission control unit, which may actually be mounted in the transmission!
Now, we didn’t just leap from mechanical linkages to electronically-controlled shifting overnight. Even in the ’60s there were push button shifters. In the ’90s and into this century a lot of trial-and-error development went on with different combinations of mechanical shifting and electronic controls. In the case of a modern-day Jaguar, an electronic shifter module is used along with a mechanical shifter cable. The cable attaches to an arm on the transmission and directly controls valve body operation. You may think that a Jaguar is too exotic a vehicle to work on, and that you’re not familiar enough with them to take on the challenge. But these are Ford 5R55N transmissions, used from the time Ford bought Jaguar. In addition, they’re also fairly simple to work on.
The Set Up
 Well, either as a result of the design, or wear of components, on occasion these transmission control systems will not allow the shifter to be moved out of park — the safety mechanisms will not unlock the shifter. In the case of a 2003 Jaguar S-Type with the 4.0L motor, the shifter module indicates the driver-selected gear to the transmission control unit. There is also a transmission range switch mounted on the transmission indicating shift linkage position there. If these two signals do not correlate, the shifter module will not allow the shifter to be moved. This has been an issue with these vehicles, and Jaguar has addressed it with bulletin #S307-16, which walks you step-by-step through the parts and procedures to correct this issue. The problem is more noticeable while parked on an incline, and Jaguar felt it was due to excessive wear of the control lever profile, and calls for an updated part. What are the steps, and how can you make sure you’re actually going to correct the problem? Here, we’ll highlight the important points that will properly repair the vehicle. In the end, the shifter module will align with the transmission range switch and take care of the shift linkage being out of alignment. This procedure applies to 2000 to 2002 model Jaguar S-Types.
Getting Down To Business
 As with most transmission service work, you should start by draining the oil pan. You do this by removing the large standpipe bolt in the middle of the pan. Normally, you remove the small hex key bolt to check the fluid level. Here you need to remove the larger standpipe bolt and drain most of the transmission fluid. While that is draining, you can start getting some components out of your way. You will not be able to drop the pan until you remove three components: The oxygen sensor connector at the front of the pan, the rear transmission mount, and while you may be able to snake by the transmission range switch, it needs to be removed anyway, so you may as well take it off. You can also access all of the transmission pan bolts more easily with these components out of the way. With the transmission mount removed, you are going to need to support the transmission at a point that is out of your way while you work. While removing the pan, realize that there is still a small amount of transmission fluid that you may end up wearing if you are not careful. There is a magnet in the pan to attract metal filings, so be sure to clean that off before reinstallation. More components may need to be removed, such as the filter screen, valve body, solenoid pack, and the park pawl/actuator rod, but for now we are going to move on to the tailshaft housing.
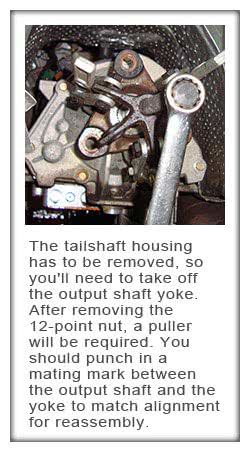
Once the pan is off, you are only getting started. The rear tailshaft housing must come off. This means the driveshaft needs to be removed, as well as the rear flange. You should mark the output shaft and the yoke so you can put it back in the same position and minimize the possibility of a driveshaft balance/vibration problem. It’s also a good idea to mark the position of the flex-disc between the yoke and the driveshaft both at the transmission and differential mounting for the same reason. Finally, take out the driveshaft as one piece with the center bearing so there is no possibility of misalignment, and remove the output shaft yoke with a 12-point socket. You will need a puller to remove the output shaft flange. With the driveshaft and flange out of you way you can then remove the bolts securing the tailshaft housing. After removing the housing, you’ll notice the park pawl actuating shaft jutting out of the back of the transmission. This will be replaced, so be mindful of its position.
 With the valve body in place, you can remove the manual control lever, but it may be easier with the valve body removed. If you don’t want to drop the valve body, you’ll still need to remove the detent spring that holds the manual control lever in position. If you are going to remove the valve body and solenoid pack, start by removing the solenoid pack electrical connector on the driver’s side of the transmission, on the case above the solenoid pack itself. It’s a blind bolt, but a 10 mm ratcheting wrench works great. You need a Torx bit to remove the solenoid pack. You’ll have to unplug the small two-wire connector for the pressure switch from the solenoid pack. When dropping the valve body, you need to know that there’s a spring between the valve body and the case of the transmission.
 We usually suggest that you lay out the valve body mounting bolts on a piece of paper in the same pattern they came out in just in case some of them have different lengths. In this case, you don’t need to worry since all of the bolts are the same length, but it’s a good habit to get into with any job. With the valve body coming down, make note of the position of the orange spring between the valve body and the case. In removing the valve body, you will lose much more transmission fluid and need at least two more quarts than the bulletin recommends. As with all transmission work, dirt and foreign material can severely damage the internals, particularly in the valve body, so be sure to clean all the internal components with lint-free rags and clean transmission fluid.
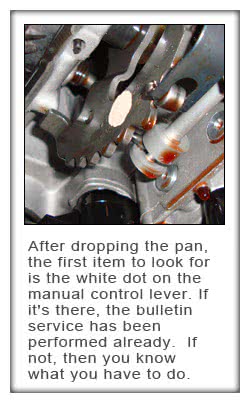
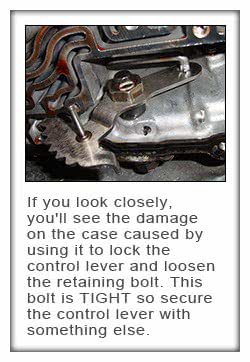
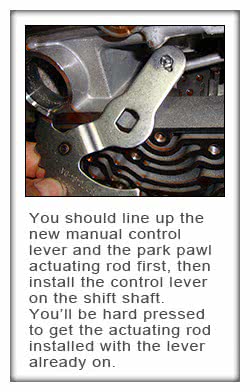
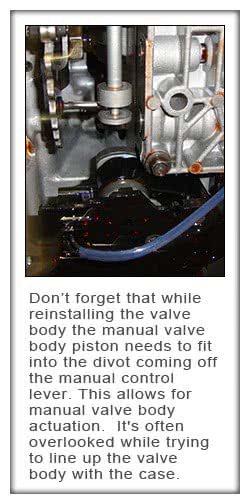 Now you can see the control lever that needs to be replaced. The new lever should not wear out. The nut that holds the shift pawl is TIGHT! If you leverage up against the case, you will bent the pawl and damage the aluminum. Try to grab the pawl with something to hold it steady while you loosen the nut. Once the pawl is removed along with the park pawl actuator rod, you can start installing the new components. Obviously, the first parts to be installed are the new manual control lever and new park pawl actuating rod. Hold the tail of the actuating rod and position the control lever so you can slide the rod into the lever. Then, line up the “D†slots on the lever and install it on the case shift shaft. Once these are installed, you are instructed to tighten the bolt that secures the lever to 35 ft./lbs. You should use a thread-locking compound to make sure this nut stays secure. If it comes off the shaft, the driver will no longer be able to shift gears. Even if you pulled the valve body and solenoid pack, you are now more than half-way home.
Half Way To Go
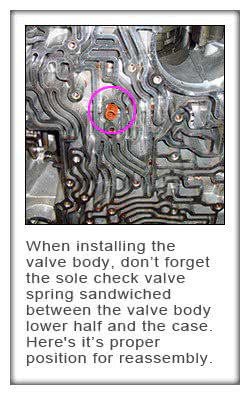
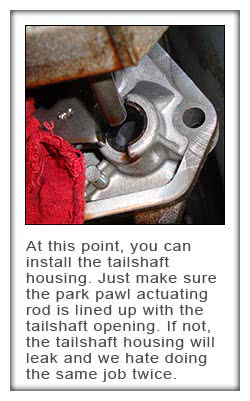
If you removed the valve body, position the orange spring in it and bolt up the lower half. When installing the solenoid pack, lubricate the two new “O”-rings that pass through the case. You must torque the bolts to 70 in./lbs. so as not to damage the internal circuitry. Don’t forget to plug in the pressure switch. Torque the valve body bolts to 89 in./lbs. You can now reinstall the transmission oil pan and/or start reinstalling the tail-shaft housing with a new gasket. Remember, the park pawl actuating rod needs to be lined up with the opening in the tail-shaft housing.
After reinstalling the housing, yoke and driveshaft assembly, you can install the pan and standpipe and start filling the transmission with fluid. The fill plug is in the tail-shaft housing. Fill until fluid starts to drip out of the standpipe with the smaller Allen-key bolt removed. After reinstallation of the O2 sensor connectors, transmission range switch, and the rear mount, you can start the vehicle and run the transmission through its gears to fill the valve body and clutches. If the vehicle has traction control, you won’t be able to do this on a lift. You’ll have to drive it and shift it into each gear while moving, being mindful of engine rpm. Use your scan tool to determine the transmission fluid temperature. At between 80 and 120 deg. F., you can check the fluid level, and add or drain as necessary.
Coupled with all this, the bulletin calls for the replacement of the shifter cable and shift module. We’ll review these steps in the next installment, so stay tuned to Master Technician.
by Kerry Jonsson


0 Comments