

by Robert Freudenberger

With 15 million sold from 1909 through 1927, Ford’s Model “T” got this country into automobiles. But the “Tin Lizzie” lacked something we’d consider essential today: a water pump. The liquid cooling medium (plain H2O with maybe a little alcohol in it to keep the ice bergs away) circulated by the purely natural phenomenon of convection. It absorbed heat from the block, which caused it to rise and enter the top of the radiator. As it cooled, it sank to the bottom and entered the lower part of the engine. While this thermo‑siphon principle worked well enough for normal service, if you wanted to run a “T” hard, you spent a few dollars for an aftermarket add‑on water pump to make coolant movement a more positive affair.
Essentials

Even in a relatively small four-cylinder engine, a water pump moves a hefty volume of coolant ‑‑ from maybe 100 gallons per hour at idle up to over 1,000 at Interstate speeds. The most logical place for a centrifugal pump is as low in the cooling system as possible. This reduces the possibility of cavitation and its resultant erosion and possible overheating. On Subaru vehicles, the pump is located at the bottom front of the engine, and the thermostat can be found in the lower part of the pump housing. This location provides even engine warm-up because it allows metering of the coolant temperature to be especially accurate. The thermostat senses the temperature of the crankcase and radiator coolant as it is mixed. As you know by now, all of the coolant must be drained to change the thermostat.
Keeping a pressurized liquid from escaping along a rotating shaft requires a certain amount of engineering. Where water pumps are concerned, in the old days this job was handled by textile or rope-type packings similar to what you’d find around the propeller shaft of a vintage inboard boat. They wept continuously, but they did have one advantage: They were serviceable.
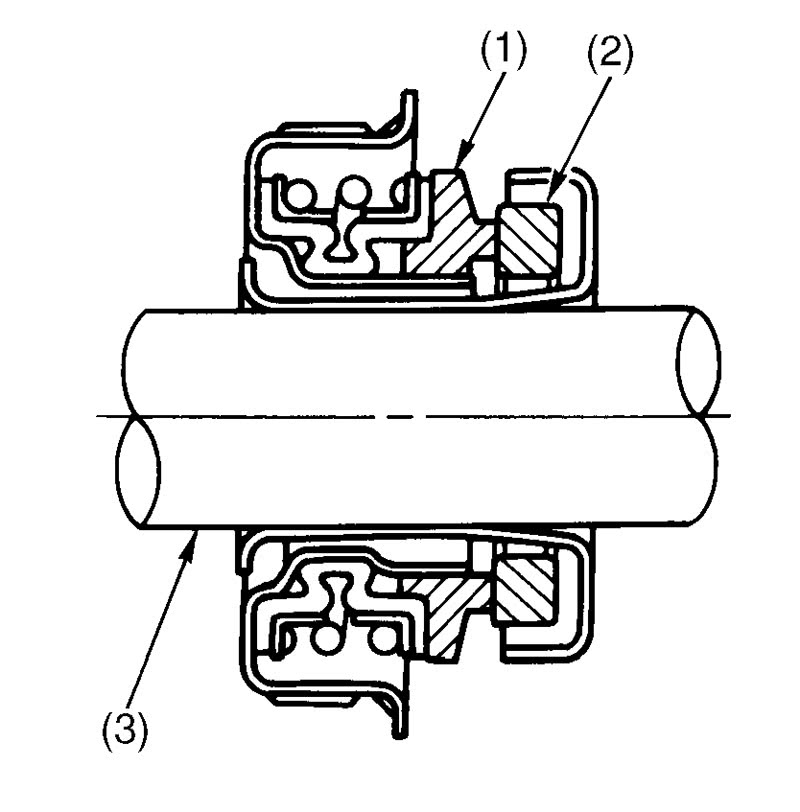
For over half a century, what we’ve had is the mechanical seal. This comprises two perfectly flat rings, one stationary and the other rotating with the pump shaft, that are pressed together by means of a coil spring. The rings may be made of carbon, ceramic, phenolic, porous bronze, cast iron, etc. in any combination. This allows only enough seepage to keep the elements lubricated.
Myths and maladies
We’d like to take this opportunity to explode a couple of myths. Contrary to what you’ve probably heard, water pump seal failures are usually not due to warping or fracturing of the precisely-made rotating elements. What happens is the rubber cup or the boot that surrounds the spring disintegrates. Think about it. Haven’t most of the pump failures you’ve seen occurred shortly after an overheating incident? When the element has to run dry, it gets extremely hot, which takes the rubber parts close to it way beyond the maximum temperature they can survive.
Some people believe that silicates and phosphates from anti-freeze, or other hard particles such as casting core sand, can damage the seal faces and cause leaks. Engineers have explained to us, however, that the running clearance is way too small to admit solids of any appreciable diameter.
Leakage is the Number One failure, but noise is second, and is always indicative of a terminal condition. While service literature on water pumps will often show a picture of a badly eroded impeller, that condition is so rare that you’ll probably never see it. Bubble erosion is another possible problem. Pumps can be eaten through on the suction side, mostly because of the misguided practice of installing a low‑pressure radiator cap.
While you’re in there . . .
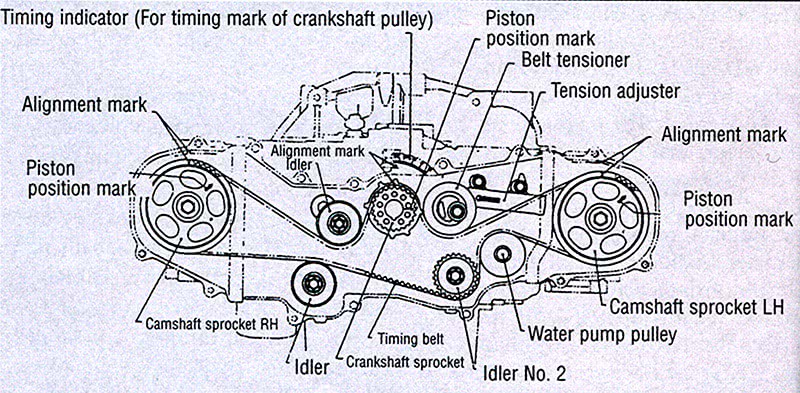
Subaru vehicles power the water pump with the back of the timing belt, or, in the case of the 3.0L six, by means of the timing chain (more on this engine later). This makes it impossible to run the engine without the pump shaft spinning, thus avoiding the possibility of truly disastrous overheating.
This brings up an important point to remember whenever you’re replacing a Subaru water pump. Does it make any sense to do all the disassembly involved, then put the old T-belt back on? Certainly not, yet we still see people doing it. That’s false economy taken to a high degree. After all, a new brand-name replacement belt is a relatively inexpensive part. You should explain to your customers that it’s your policy to replace both at once.
The flip side of this situation occurs when you’re replacing a timing belt. Should you add a new pump while you’re in there? Given that late-model Subaru vehicles carry a 105,000-mile belt replacement interval, definitely. Sure, the pump seal may go for quite a while longer, but probably not until the next belt change. By the way, we should mention that the rubber-coated pump gasket is to be used once only no matter how good it may look.
Big job
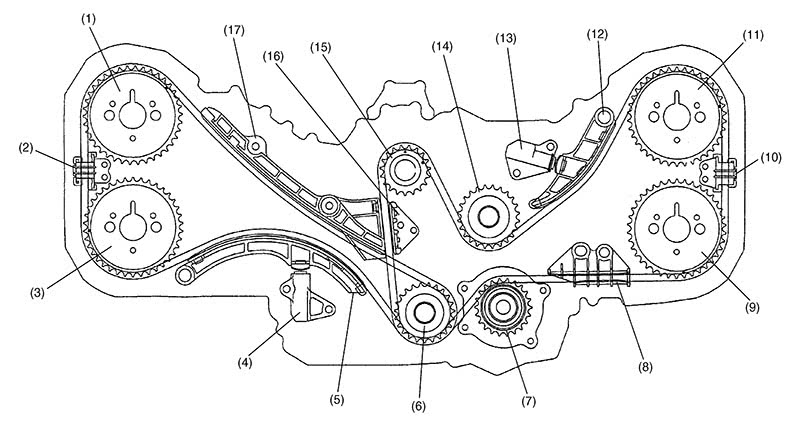
We mentioned the Subaru 3.0L six above, and it puts a different spin on water pump service. It was introduced in 2001, but most of you still haven’t done this job yet. The pump is driven by the timing chain, so if the engine can run the pump will pump. But replacement is a dramatically more involved procedure than it is on other Subaru engines.
To begin with, there are 59 bolts of various lengths holding the big cast timing cover in place. Once you get that off and the chain out of the way, you can use two M8 bolts to force the pump out of its recess (it’s sealed with an “O”-ring). Then comes the job of getting the chain back on in proper synch, and remounting the cover so that it doesn’t leak oil.
So, good cooling system maintenance and regular hose replacement are even more important than it is with other models where the water pump is relatively easy to change — as we said, an overheating episode will fry the pump’s shaft seal. Also, it’s imperative that you are absolutely sure of your diagnosis before you give the customer a big quote. A seal leak is usually easy to identify using a pressure tester or UV dye, but a low-flow situation may not be. You can use a non-contact infra-red pyrometer to see if the heat “map” through the radiator appears normal, but that’s not exactly a go/no-go test. A better way is to drain the coolant level in the radiator down to the tubes, get the engine hot, then shut it off for maybe 10 minutes and let it heat soak to make sure the thermostat is wide open. Or, you could remove the ‘stat. Now, fire it up again, run it at 3,000 rpm and you should see strong circulation, “almost like from a garden hose,” as one radiator shop owner puts it. A simple variation on this is to remove the hose that comes out of the heater core, place it in a bucket and start the engine. Since Subaru vehicles don’t have a shut-off valve to the heater, you should see a robust stream no matter where the controls are set.


0 Comments