

It seems like it’s us against them. The manufacturer either doesn’t want to release late-model service information, or makes it so costly you need to charge your customer significantly more. This prevents you from being cost-competitive with new-car dealers. Reflashing computers can be done through J2534 protocol, but the law says only on 2004 or later. So, with a 2003 vehicle you’ll need to take it to the dealer or have the customer take it. This also makes you less competitive.
Volvo offers complete diagnostic and reprogramming services, but you need to know how to navigate the website and the online tools. Here, we’ll lay out the procedure, and what can and cannot be done.
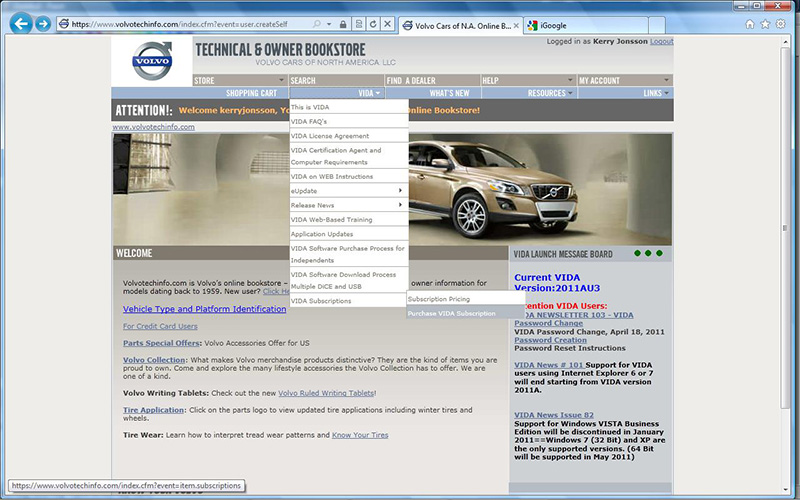
First, you will need to log on to the Volvo technical information website. You can link to it from NASTF website, or go directly to www.volvotechinfo.com. You can log on from any computer at any time to make purchases and subscribe. You will need a computer dedicated to the installation of the diagnostic software. Technical support issues are communicated through the help request system on this website, not the diagnostic software itself. Signing up with Volvo tech info is free. From there you can purchase technical information, wiring diagrams and training. If you want to connect to a vehicle and diagnose or reprogram, you will need to purchase a subscription to the Volvo diagnostic software, known as VIDA (Vehicle Information & Diagnostics for Aftersales), and purchase an interface or pass-through device. This subscription will allow you to diagnose and reprogram new modules.
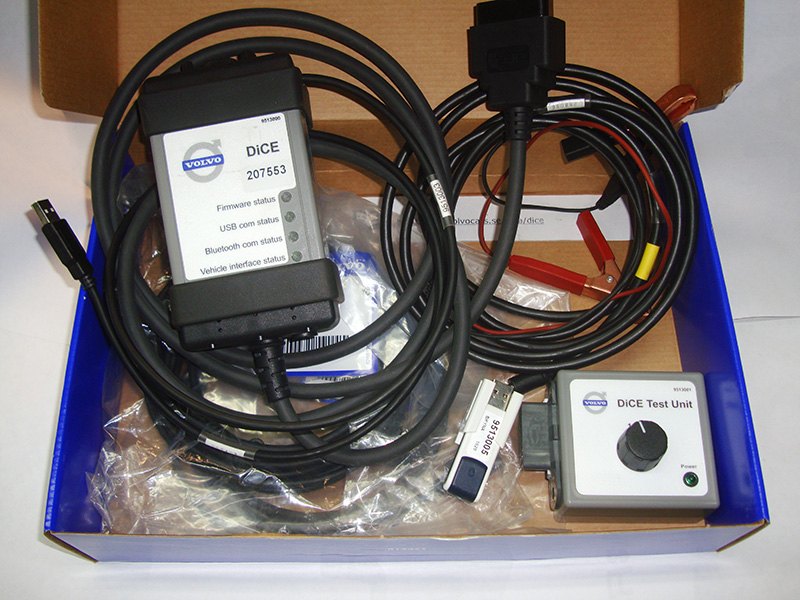
A pass-through device is required to connect your laptop to the vehicle. You have two options. One is using a J2534 compliant pass-through device. This limits what you can program on the car. Only the PCM can be programmed with J2534 on 2004 vehicles an onwards. A DICE module is the Volvo factory tool that allows you to program any control unit on the vehicle once you purchase the additional software. You can purchase the DICE module from you local Volvo dealer or go to the Links field on the Volvo home page and select Volvo Special Tools. From there you can select the link to the SPX website, www.spxvtc.com, or you can call 1-800-345-3399 and order your DICE module. They cost approximately $1,500 depending on where you purchase. Be careful on ebay as there are pirated copies that may or may not have all the features and the ability to reprogram modules.
You will first have to install the VIDA software on your computer. In order to have access to this software, you will have to purchase a subscription each and every time you use it. The minimum subscription is $115.50 and lasts for three days. If you would like to join for 30 days, the cost is $742.50 and for a year $7,357.50. It’s important to remember that Volvo uses something called the Address Verification System. Your credit card information must be exactly the same as your Volvo account profile, including abbreviations. You cannot use a personal credit card if your account has your business address. This will not only block you from purchasing a subscription, it will also block you from purchasing any reprogramming software. If you have used VIDA before and have the most current software, you can activate your subscription right away.
If it has been more than three months since you last used it, you will probably need to update your software. Volvo will overnight you the CDs you need to do this as part of the subscription. The software should automatically install once you slide the disc into your computer DVD drive. If not, open the disc and open the install file. The first installation can take several hours, so give yourself some time. Updates don’t take as long, but can still require considerable time depending on the speed of your computer. You don’t need to have the tool connected to the vehicle while installing the updates.
Four icons will be added to your desktop: VIDA All in One, VIDA On the Web, VIDA Admin, and VIDA Configuration. Select VIDA Configuration, and under the Location tab select Internet even if it is checked off, then hit the Save field and you’re done here.
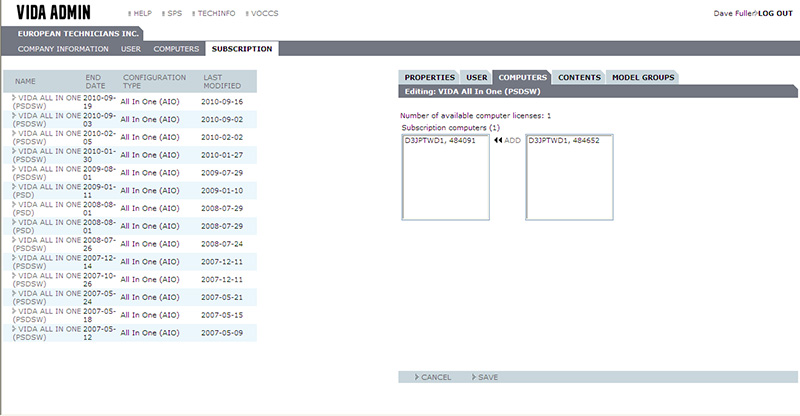
At this point you can now activate your subscription. You can do this by selecting the VIDA Admin icon. You will have to login again, but not with the same user name and password you use for the Volvo website. You will be e-mailed your user name and temporary password for the VIDA software. This info must be used when you login to VIDA only. You can change the password when you are logged in. The next time you subscribe to VIDA, you will need to change your password. Keep a record of your old password because you will need it to change to a new one. Otherwise, you will have to contact the help desk and wait for a password reset. This can take anywhere from one hour to 24 hours depending on how busy Volvo’s help desk is. While in VIDA Admin, there are some additional steps needed to activate your subscription.
Under the Subscription tab, select the latest one on the left with the current date. Another menu will pop up on the right. Under the “Properties†tab, click the check box to activate this subscription. At the bottom, click the Save field. Then, select the next tab “User†and add your user I.D. and again hit the save button. Finally, under the “Computer†tab your computer I.D. number needs to be added. This is why you need to dedicate one computer to the VIDA application. Unless you are going to connect more than one DICE module at a time, you don’t need two or more computers running VIDA. If you change computers that log into VIDA, you will have to ask the help desk to remove the old control unit. You can run two or more DICE modules with one computer. With a J2534 interface, you can only connect one pass-through device at a time.
Now the clock is ticking and you have exactly three, 30, or 365 days from the exact moment you activated your subscription. If you start a subscription on Friday at 12:00 pm. it will end on Monday at 12:00 pm, so it’s best to activate it Monday through Wednesday unless you’re open on the weekends. Also remember the help desk will not be open on Saturday and Sunday.
The overall process starts like this. You have your computer connected to a pass-through device, which is then connected to the vehicle diagnostic connector. You then log into the diagnostic or programming application known as Vida All in One. Your user name should pop up and you then enter your password. Once you are logged into VIDA, the first thing you should do is select the pass-through device under the heading “Communication Tool†and turn the ignition key on. Remember J2534 will only allow you to program the PCM, but a DICE module will get you into everything.
The next step is to identify the vehicle. You can manually select the year, make and model with the other options, but it is strongly recommended that you enter the VIN, or have the tool read the VIN from the vehicle. If you are going to have the tool find the VIN, make sure you select “AME” under the field “Partner Group†for American vehicles. Once you have extracted the VIN, compare it to the one on the vehicle and make sure they are the same. If not, this means control units have been replaced. On vehicles with a CEM (Central Electric Module), the VIN is stored in there. On vehicles without a CEM, the VIN is stored in the instrument cluster (DIM, or Driver Information Display). Once you have identified the vehicle, select the “OK†field and you’re done here. Now you can actually start working on the car.
The two most common sections you will use are the “Diagnostics†and “Software†tabs from the top line of the page. To move on to another vehicle, you can select “Start†and “Vehicle Profile†and either request or enter a new VIN. Under the “Diagnostics†tab, the “Details†screen will pop up and the software will start reading the vehicle you are working on. This is where the specific build options are displayed. This information may be useful later. The next one is the “Network†tab, a pictogram showing all of the possible control units this vehicle can have and which ones are communicating. To the right of the pictogram, you can select “Update†and it will re-read the vehicle data and stored codes. You can also test the DICE module if you feel you are having communication problems.
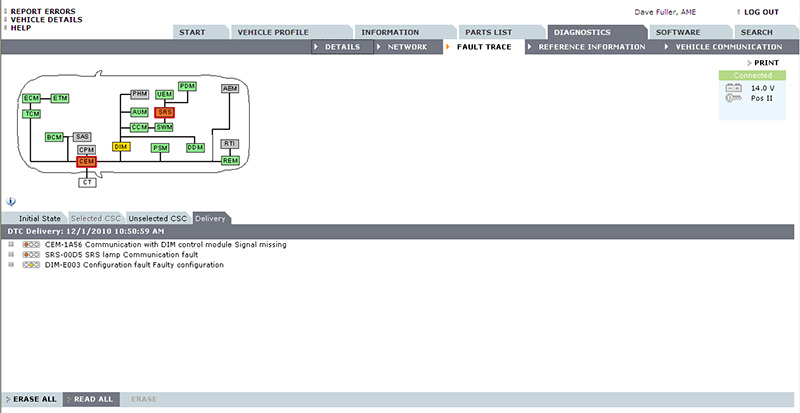
To finally read DTCs, move on to the “Fault Trace†tab. Here you will see the same pictogram with different colors for the control units. Depending on which control units are talking back, the boxes indicating the control units are different colors. Grey boxes means the vehicle does not have these installed. A green box means there are no codes in that particular module. A yellow box means that there are stored codes in the control unit. A Red box means that there are live faults in the control unit. Now look toward the bottom of the screen. You will see a few headings. “Initial State†is all of the DTCs that were read initially for all control units. You will see three colored lights to the left of the Volvo-specific DTC. Like a traffic signal, green means everything is okay, yellow means there is an intermittent fault, and red means there is a “hard†code.
In the lower section, you will see the “Delivery†tab. This allows you to erase the codes prior to delivery to the customer. While in the “Delivery†tab, select “Erase All†at the bottom left of the screen. You must erase all codes in all systems in order to clear codes. This was even true of the older VADIS system. The smallest glitch will be picked up as a DTC so you may find many codes in the initial state. We sometimes think it is a good idea to record the codes (that’s done in initial state) and then right away go to delivery and erase the codes. Then go for a short road test and see what codes return. If you have a hard code, it should come back within a 15 minute road test. If not, then the problem is probably intermittent and will probably pass any testing you may perform at that time.
Once you have isolated the codes that are turning on the warning light, you can move into the diagnostic phase. While still in the upper “Diagnostics†tab, select “Vehicle Communication†and the same pictogram of the vehicle will be displayed. Click on the box of the system to would like to enter to get data. A menu will be displayed in the lower section of the screen. Here you will have the choice of “Parameters,†“Activations,†“Advanced,†and “Programmed Valuesâ€, which is grayed out so you cannot select it. “Parameters†will get you a list of data PIDS you can pick to display, “Activations†will provide a list of computer-controlled outputs you can control to see if they’re working. “Advanced†has specific functions that need to be reset if battery power is lost, or if a new control unit is fitted.
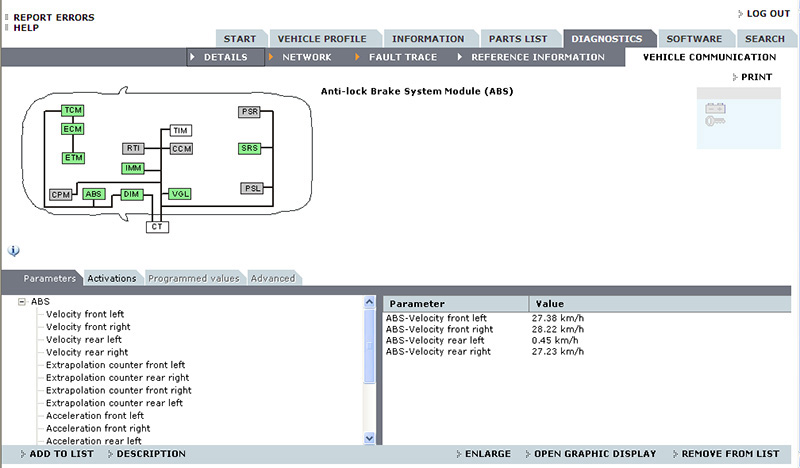
While in “Parameters,†click on the + box next to the computer you have selected to diagnose. A pull-down menu will pop up and a list of PIDS will be displayed. Highlight one of the PIDS and at the bottom of the screen select “Add to List.†The highlighted PID should show up in the parameter display box in the lower right of the computer screen. You can select several PIDS to display at once. You can also select another system you want to diagnose and add PIDS to your existing selection. This can be valuable while diagnosing something like transmission shift problems. The vehicle speed sensor (VSS) input typically comes from the ABS unit and is shared on the CAN bus. You can now compare the VSS readings from the ABS unit and the VSS PID from the transmission control module (TCM) and verify that they are the same.
If you have a laptop running VIDA, you can also take the vehicle on a road test and have someone watch the data. If you find data that is not responding as it should, you can now start to diagnose the circuit with a DMM or scope to further isolate the problem. Another advantage of the VIDA software is the ability to graph the data. Below the lower right data PID screen, you can select “Open Graphic Display†and another window will pop up. A graph displays the PIDS you selected. You can road test the vehicle, pause the graph, and review it when you return to the shop. We always recommend that you back up your findings by means of circuit testing with a DMM or scope so you can determine if the component is the problem, or the wiring to and from it.
Not every manufacturer offers a scan tool with factory data and programming over the internet, even if it is with their own tool. If you are working on enough Volvo vehicles, the cost of the DICE module and the subscription should be recouped in a reasonable time. Of course, Volvo is continually updating the website, so some of the images you see here may be slightly different, but the general operation is the same. It may be a good idea to print the images in this article and refer to them as you read so you can follow along. We hope you find this information useful and are looking forward to the next article on initializing and programming coming in Import Service Online.
by Kerry Jonsson


0 Comments