
Installing a new windshield or re-installing the original is really a matter of cutting the anchoring adhesive, extracting the glass and cleaning up the mounting area for installation, as it has been for generations. But sophisticated new techniques and materials are available.
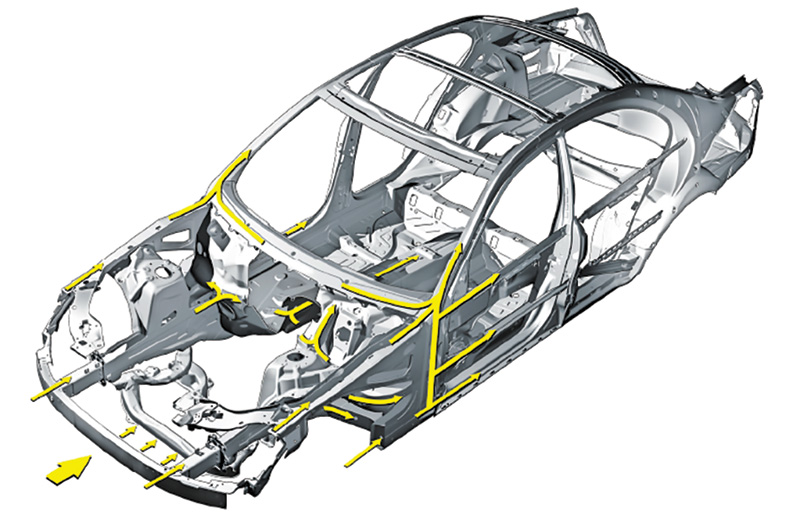
Once anchored securely in place, the windshield becomes an integral element in vehicle structural strength.
Preparing to replace windshields in late-model Mercedes-Benz vehicles? Be aware that these are more challenging undertakings than they once were — the windshields in today’s highly-developed Mercedes-Benz road warriors do more than simply provide good vision and keep the driver dry and un-windswept.
Glass — primarily the windshield — also adds strength to the vehicle’s safety cage structure, helps retain the occupants within the vehicle in case of collision, supports the front passenger airbag when deployed, and manages energy dissipation in a collision.
Vehicle glass also serves as a platform for various antennas, the wiper park heater, defogger, rain/light sensor, night view assist, multifunction cameras, rearview mirror mount, and in some cases the infrared (IR) reflective film protection (SUNGATE).
Following the roadmap for installation, keep these points in mind:
- The windshield glass being replaced was fastened into the vehicle with very strong adhesive.
- Cut out the glass from the adhesive and remove all but 2 mm of old adhesive before installing or reinstalling glass. Special windlass tools increase the efficiency of the removal process.
- Installed glass becomes an important part of the vehicle’s structure and strength, and only Mercedes-Benz-approved adhesive applied correctly MUST be used to install and anchor glass in place.
- Once installed, calibrate or recalibrate all sensors and other devices mounted on or within the glass to ensure each performs as it should.
NHTSA tests check windshield strength
These installation mandates are absolutes, and MUST be followed according to Federal law to ensure vehicle structural rigidity.
The National Highway Traffic Safety Administration (NHTSA) test MVSS 212 measures an installed windshield’s ability to keep an occupant who is not belted within the vehicle during a collision, and requires that 75% of the perimeter of the windshield must stay in the body opening after crashing the vehicle into a fixed barrier at 30 mph.
NHTSA Test MVSS 216 measures a vehicle roof’s resistance to crushing during a rollover and works by securing the vehicle to a horizontal plane, then applying a downward force to the top of the A-pillar equal to 1.5 times the vehicle’s weight. The downward force test device must not move more than five inches.
Applying proper adhesive correctly is critical, and Mercedes-Benz OEM materials are designed to guarantee the required performance. Glass adhesive used to install the windshield must accomplish the following:
- Keep out moisture and wind
- Allow glass to add strength to the vehicle’s structure
- Allow the body to flex slightly while not cracking the glass
- Insulate antennas integrated within the glass from grounding to the vehicle’s body
For these reasons, only use Mercedes-Benz approved adhesive. To increase vehicle structural rigidity, since January 2004 higher shear-strength adhesive has been used at all Mercedes-Benz production plants for bonding glass. This necessitated a new glass adhesive and glass installation kit for repair work, also used for installing panoramic roofs. The glass installation kit (introduced on 06/29/2016) is called “RS Windshield†(Repair Set) in the EPCnet parts catalog, and replaces the previous two-component adhesive kit, which utilized the Betagun for application. The current kit includes:
- Adhesive cartridge
- Cartridge adhesive applicator nozzle
- Glass cleaner
- Lint-free towel
- Primer and instructions (more on the use of the installation kit later)
Protect exposed interior with strong covering material

Remove the clips and retainers around the windshield and place aside for re-installation.
Of course, before you can use the installation kit, you must first cover the vehicle seats and other exposed interior items with strong material to protect from damage when extracting the old windshield or parts of one and cleaning up residue from the previous installation. Also place protective tape at delicate spots surrounding the windshield that might sustain damage.

Tape delicate areas that might suffer damage when cutting out the old windshield.
Depending on the vehicle year and model, the area at the base of the windshield at the rear of the hood housing the windshield wipers may need to be removed and set aside if it blocks access to the windshield glass. If necessary, this is a simple and quick matter. Check in WIS for any other disassembly details that may apply to the specific vehicle. These actions ensure clear access to the windshield and working room for removing the old windshield and installing a new one or re-installing the previous one.
Carefully remove locating clips and fasteners
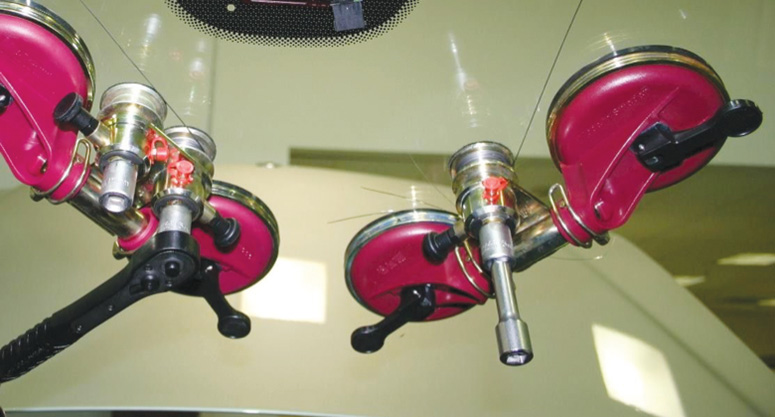
The roll out cutting tool is basically a set of two windlasses used to draw fine wire around the perimeter of the windshield and precisely cut the adhesive holding the old windshield in place, freeing the windshield for removal.
Remove locating clips and anchoring fasteners, and put them aside for reinstallation. These clips are essential for keeping the windshield in the correct position and holding it in place in highway use, especially if the going gets rough and the vehicle is subjected to structure-threatening activity.
The next step is to cut the adhesive bead holding the old glass in place. On today’s vehicles, the Mercedes-Benz Roll Out 2004 Cutting Tool is recommended to precisely cut the adhesive bead. This tool offers several advantages over previous methods:
- Highly efficient process
- Minimized possibility of paint damage
- No need to remove A-Pillar trim or headliner
- Reduced chance of breaking the windshield
Also, the process can be done by one technician, whereas other types of adhesive removal may require two people.
The current Roll Out 2004 Automotive Glass Replacement kit includes:
- Windlass and cutting wire
- Parabolic chisel and awl
- Reversible ratchet
- Mounting wedge
- Guide needle and bent needle
- Extension pieces: 150 mm and 75 mm
- Safety goggles and protective gloves
NOTE: Always wear safety glasses when cutting out glass!
Using the Roll Out 2004 Cutting Tool

Carefully pull the wire with the windlass around the perimeter of the windshield.
The cutting tool kit is based on the use of windlasses that pull the adhesive cutting wire placed around the windshield to smoothly cut the adhesive. The wire provides a precision cut, and can be performed by one technician without assistance.
Although the kit comes with detailed instructions, here we will acquaint you with the procedure so you can see its advantages over old-fashioned methods. To set up the tool, cut a length of wire from the spool in the kit about four times the diagonal dimension of the windshield. Then:
- From inside the vehicle, push the awl from the kit through the adhesive near the bottom center of the windshield to avoid damage to VIN tag.
- Mask painted areas if necessary to prevent paint damage.
- Bring both ends of the wire through the hole in the awl, bending the wire over the awl to secure it.
- Pull the awl back through the adhesive into vehicle interior, with bent wire tips facing upward so they glide against glass when pulling wire through.
- Feed the wire around the perimeter of the windshield up against the adhesive, removing rubber spacers if possible.
- Pull the wire into the vehicle’s interior, ensuring that it is located below the glass at all four corners.
- Remove the wire from the awl and clip off the bent ends.
- Attach the first windlass to the right side of the glass, mounting the windlass as close to the glass edge as possible to reduce stress on the glass and prevent cracking.
- Insert the wire into the winding coil and wind the wire into the windlass, then continue to wind using the ratchet.
- Use the chisel to guide the wire along the perimeter of the glass, protecting the interior from wire damage where necessary by using plastic guards — the chisel helps the wire cut more smoothly.
- Continue to draw the wire along the body flange and into the windlass until it cannot be drawn in further, and hold winding coil to prevent it from springing back. Release the windlass lock by pulling it outward, and reposition the windlass to prevent the winding coil from becoming immobilized, which might require starting over.
- Attach the second windlass to the left side of the windshield and draw the wire in. Using plastic guards to protect the interior, reposition the second windlass to continue cutting the adhesive bead — avoid damaging wiring from the overhead control panel.
- Reposition one windlass so it overlaps the other to cut the remaining adhesive while continuing to use the chisel to guide the wire.
- When the wire is pulled through, clip the wire and remove each windlass.
- Whether the wire is round or square, pull the wire the rest of the way through by hand, then clip it and remove each windlass.
CAUTION: The glass can crack where it is attached if excessive pressure is put on the windlass — this could happen when cutting through spacers.
Prepare glass for installation
Locate the replacement glass part number by VIN to ensure you get the correct glass based on the vehicle’s equipment level. Some windshields include the last four digits of the part number under the Bar Code in the glass identification information at the lower left corner. This can be used as reference when looking up the correct windshield via EPCnet.
If replacing with new glass:
- Wear clean gloves to prevent fingerprints.
- Clean the entire windshield with standard glass cleaner.
- Attach any antennas.
- Secure any electrical connectors assembled on the glass with tape to keep them out of the way during installation.
- Clean the adhesive area with the cleaner in the kit and apply the primer to the adhesive area.
- Make sure to avoid putting the primer on electrical plug contacts area on the back of the windshield.
If glass is being reinstalled:
- Remove the old adhesive with no more than 2 mm left behind.
- Clean the exposed primer area with the cleaner in the kit if the primer was removed during the adhesive removal process — check the primer coat and repair it with new primer if necessary.
- Secure any electrical connectors on the glass with tape to keep them out of the way.
If any corrosion is detected, repair it before installing the new windshield, and if the body flange is distorted in any way, repair it also.
- If there is paint damage in the adhesive area, apply primer to any scratches, or, in the painted area, perform touch up, preferably using a two-part catalyzed sealer.
- If the adhesive flange has been exposed for more than 24 hours, apply primer to it.
- Install new rubber spacers, ordered with the windshield and glass installation kits.
- Run the defroster to make sure that any glass chips are blown out, then vacuum the work area to remove any loose debris.

Very carefully align the windshield glass in preparation for installing it.
Align the glass before installation

Complete glass installation kit offers the shop the tools to precisely cut out old glass and install a new windshield. Approved windshield adhesives are included.
Before the adhesive is applied:
- Align (dry-fit) the glass, with the distance between the glass and roof specified in WIS. Use a feeler gauge to check specified distances and gaps.
- Make sure the VIN plate aligns with the glass opening.
- Use tape to provide reference points.
- When removing the windshield after positioning, recheck the installation position of the rubber spacers — spacers can become dislodged during the alignment process.

This special adhesive nozzle enhances the application of the proper adhesive bead.
For the actual installation, apply the adhesive to either the body flange or the glass. The height of the adhesive bead should be approximately 13 mm or .5 in., unless otherwise stated in WIS.
-

Apply a precise 13 mm-high adhesive bead to either the windshield to be installed or the frame in the vehicle.
Keep the nozzle perpendicular to the application surface.
- Make sure applied adhesive bead height is approximately13 mm and that it is smooth and straight. Adhesive application is incorrect if there is too much adhesive in one area, application is uneven, or air bubbles are present, which could cause a leak.
- When using a battery-operated caulking gun, employ the intermediate piece special tool.
- Install the glass within 10 minutes of applying the adhesive as it will start to cure after that interval, thus, providing decreased adhesion.
Putting it in place, actually
Open the door windows before installing the windshield — slamming a door with all windows closed may cause fast cabin pressure build-up and unseat the new windshield before the adhesive has cured.
Install the windshield by aligning the glass to the reference points made previously and set the glass down in the vehicle opening (the adhesive has already been applied either to the outer perimeter of the glass, or to the vehicle windshield frame).
- Press down firmly on the entire outer perimeter of the glass directly over the adhesive.
- Place two pieces of tape from the glass to the roof, and two pieces to the pillars.
The windshield is installed!
- Perform a water leak test once the adhesive cures, replace all removed clips and parts, and reconnect the battery.
- After cleaning both sides of the window, align the wiper blades to clear marks present in the blackened area of the lower portion of the windshield, or align according to WIS instructions.
Calibrate all systems affected

Required tools for multifunctioncamera calibrations include the Xentry/DAS, headlamp aimer, and ROMESS calibration target.
To complete the installation and ensure that the vehicle performs safely day and night, calibrate or recalibrate all systems affected by the installation of a new windshield, or re-installation of previous one, including function checks as needed. Systems needing calibration include:
- Rain/light sensor — if not calibrated, the rain sensor may cause erratic function of the windshield wipers
- Night vision and multifunction cameras
- Infrared sensor transmitter and receiver
- Multifunction camera and stereo multifunction camera, essentially the same as multifunction camera
- Night view assist camera
- Windshield wiper arm angle check and adjustment
- Radio functionality if glass includes antenna
- Transfer registration/inspection stickers
After calibration, the Mercedes-Benz is ready to drive — with a clean, fresh view!
Download PDF 〉


0 Comments