
Applying appropriate TLC to special tops on Mercedes-Benz vehicles can involve a few simple tweaks, or some real elbow grease, depending on any problems that may be present. In many instances, reinstalling a component will keep the top on an even keel, while other situations require testing, rerouting, or the installation of new parts. The time and effort will have been well spent to ensure driving satisfaction in a superior motor car equipped with extra pizazz.

Mercedes-Benz is certainly no newcomer to the convertible concept. This majestic 1930 Maybach proves it.
What could be more rewarding than dropping the top and cruising some scenic route on a beautiful afternoon? Special roof treatments – soft tops, sun roofs, hard, panoramic, or Vario tops – are icing on the cake of driving a Mercedes-Benz, but every now and then they need adjustment or repair to function as they should and continue contributing to the pleasure of driving a fine car. The most visible culprits in the need for TLC are soft convertible tops or Vario tops with their “drawbridge†opening and closing mechanism.

An acoustic fabric soft top reduces wind noise and includes a spoiler that rises from the windshield frame when the top is down, reducing turbulence and wind rush noise.
A convertible or cabriolet is an automobile body style that can convert between an open-air mode and an enclosed one, varying in degree and means by model. While convertible tops normally operate flawlessly for many years, glitches can arise in the mechanical linkage, hydraulic or electric power units, or in the top itself.

This modern SLK gives you open-air delight when you want it, snug security when you need it.
Historically, a retractable roof consists of an articulated frame covered with a folding textile-based fabric similar to that on an open carriage. A detachable hardtop provides a more weatherproof and secure alternative, and as technology improved a retractable hardtop that can be removed and stowed in its own rigid room in the trunk became available. A semi-convertible (also known as a Vario vehicle) has a retractable metallic top, which retains fully-framed windows on its doors and side glass.
The following sections are highlights of vehicle types Mercedes-Benz’s Collision Center News identified that occasionally need adjustment or repair in soft top, sun roof, Vario roof, and panoramic roof models.
NOTE: For all procedures, be sure to check WIS for the details of your specific model.
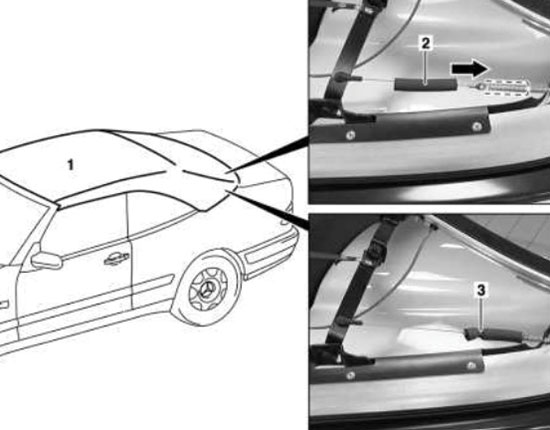
Soft Tops (Model 209): Reattach Tension Cable to Soft Top Canvas

Guide the tension cable through the water pocket, thread the guide together and lock it into position in the soft top bow.
The tension cable seam can become detached at the soft top canvas. Use this procedure to reattach:
- Remove the rear window. Refer to WIS document AR67.20-P-5145QA.
- Expose the soft top at C-pillar by removing rivet and bolt from the retaining rail.
- Fold the plastic rail of the soft top canvas forward and remove the bolt and rivet, then guide the strap of the soft top canvas together with the narrow strap around the soft top bow and rivet it to the water pocket together with the wide strap.
- Unclip the guide with the tension cable, and slide the tension cable through the water pocket. Thread the guide together and lock it into position in the soft top bow.
- Repair/bond the fold seam using adhesive tape to mask off the area that is not to be bonded. Mix the adhesive from the repair kit, then remove the black plastic slide, spread the adhesive on the surfaces to be bonded, and allow a flash-off time of five minutes.
- Clamp the adhesive seam using spring clamps and a straight edge; after bonding, the adhesive seam must harden for at least five hours, then reassemble the soft top C- Pillar and install the rear window.
- If this condition occurs, the soft top canvas must be repaired by bonding the fold seam. Do not replace the soft top canvas if the fold seam has become detached.
Allow Soft Top to be Opened Hydraulically

Move the lever several times in the lock or unlock direction and apply lubricant to the latch/operating lever.
If the soft top cannot be opened hydraulically after being released manually and after the header bow is pressed over the dead center position, this may be the result of the soft top switch in the rear soft top lock not being actuated by the operating lever due to excessive mechanical friction. The soft top control module detects an implausible status, causing a malfunction the next time the soft top is opened, and may show or store one of these codes: 996D (soft top position is implausible); 996E (status of the rear soft top lock is implausible); 996F (status of the front soft top locks is implausible).
 to the lever.")
Apply lubricant (A000 989 36 60) to the lever.
To resolve, move the lever several times in the lock or unlock direction and apply lubricant (A000 989 36 60) to the latch/operating lever. If the soft top is not in a confirmed end position — fully closed or open — the hydraulic system is depressurized after 7 minutes (ignition on) or 20 seconds (ignition off), permitting the soft top to be manually lowered to the rear, and allowing accessibility to the soft top lock.
Cure Electrically-Powered Cabriolet Top Not Opening
With thick sound insulation, an acoustic fabric soft top reduces wind noise and includes a spoiler that rises from the windshield frame when the top is down, reducing turbulence and noise. The fabric is so tough it is said to be almost impossible to cut through with a knife, and occasionally customers will complain the top will not open or close without the ignition switched on, which it will definitely not do. Make sure the SmartKey is in Position 2 (ON) in the ignition lock before exploring other functioning options.
- If the trunk lid is open, close the trunk lid, and if the trunk partition is not closed, close it.
- If the soft top has been opened and closed several times in a row the soft-top drive has been deactivated automatically for safety reasons, and the soft top cannot be opened or closed again until after ten minutes.
- To check, switch the ignition off, turn it back on, and repeat the opening or closing procedure. If none of this works and the top still will not open, the soft-top mechanism or control system is at fault.
Fix Soft Top Canvas Pulling Out of Soft Top Bow Retaining Groove
Detach the soft top from the soft top bow and fold it upward, then anchor the sponge rubber hose in place using a cable tie.
If the soft top canvas pulls out of the retaining groove of the soft top bow, detach the soft top canvas from the soft top bow and fold it upward, move the sponge rubber hose to its intended position, anchor the sponge rubber hose in place using a cable tie, and cut off the excess tightened cable tie.
Replace the Hydraulic Pump if Supply Pressure is Less than Specified
NOTE: The following is the general procedure, but you must consult WIS for further test details for your specific model.
Check supply pressure in vehicles equipped with a soft top hydraulic pump if the hydraulic system appears to be functioning sporadically — use the test and adjustment values for soft top hydraulics. Assemble the testing unit, including the pressure gauge, adapter and test line with connection M10x1 on both sides, and insert the rod-side hydraulic line into the adapter, making sure that the sealing ring is seated correctly.
- Lock the latch, fasten with a bolt, and actuate the soft top hydraulic pump with the diagnostic system.
- Remove the test equipment after testing, disassemble and read the supply pressure on the gauge — if it is less than the minimum acceptable supply pressure, replace the soft top hydraulic pump.
- Bleeding the hydraulic system as well as the soft top hydraulic pump is not required after pressure testing.
WARNING: If the soft top is not fully opened or closed, the soft-top hydraulics depressurize after a short time. This causes the soft top to lower unexpectedly and may cause the technician or others to be trapped. Always open or close the soft top completely.
Sun Roofs: Adjust the Gap between the Roof and the Windshield Trim Strip
The gap between the roof and the windshield trim strip should be 5 to 6 mm, and not less than 5 mm. Otherwise, closing forces for the front catches will be too high. If high closing forces negatively affect locking and release operations, install spacers below the locking pins, then perform a rain test. If a replacement sun roof is installed, perform following work after adjustment:
- Unlock the roof, lift it at the front, support it with rubber mallet, and mark the position of the locking pins with a felt-tip pen.
- Loosen the screws and adjust the gap by moving the locking pin toward the rear to decrease the gap, or toward the front to increase the gap. Adjust the locking pins by moving them parallel to the side so that there is no gap between the covering on the front pillars and the roof at the left and right sides.
- Tighten the screws and lock the roof with the top switch, then check the opening and locking operations several times.
Adjust Tilting/Sliding Sun Roof Top Panel

Loosen the screws and adjust the gap by moving the locking pin toward the rear to decrease the gap, or toward the front to increase the gap.
To adjust the sun roof top panel, remove the sun roof headliner and loosen the fastening screws on the sliding angle pieces front left and right; push the sliding angle pieces inward until the sliding shoes are abutting laterally and the sun roof is located accurately in the center of the cutout.
- The sun roof frame has tolerances with regard to its total width, and lateral clearance must be checked at several points. Unscrew the control cable on the sliding carrier and move the sun roof top panel manually.
- Open the sun roof and loosen the fastening screws on the slide rails.
- Adjust the height adjusting screw at left and right so that the front edge of the closed sun roof is 0-1 mm deeper than the roof outer skin.
- Tighten the fastening screws of the sliding rails.
Adjust Rear Height, Remove Headliner
Create two centering pins and remove the sun roof headliner, then close the sliding roof and loosen the screws on the left and right retaining brackets.
- Plug the centering pin into the left and right centering bore.
- Adjust the sun roof top panel so it is flush with the roof, or up to 1 mm deeper. Starting from the slide position at the rear in the curved area, tighten the screws on the left and right retaining brackets.
- Pull out the centering pin and install the sun roof headliner.
Unique Vario Roofs:

Adjust the gap between the Vario roof and cross member above the windshield, checking the gap with a feeler gauge.
The hydraulically operated, three-part folding Vario roof turns roadsters into cars for all seasons, taking up a third of the available luggage compartment space when open and offering everyday practicality and quiet running as if the vehicle were a coupé or sedan. Three moving elements interconnected by a sophisticated pivoting mechanism make the Vario roof work, and include a magnesium/plastic/glass hybrid modular roof, two magnesium and plastic C-pillars, and a magnesium frame and single-pane safety glass pivoting rear window. Six electrically-operated hydraulic cylinders and one hydraulic pump actuate the folding system, opening or closing the Vario roof in about 16 seconds.
Adjust the Contour of a Vario Roof
(Consult WIS for the correct template to use for checking and adjusting the roof contour of the specific model.)
- Remove the C-pillar cover on the Vario roof and the cover above the B-pillar.
- Unhook the return spring and push the slide up.
- Loosen the bolts on the main mount and move; when moving the main mount, do not lock the slide main mount toward the rear or front.
- Tighten the bolts on the main mount.
- Hook in the return spring, close the Vario roof, and check the contour with the template — position the template on the rails, ensuring that when hooking in the return spring the sleeve for the control cable is located in the bracket.
- Open and close the roof. When locking, avoid excessive downward pressure around the separation joint between the front and rear roof sections while the rear side window is not yet in contact with the roof seal, and check the stop buffer adjustment, the catch on the C-pillar, crank the windows, and the rear side windows.
- Install the cover above the B-pillar and C-pillar paneling of the Vario roof mechanical system.
Adjust the Vario Roof Gap

Loosen the bolts on the main mount and move it; when moving the main mount, do not lock the slide main mount toward the rear or front.
Adjust the gap between the Vario roof and the crossmember above the windshield, checking the gap with a feeler gauge. A V-shaped gap of 1 mm is normal over the roof width:
- Remove the paneling at the top of the windshield, loosen the two screws, and remove the intermediate, then tighten the screws slightly.
- Close the roof and align it laterally, adjusting the roof in relation to the crossmember above the windshield so that it is flush with the A-pillar.
- Open and close the roof — the rotary catch should engage in the center of the mount and not touch the mount at top or bottom when closing.
- Check the adjustment of the catch on the C-pillar and roof contour.
- Tighten the screws and install the paneling at the top of the windshield.
Adjust the Catch on the C-Pillar
- Remove the C-pillar paneling on the Vario roof and close the roof.
- Push the slide up (the interval between the pin and the oblong hole release in the slide is 2 to 3 mm), and loosen the screw
- Adjust the cam by turning it to the left or right to obtain an interval of 2 to 3 mm after releasing the slide.
- Open and close the roof several times. If the roof is subjected to excessive pressure downward in the area of the separation joint between the front section and the rear section of the roof when locking, adjust the stop roof buffer.
- Install the C-pillar paneling on the roof.
Cure Noise from Panoramic Roof

Replace any missing bolts, tightening all nine bolts to 5 Nm ±1 N.
Loose or missing bolts could cause noise from the panoramic roof area. To check and cure, if that is the problem:
- Remove the headliner (refer to WIS document AR68.30-P-4300SX).
- Check for loose or missing bolts at the body cross bracing, replace any missing bolts, and tighten all nine bolts to 7 Nm ±1 Nm.
- Check for loose or missing bolts at the panoramic roof frame.
On vehicles with panoramic roof trim:
- If repairs were being done on a vehicle equipped with the Parktronic system under warranty at an authorized Mercedes-Benz dealership, in addition to the headliner R&R (68-1611) the Night Vision unit (68-1698) would be upgraded to the newer Night View Assist (68-1714). This doesn’t affect you, so don’t get confused if you see a reference to it.
- Replace or adjust the panoramic roof frame hardware.
Correct Bonding of Rear, Fixed Part of the Panoramic Glass Roof
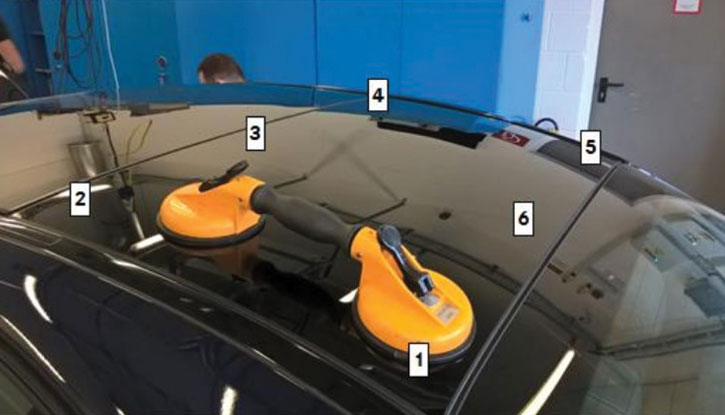
Thoroughly clean the rear glass before any other operations are performed.
Bonding on certain Model 205 vehicles may be incorrect, and the rear fixed part of the glass roof could separate from the vehicle. If it does, the glass panel may need replacement. This is Recall
#RC-2016020006, affecting only a few vehicles, but check the bonding of the rear glass panel to be sure, replacing the glass panel if needed after performing a recall campaign VMI check to determine if the vehicle is involved in the campaign and if it has been previously repaired. Recall Campaigns do not expire and may also be performed on a vehicle with a vehicle status indicator. Here are the repair procedures:
-

Hook a force gauge onto the cable tie and pull upwards with 25 kg or 50 lbs. of tractive force.
Clean the rear fixed glass section and install the vacuum lifter, attaching a cable tie to the suction lifter handle.
- Hook theforce gauge onto the cable tie and pull it upwards with 25 kg or 50 lbs. of tractive force. The Panoramic glass sunroof must not detach from the vehicle. Do not lean you head over the roof when applying upward force to prevent the roof from separating from the vehicle when force is applied, and do not reuse the same cable tie on subsequent vehicles — use one new cable tie per vehicle.
- Repeat measurements and if the fixed glass section has not detached from the vehicle the checking procedure is complete and the glass is correctly attached.
- If needed, replace the rear fixed glass section for the Panoramic sliding sunroof using Roll-Out 2004 glass removal tool (SSEP Article # 521-900 589 046700). If the fixed glass section for the Panoramic sliding sunroof detaches from the vehicle, the results of the check/test must be recorded on the repair order and kept with the vehicle’s file.
- Use special adhesive for this operation and ensure that the temperature of the special adhesive is >70 deg. F. to avoid difficulty in application, and use the dual caulking gun to apply the adhesive.


0 Comments