

Nissan power windows now include Auto-Up and Anti-Pinch features that must be initialized after any event or repair procedure that interrupts power supply to the power window system. Initialization is easy, and information about the procedure and when to use it is available in your Nissan service manual.
The Nissan power window system includes separate drive motors and control switches for each individual movable window, plus a master switch that can operate all window motors from its location in the driver’s door. Door lock/unlock function buttons are a separate part of the switch circuitry, but are built into the window switch hardware. System status is monitored by the body control module (BCM), which supplies power to the window switches.
The main power window and door lock/unlock switch circuit also includes an encoder feature that converts the rotation of the power window motor shaft into a pulse signal. The encoder continuously monitors the rotation of the front LH (left hand) and RH (right hand) window motor shafts and transmits the pulse signal to the power window and door lock/unlock switch. The pulse varies based on the direction of window travel (up or down), and the rate of travel.
The pulse signal enables the power window switch to control the Auto-Up/Down and Anti-Pinch functions on the front LH and RH windows.
Auto Up/Down feature
The power window switch reads the changes in the encoder signal and stops the Auto Up/Down operation when the glass is at the fully open or closed position. The Auto Up/Down function does not operate if the encoder is malfunctioning. If the Auto Up function is inoperative on the passenger side switch, it will the prevent master switch from working which could lead to misdiagnosis.
Anti-Pinch feature
The power window and door lock/unlock switch also knows the encoder pulse rate it should see when the power window is traveling up or down at the factory-specified speed (motor rotation rate). When resistance is applied to the power window motor, i.e. if an object is pressing against the window glass, the reduction in motor rotation speed changes the frequency of the encoder pulse signal. The power window and door lock/unlock switch receives the reduced frequency pulse signal and reverses the rotational direction of the power window motor.
Retained Power function
Retained Power is a backup power supply that enables power window operation for approximately 45 seconds after ignition shutoff.
Fail-Safe
When the encoder signal indicates that up/down speed and direction of the window is either different than the factory specification, or an incorrect representation of actual window operation, the power window and door lock/unlock switch enters fail-safe mode. When in fail-safe mode, the Auto-Up, Anti-Pinch and Retained Power functions do not operate, although the power window motor remains operable.
A repaired or newly-installed power window switch is in fail-safe mode until the switch is initialized for normal operation. After initialization, the power window switch enters fail-safe mode only when a system malfunction occurs. One malfunction that kicks window operation into fail-safe mode occurs when one or both of the two parts of the encoder pulse signal (direction of window travel and speed) is/are not received at the power window switch for more than the factory-specified amount of time.
The power window and door lock/unlock switch has stored in memory the number of motor rotations it takes for the window to travel from fully down (open) to fully up (closed). It sees a malfunction if the encoder pulse count for the window’s actual full closing travel is more than the factory-specified value (approximately 10 strokes for the 2013 Altima® front window). Similarly, it registers a malfunction if it detects a mismatch between the glass fully closed position stored in memory, and the actual fully closed position of the window.
The power window switch also registers a malfunction if the encoder pulse signal indicates that the window is traveling in the opposite direction of the motor (i.e. up when it should be going down, and vice versa), or when the glass travels up and down continuously instead of stopping at the fully closed or open position.
Diagnosis of power window system problems involves checking to confirm that power is flowing from the switch to the motor for each individual window, and that the encoder signal is transmitting properly between each power window motor and the main power window and door lock/unlock switch. The diagnostic examples that follow are all based on procedures from the Nissan service manual for the 2013 Altima sedan sold in North America. Other Nissan models, as well as previous model year Altima vehicles, may have different power window technologies and require different diagnostic and repair procedures.
Kicked out
Many factors can throw both the Auto-Up and Anti-Pinch features into a non-initialized condition. This can occur whenever there is an interruption of the supply of electricity to the main power window and door lock/unlock switch, such as a blown fuse, disconnection of the 12-volt battery cable from the negative terminal, disconnection of the main power window switch from its wiring harness connector, or removal and replacement of the switch itself. As you can see, some of these “malfunctions†can be caused by routine repair procedures that interrupt power supply, including repairs that may be unrelated to power window controls.
The Auto-Up and Anti-Pinch features can also be thrown into a non-initialized state if the regulator assembly is operated independently from the front power window motor, if the front power window motor is removed from the regulator assembly, or if the door glass or door glass run is removed.
Re-start
Initialization is easy. Wait at least a minute, then re-connect the battery, turn the ignition on, and if the window is not already open, press the power window switch to fully open the window. Pull the power switch up to close the window. Continue holding the switch up for four seconds after the glass stops at the fully closed position.
Next, confirm that the Anti-Pinch feature is working. Fully open the window. Hold a piece of wood or plastic at the top of the window opening and, using the Auto-Up button, close the window. After contacting the obstruction, the glass should reverse and then lower approximately 150 mm (5.9 inches) and stop.
Note that any malfunction in the power window system (switch, motor, encoder, etc.) must be repaired before performing initialization. The system switches back to fail-safe mode when any malfunction is found in the power window switch or motor.
If driver’s window does not operate
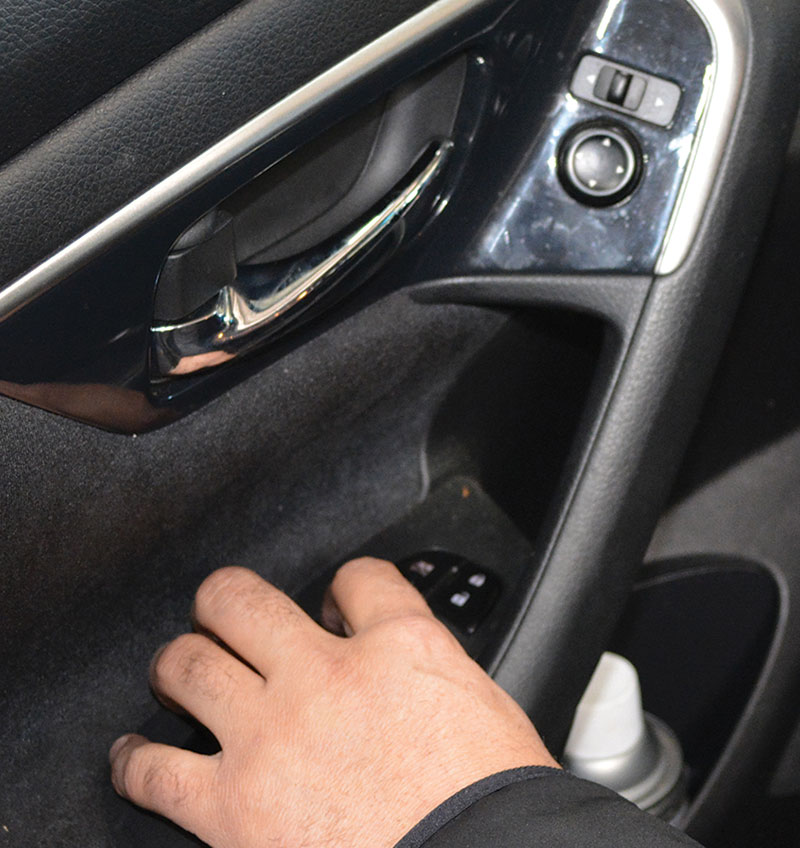
Because it is likely to be the most frequently opened and closed, the driver’s window receives more wear than the others. In the event of a malfunction, the first step is to confirm that battery power is available at the main power window switch connector D8 (terminals 17 – 19).

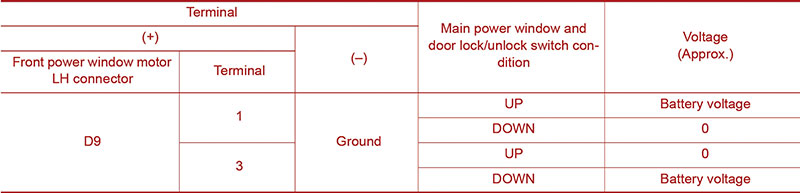
Then see if the main power window and door lock/unlock switch is generating the proper output signal. Turn the ignition off, disconnect the front power window motor LH and turn ignition back on. Check voltage between the front power window motor LH connector D9 (terminals 1 – 16) and ground. When the window is going up, you should see battery voltage on terminal 1 and zero volts on terminal 3. Going down should show the opposite – battery voltage on terminal 3, and zero volts on terminal 1.
If not, check the wiring harness. You should see continuity between the main power window switch connector D8 and the front window motor LH connector D9, when probing terminals 17 and 1, then 19 and 3, respectively. There should be no continuity between the main power window switch connector D8 (terminals 17 and 19) and ground.
If the harness fails these checks, replace it. If it passes, replace the main power window and door lock/unlock switch.
If the window does not work, check the front power window motor LH next. Connect battery voltage directly to the power window motor connector D9. When you connect the positive to terminal 3, and negative to terminal 1, the window should go down. Reverse the connections and the window should go up. If it performs otherwise, replace the power window motor LH.
If the window still does not work, check for intermittent faults. Refer to the electrical incident pages of the Nissan service manual section GI (General Information) for procedures to check whether an intermittent fault is being caused by excess vibration (loose wires or connector pins), heat sensitivity, moisture and corrosion, high electrical load, or other potential causes.
Once the power window can be operated manually using the appropriate button, don’t forget to initialize the Auto-Up and Anti-Pinch functions.
If window operates manually, but not using Auto Up/Down
If the power window operates manually but does not respond to the Auto-Up/Down button, perform the initialization procedure.
If Anti-Pinch function does not operate normally
Perform the initialization procedure for the Anti-Pinch function. If initialization fails, repair or replace whatever component – the window switch, wiring harness connector or motor – is malfunctioning.
Once initialization succeeds, make sure that nothing can cause the glass to stick as it is sliding up or down, as that would throw the Auto-Up and Anti-Pinch features back into fail-safe mode. There should be no foreign material stuck to the window glass or glass track, the track run rubber should not be excessively worn or deformed, and the window sash should not be tilted too much in one direction or the other.
Encoder: Watching the signs
If power is flowing and the window motor and switch pass inspection, check the encoder circuit for faults. First, locate the main power window and door lock/unlock switch connector D12 using the wiring diagram in the Nissan service manual section PWC (Power Window Control).
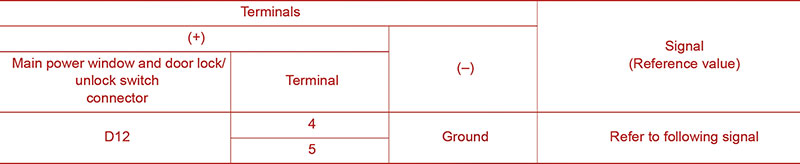
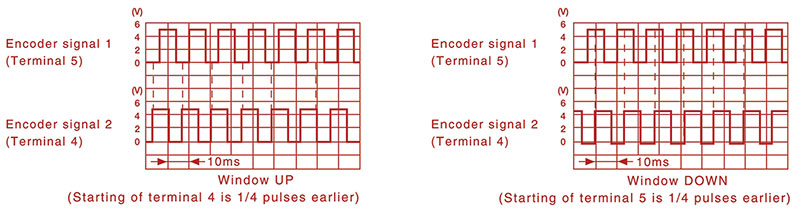
Connect the front power window motor LH to the battery and turn on the ignition. Use an oscilloscope to check the signal between the main power window switch connector D12 (terminals 4 and 5) and ground. If you see an on-off square wave voltage pattern that alternates between zero and approximately five volts, the encoder signal is OK, and you may need to check for intermittent faults.
Check power supply. If you do not see the appropriate wave pattern, check that there is power being supplied to the front power window motor LH connector D9. To do this, turn the ignition on and check for voltage between the front power motor LH connector D9 (terminal 2) and ground. You should see a value of approximately ten volts.
Inspect the wiring harness if you see less than ten volts. If the reading is ten volts, check the ground circuit.
Wiring harness check #1. First turn the ignition off. Disconnect the main power window switch and the front power window motor LH. Check for continuity between the main power window switch connector D12 (terminal 14) and the front power window motor connector D9 (terminal 2).
Also confirm that there is no continuity on the other side of the circuit between the main power window switch connector D12 (terminal 14) and ground. If there is power on the ground side, look for a fault in the wiring harness or connectors and repair or replace as necessary.
If the harness checks out OK, replace the main power window and door lock/unlock switch. Refer to Nissan service manual section PWC-66 for detailed removal and installation instructions. Don’t forget to initialize window Auto-Up, Anti-Pinch and Retained Power functions after installation of the new switch. See PWC-27 for more about initialization procedures.
Ground circuit check. First make sure ignition is off. Disconnect the front power window motor LH. Check for continuity between the front power window motor LH connector D9 (terminal 4) and ground. If there is a malfunction in the ground circuit, check and replace the appropriate wiring or harness connectors.
Wiring harness check #2. If there is no continuity between the front power window motor LH and ground, check for power between the main power window switch connector D12 (terminal 12) and the front power window motor LH connector D9 (terminal 4). If there is continuity (power getting to the switch), check the main power window switch for malfunction. Refer to the Nissan service manual section PWC-33 for the detailed inspection procedure. If power is not reaching the switch, inspect and replace the wiring or connector as necessary.
Wiring harness check #3. If you found continuity in the front power window motor LH ground circuit, disconnect the main power window switch and check for continuity between the switch D12 (terminals 4 and 5) and the front power window motor LH connector D9 (terminals 5 and 6). Then make sure there is no continuity between the main power window switch connector D12 (terminals 4 and 5) and ground.
If the ground circuit checks out, replace the front power window motor LH. Refer to the Nissan service manual section GW-16 for detailed removal and installation instructions. After front power window motor LH installation is complete, perform the initialization procedure. See the Nissan service manual section PWC-27 for initialization instructions.
There are a variety of other diagnostic issues that may come up, and diagnostic procedures are similar. Use CONSULT III Plus to search for trouble codes, and refer to the appropriate Nissan service manual to explore possible diagnostic and repair procedures.


This article is very good and specific,we need more tech news like these.