Maintenance is the key to vehicle reliability, and is the bread-and-butter of the independent workshop. Most vehicle owners know to get their oil changed regularly – witness the growth of quick-lube joints – but what about that automatic transmission?
![]() The maintenance sheets for newer Mercedes-Benz vehicles show a transmission oil and filter change once at about 35,000 to 40,000 miles. The reasoning is that any contamination from wear during this initial break-in period will have stabilized and been caught by then, so by performing a maintenance service, the trans should be good from there on. And, if you trust that those German engineers know what they’re doing, it is.
The maintenance sheets for newer Mercedes-Benz vehicles show a transmission oil and filter change once at about 35,000 to 40,000 miles. The reasoning is that any contamination from wear during this initial break-in period will have stabilized and been caught by then, so by performing a maintenance service, the trans should be good from there on. And, if you trust that those German engineers know what they’re doing, it is.

Regular transmission fluid maintenance is much more expensive with synthetic ATF than it was with conventional Dexron, but transmission work is much more expensive, too. The visual comparison of clean to dirty ATF as seen on this flush machine is a powerful customer pleaser.
Additional maintenance isn’t harmful, may possibly be beneficial, but definitely isn’t on the maintenance schedule published by Mercedes-Benz. Yet, most customers will request it, and even agree to it when asked, because, well, a few dollars now might prevent something vastly more expensive down the road.
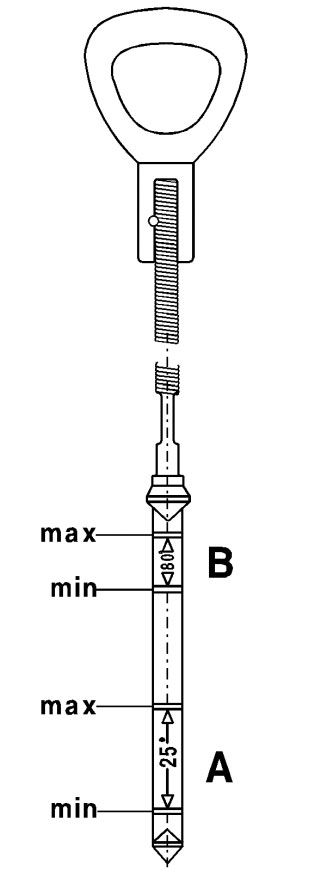
In the NAG1 (722.6) transmission, the dipstick was eliminated, but by using special tool W140 589 15 21 00 you can check the oil level using the dipstick tube. Later generations eliminated the dipstick tube as well.
Let’s take a look at three modern Mercedes-Benz automatic transmissions and the details of their needs.
NAG
First, we have the venerable 722.6 “NAG†(New Automatic Gearbox), a five-speed fully-electronic transmission introduced in the mid 1990s with the 210 E-Class chassis. In Model Year 2004 the 722.9 “NAG2†was introduced in vehicles equipped with non-turbo M113 V-8 engines, adding two additional forward gears for a total of seven speeds. Recently, the 725.0 “NAG3†was launched, a 9-speed entry in the race for fuel efficiency.
722.6
 transmissions, one common leak source was the “pilot bushing†(21), which was the electrical connection to the transmission internal valve unit (19). Replacement is an easy task and the latest version is reliable, but don’t over-tighten the bolt (22).")
In the NAG1 (722.6) transmissions, one common leak source was the “pilot bushing†(21), which was the electrical connection to the transmission internal valve unit (19). Replacement is an easy task and the latest version is reliable, but don’t over-tighten the bolt (22).
When the 722.6 NAG1 transmission was introduced, it was a technological breakthrough: Far fewer parts, fully-electronic, and far more reliable and smooth than anything before possible, even considering the very refined 722.3 hydraulically-controlled predecessor. But for service shops, the biggest thing was the new transmission oil: ATF Dexron III was out, and this new synthetic stuff, at a considerably higher price, was in. Some tried using Dexron III, either to save money, or through ignorance or error, and found that not only did the 722.6 not like it at all, bad things happened fairly soon. A spate of transmission replacements was the result, often paid for by the shop owner.
Several other features were introduced here, including a lock-up torque converter, the deletion of a transmission oil dipstick (use special tool W140 589 15 21 00 to check the fluid level), a seal for the dipstick tube covering, and a new oil pan and its bolts, which are sensitive to over-tightening.
One service issue seen often on the 722.6 is the so-called “pilot bushingâ€, which is the electrical connector located in the front right of the transmission just above the pan. Early versions of this component had O-rings, which tended to leak — slowly, over time. This slow drip would often not be addressed by the customer until it was almost too late, with slipping shifts and eventual loss of power transmission entirely. The solution is to replace the entire part, and to be sure to tighten the single central bolt holding it in place carefully to specification, a downright miniscule 2.5 Nm, which really is just finger-tight. But don’t trust your fingers: Use a good micro-torque wrench, or risk a repeat failure. The modern version of this part is quite reliable.
Before we discuss maintenance, it is a well-known rule that automatic transmission work always requires the utmost cleanliness. Even the smallest dirt particles in the hydraulic components can lead to malfunctions and a total failure of the transmission. Always clean the work area thoroughly before removing any fasteners, covers or plugs.
Maintenance is straightforward in this model. Start by warming the transmission to 176 deg. F., clean the area to keep road dirt out, and drain out the oil pan using the drain plug (replace the copper seal washer upon installation, and observe the tightening torque). Then remove the oil pan, but be careful, since there’s usually still some oil left in it. Check the pan for the presence of a magnet (if not installed put one in — they’re inexpensive from your dealer) and clean any debris out. Pull out the old filter and replace it, then reinstall the pan with a new gasket (lightly lubricated with new oil). Again, observe the pan bolt torque religiously or it’ll come back to bite you.
Now, flush out the old oil. WIS has two documents, one for shops equipped with a transmission flushing machine, and one for those without. For the ‘without’ version you’ll need about 14 liters of approved transmission fluid to complete the process. If you have a transmission flush machine, follow the manufacturer’s instructions for how much fluid to use. Just don’t mix the special synthetic Mercedes-Benz fluid with standard fluid. Check and correct the fluid level through the dipstick tube as necessary, and the oil and filter change is done.
A word about the transmission fluid: The original 722.6 fluid is no longer sold, having been replaced by the fluid used in early versions of the 722.9 transmission. This fluid carries Mercedes-Benz specification 236.14, is also known as ATF134, is colored red, and can be ordered from your local dealer under part number A001 989 68 03. Don’t confuse this with the newer fluids, which are blue or gold in color. We’ll discuss this further in a moment.
722.9
 was changed, indicating the need for a different fluid and overflow tube. Here we see the “newer†version pan, which has deeper oval indentations (arrows) and a green overflow pipe (visible with the drain plug removed). The side of the pan is flat, unlike the older version pan, which has a noticeable angled chamfer. Be sure to follow the WIS instructions for the version you’re working on.")
In 2010, the design of the oil pan of the NAG2 (722.9) was changed, indicating the need for a different fluid and overflow tube. Here we see the “newer†version pan, which has deeper oval indentations (arrows) and a green overflow pipe (visible with the drain plug removed). The side of the pan is flat, unlike the older version pan, which has a noticeable angled chamfer. Be sure to follow the WIS instructions for the version you’re working on.
The NAG2 transmission completely eliminated the dipstick tube, and is filled from below. This is simple if you have a filling pump (with the correct adapter), and darn near impossible if you don’t.
As before, after cleaning the area to avoid any road crud from getting in, we start by draining out the oil pan: Remove the drain screw and pry off the overflow tube (inside the pan) with special tool ‘Drift’ W722 589 03 15 00, allowing the oil to drain out. At the same time, drain the torque converter — the 722.6 generally didn’t have a drain plug on the torque converter, which is why we used such an elaborate procedure and 14 liters of fluid; the 722.9 has a drain, so use it, then reinstall the plug with a new seal ring.
With the oil out, remove the pan, again carefully since there may be some oil left in there. Pull out the old filter and install the new. Clean out the pan (and magnet) carefully and install a new overflow tube of the same color (using the wrong one will under- or over-fill the transmission, and may be a source of problems). Searching for the tube part number in the EPC by VIN helps get this correct. Since the bolts holding the pan in place are aluminum stretch bolts, it is absolutely mandatory that they be replaced. The pan gasket, too, of course.
To fill the transmission with fluid, mount the adapter to the drain opening and connect your trans oil pump. Now pump six liters into the transmission. Be sure to use the correct fluid — more on that in just a moment. Leave the pump connected.
Start the engine and bring the transmission oil up to temperature. The exact temperature depends on the vehicle: With a chamfered oil pan the spec is 113 deg. F., and without a chamfered oil pan the spec is 95 deg. F. in the model we checked, and if the car has an auxiliary transmission oil cooler the oil must reach 194 deg. F. before the oil starts flowing through it. In every case, you should follow the WIS instructions for the specific vehicle you’re working on to be sure. Use XENTRY to measure the oil temperature, and never “power-brake†the transmission to increase the oil temperature. Instead, hold the throttle at about 2,500 rpm with the transmission in Park.
Switch off the engine and re-verify the transmission fluid temperature. If it’s too hot (i.e., you heated up the oil because of the auxiliary oil cooler), shut off the engine and let it cool down. When it’s correct, start the engine and add either four liters (if the torque converter was drained) or two liters (if the torque converter was not drained) to the transmission using the oil pump. Shift through P-R-N-D several times with the vehicle completely stationary (brakes on) and the engine at idle. Shift into P.
Verify yet again the correct temperature and, if it is correct, remove the pump and adapter and let any excess oil drain out. It is essential that the engine be at idle, and the transmission fluid is not hotter than the specification. It may be necessary to switch off the engine and let things cool down before removing the pump and adapter. Let excess oil drain until only drops come out, then install the drain plug with a new seal washer.
Temperature
Why the obsession with temperature? Seriously, it was checked at least three times! We do this because of the very high sensitivity of the special transmission fluid to temperature. Its volume changes significantly with temperature, and if you perform the last step (letting it drain from the overflow tube until it drips) at the wrong temperature, you can be certain that the transmission oil level will not be correct. Do we have to explain what happens when there is too little or too much fluid in an automatic transmission? This is a circumstance best avoided.
Transmission Oil
We’ve mentioned it already, but what you need to know about transmission oil when dealing with 722.6 and later transmissions is shown in the chart. The original 722.6 oil, which is no longer sold, was replaced by the “early, red†722.9 transmission oil. Later, the oil switched to blue, and then gold. None of these oils are interchangeable, and they must never be mixed.
Using the correct transmission oil is critical, and none of the electronic transmissions can use Dexron III. Also note that these fluids cannot be mixed and are not interchangeable.
| Â |
236.14Â (Red, ATF134) |
236.15 (Blue, ATF134-FE) |
236.17 (Gold) |
| 722.6 (NAG1) | OK | ||
|
722.9 (NAG2) Up To S/N 2834526 |
OK | ||
|
722.9 (NAG2) As Of S/N 2834527 with engine 113, 152, 156, 157, 275 and 279 |
OK | ||
|
722.9 (NAG2) As Of S/N 2834527 with engine other than 113, 152, 156, 157, 275 and 279 |
OK | OK | |
|
725.0 (NAG3) |
OK | ||
|
Using the correct transmission oil is critical, and none of the electronic transmissions can use Dexron III. Also note that these fluids cannot be mixed and are not interchangeable. |
|||
725.0 NAG3
The NAG3, introduced only recently, is a nine-speed fully-electronic transmission. As with the NAG2, there is no external control unit, and be aware that there are two versions: up to the end of Model Year 2014, and as of Model Year 2015. These differ slightly in how they’re drained and refilled.
 and Position 4 is for draining out the oil completely.")
The quick-release coupling as of Model Year 2015 has a valve with four positions: Position 1 is for adding oil, Position 2 is not used in the USA, Position 3 is for adjusting the oil level (see text) and Position 4 is for draining out the oil completely.
Replacing the transmission oil and filter is similar to the procedure in the 722.9 in that you start by draining the pan and torque converter. In early versions of the NAG3, an overflow tube and bayonet coupling (a quarter-turn drain plug) are installed, and the procedure is much like the NAG2 mentioned above. As of Model Year 2015, the NAG3 is equipped with a Quick-Release coupling that has four distinct positions as shown. Use the oil thrower from assembly tool W725 589 02 90 00 to release the quick-release coupler, then use the wrench to turn the coupler so the wing on the tool is in Position 4, allowing the oil to drain. Also drain the torque converter, and keep track of the quantity drained from both the pan and the converter for refilling.
 are part of the oil pan (34), so you have to replace the whole assembly. Not only must you use the correct torque, but as with cylinder head gaskets, you must tighten the bolts in sequence (1 through 10) in two stages. WIS covers the details nicely. You can also see the quick-release coupling (30) in this photo.")
In the 725.0 NAG3, the filters (32) are part of the oil pan (34), so you have to replace the whole assembly. Not only must you use the correct torque, but as with cylinder head gaskets, you must tighten the bolts in sequence (1 through 10) in two stages. WIS covers the details nicely. You can also see the quick-release coupling (30) in this photo.
Once the oil is drained, the oil pan is removed. In this transmission, the pan and filters are a single assembly. Replace the entire oil pan with the filters. Additionally, the ten screws holding in the oil pan must be replaced, since they are stretch bolts. When installing the new pan, not only must you observe the proper torque, but also the proper torque sequence (1 through 10) as shown in the image. It goes without saying that utmost cleanliness is to be observed, and you need a new pan gasket, too. Start by torquing all bolts to 4 Nm (which is not a lot of torque), and then repeat the sequence with a 90 degree (1/4 turn) final tightening. Of course, check in WIS that these values are correct for the vehicle you’re working on.
To fill the transmission with fluid, connect the adapter W725 589 00 90 00 to the filling pump (set to not more than 2 Bar/29 PSI to avoid damaging the pan), and attach the adapter to the transmission. For an oil pump, WIS suggests using Pump W000 588 06 82 00, but we couldn’t verify USA availability, so check with your dealership for what they’re using. Pump in the same amount you drained, plus one-half liter additional, of the correct fluid (Specification 236.17, colored gold).
")
The ‘wing’ on the assembly tool W725 589 02 90 00 is used to determine the quick-release coupling valve position, and the
wrench end can turn
the valve with little fuss. (Note: Color added for reference only.)
Disconnect the filling adapter and install the quick-release coupling. Using XENTRY, determine the oil temperature using the “adjust oil level†procedure. With the oil temperature less than the specified value (letting it cool off if necessary), remove the quick-release coupling and, using the wrench end of assembly tool W725 589 02 90 00, turn the valve inside so the wing on the tool points to Position 1.
Start the engine and warm the oil as specified, and when the exact temperature is reached turn the valve to Position 3. Let the oil drain until it becomes a thin stream (more than just dripping) and the oil reaches one deg. C higher. Turn the valve back to Position 1, reinstall the quick-release coupling, and switch off the engine.
That covers the basic maintenance of the NAG1, NAG2 and NAG3 automatic transmissions. In a future issue, we’ll discuss some of the unique maintenance needs of the 7G-DCT dual-clutch transmission first introduced in the CLA (117) model.
|
Vehicle |
Fill temperature |
Turn to ‘Position 3’ at… |
Valve to position 1 when thin stream AND this temperature is reached |
|
205, 207, 213, 217, 218, 222, 231, 253Â (Not all have 725.0 NAG3) |
95°F | 102°F | 104°F |
|
166, 292 |
131°F | 138°F | 140°F |
|
Temperature limits in NAG3 transmissions as of Model year 2015. The temperature is read using XENTRY in the “Adjust oil level†procedure. The temperatures are critical to ensure the proper oil level, so don’t take any shortcuts here. As always, verify the values expected in WIS for your specific vehicle. |
|||


0 Comments